Card1Cultivations January 13, 2025
Germination has commenced. Paper towel method for 3 chosen beans with heat mat set to 78 degrees in darkness.
Jan 15- D369-1 has not germinated yet and no tap root is present . Attempting to germinate another bean tonight D369-2. Which ever one heads towards the light will be named Carol Ann.
Jan 16 - As suspected, the initial seed germination failed for D369-1, the second seed was checked and a taproot has germinated. The bean was transplanted into it’s 3 gallon pot ready for emergence.
likes
comments
Share
Used method
Paper Towel
Germination Method
1
Week 1. Vegetation
1y ago
1/4
2.54 cm
Height
18 hrs
Light Schedule
23 °C
Day Air Temp
5.8
pH
No Smell
Smell
58 %
Air Humidity
26 °C
Solution Temp
27 °C
Substrate Temp
20 °C
Night Air Temp
11.36 liters
Pot Size
0.76 liters
Watering Volume
60.96 cm
Lamp Distance
Card1Cultivations January 20, 2025
Planted tap roots into 3 gallon pots and placed them into smaller 3x3 tent. Used domes to increase humidity until seedlings emerge.
Jan 16 - both C-99s have emerged, C99-1 emerged with a helmet head that I carefully sprayed with RO water to soften up. It took half a day to help get it off. C99-2 emerged normally.
Jan 18 - emergence occurred for D369-2
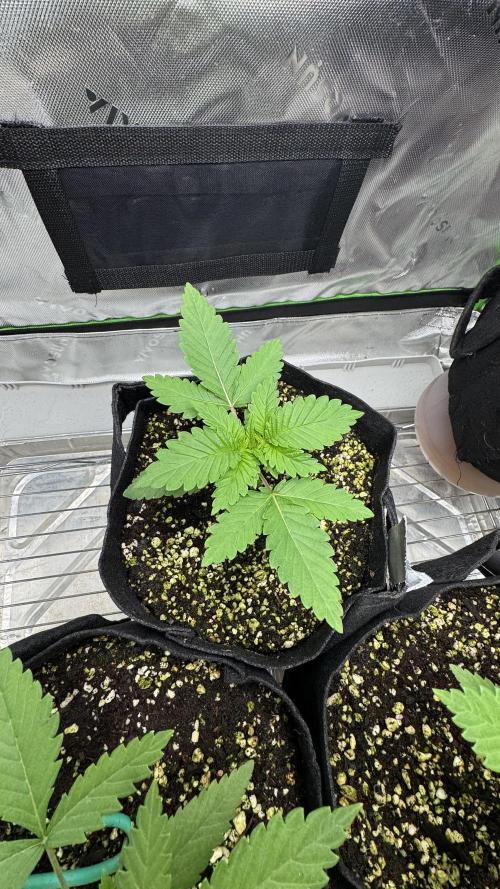
By January 25 I am 5 days into what I consider the seedling stage.
likes
comments
Share
2
Week 2. Vegetation
1y ago
1/12
7.62 cm
Height
18 hrs
Light Schedule
23 °C
Day Air Temp
5.8
pH
No Smell
Smell
58 %
Air Humidity
26 °C
Solution Temp
27 °C
Substrate Temp
20 °C
Night Air Temp
11.36 liters
Pot Size
1.14 liters
Watering Volume
60.96 cm
Lamp Distance
Card1Cultivations January 27, 2025
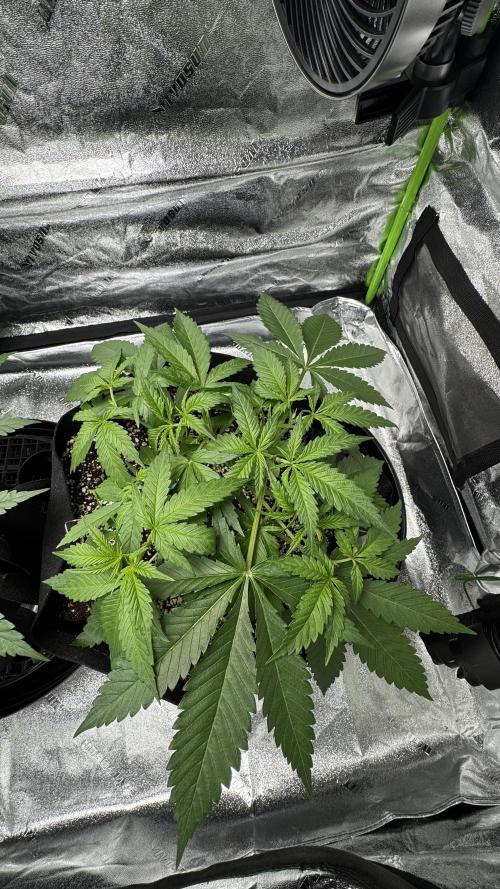
Strong seedling growth from the start. Named the girls this week. The two Cinderella 99 were named after the mean step sisters Drizella (C99-1) and Anastasia (C99-2). And the Dimension 369 strain was named Carol Anne (D369) from the movie Poltergeist.. (go towards the light!….lol)
Water Treatment:
5-Stage Reverse Osmosis Filter connected to 10 gallon reservoir with float shut off valve and a spigot installed to fill bucket below.
Water temperature achieved using fish tank heater.
Measurements taken using a BluLab OnePen that can measure TDS, PH and Temp. (Best tool ever, comes with app)
Nutrients:
General Hydroponics brand ( added to water in this specific order to avoid mixing issues ) mixed in 5 gallon bucket with small pump for consistent circulation to mix properly and avoid hand stirring.
Silica
calMag
3 main Floraseries (micro, gro, bloom)
Additives:
FloraBlend - 5ml per gallon
Floralicious
PH balance last to 5.8 in coco coir:
generic ph up / generic ph down
FLORASERIES 10-PART WEEKLY CUSTOM FEEDCHARTS downloaded from website.
Week 1 light feed schedule with 1ml FloraBlend supplement. 78 degrees, .45 ec, 5.8 ph
Jan 21 - First week batch left in gallon jug in tent to keep water temperature optimal for roots. 75f / .45 ec / 5.8ph @ 400ml to each.
Jan -22 - Micro dose with leftover week 1 mix. Used syringe with 30 ml focused around seedling.
Seedling heating pad set under pots to 80 degrees to keep roots happy.
Secondary space heater added to tent to keep up temps in colder basement lungroom. It is triggered using an AC Infinity smart plug. The AC Infinity heater is amazing but can only increase ambient temps about 10-15 degrees effectively. Same goes for the AC Infinity T3 humidifier, it is also amazing but for seedling conditions in a 3x3 tent, an extra humidifier was added to the tent.
It would be more efficient to use a seedling dome. Perhaps a future investment? For now this setup will do and I can start in 3 gallon pots and avoid a transplant into them which is less stressful on the plant IMO.
likes
comments
Share
3
Week 3. Vegetation
1y ago
1/5
7.62 cm
Height
18 hrs
Light Schedule
23 °C
Day Air Temp
5.8
pH
No Smell
Smell
58 %
Air Humidity
26 °C
Solution Temp
27 °C
Substrate Temp
20 °C
Night Air Temp
11.36 liters
Pot Size
1.14 liters
Watering Volume
60.96 cm
Lamp Distance
Card1Cultivations February 3, 2025
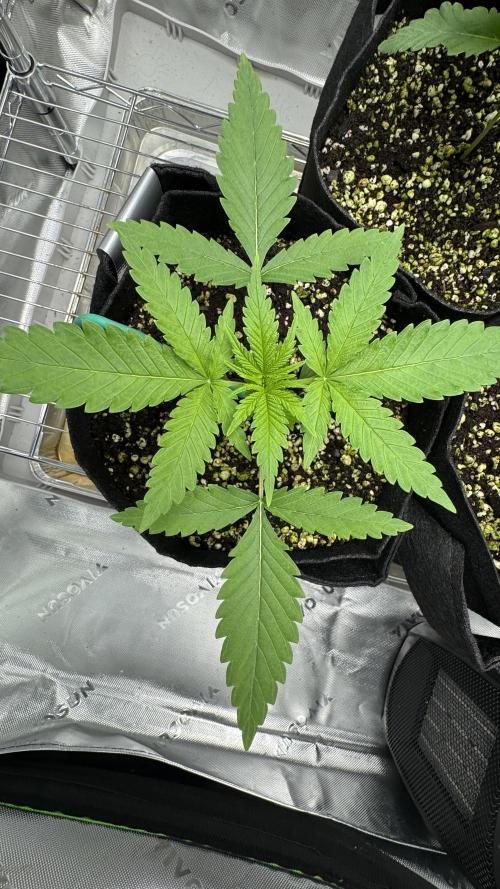
Week 3 and I can consider these seedlings now officially in the vegetative stage.
Growth is on track and looking great!
Weekly watering with nutrient feeding every other day to run off waste and using a shop vac to clean up.
5.8 ph / 1.59 ec / 75.6 degrees
likes
comments
Share
4
Week 4. Vegetation
1y ago
1/28
7.62 cm
Height
18 hrs
Light Schedule
23 °C
Day Air Temp
5.8
pH
No Smell
Smell
58 %
Air Humidity
26 °C
Solution Temp
27 °C
Substrate Temp
20 °C
Night Air Temp
11.36 liters
Pot Size
1.14 liters
Watering Volume
60.96 cm
Lamp Distance
Card1Cultivations February 10, 2025
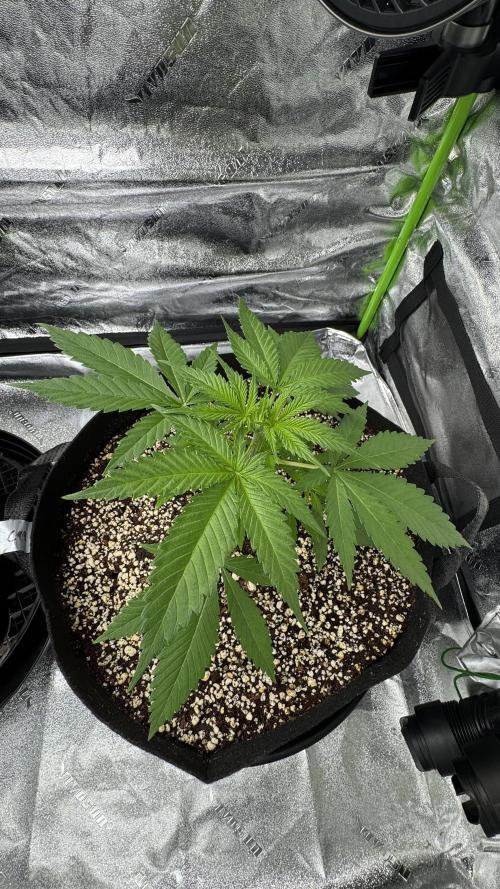
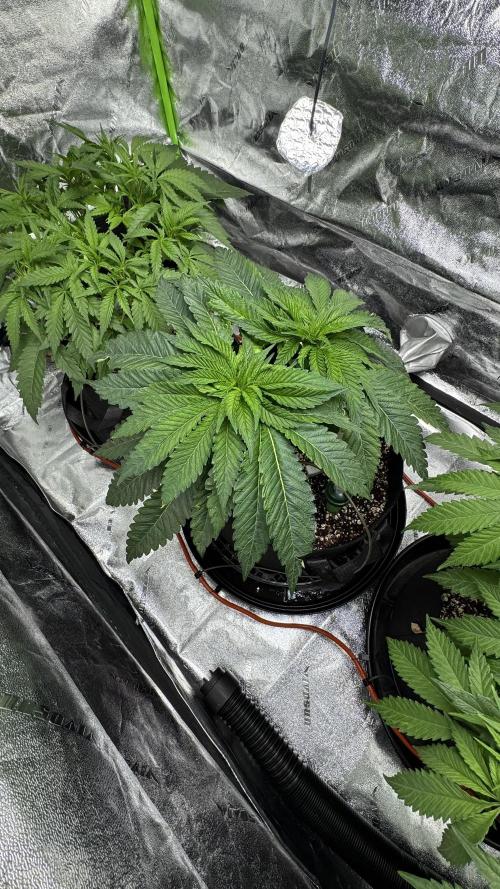
Growth is amazing and the girls already need to be transplanted into their final 5 gallon pots.
Transplanting went well, I could have waited another week and I think it would have been better.
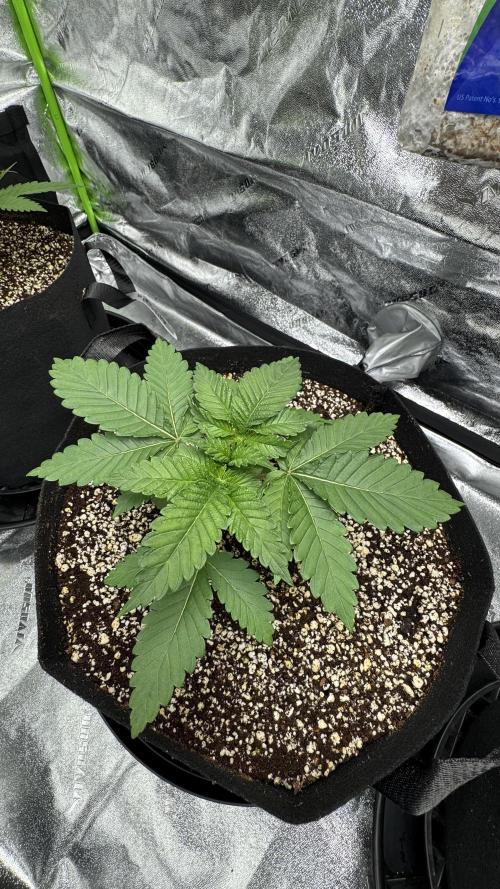
I waited a few days for recovery before topping all three girls.
Anastasia is having issues with the main stem growing straight so I added supports to encourage straight growth. Drizella is too but not as severe.
During the transplant process. I also sprinkled Great White Mycorrhizae on the roots for better root health and to reduce transplant stress.
Nutrients still hand watering every other day to run off.
5.8 ph / 1.63 ec / 74.7 degrees
I reconditioned my coco coir from my first grow that was originally 1 bag of royal gold tupur blend which I believe produced some nats due to the forest material mixed in with the coco coir. This one original bag was enough to fill two 3 gallon pots and transplant them into two 5 gallon pots with a little left to spare.
I hand cleaned that first grow medium to remove all large root debris and then rinsed it thoroughly in Ro only water before letting it dry for several weeks leading up to this current transplant. I then soaked it in a solution of Sensizym and calMag to break down any remaining dead roots into nutrients while ensuring the medium is still well buffered.
The girls were started in the 3 gallon pots using a new bag of roots organics brand 70/30 coco coir/perlite. That medium had to be buffered well with calMag to avoid common Calcium and Magnesium deficiency that surface due to coco coirs ability to soak it up and steal it from the plant. This was a leason learned from my first grow that resulted in several foliage feedings to adjust for.
I was able to recycle a great deal of coco coir from my first grow which provided me enough to bump this grow up to three plants from two. So I used the recycled coco as the base and most of the back fill in all thee 5 gallon pots. I did have to use a little extra of the 70/30 to top everything off properly.
I still have a 1/4 of a bag of the 70/30 left dor future grows.
likes
comments
Share
Used techniques
Transplantation
Technique
LST
Technique
Topping
Technique
Defoliation
Technique
5
Week 5. Vegetation
1y ago
1/49
10.16 cm
Height
18 hrs
Light Schedule
23 °C
Day Air Temp
5.8
pH
No Smell
Smell
60 %
Air Humidity
26 °C
Solution Temp
27 °C
Substrate Temp
20 °C
Night Air Temp
11.36 liters
Pot Size
3.79 liters
Watering Volume
60.96 cm
Lamp Distance
Card1Cultivations February 17, 2025
Up to now I have only been using my 3x3 tent as I slowly invest and build out a larger and taller 32x60x80 that I got dirt cheap on FB marketplace. I had to modify the larger tent and use a pipe cutter to reduce the height of the tent to fit in my basement that is about 3 inches shorter than that. It seems to have worked out well and the slack from it being shorter is not an issue. I just have to take care when unziping the tent.
Overall opinion on Vivosun tents are that they will do the job. But the stitching shows light leaks at the seems and at the Velcro observation windows.
My goal is to eventually develop a perpetual grow. Using the smaller 3x3 as the seeding/veg tent and then using the larger tent for flowering and drying.
Up to now i have only used the larger tent for drying and have just started to dial in the new tent equipment.
I am realizing that to make my life easier the girls need to be transferred to larger tent to accommodate three 5 gallon pots easier for watering.
At this point I have determined that my smaller 3x3 tent and watering/feeding system does not work well to accommodate three 5 gallon pots and has become a pain to maintain in such a small space and will not last long for me. Although doable I think for a more stress free and easier process in the future, my perpetual garden plans will be easier and better equipped for two plants only in a 3x3 tent even with moving them to a larger tent later on for flowering.
With all that said, I basically forced myself into moving them to the larger tent earlier than I planned to.
This brought me to another realization that the equipment I have invested into the larger tent is semi struggling to meet the larger environment in s cold basement.
The 3x3 tent has already been a freak show of equipment from my first grow as I made the rookie mistake of investing in subpar equipment and stepped over s dollar to pick up a dime by buying a Vivosun starter kit. I have so many complaints on Vivosun products that I am not going to bother pointing them all out.
3x3 tent vivosun
Vivosun light with built in fan
Vivosun oscillating fan
Vivosun inline fan
Vivosun controller and app
Shitty space heater outside lungroom
Shitty humidifier when needed
Replacement and or add on equipment:
AC Infinity CLOUDFORGE T3
AC Infinity THERMOFORGE T3
AC Infinity CLOUDLINE PRO S4
AC Infinity Controller 69 - 4 ports
AC Infinity UIS Control Plug
AC Infinity VPD Thermometer
I quickly learned that this set up in a cold north eastern basement is going to make me exhausted to maintain and the equipment has no real support for VPD other than giving you that measurement as a readout in the app and controller. I also quickly realized I should have invested in Ac Infinity products from the start and slowly began to phase out Vivosun products.
I started by investing in the Ac infinity heater and humidifier with the controller 69 with wifi. This allowed me to maintain those devices outside of the tent and have actual control over VPD.
But now i was maintaining devices on two different controllers and the Vivosun equipment is not very compatible friendly. So I then eventually replaced the Vivosun inline fan with an Ac infinity S4 that brought me full VPD control with the IR temperature fun to gain proper leaf temp offsets which can also be managed in the AC infinity family of products.
These initial changes to my environment and equipment transformed my grow into a much more pleasing and successful growing experience.
With the 2x4 larger tent up and in place I started to slowly invest in that when possible with the following equipment.
Vivosun 24x48x60 modified
Ac infinity Ionboard S24
AC Infinity CLOUDFORGE T3
AC Infinity THERMOFORGE T3
AC Infinity CLOUDLINE PRO S4
AC Infinity Controller 69 PRO - 8 ports
AC Infinity CLOUDRAY S6
electrical upgrades and expansion required as well.
Sometime around February 7 I moved the girls to the new tent. I also realized that the equipment does struggle in the lager tent and is much more sensitive to change and swings.
Since the 69 pro controller has 8 ports, for now i have doubled up and connected both AC heaters and humidifiers up to the 2x4 tent and use them as secondary booster equipment and is working well during the coldest winter basement months.
My future perpetual garden plans will need some rethinking and adjustments as i dial in both tents to run effectively and efficiently with the equipment I have.
The Girls seem very happy in their new home
1 like
comments
Share
6
Week 6. Vegetation
1y ago
1/14
12.7 cm
Height
18 hrs
Light Schedule
23 °C
Day Air Temp
5.8
pH
No Smell
Smell
60 %
Air Humidity
26 °C
Solution Temp
27 °C
Substrate Temp
20 °C
Night Air Temp
11.36 liters
Pot Size
3.79 liters
Watering Volume
60.96 cm
Lamp Distance
Card1Cultivations February 24, 2025
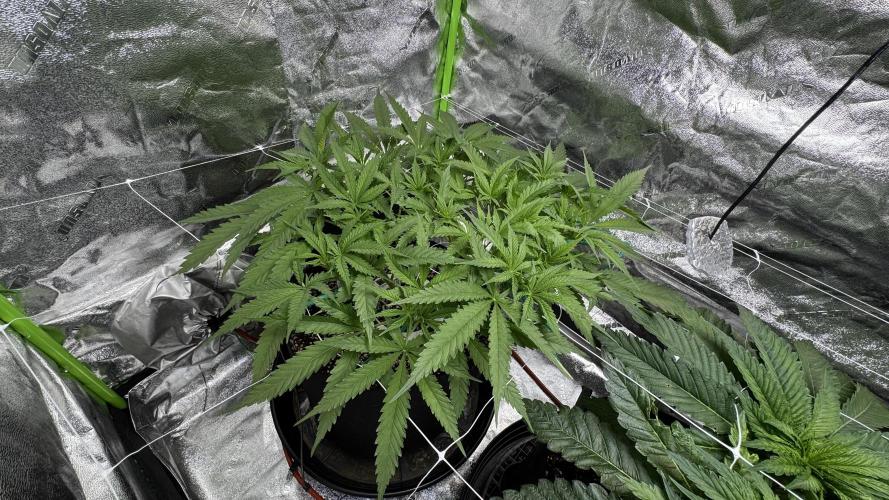
Amazing fast growth, training an preparation to install Blumat gravity fed irrigation system.
2 likes
comments
Share
Used techniques
LST
Technique
Defoliation
Technique
HST
Technique
7
Week 7. Vegetation
10mo ago
1/36
35.56 cm
Height
18 hrs
Light Schedule
23 °C
Day Air Temp
5.8
pH
No Smell
Smell
60 %
Air Humidity
16 °C
Solution Temp
21 °C
Substrate Temp
20 °C
Night Air Temp
18.93 liters
Pot Size
3.79 liters
Watering Volume
60.96 cm
Lamp Distance
Card1Cultivations March 3, 2025
Last week was spent working out and dialing in the Blumat irrigation system.
I have invested in a digital tensiometer to monitor moisture levels in the pots and reach a moisture curve in tye 100mbar range
I am having to relearn and modify my water and feed regiment up till now.
With the Blumat system I am using a 5 gallon reservoir suspended at 5ft above the soil level to achieve a minimum of 1.5-2 psi.
Calibration is crucial and I have already had a run away due to improper calibration.
Since I plan to feed through the system, It is recommended to dilute my water soluble nutrients by 50-75% and use drip clean.
A reservoir fill consists of 2.5 gallons of RO only water PH balanced to 5.8 and poured into a cleaned out bucket.
I then mix 2 gallons of nutrients as I have been from the start following week by week per my feed chart and now add in the recommended amount of drip clean and balance the ph to 5.8. I am in 4+ weeks on the moderate general hydroponic feed schedule
I then combine the 2 gallon nutrient mix to the 2.5 gallons of RO only water to dilute per Blumat recommendations.
My final spot check gets me ph 5.8 with an ec level of around 1.1 - 1.3
Since you can essentially feed and or water independently from the Blumat system which just delays activation of the drip rings I will be watering in recharge microbe which cannot be added to the Blumat system due to it’s potential to clog the system. This will also ensure a decent weekly run off to waste to reduce nutrient buildup and help the plants absorb nutrients better.
After a few set backs and a learning curve that comes with implementing and dialing in a Blumat system using coco coir. I think it will be a great decision to invest in for obvious reasons.
So far I am averaging about 3-4 days before I must replenish the reservoir, when I layer a hand watering/feed on top of it that extends the replenishment a day or two more.
The girls love it and I notice less strain on the tent environment with less moisture swings in the soil and with VPD. Leaf temps no longer fluctuate and stay in excellent levels of -3 degrees below ambient temperatures.
So far it has been worth the time, risk and effort to introduce a new irrigation and fertigation system which does loosen the shackles of responsibility that comes with the choice to hand water and feed your plants.
I also installed the scrog net and started filling that out.
March 9: Carol Anne had a second blumat “run away”. I had hoped dialing the moisture back would help. So I pulled the carrot and did my weekly hand recharge watering. Now I must wait for the moisture meter to read close to 100mbar before placing the recalibrated carrot back into the pot.
The cap has been recalibrated to a hanging drip connected to the system under half a reservoir of water for best average calibration results. Then I dialed the cap back counter clockwise another 1.5 carrot marks on the cap and is now set.
The other two step sisters remain on the blumat system as is with no issues and Carol Anne’s line in plugged temporarily until the levels reach closer to 100mbar.
1 like
comments
Share
Used techniques
Defoliation
Technique
LST
Technique
ScrOG
Technique
8
Week 8. Vegetation
10mo ago
1/10
38.1 cm
Height
18 hrs
Light Schedule
23 °C
Day Air Temp
5.8
pH
No Smell
Smell
60 %
Air Humidity
16 °C
Solution Temp
21 °C
Substrate Temp
20 °C
Night Air Temp
18.93 liters
Pot Size
3.79 liters
Watering Volume
60.96 cm
Lamp Distance
Card1Cultivations March 10 - 17, 2025
Lots of activity and growth in the tent this week.
After resolving two run away events with the Blumat system and the carrots in Anastasia and Carol Anne that I think are finally resolved.
Anastasia’s moisture curve is between 90 - 110 mbar. And the other two are also stable.
They are going through about 1/4 of a gravity feed 5 gallon bucket mounted 5 ft above the soil and outside the tent for easy access.
I am now mixing a bucket batch with 2.5 gallons of plain RO water ph leveled to 5.8 with an average temperature in the low 60 degrees.
I am still using the 10 part - General Hydroponic nutrient line feed chart on week 4+ moderate feed and am mixing into two gallons on RO water with an average temperature of 60ish.
Using the following nutrients in the exact order which is important to follow to avoid mixing issues.
2 gallons fresh Reverse Osmosis filtered water with a base zero EC level.
Silica = 5ml
Calmag = about 4ml
General Hydroponics Flora Series 3 part nutrients:
FloraMicro = about 11ml
FloraGro = about 14ml
FloraBloom = about 8ml
Additives:
- General Hydroponics FloraBlend = a out 10ml
- General Hydroponics Floralicious Plus = 3ml
- House & Garden HGDPC002 Drip Clean = 8ml
Last step is to level ph to 5.8
My nutrient batch ends up at 5.8 ph with an EC level of 2.0 at about 60 degrees f.
I then pour the 2 gallon nutrient mix into the 2.5 gallons of plain RO water to dilute the solution per sustainable village blumat system recommendations.
The final batch usually requires a final ph spot check and minor adjustments.
So far the planned schedule based on a current 4 day depletion rate will be to start with s fresh mixed batch as mentioned above.
When the bucket level reaches 3/4 empty i replenish the bucket to 1/2 full using plain RO water ph leveled to 5.8.
Then top off the bucket with another 2 gallons of nutrient rich mix as mentioned above.
This increases the EC level to about 1.25.
Then on the second reservoir depletion I will let the bucket drain to close to the empty level without letting it go dry.
After the 2nd replenishment is almost gone i will do a 3 gallon hand watering with a mix of Real Growers Recharge - Mycorrhizae Instant Compost Tea/Soil Microbes mixed into each 1 gallon poured into each pot. This achieves 3 things, the first are the obvious benefits of better nutrient intake. It also allows for a good drain to waste to help flush salt buildups. Lastly it saturates the pot moisture levels down to the low 70-80mbar range and essentially temporarily deactivates the blumat system and prolongs the call for water and nutrients from the reservoir for an extra 12-24 hours until the pots dry out to the blumat carrots calibrated settings of about 110-120 mbar.
I will have to adjust as I switch to flower but overall, now that the blumat system is dialed in and I understand it better I find tat it is very effective at keeping the tent environment more stable ad efficient. The plants seem happy as shit and maintain
Ing a reservoir with a bi weekly hand watering flush is so much better than my old ways of mixing 2-3 gallon nutrient batches and hand watering/feeding and dry vacuuming it all up every two days is way better and less wastefull and more sustainable.
So far It appears it was worth the investment and the test of my time and patience.
The week was also full of a few defoliation snd lollipoping with plenty of scrog net low stress training to continue to fill out the canopy.
Drizzella (right) is still stealing the show and dominating her presence in the tent with 30-40 potential cola points.
Anastasia (left) is smaller than her sister but is responding well to all the LST and defoliation. DD he has significantly less potential cola points, but her fan leaves are larger but also softer or more silky feeling.
Carol Anne (middle) continues to be a short stubborn and mesmerizing cultivar. She resembles a head of lettuce and is so strikingly different than her two cousins.
I rounded out the week with continued VPD monitoring to maintain about 1 kpa with an average leaf temp offset of -3 degrees.
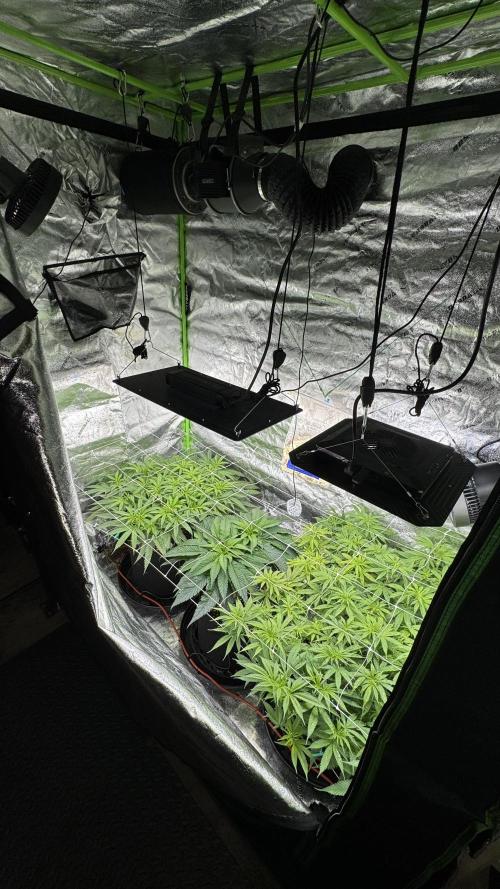
I then pulled the Vivosun Aerolight 150SE led light from my smaller and currently dormant 3x3 tent and installed it in the 3x5 tent.
Even though the AC infinity Ionboard is doing the job on its own. I added the second light for better light distribution across the tent as I was getting good DLi levels in the 30s in the middle of the tent but it tapered off to low 20s near the walls.
After adding the second light I am now achieving PPFD rates of 500-600 and DLI levels in the low 30s from wall to wall and i think it will make a good impact on growth and a more efficient tent environment as The added circulation from the built in fan on the light, as well as increased heat generated from the lights is demanding less from the heaters.
2 likes
comments
Share
9
Week 9. Vegetation
9mo ago
1/12
40.64 cm
Height
18 hrs
Light Schedule
23 °C
Day Air Temp
5.8
pH
No Smell
Smell
60 %
Air Humidity
16 °C
Solution Temp
21 °C
Substrate Temp
20 °C
Night Air Temp
18.93 liters
Pot Size
3.79 liters
Watering Volume
60.96 cm
Lamp Distance
Card1Cultivations March 17 - 24
Growth is still going very well with lots of LST and defoliation.
Business as usual with nutrients and the Blumat system seems dialed in a I prepare to leave them unattended for 5 days in April.
Near the end of the week I installed a second net.
likes
comments
Share
10
Week 10. Flowering
9mo ago
1/9
43.18 cm
Height
12 hrs
Light Schedule
23 °C
Day Air Temp
5.8
pH
No Smell
Smell
58 %
Air Humidity
16 °C
Solution Temp
21 °C
Substrate Temp
20 °C
Night Air Temp
18.93 liters
Pot Size
3.79 liters
Watering Volume
50.8 cm
Lamp Distance
Card1Cultivations March 24 - 30
Pretty mellow week with final prep for leaving them unattended for 5 days.
Drizzela is showing signs of a lime green discoloration in a small area to keep an eye on.
Blumat is steady and dialed in. The plan will be to water over the Blumat system with recharge mixed in which will prolong calling for water from the reservoir.
likes
comments
Share
Used techniques
LST
Technique
ScrOG
Technique
Defoliation
Technique
12-12
Technique
11
Week 11. Flowering
9mo ago
1/13
43.18 cm
Height
12 hrs
Light Schedule
24 °C
Day Air Temp
5.8
pH
No Smell
Smell
55 %
Air Humidity
16 °C
Solution Temp
21 °C
Substrate Temp
20 °C
Night Air Temp
18.93 liters
Pot Size
3.79 liters
Watering Volume
50.8 cm
Lamp Distance
Card1Cultivations March 31 - April 7
This week was my planned time out of town.
I was gone 5 days and the blumat reservoir was bone dry. And the mbar was in the 400s. But they did there job and would have continued to do so if I had a larger reservoir.
All the girls were well and not too thirsty. So the Blumat did it’s job. With that said i had to pull the carrots and reset the system and purge it. Which came with issues as I purchased quick release blackheads and the were adding air to the lines somehow and I had to switch back to the old reservoir bulckheads.
I think I am going to retire the Blumat system and try the autopot tray2grow system with a larger reservoir. The blumat is too finicky and hands on and only good for short spans away.
My 5 day anxiety was rewarded with opening the tent to a sea of green with very noticeable flowers developing!
I did however also notice the lime green discoloration has also gotten worse. I have diagnosed the issue as a sulfur deficiency. So I made an Epsom Salts foliage spray. And have added a pinch of it to the nutrient schedule and the symptoms are slowly fading back to a healthy color green. It has taken a few sprays and about a week to notice a change.
likes
comments
Share
12
Week 12. Flowering
9mo ago
1/7
43.18 cm
Height
12 hrs
Light Schedule
24 °C
Day Air Temp
5.8
pH
No Smell
Smell
55 %
Air Humidity
16 °C
Solution Temp
21 °C
Substrate Temp
20 °C
Night Air Temp
18.93 liters
Pot Size
3.79 liters
Watering Volume
50.8 cm
Lamp Distance
Card1Cultivations April 7 - 14
The transformation into flower is an amazing period in the growth process. So watching these girls dtart to blossom is a treat.
1 like
comments
Share
Used techniques
Defoliation
Technique
12-12
Technique
ScrOG
Technique
13
Week 13. Flowering
8mo ago
1/2
43.18 cm
Height
12 hrs
Light Schedule
24 °C
Day Air Temp
5.8
pH
No Smell
Smell
55 %
Air Humidity
16 °C
Solution Temp
21 °C
Substrate Temp
20 °C
Night Air Temp
18.93 liters
Pot Size
3.79 liters
Watering Volume
50.8 cm
Lamp Distance
Card1Cultivations April 14 - 21
Steady as they go. Some minor defoliation.
likes
comments
Share
14
Week 14. Flowering
8mo ago
1/12
43.18 cm
Height
12 hrs
Light Schedule
24 °C
Day Air Temp
5.8
pH
No Smell
Smell
55 %
Air Humidity
16 °C
Solution Temp
21 °C
Substrate Temp
20 °C
Night Air Temp
18.93 liters
Pot Size
3.79 liters
Watering Volume
50.8 cm
Lamp Distance
Card1Cultivations April 21 - 28
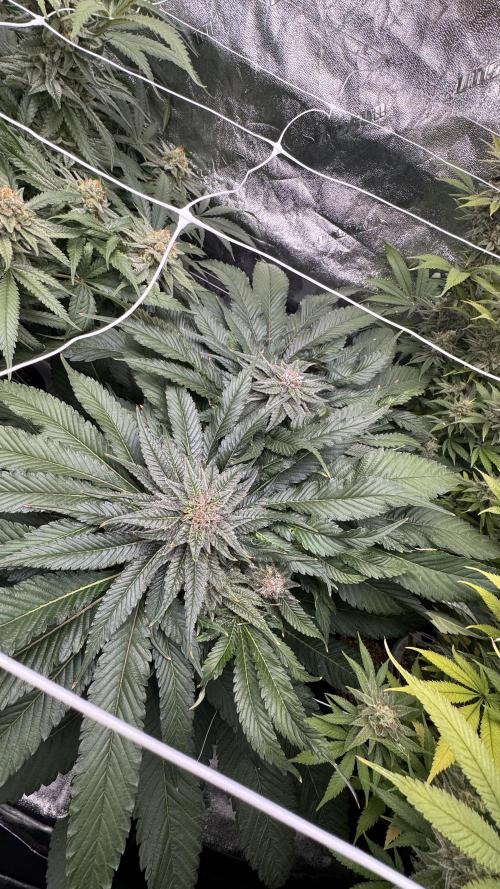
This week was a fun week of auto pilot watching the buds fill in and the plants stretch.
Drizella has been the beast of the grow and stretched the most. But the 2nd row of netting helped keep things under control.
Carol Anne is far below that second net tier. She is for sure dealing with life as a short stunted plant. Hoping for the best outcome for her, but I’m sure she ain’t gonna look so pretty when it comes time to chop n hang her to dry.
Anastasia is beautiful and I think also dealing with stunted growth a little. Either that or her phenom is wildly different than her sister Drizella. She is just reaching the second net tier and is very bushy with more compact bud zones and colas.
likes
comments
Share
15
Week 15. Flowering
8mo ago
1/12
43.18 cm
Height
12 hrs
Light Schedule
24 °C
Day Air Temp
5.8
pH
No Smell
Smell
55 %
Air Humidity
16 °C
Solution Temp
21 °C
Substrate Temp
20 °C
Night Air Temp
18.93 liters
Pot Size
3.79 liters
Watering Volume
50.8 cm
Lamp Distance
Card1Cultivations April 28 - May 5
This week the nutrients have been completely phased out and they are now just sipping plain TO water ph balanced to 5.8 still. As they start entering into the flushing zone with harvest day quickly approaching.
Daily tricome inspections become the focal point In these final days and or weeks.
I