


Alaskan purple seedsman



VEG
Lampwin Light Emitting Diodes/300W
Lampwin
FLO
Lampwin Light Emitting Diodes/300W
Lampwin

Soil
Custom

Indoor
Room Type
LST
weeks 4-5
Defoliation
weeks 7, 10, 12
10 liters
Pot Size
Start at Harvest
1
Week 1. Vegetation7y ago


2 cm
Height
24 hrs
Light Schedule
25 °C
Day Air Temp
6.3
pH
70 %
Air Humidity
22 °C
Solution Temp
21 °C
Night Air Temp
10 liters
Pot Size
0.1 liters
Watering Volume
90 cm
Lamp Distance
Nutrients 3

BioBloom
3 mll

BioGrow
3 mll

BioEnhancer
0.6 mll
Master_weeda Hello to all the padawans and Jedi masters!
First of all, thanks to Tom from Seedsman for the seeds and Greenhouse for allowing me to do this grow by providing the Greenhouse feeding.
I remind you that I am simultaneously growing 9 pots of 10 and 11 liters in a box designed for 4, and I only use the bare minimum of equipment necessary for a proper grow at the lowest possible price.
EQUIPMENT CONFIGURATION
Box 80×80×160
Lamp LED Lampwin 300 watts ×2
Clip fan 15 watts
Xiaomi Deerma humidifiers 5L
Hygrometer thermometer
Extractor PROFAN 107 m3/h - 100
Programmable electronic socket ×2
1 black square pot 10 liters
Greenhouse feeding enhancer
Greenhouse feeding biobloom
Greenhouse feeding biogrow
Biobizz lightmix substrate
Wire and cutting pliers
Microscope
Small precision scale
GROW STEP BY STEP
First, I germinated my seed with the Easy Start from Royal Queen Seeds, and I’m pleasantly surprised because honestly, the success rate is very high (17 seeds out of 19), easy to use, and very effective.
Once the seedling is out and about 2 or 3 centimeters tall, I gently take it and place it directly into its final pot. I recommend pots ranging from 10 liters to 15 liters for autoflowering grown indoors.
The pot will have been previously prepared (video in diary) with 30 grams of Greenhouse feeding biobloom and 30 grams of Greenhouse feeding biogrow, which is the equivalent of 3 grams per liter of substrate.
So, I place the seedling in its final pot, cover it a bit with soil, lightly compact it, and water to keep the substrate moist, no more.
I place my 300-watt LED lamp about 90 centimeters above the seedling with a light cycle of 24/24 for a week. At the beginning of week 2, the light cycle will switch to 20/4 thanks to a timer, as this is the light cycle that offers the best yield for an autoflowering strain.
Day 1: light watering
Day 2: light watering
Day 3: the seedling starts to become more vigorous, setting up ventilation to increase its root mass and light watering
Day 4: watering with one and a half liters of water at pH 6.3 to which I added 0.9 grams of Greenhouse feeding enhancer (that’s 0.6 grams per liter of water)
Day 5: no special technique
Day 6: no special technique
A pleasantly calm week with no apparent problems or deficiencies.
May the force be with you!
12 likes
2 comments
Share
2
Week 2. Vegetation7y ago




5 cm
Height
20 hrs
Light Schedule
24 °C
Day Air Temp
6.3
pH
70 %
Air Humidity
22 °C
Solution Temp
21 °C
Night Air Temp
10 liters
Pot Size
0.1 liters
Watering Volume
90 cm
Lamp Distance
Nutrients 3
BioBloom
3 mll
BioGrow
3 mll
BioEnhancer
0.6 mll
Master_weeda Hello to all the padawans and Jedi masters
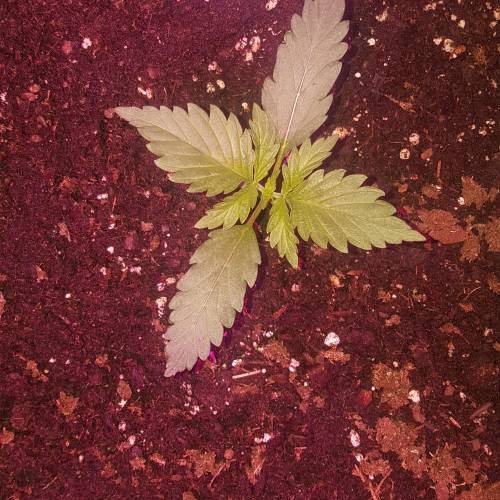
For this week 2, no techniques were practiced, I just monitored that the humidity stays at a rate of 70%. I did a light watering until day 10 because transplanting the autoflowering plants into their final pots increases the risk of overwatering the substrate. 🤐
To mitigate this risk, it’s better to water with 10 or 20 centiliters of water at pH 6.3 during the first 10 days of the seedling. On day 11, I water my pot normally with a quarter of its volume in water (for a 10-liter pot, 2.5 liters), still with a pH of 6.3, and I add 0.6 grams of greenhouse feeding enhancer per liter of water.👍
The enhancer is a mix of humic acids, seaweed extracts, strains of Trichoderma harzianum, and Bacillus subtilis.
It increases the vitality of the plant, improves nutrient absorption, and enhances soil quality.👍
I will do a similar watering in 2 weeks
May the force be with you 💪
11 likes
2 comments
Share
3
Week 3. Vegetation7y ago


7 cm
Height
20 hrs
Light Schedule
24 °C
Day Air Temp
6.3
pH
70 %
Air Humidity
22 °C
Solution Temp
21 °C
Night Air Temp
10 liters
Pot Size
0.1 liters
Watering Volume
90 cm
Lamp Distance
Nutrients 3
BioBloom
3 mll
BioGrow
3 mll
BioEnhancer
0.6 mll
Master_weeda Hello to all the padawans and Jedi masters!
I'm taking advantage of this week, which is going to be relatively calm, to remind you of what I believe is the best technique for watering an autoflowering plant:
By following these simple tips, you'll achieve optimal results throughout your grow:
Cannabis is a plant that doesn't like to receive light watering continuously. It's essential to water it in large quantities and then wait for the soil to be well dry before watering again!
To calculate the amount of water needed for each plant, follow this rule:
The volume of water given during each watering should represent at least about a quarter of the pot's volume!!
Examples:
for a 1L pot, give 0.25L of water at each watering; for a 4L pot, give 1L of water at each watering; for a 12L pot, give 3L of water at each watering; for a 30L pot, give 7.5L of water at each watering! etc...
To give such a volume of water, it's often necessary to water in two (or even three) times, slowly and evenly over the entire surface. Place good saucers under the pots; they will fill with water that will rise into the pot by capillarity in less than a day. It's also very important to use good quality potting soil, with good water retention capacity but that also ensures good drainage (it should contain perlite and/or coco, etc.)
Now you need to wait a few days while regularly lifting the pots with your arms. When they become very light again, you can water once more!!
Indeed, since water weighs much more than soil, a pot soaked with water weighs several times the weight of a pot of a plant ready to be watered. With a bit of practice, you'll quickly learn to lift your pots to know when a plant is thirsty.
It's a technique that's both very easy and very effective, and can be applied to all potted plants!
By watering this way, generally, you'll need to water your plants every 3 to 6 days.
May the force be with you 💪
13 likes
comments
Share
4
Week 4. Vegetation7y ago




13 cm
Height
20 hrs
Light Schedule
24 °C
Day Air Temp
6.3
pH
70 %
Air Humidity
22 °C
Solution Temp
21 °C
Night Air Temp
10 liters
Pot Size
0.1 liters
Watering Volume
90 cm
Lamp Distance
Nutrients 3
BioBloom
3 mll
BioGrow
3 mll
BioEnhancer
0.6 mll
Master_weeda Hello to all the padawans and Jedi masters
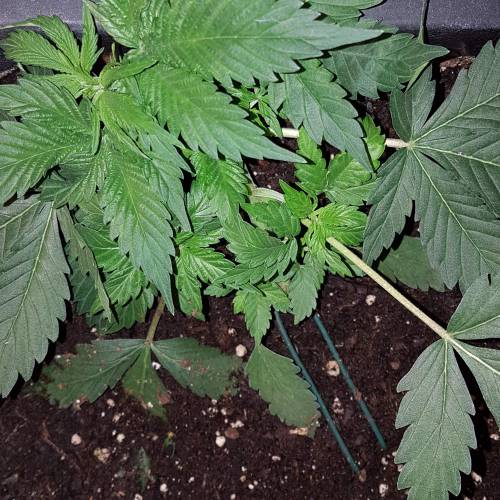
This plant is truly exceptional! It represents strength and I'm proud of it 😍
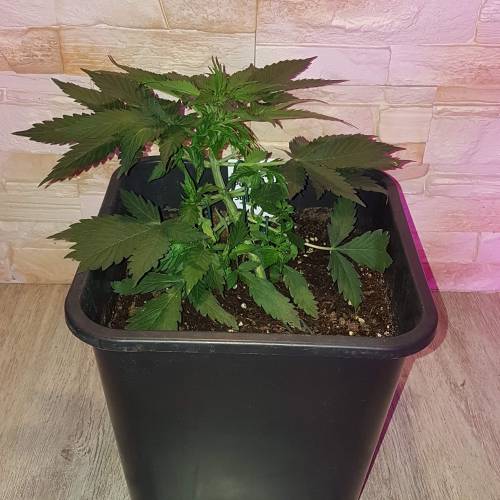
Week 4 is already here! My plant is healthy, the LST is going relatively well, I adjust it every day, and I combine it with the Apex pinching technique, which will allow me to have a more uniform canopy, thus better light penetration and consequently a better yield.
Pinching is a common practice in horticulture.
Many growers use it to improve the yield of their cannabis or other plantations.
It's often about 'trimming' the apical buds.
This trimming is also practiced, but it is no longer, strictly speaking, a matter of pinching.
Like a trim, pinching will stimulate the development of branches while preserving the tips in view of flowering.
It is very useful for uniformizing a canopy.
To perform pinching, you just need to 'firmly' press the stem [between your thumb and index finger] around the apex until you feel a slight 'crAck'.
This will damage the vessels involved in the circulation of sap [located around the stem], but the stem will still retain some rigidity.
To achieve the same result, you can also slightly twist the stem on itself.
The interruption of the nutrient circuit between the apex or apexes and the rest of the plant will cause a hormonal imbalance that will result in the development of branches before the pinching point.
Day 25, I water my pot normally with a quarter of its volume in water, always with a pH of 6.3. To this water, I add 0.7 grams of greenhouse feeding enhancer to promote root development.
After that, I will just have to adjust my LST until the stretch and monitor my watering. I will pinch my apexes according to the plant's growth to uniformize the canopy.
A little reminder of what LST is and how to practice it as effectively as possible:
When to start applying the LST technique
Many growers start manipulating as soon as the plants have between 3 and 6 nodes or a pair of leaves. During this first stage of growth, the still flexible trunk can be bent without the risk of breaking, even though as the plant develops, it will become increasingly difficult to bend. We can continue to guide the growth of the branches throughout the entire cultivation, even during flowering, which represents a great advantage over trimming at this stage, which is not at all recommended once the formation of buds begins, as it will stress the plant, delaying the harvest.
How to apply the LST guiding technique
If we are careful, the natural flexibility of cannabis fibers allows us to bend their trunk and branches with relative ease, even during the flowering of the plants.
Using a thin rope, we can attach the tip of the plant to the base of the pot, for example, or to a stake we have planted in the substrate. We will carefully bend the trunk and secure it with the rope. From there, we can gradually increase the tension of the rope, a little more each day, until we achieve the desired position. Pay attention to the plant's reaction, try not to apply too much pressure on the rope, and remember that the flexibility of the branches can vary from plant to plant.
To achieve better results, just follow a few simple rules. First, we need to choose a thin rope but not too thin so as not to injure the trunks as they grow and become thicker.
We can use soft plastic hooks or any other flexible material to avoid damaging the plants. Especially indoors, using colored plastic cords (see @Silky's diaries) is very practical for easily seeing the attachments and facilitating work in the midst of the network formed by the ropes, stakes, meshes, or supports we have in the cultivation. Of course, in outdoor cultivation, especially in guerrilla growing, we will do just the opposite and use colored materials that do not attract attention so that our garden remains discreet.
To minimize stress on the plants, it's best to perform these manipulations in the evening or just after the indoor lights go out, allowing them to recover during the night. Normally, the next day we will be able to observe how the tips of the branches we have bent rise again towards the light source.
I combine Apex pinching (explanations above) with LST, which will allow me to have a more uniform canopy, thus better light penetration and consequently a better yield.
May the force be with you 💪
12 likes
1 comment
Share
Used techniques
LST
Technique
5
Week 5. Vegetation7y ago




13 cm
Height
20 hrs
Light Schedule
24 °C
Day Air Temp
6.3
pH
70 %
Air Humidity
22 °C
Solution Temp
21 °C
Night Air Temp
10 liters
Pot Size
0.1 liters
Watering Volume
90 cm
Lamp Distance
Nutrients 3
BioBloom
3 mll
BioGrow
3 mll
BioEnhancer
0.6 mll
14 likes
1 comment
Share
Used techniques
LST
Technique
6
Week 6. Flowering7y ago


21 cm
Height
20 hrs
Light Schedule
24 °C
Day Air Temp
6.3
pH
70 %
Air Humidity
22 °C
Solution Temp
21 °C
Night Air Temp
10 liters
Pot Size
0.4 liters
Watering Volume
60 cm
Lamp Distance
Nutrients 4

Bio-Bloom
1 mll
BioBloom
3 mll
BioGrow
3 mll
18 likes
2 comments
Share
7
Week 7. Flowering7y ago


34 cm
Height
20 hrs
Light Schedule
24 °C
Day Air Temp
6.3
pH
55 %
Air Humidity
22 °C
Solution Temp
21 °C
Night Air Temp
10 liters
Pot Size
0.4 liters
Watering Volume
60 cm
Lamp Distance
Nutrients 4
Bio-Bloom
1 mll
BioBloom
3 mll
BioGrow
3 mll
Master_weeda Day 47 watering with pH 6.3 water to which I add 1ml per liter of Topmax Biobizz water
16 likes
10 comments
Share
Used techniques
Defoliation
Technique
8
Week 8. Flowering7y ago


41 cm
Height
20 hrs
Light Schedule
24 °C
Day Air Temp
6.3
pH
50 %
Air Humidity
22 °C
Solution Temp
21 °C
Night Air Temp
10 liters
Pot Size
0.4 liters
Watering Volume
60 cm
Lamp Distance
Nutrients 4
Bio-Bloom
1 mll
BioBloom
3 mll
BioGrow
3 mll
Master_weeda Stretch 7 centimeters
Day 52 watering with pH 6.3 water
15 likes
2 comments
Share
9
Week 9. Flowering7y ago


61 cm
Height
20 hrs
Light Schedule
24 °C
Day Air Temp
6.3
pH
Weak
Smell
50 %
Air Humidity
22 °C
Solution Temp
21 °C
Night Air Temp
10 liters
Pot Size
0.4 liters
Watering Volume
60 cm
Lamp Distance
Nutrients 4
Bio-Bloom
1 mll
BioBloom
3 mll
BioGrow
3 mll
Master_weeda + 21 centimeters
Day 56 watering with two liters of water pH 6.3
Day 58 watering with two liters of water pH 6.3
Day 60 watering with two liters of water pH 6.3
15 likes
comments
Share
10
Week 10. Flowering7y ago


74 cm
Height
20 hrs
Light Schedule
24 °C
Day Air Temp
6.3
pH
Weak
Smell
50 %
Air Humidity
22 °C
Solution Temp
21 °C
Night Air Temp
10 liters
Pot Size
0.4 liters
Watering Volume
60 cm
Lamp Distance
Nutrients 4
Bio-Bloom
1 mll
BioBloom
3 mll
BioGrow
3 mll
Master_weeda Stretch 13 centimeters
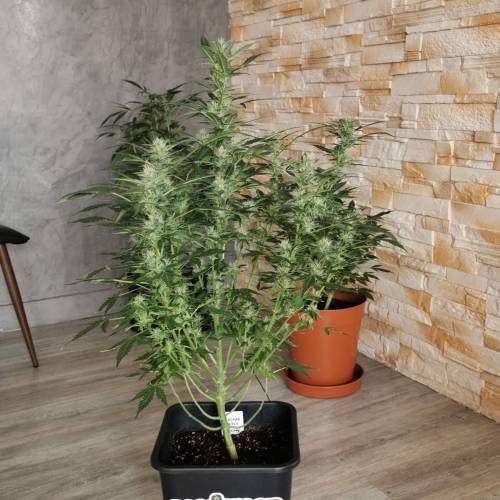
Day 66 defoliation and watering with two liters of water pH 6.3 to which I add one gram per liter of water of greenhouse feeding enhancer
12 likes
comments
Share
Used techniques
Defoliation
Technique
11
Week 11. Flowering7y ago




76 cm
Height
20 hrs
Light Schedule
24 °C
Day Air Temp
6.3
pH
Weak
Smell
50 %
Air Humidity
22 °C
Solution Temp
21 °C
Night Air Temp
10 liters
Pot Size
0.4 liters
Watering Volume
40 cm
Lamp Distance
Nutrients 4
Bio-Bloom
1 mll
BioBloom
3 mll
BioGrow
3 mll
16 likes
comments
Share
12
Week 12. Flowering7y ago


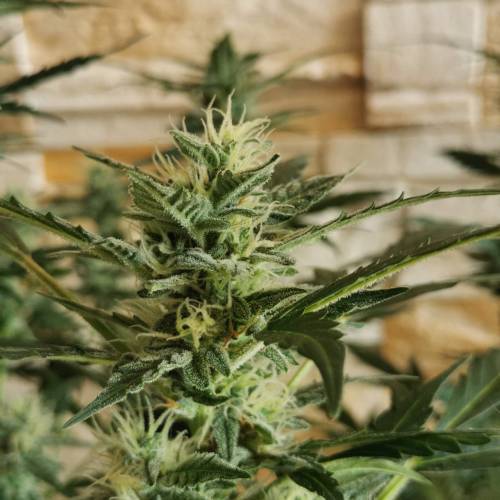


76 cm
Height
20 hrs
Light Schedule
24 °C
Day Air Temp
6.3
pH
Weak
Smell
50 %
Air Humidity
22 °C
Solution Temp
21 °C
Night Air Temp
10 liters
Pot Size
0.4 liters
Watering Volume
40 cm
Lamp Distance
Nutrients 4
Bio-Bloom
1 mll
BioBloom
3 mll
BioGrow
3 mll
Master_weeda Hello to all the padawans and Jedi masters
Day 77 watering with 2 liters of water pH 6.3
Day 78 light defoliation to free up the buds.
Day 82 watering with 2 liters of water pH 6.3
13 likes
comments
Share
Used techniques
Defoliation
Technique
13
Week 13. Flowering7y ago


76 cm
Height
20 hrs
Light Schedule
24 °C
Day Air Temp
6.3
pH
Strong
Smell
50 %
Air Humidity
22 °C
Solution Temp
21 °C
Night Air Temp
10 liters
Pot Size
0.4 liters
Watering Volume
40 cm
Lamp Distance
Nutrients 4
Bio-Bloom
1 mll
BioBloom
3 mll
BioGrow
3 mll
Master_weeda Hello to all the padawans and Jedi masters
Day 84 watering with 2 liters of water ph6.3
Day 87 watering with 2.5 liters of water ph6.3
14 likes
comments
Share
14
Week 14. Flowering7y ago


76 cm
Height
20 hrs
Light Schedule
24 °C
Day Air Temp
6.3
pH
Strong
Smell
50 %
Air Humidity
22 °C
Solution Temp
21 °C
Night Air Temp
10 liters
Pot Size
0.4 liters
Watering Volume
40 cm
Lamp Distance
Nutrients 4
Bio-Bloom
1 mll
BioBloom
3 mll
BioGrow
3 mll
Master_weeda Hello to all the padawans and Jedi masters
Day 91 watering with 2 liters of water ph6.3
Day 93 watering with 2 liters of water ph6.3
Day 96 watering with 2 liters of water ph6.3
15 likes
comments
Share
15
Week 15. Flowering7y ago


76 cm
Height
20 hrs
Light Schedule
24 °C
Day Air Temp
6.3
pH
Strong
Smell
50 %
Air Humidity
22 °C
Solution Temp
21 °C
Night Air Temp
10 liters
Pot Size
0.4 liters
Watering Volume
40 cm
Lamp Distance
Nutrients 4
Bio-Bloom
1 mll
BioBloom
3 mll
BioGrow
3 mll
Master_weeda Hello to all the padawans and Jedi masters
Day 98 watering with 2 liters of water pH 6.3
14 likes
8 comments
Share
16
Week 16. Harvest7y ago
Happy Harvest Day!


8/10
Rated
Bonjour à tous les padawans et maîtres jedis
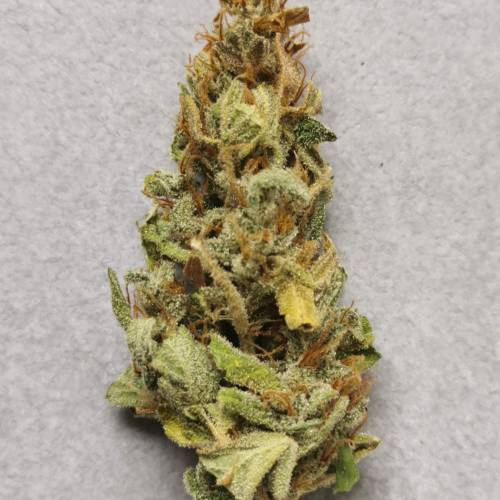
La culture de cette plante c'est relativement bien passée avec un rendement de 57 grammes sec d'une qualité supérieure qui me laissera un souvenir de fumée inoubliable👌
Son goût et son odeur sont composés d'un mélange de baies sucrées accompagnée de notes florales pour un excellent bouquet.
Son héritage Kush lui donne une excellente puissance psychoactive, produisant un effet relaxant au niveau corporel, mais mentalement actif et psychédélique par son héritage de Sativa du Brésil.
Caractéristiques de Alaskan Purple de Seedsman
Nom: Alaskan Purple
Génétique: Purple Alaskan x Kush x Brazilian sativa
La culture ne m'a rien procuré de spécial comme sensation ou plaisir de cultivateur mais le fumeur que je suis peut vous dire sans hésiter de la cultiver car elle procure une fumée de première qualité je la recommande vivement ❤️
Que la force soit avec vous
Show more
Translate
Spent 106 days
Ger Veg Flo Har
344 g
Bud wet weight per plant
57 g
Bud dry weight per plant
1
Plants
0.8 m²
Grow Room size
Normal
Difficulty

Giggly, Happy, Relaxed
Positive effects

Dry eyes
Negative effects

Berries, Flowery
Taste
Height
Day air temperature
Air humidity
PH
Light schedule
Solution temperature
Night air temperature
Pot size
Lamp distance




15 likes
14 comments
Share
Equipment Reviews





2 comments
Sort by
popularity
popularity
newest
oldest

2x4auto commented7y ago
I’ll be following, good luck!
likes 3

Master_weeda commented7y ago
@2x4auto, you are welcome! 😉
May the strength be with you 💪
likes 7

the end.
Enjoying this diary? Follow for more updates!

Prefer the old Diary view?
Go back to the old Diary view