


FBT012 #3 fastbuds test



VEG
Lampwin Light Emitting Diodes/300W
Lampwin
FLO
Lampwin Light Emitting Diodes/300W
Lampwin

Soil
Custom

Indoor
Room Type
LST
weeks 3-5
Defoliation
weeks 5-6, 8
11 l
Pot Size
Start at Harvest
1
Week 1. Vegetation7y ago


3 cm
Height
24 hrs
Light Schedule
26 °C
Day Air Temp
6.3
pH
70 %
Air Humidity
22 °C
Solution Temp
21 °C
Night Air Temp
0.25 l
Pot Size
0.1 l
Watering Volume
90 cm
Lamp Distance
Nutrients 3

BioBloom
3 mll

BioGrow
3 mll

BioEnhancer
0.6 mll
Master_weeda Hello to all the padawans and Jedi masters!
First of all, thanks to FastBuds for allowing me to be their tester, and to Greenhouse for letting me do this grow by providing the Greenhouse feeding and seeds.
I remind you that I am simultaneously growing 9 pots of 10 and 11 liters in a box designed for 4, and that I only use the bare minimum of equipment necessary for a proper grow at the lowest possible price.
EQUIPMENT CONFIGURATION
Box 80×80×160
Lamp: Lampwin 300 watts ×2
Clip fan 15 watts
Xiaomi Deerma humidifiers 5L
Hygrometer thermometer
Extractor PROFAN 107 m3/h - 100
Programmable electronic socket ×2
1 round brown pot 0.25 liters
1 round brown pot 11 liters
Greenhouse feeding enhancer
Greenhouse feeding biobloom
Greenhouse feeding biogrow
Biobizz lightmix substrate
Wire and cutting pliers
Microscope
Small precision scale
GROW STEP BY STEP
I first germinated my seed with the Easy Start from Royal Queen Seeds, and I am pleasantly surprised because honestly, the success rate is very high (17 seeds out of 19), easy to use, and very effective.
Once the seedling emerged and reached a height of 2 or 3 centimeters, I carefully took it and placed it directly in a 0.25-liter pot, unfortunately due to a lack of substrate which prevented me from putting it in its final pot. I will do that later, hoping not to stress the plant, which could result in poor growth. I therefore recommend pots ranging from 10 liters to 15 liters for autoflowering grown indoors.
The pot was previously prepared (video in diary) with 30 grams of Greenhouse feeding biobloom and 30 grams of Greenhouse feeding biogrow, which is the equivalent of 3 grams per liter of substrate. (I will surely do this during week 2)
I then place the seedling in a 0.25l pot, cover it with soil, compact it, and water it.
I set my 300-watt LED lamp about 90 centimeters above the seedling with a light cycle of 24/24 for a week. At the beginning of week 2, the light cycle will switch to 20/4 thanks to a timer, as I believe this light cycle offers the best yield for an autoflowering strain.
Day 1: light watering
Day 2: light watering
Day 3: the seedling starts to become more vigorous, setting up ventilation to increase its root mass and light watering
Day 4: watering with pH 6.3 water to which I added 0.9 grams of Greenhouse feeding enhancer (which is 0.6 grams per liter of water)
Day 5: no special technique
Day 6: repotting into its final pot. I do not recommend repotting an autoflowering strain; it is preferable to put it directly into its final pot. I didn’t do it because due to poor management, I didn’t have enough substrate left.
A pleasantly calm week with no apparent problems or deficiencies.
May the force be with you!
20 likes
14 comments
Share
Grow Questions

Master_weedastarted grow question 7y ago
Hello everyone, what nutrient supplement can I add to my fertilizer greenhouse feeding enhancer biobloom biogrow?
Solved
Techniques. Defoliation
7 likes

Mrs_Larimaranswered grow question 7y ago
Hi weedawan. I personally never let automatics sit in small pots, because they dont like it at all and may stay small. But we will see.I put them always in their final pots filled with a nice soilmix ( as you have=) those greenhouse feedings ar very strong, and i know different persons who overnuked the plants with that stuff. I whish you maximum succes for your grow. I recommend you the Green Buzz Liquids line, its a great organic liquid fertiliser line, filled with beneficals. here in GD is a Representant of this Company. Just hit @GreenBuzzLiquids,,, greetings
2
Week 2. Vegetation7y ago


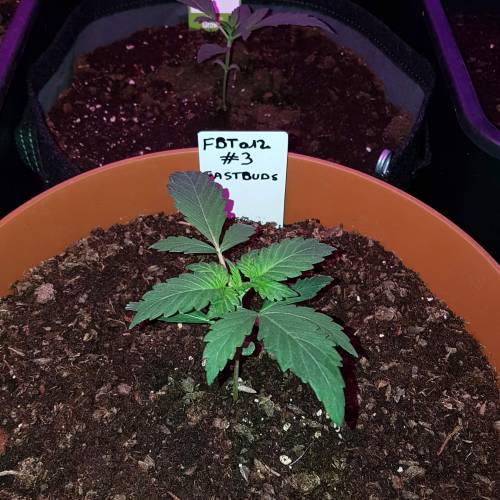


6 cm
Height
20 hrs
Light Schedule
24 °C
Day Air Temp
6.3
pH
70 %
Air Humidity
22 °C
Solution Temp
21 °C
Night Air Temp
11 l
Pot Size
0.1 l
Watering Volume
90 cm
Lamp Distance
Nutrients 3
BioBloom
3 mll
BioGrow
3 mll
BioEnhancer
0.6 mll
Master_weeda Hello to all the padawans and Jedi masters
For this week 2, no techniques were practiced, I just monitored that the humidity stays at a rate of 70%. I did a light watering until day 10 because transplanting the autoflowering plants into their final pots increases the risk of overwatering the substrate. 🤐
To mitigate this risk, it is better to water with 10 or 20 centiliters of water at pH 6.3 during the first 10 days of the seedling. On day 11, I water my pot normally with a quarter of its volume in water (for a 10-liter pot, 2.5 liters), still with a pH of 6.3, and I add 0.6 grams of greenhouse feeding enhancer per liter of water. 👍
Enhancer is a mix of humic acids, algae extracts, strains of Trichoderma harzianum, and Bacillus subtilis.
It increases the vitality of the plant, improves nutrient absorption, and enhances soil quality. 👍
I will do a similar watering in 2 weeks.
May the force be with you. 💪
13 likes
2 comments
Share
3
Week 3. Vegetation7y ago


9 cm
Height
20 hrs
Light Schedule
24 °C
Day Air Temp
6.3
pH
70 %
Air Humidity
22 °C
Solution Temp
21 °C
Night Air Temp
11 l
Pot Size
0.1 l
Watering Volume
90 cm
Lamp Distance
Nutrients 3
BioBloom
3 mll
BioGrow
3 mll
BioEnhancer
0.6 mll
Master_weeda Hello to all the padawans and Jedi masters!
For this week, I plan to practice a special technique, LST, and just one watering. As usual, I wait for the fifth node or until I judge the plant to be robust. I'm taking advantage of this week, which will be relatively calm, to apply LST and remind you of what I consider the best technique for watering an autoflowering plant and how I practice LST.
By following these simple tips, you'll achieve optimal results throughout your grow:
Cannabis is a plant that doesn't like to receive light watering continuously. It's imperative to water it in large quantities, then wait for the soil to dry out well before watering again!
To calculate the amount of water needed for each plant, follow this rule:
The volume of water to give during each watering should represent at least about a quarter of the pot's volume!!
Examples:
for a 1L pot, give 0.25L of water at each watering; for a 4L pot, give 1L of water at each watering; for a 12L pot, give 3L of water at each watering; for a 30L pot, give 7.5L of water at each watering! etc...
To give such a volume of water, it is often necessary to water in two (or even three) times, slowly and evenly over the entire surface. Place good saucers under the pots; they will fill with water that will rise into the pot by capillarity in less than a day. It is also very important to use a good quality potting soil, with good water retention capacity but also ensuring good drainage (it should contain perlite, and/or coco, etc.)
You then need to wait a few days while regularly lifting the pots with your arms. When they become very light again, you can water again!!
Indeed, since water weighs much more than soil, a pot soaked with water weighs several times the weight of a pot of a plant ready to be watered. With a little training, you'll quickly learn to lift your pots to know when a plant is thirsty.
It's a technique that is both very easy and very effective, and can be applied to all potted plants!
By watering this way, generally, you'll need to water your plants every 3 to 6 days.
For this week 3 on day 17, my plant is 12 centimeters tall and its fifth node appears, so I decide to practice LST on my plant.
For this, I use galvanized wire that I plant directly into the substrate, being careful not to damage the roots because let's not forget that what grows above also grows below.
On day 17, I spray a solution made of one teaspoon of soft black soap diluted in a liter of water as a preventive measure against potential pests.
I adjust my LST according to the growth of my plant...
As for me, that's how I proceed. As promised, a little reminder of:
When to start applying the LST technique
Many growers start manipulating as soon as the plants have between 3 and 6 nodes or a pair of leaves. During this first stage of growth, the still flexible trunk can be bent without the risk of breaking, even though as the plant develops, it will become increasingly difficult to bend. We can continue to guide the growth of the branches throughout the grow, even during flowering, which for this stage represents a great advantage over pruning, which is not recommended at all once the formation of buds begins, as this will stress the plant, delaying the harvest.
How to apply the LST guiding technique
If we are careful, the natural flexibility of cannabis fibers allows us to bend their trunk and branches with relative ease, even during the flowering of the plants.
By using a thin rope, we can tie the tip of the plant to the base of the pot, for example, or to a stake that we have planted in the substrate. We will carefully bend the trunk and secure it with the rope; from there, we can gradually increase the tension of the rope, a little more each day, until we achieve the desired position. Pay attention to the plant's reaction, try not to apply too much pressure on the rope, and remember that the flexibility of the branches can vary from plant to plant.
To achieve better results, just follow a few simple rules. First, we need to choose a thin rope but not too thin so as not to injure the trunks as they grow and become thicker.
We can use soft plastic hooks or any other flexible material to avoid damaging the plants. Especially indoors, using colored plastic cords (see @Silky's diaries) is very practical for easily seeing the ties and facilitating work among the network formed by the ropes, stakes, nets, or supports we have in the grow. Of course, in outdoor cultivation, especially in guerrilla grows, we will do just the opposite and use materials that are colored to avoid drawing attention so our garden remains discreet.
To minimize stress on the plants, it's best to perform these manipulations in the evening or just after the indoor lights go out, allowing them to recover during the night. Normally, the next day we can observe how the tips of the branches we have bent rise again towards the light source.
May the force be with you!
18 likes
comments
Share
Used techniques
LST
Technique
4
Week 4. Vegetation7y ago


9 cm
Height
20 hrs
Light Schedule
24 °C
Day Air Temp
6.3
pH
70 %
Air Humidity
22 °C
Solution Temp
21 °C
Night Air Temp
11 l
Pot Size
0.1 l
Watering Volume
90 cm
Lamp Distance
Nutrients 3
BioBloom
3 mll
BioGrow
3 mll
BioEnhancer
0.6 mll
Master_weeda Hello to all the padawans and Jedi masters
For this week 4, I'm fine-tuning my LST and trying not to stress my plant before it enters flowering. I'm combining LST with apex pinching to strengthen the secondary branches of my plant. I'm weighing my pots to monitor my plant's water needs. I will water at the right time with a quarter of the pot volume with pH 6.3 water, and I will add 0.7 grams of greenhouse feeding feeding enhancer per liter to it. Day 25 watering. A little reminder of what apex pinching is:
Pinching cannabis plants
Close to the principle of apex pruning, this technique has several advantages, the main one being to maintain the large central bud of the plant, with maximum production and quality.
Pinching cannabis plants
Apex pinching (the top of the plant) simply involves gently pinching the stem of the top tier of the plant between the thumb and index finger until you feel the fiber crush under your fingers with a characteristic little crunch sound. If the available space on the stem of the top tier does not comfortably allow you to place your fingers, you should pinch the tier below instead.
Pinching will significantly slow the vertical growth of the plant while stimulating the development of the secondary branches, thus giving the plant a bushy shape. The plant will take a few days to repair this pinching, forming a knot at that spot, and then will continue its growth normally. Pinching can then be repeated if necessary on the newly formed next tier, as well as on any secondary branches that may exceed the apex.
Pinching is therefore an excellent technique for achieving a nice uniform canopy of the sea of green type. By regularly pinching the apex of the larger plants in your space during growth and at the beginning of flowering (stretch), you will easily obtain plants of uniform height in full bloom, which will facilitate cultivation and increase final production, especially if you are simultaneously growing multiple marijuana varieties.
With a bit of practice, pinching can be done as quickly as effectively. In case of overly aggressive pinching that results in a torn apex, it will simply produce the same results as a classic apex pruning, which won't be dramatic.
May the force be with you.
16 likes
comments
Share
Used techniques
LST
Technique
5
Week 5. Vegetation7y ago




9 cm
Height
20 hrs
Light Schedule
24 °C
Day Air Temp
6.3
pH
70 %
Air Humidity
22 °C
Solution Temp
21 °C
Night Air Temp
11 l
Pot Size
0.1 l
Watering Volume
90 cm
Lamp Distance
Nutrients 4

Top-Max
0.5 mll
BioBloom
3 mll
BioGrow
3 mll
Master_weeda Hello to all the padawans and Jedi masters
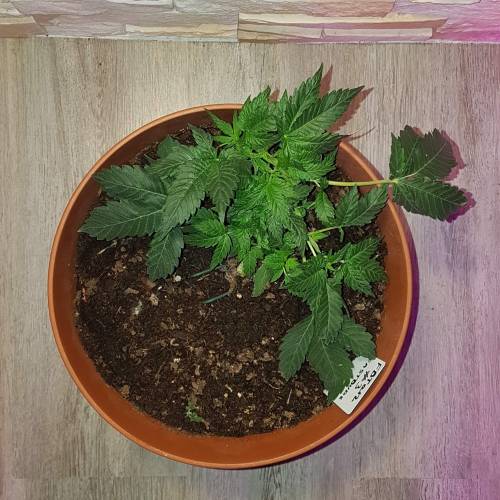
Day 28, I continue to adjust my LST according to the growth of my plant. I find that this genetic variety is a bit weak compared to other seeds planted at the same time and under the same growing conditions.
I'm doing a slight defoliation that I combined with an Apex pinch to allow for better light penetration, which will result in more even growth.
On day 32, I continue to pinch my apexs to achieve a more uniform canopy, and as usual, I monitor my plant's water needs by weighing my pot daily.
Day 33, my plant is small but very bushy. It has the shape I want, so I decide to remove the wire that was holding the branches to give it the shape I wanted. I'm quite satisfied with the plant's growth. I water my plant with 2 liters of water at pH 6.3, to which I add 0.5ml of topmax from Biobizz.
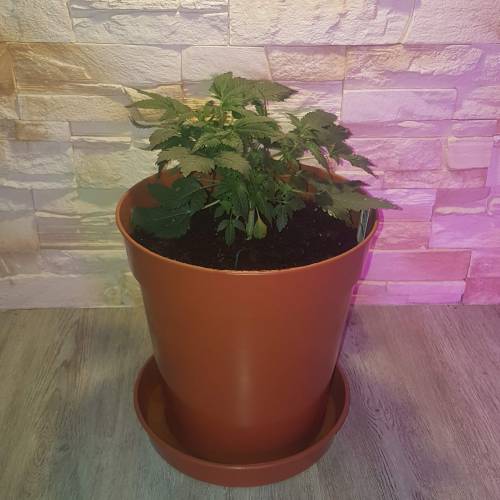
Day 34, the stretch begins, and we will see if this strain has the resources to catch up during its stretch phase.
This week has gone relatively well.
May the force be with you 💪
13 likes
comments
Share
Used techniques
LST
Technique
Defoliation
Technique
6
Week 6. Flowering7y ago




14 cm
Height
20 hrs
Light Schedule
24 °C
Day Air Temp
6.3
pH
70 %
Air Humidity
22 °C
Solution Temp
21 °C
Night Air Temp
11 l
Pot Size
0.1 l
Watering Volume
60 cm
Lamp Distance
Nutrients 4
Top-Max
0.5 mll
BioBloom
3 mll
BioGrow
3 mll
12 likes
comments
Share
Used techniques
Defoliation
Technique
7
Week 7. Flowering7y ago


18 cm
Height
20 hrs
Light Schedule
24 °C
Day Air Temp
6.3
pH
Weak
Smell
55 %
Air Humidity
22 °C
Solution Temp
21 °C
Night Air Temp
11 l
Pot Size
0.1 l
Watering Volume
60 cm
Lamp Distance
Nutrients 4
Top-Max
0.5 mll
BioBloom
3 mll
BioGrow
3 mll
13 likes
comments
Share
8
Week 8. Flowering7y ago


26 cm
Height
20 hrs
Light Schedule
24 °C
Day Air Temp
6.3
pH
Weak
Smell
55 %
Air Humidity
22 °C
Solution Temp
21 °C
Night Air Temp
11 l
Pot Size
0.1 l
Watering Volume
60 cm
Lamp Distance
Nutrients 4
Top-Max
0.5 mll
BioBloom
3 mll
BioGrow
3 mll
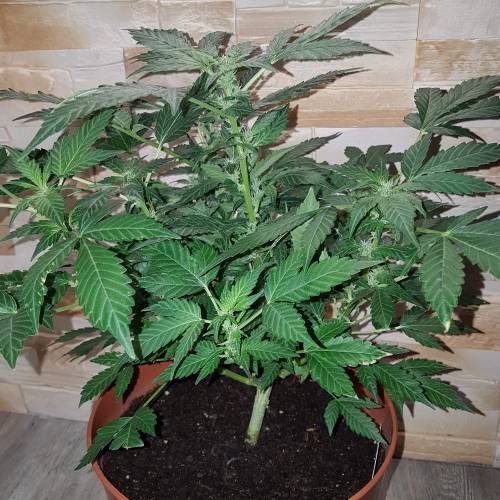
Master_weeda Stretch 8 centimeters
Day 49 watering
Day 52 defoliation and watering with 2 liters of water pH 6.3
Day 54 defoliation
15 likes
2 comments
Share
Used techniques
Defoliation
Technique
9
Week 9. Flowering7y ago




33 cm
Height
20 hrs
Light Schedule
24 °C
Day Air Temp
6.3
pH
Weak
Smell
55 %
Air Humidity
22 °C
Solution Temp
21 °C
Night Air Temp
11 l
Pot Size
0.1 l
Watering Volume
60 cm
Lamp Distance
Nutrients 4
Top-Max
4 mll
BioBloom
3 mll
BioGrow
3 mll
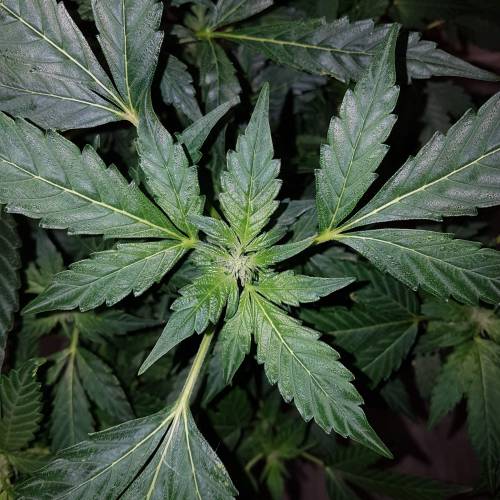
Master_weeda + 7 centimeters Day 56
Day 56 watering with two liters of water ph6.3 adding 5 grams of greenhouse feeding biobloom while scratching the soil
Day 59 watering with two liters of water ph6.3 to which I add 4ml per liter of water of topmax biobizz
14 likes
comments
Share
10
Week 10. Flowering7y ago


40 cm
Height
20 hrs
Light Schedule
24 °C
Day Air Temp
6.3
pH
Weak
Smell
55 %
Air Humidity
22 °C
Solution Temp
21 °C
Night Air Temp
11 l
Pot Size
0.1 l
Watering Volume
60 cm
Lamp Distance
Nutrients 4
Top-Max
4 mll
BioBloom
3 mll
BioGrow
3 mll
Master_weeda Hello to all the padawans and jedi masters
Stretch 7 centimeters
Day 63 watering with two liters of water ph6.3
Day 66 defoliation
10 likes
comments
Share
11
Week 11. Flowering7y ago


42 cm
Height
20 hrs
Light Schedule
24 °C
Day Air Temp
6.3
pH
Normal
Smell
55 %
Air Humidity
22 °C
Solution Temp
21 °C
Night Air Temp
11 l
Pot Size
0.1 l
Watering Volume
60 cm
Lamp Distance
Nutrients 4
Top-Max
4 mll
BioBloom
3 mll
BioGrow
3 mll
Master_weeda Day 70 watering with 2 liters of water pH 6.3
17 likes
2 comments
Share
12
Week 12. Flowering7y ago


42 cm
Height
20 hrs
Light Schedule
24 °C
Day Air Temp
6.3
pH
Normal
Smell
55 %
Air Humidity
22 °C
Solution Temp
21 °C
Night Air Temp
11 l
Pot Size
0.1 l
Watering Volume
60 cm
Lamp Distance
Nutrients 4
Top-Max
4 mll
BioBloom
3 mll
BioGrow
3 mll
Master_weeda Hello to all the padawans and Jedi masters
Day 77 watering with 2 liters of water pH 6.3
16 likes
comments
Share
13
Week 13. Flowering7y ago


42 cm
Height
20 hrs
Light Schedule
24 °C
Day Air Temp
6.3
pH
Strong
Smell
55 %
Air Humidity
22 °C
Solution Temp
21 °C
Night Air Temp
11 l
Pot Size
0.1 l
Watering Volume
60 cm
Lamp Distance
Nutrients 4
Top-Max
4 mll
BioBloom
3 mll
BioGrow
3 mll
Master_weeda Hello to all the padawans and jedi masters
Day 84 watering with 2 liters of water ph6.3
15 likes
1 comment
Share
14
Week 14. Flowering6y ago


42 cm
Height
20 hrs
Light Schedule
24 °C
Day Air Temp
6.3
pH
Strong
Smell
55 %
Air Humidity
22 °C
Solution Temp
21 °C
Night Air Temp
11 l
Pot Size
0.1 l
Watering Volume
60 cm
Lamp Distance
Nutrients 4
Top-Max
4 mll
BioBloom
3 mll
BioGrow
3 mll
Master_weeda Hello to all the padawans and Jedi masters
Day 92 watering with 2 liters of water pH 6.3
12 likes
2 comments
Share
15
Week 15. Flowering6y ago


42 cm
Height
20 hrs
Light Schedule
24 °C
Day Air Temp
6.3
pH
Strong
Smell
55 %
Air Humidity
22 °C
Solution Temp
21 °C
Night Air Temp
11 l
Pot Size
0.1 l
Watering Volume
60 cm
Lamp Distance
Nutrients 4
Top-Max
4 mll
BioBloom
3 mll
BioGrow
3 mll
Master_weeda Hello to all the padawans and Jedi masters
Day 98 watering with 2 liters of water ph6.3
Day 100 watering with 2 liters of water ph6.3
Day 103 watering with 2 liters of water ph6.3
17 likes
2 comments
Share
16
Week 16. Flowering6y ago


42 cm
Height
20 hrs
Light Schedule
24 °C
Day Air Temp
6.3
pH
Strong
Smell
55 %
Air Humidity
22 °C
Solution Temp
21 °C
Night Air Temp
11 l
Pot Size
0.1 l
Watering Volume
60 cm
Lamp Distance
Nutrients 4
Top-Max
4 mll
BioBloom
3 mll
BioGrow
3 mll
Master_weeda Hello to all the padawans and Jedi masters
Day 105 watering with 2 liters of water pH 6.3
14 likes
1 comment
Share
17
Week 17. Flowering6y ago


42 cm
Height
20 hrs
Light Schedule
24 °C
Day Air Temp
6.3
pH
Strong
Smell
55 %
Air Humidity
22 °C
Solution Temp
21 °C
Night Air Temp
11 l
Pot Size
0.1 l
Watering Volume
60 cm
Lamp Distance
Nutrients 4
Top-Max
4 mll
BioBloom
3 mll
BioGrow
3 mll
Master_weeda Hello to all the padawans and Jedi masters
Day 113 watering with 3 liters of water ph6.3
Day 117 watering with 2 liters of water ph6.3
12 likes
comments
Share
18
Week 18. Flowering6y ago


42 cm
Height
20 hrs
Light Schedule
24 °C
Day Air Temp
6.3
pH
Strong
Smell
55 %
Air Humidity
22 °C
Solution Temp
21 °C
Night Air Temp
11 l
Pot Size
0.1 l
Watering Volume
60 cm
Lamp Distance
Nutrients 4
Top-Max
4 mll
BioBloom
3 mll
BioGrow
3 mll
Master_weeda Hello to all the padawans and Jedi masters
15 likes
comments
Share
19
Week 19. Flowering6y ago


42 cm
Height
20 hrs
Light Schedule
24 °C
Day Air Temp
6.3
pH
Strong
Smell
55 %
Air Humidity
22 °C
Solution Temp
21 °C
Night Air Temp
11 l
Pot Size
0.1 l
Watering Volume
60 cm
Lamp Distance
Nutrients 4
Top-Max
4 mll
BioBloom
3 mll
BioGrow
3 mll
Master_weeda Hello to all the padawans and Jedi masters
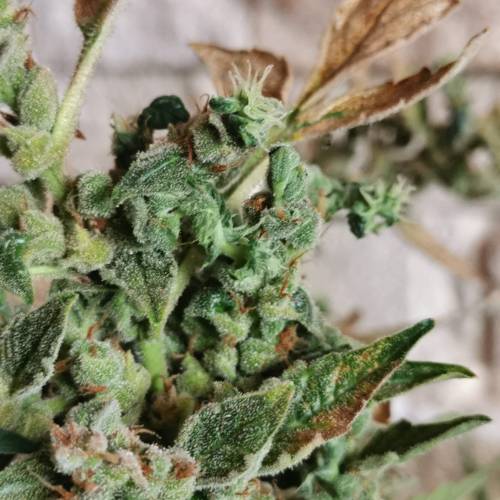
Nothing to report, the plant is healthy and has an exceptional smell
I think I’ll harvest it this week
Because the trichomes are starting to turn amber at over 30%
How do you know when to harvest?
The harvest window for cannabis is one of the aspects of cultivation that is unfortunately too rarely taken into account, or the grower simply doesn’t have the patience to wait a few more days to ensure maximum THC content.
Some strains are better if harvested before their peak THC production, while others are better if harvested afterward.
There will always be some variations, but you can use the rules below to help you assess the best harvest window for your plants, based on the trichomes:
1) Perfectly formed trichome heads that are still clear will give you a cleaner, more uplifting high with less sedative effect; this is the best harvest window for heavy Indica strains.
2) Perfectly formed trichome heads that are becoming slightly cloudy or milky; this is probably the best time to harvest most of the hybrids currently available.
3) Perfectly formed trichome heads that are completely cloudy or milky, with at least 30% turning amber; this is generally the best harvest window for late-maturing Sativas like Haze. It’s also the right time to harvest when using the plant to make hash.
The mistake to try to avoid is harvesting before the trichomes are perfectly formed; most growers who follow the previous rules will harvest when the majority of the resin heads are milky.
Harvesting before this window will produce buds that are less potent, containing fewer essential oils and terpenes, and your harvest will have a grassy or hay-like taste, even if it is dried and cured properly.
May the force be with you 💪
13 likes
comments
Share
20
Week 20. Flowering6y ago


42 cm
Height
20 hrs
Light Schedule
24 °C
Day Air Temp
6.3
pH
Strong
Smell
55 %
Air Humidity
22 °C
Solution Temp
21 °C
Night Air Temp
11 l
Pot Size
0.1 l
Watering Volume
60 cm
Lamp Distance
Nutrients 4
Top-Max
4 mll
BioBloom
3 mll
BioGrow
3 mll
14 likes
6 comments
Share
20
Week 20. Harvest6y ago
Happy Harvest Day!


7/10
Rated
Bonjour à tous les padawans et maîtres jedis
Avec son phénotype différent de ce que l'on peut voir habituellement j'avoue avoir longtemps était déçu, tout au long de la floraison, car les têtes bizarres m'ont longtemps déstabilisées.
La croissance c'est relativement bien passé et j'ai étais agréablement surpris par la robustesse de cette plante
La floraison ne fut pas si compliquée que je le laisse croire
Elle a était un peu longue pour une autofloraison annoncé à 10 semaines max.
Cette culture ne représente pas ce que peut être réellement cette variété car le phénotype est différent ce la réalité
Au final je recommande tout de même cette variété car elle m'a procuré un réel plaisir au smoke test
Show more
Translate
Spent 141 days
Ger Veg Flo Har
277 g
Bud wet weight per plant
42 g
Bud dry weight per plant
1
Plants
0.8 m²
Grow Room size
Hard
Difficulty

Creative, Relaxed, Uplifted
Positive effects

Dry mouth, Paranoia
Negative effects

Berries, Earthy, Woody
Taste
Height
Day air temperature
Air humidity
PH
Light schedule
Solution temperature
Night air temperature
Pot size
Lamp distance


Master_weeda Hello to all the padawans and Jedi masters
All grows have the particularity of being different, and this one is no exception.
With its phenotype different from what we usually see, I admit I was disappointed for a long time throughout the flowering, as the weird buds unsettled me for quite a while.
The growth went relatively well, and I was pleasantly surprised by the robustness of this plant.
The flowering wasn't as complicated as I let on.
It was a bit long for an autoflowering strain advertised at a max of 10 weeks.
Even though my grows don't present all the optimal conditions, I find that it still feels relatively long.
But in the end, the smoke test made up for all these inconveniences because its wonderful taste and power that takes you on a journey to a fluffy world would leave even the harshest critic speechless.
Flavor
A very unique taste that resembles a sweet cherry pie, with notes of berries, earth, and candy. Original Auto Russian is a tempting combination of fruity and floral "terps," which could be described as a cherry aftertaste.
Fastbuds describes the taste well; mine had a noble wood aftertaste and an incomparable smell.
I recommend this plant to all lovers of woody and fruity flavors.
May the force be with you 💪💚
13 likes
3 comments
Share
Equipment Reviews





1 comment
Sort by
popularity
popularity
newest
oldest

Warzouz_grass commented6y ago
Hey Weeda, It's so weird the apex, I've never seen that... Do you think it's the plant's genetics that causes this?
likes 3

the end.
Enjoying this diary? Follow for more updates!

Prefer the old Diary view?
Go back to the old Diary view