


OG Bubble Gum Zambeza seeds



VEG
Lientec Roccit 240 Light Emitting Diodes/240W
Lientec Roccit 240
FLO
Lientec Roccit 240w Light Emitting Diodes/240W
Lientec Roccit 240w

Soil
Custom

Indoor
Room Type
Topping
weeks 5
Defoliation
weeks 7, 10
11 liters
Pot Size
Start at Harvest
1
Week 1. Vegetation7y ago


24 hrs
Light Schedule
24 °C
Day Air Temp
6.3
pH
No Smell
Smell
70 %
Air Humidity
20 °C
Solution Temp
21 °C
Night Air Temp
11 liters
Pot Size
90 cm
Lamp Distance
Nutrients 1

RootBooster
2 mll
Master_weeda Hello to all the padawans and Jedi masters!
First of all, thanks to @zambeza for allowing me to grow their fabulous genetics and to @Cellmax_Nutrients for enabling this grow by providing the substrate and nutrients needed for this run.
I remind you that I grow out of passion and that yield is not my priority, and I only use the bare minimum of equipment necessary for a proper grow at the lowest possible price.
EQUIPMENT CONFIGURATION
Box 80×80×160
Lamp led Lampwin 300 watts ×2
COB led Lamp Macegrow 450 watts
Clip fan 15 watts
Xiaomi Deerma humidifier 5L
Hygrometer thermometer
Extractor PROFAN 107 m3/h - 100
Programmable electronic outlet ×2
1 Fabrikpot 11 liters
Cellmax nutrients
Cellmax biobloom
Cellmax biogrow
Organic universal soil (supermarket)
Wire and cutting pliers
Microscope
Small precision scale
GROW STEP BY STEP
First, I germinated my seed with the easy start from Royal Queen Seeds, and I’m pleasantly surprised because honestly, the success rate is very high (8 seeds out of 10), easy to use, and very effective.
Once the seedling is out and about 2 or 3 centimeters tall, I gently take it and place it directly into its final pot. I recommend transplanting autoflowering strains into their final pot because repotting could stress the plant, which would impact the yield. I therefore suggest pots ranging from 10 liters to 15 liters for autoflowering strains grown indoors.
The pot will have been prepared beforehand (geotextile pot 11l).
I then place the seedling in an 11-liter pot, cover it with soil, compact it, and water it.
I set my 300-watt LED lamp about 90 centimeters above the seedling with a light cycle of 24/24 for a week. At the beginning of week 2, the light cycle will switch to 20/4 thanks to a timer, as this is the light cycle that offers the best yield for an autoflowering strain.
Day 1: light watering
Day 2: light watering water pH 6.3
Day 3: light watering
Day 4: watering with 1.5 liters of water pH 6.3 to which I added 2 milliliters of Cellmax rootbooster
14 likes
4 comments
Share
2
Week 2. Vegetation7y ago


4.5 cm
Height
20 hrs
Light Schedule
24 °C
Day Air Temp
6.3
pH
No Smell
Smell
70 %
Air Humidity
20 °C
Solution Temp
21 °C
Night Air Temp
11 liters
Pot Size
90 cm
Lamp Distance
Nutrients 2
Cellmax
3 mll
RootBooster
2 mll
Master_weeda Hello to all the padawans and Jedi masters
Day 8 watering with 20 centiliters of water to which I added 2 milliliters of @cellmax_nutrients bio 8-2-2 (no need to adjust the pH)
Day 12 watering with 1.5 liters of water pH 6.3 to which I add 5ml of rootbooster cellmax and 3ml of cellmax bio 8-2-2
17 likes
1 comment
Share
3
Week 3. Vegetation6y ago


7 cm
Height
20 hrs
Light Schedule
24 °C
Day Air Temp
6.3
pH
No Smell
Smell
70 %
Air Humidity
20 °C
Solution Temp
21 °C
Night Air Temp
11 liters
Pot Size
90 cm
Lamp Distance
Nutrients 2
Cellmax
3 mll
RootBooster
4 mll
Master_weeda Hello to all the padawans and Jedi masters
Day 17 spraying calsimag @cellmax_nutrients but still no need for watering because the plant is healthy and the pot isn't yet at its ideal weight for a new watering, it's relatively heavy
Just a reminder for watering without making mistakes.
A few little tips to master your watering
Don't put your plants in a stone or clay pot, the pot absorbs water and under the sun's rays its edges heat up and dry out its contents.
Make enough holes in the base of your pot/tray/bucket to ensure the drainage of excess water. Overwatering can be just as harmful as drought (though it's a problem that's easier to solve).
You'll recognize overwatering when the leaves (yellow) fall, have a "thick" appearance, and droop.
Don't place the pot directly on the ground as this increases the chances of poor water drainage. Some growers use plastic risers to lift the pots off the ground, wood should be avoided due to the risk of rot.
In a pot or tray, a plant requires more frequent watering. You can develop an instinct to determine the ideal time to water by regularly lifting the pot and memorizing its weight when wet and dry.
You can also stick your finger into the soil and feel if it's sufficiently moist. The top few centimeters can be dry as long as the soil underneath is sufficiently moist.
A tensiometer is the best way to measure water levels, but it's a device that comes at a price.
Letting your plants dry out from time to time has a beneficial effect on root development and promotes nutrient uptake by the roots, but the line between a little dry and too dry is thin, so be careful.
It's often the case that the top layer of soil has difficulty absorbing water when dehydrated. If that's the case, take a fork and turn the soil over 2-3 cm deep, then cover with a little water, wait at least 5 minutes, then repeat the process, after which you can water normally with much better results.
NO WATERING DURING THE LAST WEEK BEFORE HARVEST!!!!
One week before harvest, stop watering the plant: this will give it a little boost in its budding head development.
12 likes
4 comments
Share
4
Week 4. Vegetation6y ago


10 cm
Height
22 hrs
Light Schedule
24 °C
Day Air Temp
6.3
pH
No Smell
Smell
70 %
Air Humidity
20 °C
Solution Temp
21 °C
Night Air Temp
11 liters
Pot Size
90 cm
Lamp Distance
Nutrients 2
Cellmax
3 mll
RootBooster
4 mll
Master_weeda Hello to all the padawans and Jedi masters!
Day 22 watering with 2 liters of water pH 6.3 to which I add 4ml of rootbooster cellmax and 3ml of cellmax bio 8-2-2 per liter of water.
Day 24 beginning of apex pinching which aims to invigorate the lower branches, explanation below.
Day 27 light watering (20 centiliters) with water pH 6.3 to which I add 4ml of rootbooster cellmax and 3ml of cellmax bio 8-2-2 per liter of water.
Pinching cannabis plants
Close to apex trimming in principle, this technique has several advantages, the main one being to preserve the large central bud of the plant, with maximum production and quality.
How to trim or pinch cannabis plants
How, when, and why to trim marijuana plants?
How to trim cannabis plants to control their height, improve production, or simply as a tool for indoor growing in the case of growing many distinct varieties.
There are different ways to trim plants, including apical trimming, pinching, FIM trimming, trimming the lower parts, etc. Among these types of trimming, we can also add other techniques such as supercropping or partial bending/breaking of the trunk or branches to redirect energy and better guide our plants.
Before we can trim the plants, we need to know what type of plants we want to grow, regarding their size; medium or large. We will have to take into account the space we have, as well as the external limitations to growing that we may encounter both in indoor and outdoor cannabis cultivation.
In outdoor cultivation, we will need to consider different factors that can help us choose between the various height control techniques that we will explain.
Apical trimming is one of the most well-known techniques among the vast majority of cannabis growers, whether outdoors or indoors. It allows for simple and effective control of plant height.
This trimming involves cutting the apex of the plant (its main head) using cannabis scissors, knives, razor blades, cutters, etc., after disinfecting the tool to avoid any infection during the apical surgery.
The cleaner the cuts made on the plants, the less they will suffer from stress, recovering after the growth halt caused by the cut made on the plants.
Before cutting the apex, we must consider that nothing will grow above the cut; only the parts left below the cut will develop, wanting to be the new main tips. It is necessary to wait until the plant has a certain height to trim with some logic.
The height of the plant can vary according to the needs and the times of the year we are in. If the plants are germinated in early spring, it will be necessary to trim to control height in necessary cases, such as avoiding visibility by neighbors or passersby. Conversely, if we plant late, close to autumn when the plants will flower, since they will have a reduced size, it will not be necessary to perform trimming as the production of buds will already be delayed.
The more branches the plant has, the more main tips it will have to produce a larger quantity of buds, thus increasing the final production. When we trim the main tip, the auxins of the plant are redistributed in the remaining branches, centralizing in the heads of the main tips, thus increasing their vigor and simultaneously competing to become the new main tip. This is therefore an appropriate trimming for mother plants. (for me, it’s an autoflowering, no cuttings on autoflowering plants)
Pinching cannabis plants
Close to apex trimming in principle, this technique has several advantages, the main one being to preserve the large central bud of the plant, with maximum production and quality.
Apex pinching (top of the plant) simply involves gently pinching the stem of the last tier of the plant between the thumb and index finger until you feel the fiber crush under your fingers with a characteristic little crunch sound. If the available space on the stem of the last tier does not allow you to comfortably place your fingers, you should pinch the tier below instead.
Pinching will significantly slow down the vertical growth of the plant while stimulating the development of secondary branches, thus giving the plant a bushy shape.
The plant will take a few days to repair this pinching, forming a knot at that spot, and will then continue its growth normally. Pinching can then be repeated if necessary, on the newly formed next tier, as well as on any secondary branches that may exceed the apex.
Pinching is therefore an excellent technique for achieving a nice uniform canopy of the green wave type. By regularly pinching the apex of the larger plants in your space during growth and early flowering (stretch), you will easily achieve plants of uniform height in full bloom, which will facilitate cultivation and increase final production, especially if you are simultaneously growing multiple marijuana varieties.
With a little practice, pinching can be done as quickly as effectively. In case of overly aggressive pinching that results in a torn apex, it will simply produce the same results as a classic apex trimming, which will not be dramatic.
10 likes
comments
Share
5
Week 5. Vegetation6y ago


10 cm
Height
22 hrs
Light Schedule
24 °C
Day Air Temp
6.3
pH
No Smell
Smell
70 %
Air Humidity
20 °C
Solution Temp
21 °C
Night Air Temp
11 liters
Pot Size
90 cm
Lamp Distance
Nutrients 2
Cellmax
3 mll
RootBooster
4 mll
Master_weeda Hello to all the padawans and Jedi masters
Day 31 watering with 2 liters of water pH 6.3 to which I add 4ml of rootbooster cellmax, 3ml of cellmax bio organic bloom, and 3ml of cellmax bio 8-2-2 per liter of water
Day 33 practicing the topping technique (see video) I specify that if this simple practice combined with pinching the apex (see last week) is done at the right time, it can offer a very high yield even if yield is not my main goal, my curiosity pushes me to try these two combined techniques.
TOPPING
Cannabis plants grow vertically. By doing so, the nutrient leaves and branches start to grow horizontally or diagonally from the main stem. Topping involves cutting the main stem of the vertical branch between the nodes. Try to do this with sterile scissors or a razor blade. By cutting the main stem, two secondary branches will develop into main stems. They will grow diagonally instead of growing upwards, making the plant shorter and easier to manage. Topping will prevent the plant from having a Christmas tree-like growth. This will help give the cannabis plant a shape more suited to indoor growing environments.
You can continue to do this as the branches grow. You can trim the top of each branch and grow a crazy bonsai plant. Just make sure not to go too far and end up with something uncontrollable. Some growers recommend waiting about 30 days in the plant's life before proceeding with topping. It puts a lot of stress on the plant and a young plant might not be able to handle it. We also recommend waiting a week or two after your first topping session before starting another one.
Day 35 watering with 2 liters of water pH 6.3 to which I add 4ml of rootbooster cellmax and 3ml of cellmax bio 8-2-2 per liter of water
The plant recovers very quickly from its topping
11 likes
4 comments
Share
Used techniques
Topping
Technique
6
Week 6. Vegetation6y ago




31 cm
Height
22 hrs
Light Schedule
24 °C
Day Air Temp
6.3
pH
No Smell
Smell
70 %
Air Humidity
20 °C
Solution Temp
21 °C
Night Air Temp
11 liters
Pot Size
90 cm
Lamp Distance
Nutrients 3
Cellmax
3 mll

Organic Bloom
4 mll

Alga-Max
1 mll
Master_weeda Hello to all the padawans and masters
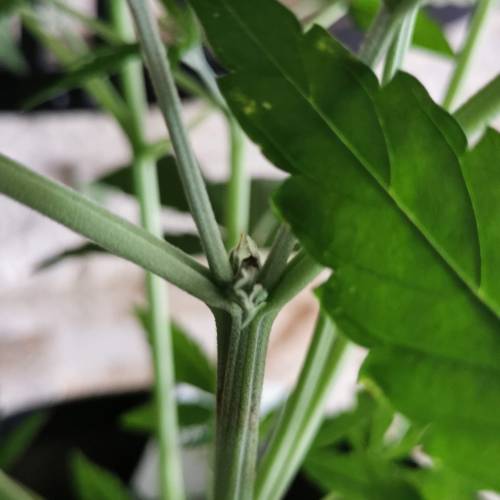
Topping the main bud and pinching the apex had a very conclusive effect; this genetic variety promises a nice yield for the harvest.
To be continued...
Day 39 watering with 2 liters of water pH 6.3 to which I add 3 milliliters of bio 8-2-2, 4 milliliters of bio organic bloom, and 1 milliliter of alga max cellmax.
Day 41 the topping had a more than satisfactory effect as it created a nice, even canopy.
12 likes
2 comments
Share
7
Week 7. Flowering6y ago


46 cm
Height
22 hrs
Light Schedule
24 °C
Day Air Temp
6.3
pH
No Smell
Smell
70 %
Air Humidity
20 °C
Solution Temp
21 °C
Night Air Temp
11 liters
Pot Size
90 cm
Lamp Distance
Nutrients 3
Cellmax
3 mll
Organic Bloom
4 mll
Alga-Max
1 mll
Master_weeda Hello to all the padawans and Jedi masters
Day 43, the start of flowering is a bit late because the topping of the main apex caused some stress to the plant, which has recovered from that cut.
The stretch during this week is incredible as it has still reached 15 centimeters!
The plant has perfectly recovered from this topping, so I decide to practice defoliation (see photos day 43).
Still on day 43, as usual, I weigh my pot and notice it's light, so I water with 2 liters of water pH 6.3 to which I add 4ml of bio organic bloom, 3ml of cellmax bio 8-2-2, and 1.5 milliliters of alga max cellmax.
Day 46, watering with 2 liters of water pH 6.3 to which I add 4ml of bio organic bloom, 3ml of cellmax bio 8-2-2, and 1.5 milliliters of alga max cellmax.
9 likes
comments
Share
Used techniques
Defoliation
Technique
8
Week 8. Flowering6y ago


66 cm
Height
20 hrs
Light Schedule
24 °C
Day Air Temp
6.3
pH
No Smell
Smell
45 %
Air Humidity
20 °C
Solution Temp
21 °C
Night Air Temp
11 liters
Pot Size
90 cm
Lamp Distance
Nutrients 3
Cellmax
3 mll
Organic Bloom
4 mll
Alga-Max
1 mll
Master_weeda Hello to all the padawans and Jedi masters
Day 50 watering with 2 liters of water pH 6.3 to which I add 4ml of bio organic bloom, 3 milliliters of bio 8-2-2, and 1.5 milliliters of alga max cellmax
Day 55 watering with 2 liters of water pH 6.3 to which I add 4ml of bio organic bloom, 1.5 milliliters of alga max cellmax, and 2 milliliters of bazooka bloom madame grow
10 likes
1 comment
Share
9
Week 9. Flowering6y ago


82 cm
Height
20 hrs
Light Schedule
24 °C
Day Air Temp
6.3
pH
Weak
Smell
45 %
Air Humidity
20 °C
Solution Temp
21 °C
Night Air Temp
11 liters
Pot Size
45 cm
Lamp Distance
Nutrients 3
Organic Bloom
4 mll
Alga-Max
1 mll

Bazooka Bloom K30
2 mll
Master_weeda Hello to all the padawans and Jedi masters
Stretch 16 centimeters
This plant amazes me with its growth speed, Zambeza hasn't slacked off, what an exceptional job on their part
Day 59 watering with 2 liters of water pH 6.3 to which I add 4ml of bio organic bloom and 2 milliliters of Bazooka Bloom Madame Grow
Day 63 watering with 2 liters of water pH 6.3 to which I add 4ml of bio organic bloom, 4 milliliters of Alga Max Cellmax, and 4 milliliters of Bazooka Bloom Madame Grow
12 likes
comments
Share
10
Week 10. Flowering6y ago


86 cm
Height
20 hrs
Light Schedule
24 °C
Day Air Temp
6.3
pH
Normal
Smell
45 %
Air Humidity
20 °C
Solution Temp
21 °C
Night Air Temp
11 liters
Pot Size
45 cm
Lamp Distance
Nutrients 3
Organic Bloom
4 mll
Alga-Max
4 mll
Bazooka Bloom K30
4 mll
Master_weeda Hello to all the padawans and Jedi masters
Day 64 watering with 2 liters of water pH 6.3 to which I add 4ml of bio organic bloom, 3 milliliters of alga max cellmax, and 4 milliliters of bazooka bloom madame.
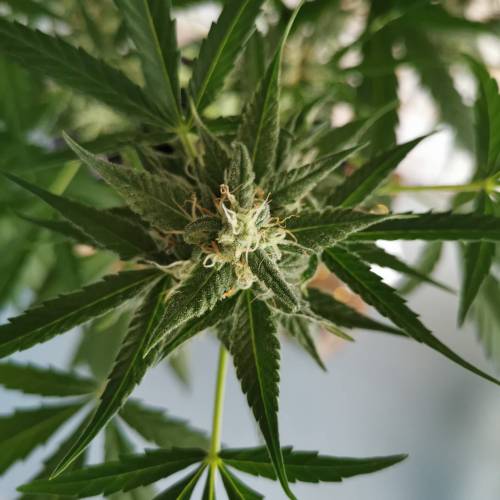
The multiple apex pinches on the trunk have paid off because this plant is huge; if it goes all the way, it promises a monumental harvest for an autoflowering.
Day 66 defoliation aimed at allowing light to reach the lower buds of the plant. I must objectively state that this plant is one of the most beautiful autoflowerings I have had the pleasure of cultivating. It shows no deficiencies; the topping has had an energizing effect. It is potentially going to give me an enormous yield.
I admit I am impatient to see the results of the harvest, which shouldn't take too long. I estimate it to be about twenty days maximum.
Day 67 watering with 2 liters of water pH 6.3 to which I add 4ml of bio organic bloom, 4 milliliters of alga max cellmax, and 4 milliliters of bazooka bloom madame grow.
9 likes
comments
Share
Used techniques
Defoliation
Technique
11
Week 11. Flowering6y ago




88 cm
Height
20 hrs
Light Schedule
24 °C
Day Air Temp
6.3
pH
Normal
Smell
45 %
Air Humidity
20 °C
Solution Temp
21 °C
Night Air Temp
11 liters
Pot Size
45 cm
Lamp Distance
Nutrients 3
Organic Bloom
4 mll
Alga-Max
4 mll
Bazooka Bloom K30
4 mll
Master_weeda Hello to all the padawans and Jedi masters
Day 72 watering with 2 liters of water pH 6.3 to which I add 4ml of bio organic bloom, 4 milliliters of alga max cellmax, and 4 milliliters of bazooka bloom madame grow per liter of water
Day 73 watering with 1.5 liters of water to which I add 4ml of bio organic bloom, 4 milliliters of alga max cellmax, and 4 milliliters of bazooka bloom madame grow per liter of water
Day 74 watering with 1.5 liters of water pH 6.3 to which I add 4ml of bio organic bloom, 4 milliliters of alga max cellmax, and 4 milliliters of bazooka bloom madame grow per liter of water
8 likes
4 comments
Share
12
Week 12. Flowering6y ago


88 cm
Height
20 hrs
Light Schedule
24 °C
Day Air Temp
6.3
pH
Strong
Smell
45 %
Air Humidity
20 °C
Solution Temp
21 °C
Night Air Temp
11 liters
Pot Size
45 cm
Lamp Distance
Nutrients 3
Organic Bloom
4 mll
Alga-Max
4 mll
Bazooka Bloom K30
4 mll
Master_weeda Hello to all the padawans and Jedi masters
Day 78 watering with 2 liters of water pH 6.3 to which I add 4ml of bio organic bloom, 4 milliliters of alga max cellmax, and 4 milliliters of bazooka bloom madame grow
Day 81 watering with 2 liters of water pH 6.3 to which I add 4ml of bio organic bloom, 4 milliliters of alga max cellmax, and 4 milliliters of bazooka bloom
Day 84 watering with 2 liters of water pH 6.3 to which I add 4ml of bio organic bloom, 4 milliliters of alga max cellmax, and 4 milliliters of bazooka bloom madame grow
9 likes
4 comments
Share
13
Week 13. Flowering6y ago


91 cm
Height
20 hrs
Light Schedule
24 °C
Day Air Temp
6.3
pH
Strong
Smell
45 %
Air Humidity
20 °C
Solution Temp
21 °C
Night Air Temp
11 liters
Pot Size
45 cm
Lamp Distance
Nutrients 3
Organic Bloom
4 mll
Alga-Max
4 mll
Bazooka Bloom K30
4 mll
Master_weeda Hello to all the padawans and Jedi masters!
This time I won't make the same mistake as with the Smoothie from FastBuds. I'm watering on day 86 for the last time with 2 liters of water at pH 6.3, to which I add 4ml of Bio Organic Bloom, 4ml of Alga Max CellMax, and 4ml of Bazooka Bloom Madame Grow per liter of water for the last time, and then it's time to start the flushing.
On day 88, I notice that the leaves are starting to yellow; the plant is entering the beginning of its senescence.
10 likes
comments
Share
14
Week 14. Flowering6y ago


91 cm
Height
20 hrs
Light Schedule
24 °C
Day Air Temp
6.3
pH
Strong
Smell
45 %
Air Humidity
20 °C
Solution Temp
21 °C
Night Air Temp
11 liters
Pot Size
45 cm
Lamp Distance
Nutrients 1
Organic Bloom
4 mll
Master_weeda Hello to all the padawans and Jedi masters
Senescence is becoming more and more present, the harvest is approaching. I will do one last watering with 2 liters of water at pH 6.3 to make sure the plant is well flushed.
8 likes
2 comments
Share
14
Week 14. Harvest6y ago
Happy Harvest Day!


10/10
Rated
Si vous cherchez le rendement voici la plante qu'il vous faut
Un départ en pôle position et première jusqu'au bout !
Facile à cultiver et très plaisante j'ai juste pratiqué topping et pinçage d'apex
Le résultat est fabuleux pour une autofloraison avec un harvest digne de ce nom
La culture est facile avec une génétique très stable qui offre un très bon rendement avec une herbe de très bonne qualité
Une odeur d'agrumes et de baie très agréable qui ce retrouve aussi dans ke goût avec une pointe d'épices pimentées
L'effet est aussi très agréable une montée progressive qui détend le corps et l'esprit
Show more
Translate
Spent 99 days
Ger Veg Flo Har
482 g
Bud wet weight per plant
103 g
Bud dry weight per plant
1
Plants
0.8 m²
Grow Room size
Easy
Difficulty

Relaxed, Uplifted
Positive effects

Dry mouth
Negative effects

Berries, Citrus, Pungent
Taste
Height
Day air temperature
Air humidity
PH
Light schedule
Solution temperature
Night air temperature
Pot size
Lamp distance


Master_weeda A very interesting yield for an autoflowering strain, very good quality weed with a very pleasant effect and a taste of lemony berry with a slight hint of spice. I recommend this variety to all fans of tasty weed!
9 likes
comments
Share
Equipment Reviews



26 comments
Sort by
popularity
popularity
newest
oldest

Puffer_Bill commentedweek 16y ago
Great photos and comments to start your diary. 🤟 🏼 😎
likes 4

Master_weeda commented6y ago
@Puffer_Bill, I try to do my best. 👍 Thank you for your compliment, buddy 💚 🙏
likes 5
Puffer_Bill commented6y ago
@Master_weeda, You are most welcome buddy 🤟 🏼 😎
likes 3
Master_weeda commented6y ago
@Puffer_Bill,you too bro 👍 ❤️ 🙏
likes 5
Puffer_Bill commentedweek 36y ago
Looking good. 💚 🌱 💚
likes 4
Master_weeda commented6y ago
@Puffer_Bill, 🙏 💚
likes 4

Pot_Portraits commentedweek 56y ago
looking good 👌
likes 3
Master_weeda commented6y ago
@Pot_Portraits,thx 🙏 💚 👍
likes 5

mmgrower commentedweek 126y ago
monster <3
likes 2
Master_weeda commented6y ago
@mmgrower, this monster smells so good 💚 👌
likes 3

Kikiwindsurf commentedweek 56y ago
Bro I got some questions !
It's amazing how good-looking the presentation (where u place the pot)
Do You grow there or just put over there for taking photos ?
It's super cool how It seems, I would like to start start somthing like that as It was a bonsai with an autoflower + 100-150 watss LED.
The plant simply amazing, but the Style and your personal presentation its delighting.
Thanks growmie
likes 2
Master_weeda commented6y ago
@Kikiwindsurf, hello my friend and thank you for your kindness 💚 no I don't cultivate
My culture is indoor under LED and I move my pots to take the pictures every time 👍 this's a lot of work but I like it 💚 take care of you during this difficult moment that the strength is with you 💪
likes 4

Castafunk commentedweek 36y ago
May the strength be with you 💪 🙏
likes 2
Master_weeda commented6y ago
@Castafunk, 💚 💪 👌
likes 2

Tom_Jay commentedweek 36y ago
🙏 as always may the Force Growmie =D looking good and healthy 👌
likes 2

GrownwithLED commentedweek 66y ago
@master_weeda, very interesting diary, great to follow! 👍 I love your pics and your comments, very insightful! 😍 Keep up the good work! 👏 😎
like 1
Master_weeda commented6y ago
@GrownwithLED, it gives me a real pleasure to cultivate it 💪 🌱 💚 and I hope just as much when I smoke it will thank you for your passage 👍 and your kindness 🙏 take care of you during this difficult time 💚
likes 3
GrownwithLED commented6y ago
@Master_weeda, mahalo for your good wishes! 🙏 I wish you and your family GOOD HEALTH as well, thats the most important thing in these times. 👍 Enjoy the smoke when its ready, you deserve it!
likes
Master_weeda commented6y ago
@GrownwithLED, 👍 💚 🙏 thx my friend
likes 2
Show More (2)
Castafunk commentedweek 146y ago
great photos my friend 😀
like 1
Master_weeda commented6y ago
@Castafunk, he's the kind-hearted man and always welcome 💚👌💪
likes 2

Bouleuss commentedweek 26y ago
In a hurry to see the result of your pretty work
like 1
GrownwithLED commentedweek 126y ago
@masterweeda, awesome trichome shots! 👍 😎
likes
Master_weeda commented6y ago
@GrownwithLED,thx you buddy 🙏 💚 👌
likes 3

the end.
Enjoying this diary? Follow for more updates!

Prefer the old Diary view?
Go back to the old Diary view