Vote Now 🏆 for the Grow Awards 2025!
Chat
Recommended

First little grow

1
24
5
1792
5 years ago
Follow
1
Week 1. Vegetation
5 years ago
3 cm
18 hrs
6.5
No Smell
50 %
18 °C
18 °C
14 °C
0 L
0 L
40 cm
Well hello fellow growers. Consider the current Covid-19 lockdown, supplies of the magic herb are uncertain, so I decided to embark on the journey of attempting to grow my own weed. I had build a small grow space in a garden shed last summer, but had never completed the setup. It's basically a 60x60x140cm (2x2x4 feet) timber box, lined with mylar on the internal walls. I am using a small cooltube, vented out to a fan and filter on a shelf outside the grow box. I decided to go with HID lights, as my research concluded this was the bast proven source of lighting. The LED scene is still in development, as far as I am concerned. I have a Philips HPIT-plus 250W MH for my veg stage, and a 400W Philips son-t+ HPS bulb for the flowering stage. I hope the 400w does not generate too much heat for my small grow space. I have a good extractor fan pulling air through the grow tube, so the plan is that the extractor will pull most of the heat from the grow space for me. I have chosen a Lumatek 400W dimmable ballast, so it the heat is too much, Plan-B is to swap out the 400W HPS for a 250w. The fan is a G-Tools temp adjustable 400m3 - so my hope is that this will be more than enough to keep the temp down. So I got me a three pack of feminised Northern Lights from the Sensi Seed Bank, as they seemed to tick all the right boxes for me. Beginner friendly, mould resistant, Fast flowering time, short and bushy, good yield, and multiple cup-winner, what's not to like right. I am going to attempt a soil grow, using cloth 'smart-pots'. I have chosen 'Plagron' for my medium and fertilisers, as I would like to do a fully organic grow. So My biggest decision at this stage was one plant or two ? - I decided to go with two - In case of disaster. So.. That's my setup basically. Now the grow. I used the paper towel method for germination. (Two saucers with damp paper towel, wrapped in a towel sat on top of my fish tank for warmth) Three days later and both seeds are well sprouted with a good sized tap root. Straight into a small pot with some bubble wrap to reduce the amount of soil for the seedlings. I used commoner DIY store potting compost, as the salesman in the grow-shop advised me that the soil I had bought for my grow (Plagron growmix) might be a little strong for seedlings. So I went with the potting compost for stage one. Placed the pots on my windowsill... and they had emerged the following day, wearing their seed cases like little hats ;) The journey has begun. The next day they were placed into the grow cabinet with the 250W MH light about 45cm above.
1 like
comments
Share
2
Week 2. Vegetation
5 years ago
4 cm
18 hrs
24 °C
6.5
No Smell
50 %
18 °C
18 °C
14 °C
0 L
0 L
40 cm
Well, my little babies seem to be quite happy. Their first true set of leaves have quickly emerged. Also their second set have emerged, and are growing well. Still potted in their commoner garden potting compost. Watering is by the cap-full only. Not a lot to do at this stage. Using the thermometer from the fish tank, but have ordered a proper thermo/hydro unit online. No nutrients being used at this stage.
1 like
comments
Share
3
Week 3. Vegetation
5 years ago
4 cm
18 hrs
24 °C
6.5
No Smell
50 %
18 °C
18 °C
14 °C
0 L
0 L
40 cm
A Busy week. I had some heat issues this week. This has been the hottest driest May in recorded history here. Its a temperate climate, so its normally cool in May 12-16C The temps are getting into the 30's in the grow box which was somewhat worrying. Even with the lights off ... I needed to take some action. As mentioned my grow space is in a timber garden shed. The roof of the shed is timber sheeting with a simple tarpaper/mineral felt, so it is just radiating all that sunlight straight into the shed. Also my air intake is a cut-out in the cabinet side wall to the interior of the shed (with some filter floss to prevent bugs/pests getting to the plants). The extractor fan is outside the grow box leading to the carbon filter, which is on a shelf beside the top of the cabinet. So all the heat which has been pulled from the cabinet lingers in the shed, and is drawn back in warmer than the outside. To remedy the situation I installed some dense foam foil surfaced building insulation in the roof of the grow box. This helped a little but still not enough to bring the temp down to the mid 20's. So I also cut an additional air intake into the opposite side of the grow space. This opening leads to the outside, so the air it pulls in is cooler. I needed to custom make a filtered covering, but luckily had a spare pre-filter for the carbon filter(Long story) so I cut a square of this and made a bracket to screw it all into place from a bit of scrap pegboard which was lying about. Temp crisis solved - I must say though that the plants seemed to be happy, no wilting or curling of the leaves. A trip back to the Sensi Seeds website and the description says they like the heat. So no damage done. I also wanted to repot the girls, but discovered the missus had binned the old pots I had intended to use. No big problem, I pulled them from their pots and removed the bubble wrap which had been taking up half the volume and re potted them back into their pots using the 'Plagron' growmix soil I had waiting. I had some reservations. I had purchaces a sack of this last summer, and dumped it in a toolshed, and never got around to using. I hoped that it had not degraded or become infested with some pest or fungus from not being 'fresh'. Looks like a real dark mix of compost, fibrous plant material some pearlite. I found this a bit tricky, and one of the plants felt very 'wobbly' when I got it re-potted. I may have damaged the connection between the stem and the roots. Got both back under the lights, and seem to be doing well since.
3 likes
comments
Share
4
Week 4. Vegetation
5 years ago
6 cm
18 hrs
26 °C
6.5
No Smell
55 %
18 °C
18 °C
10 °C
15 L
1 L
150 cm
June 5 Both plants seem to be growing strongly. I have moved the light closer to the plants, and this has made a noticeable difference in how fast they are growing. I moved the light from about 40-45cm (18 inches) down to about 15cm(6 inches) from the tops of the young plants. You can see from the pictures the there is short distances between each new set of branches. I think this is what is called tight inter-nodal growth. Heat no longer a problem, and I only have a 250w light going so not much heat from that. I think that I can see the female pre-flowers. I am now glad that I choose feminised seeds. I only bought three, so imagine if they were standard seeds, and all turned out to be boys - the horror of the thought. June 7 I have re-potted both plants into 15l (3.2 gallon) cloth smart pots (Grow Pouches). I had originally bought 30l(6.5 gallon) pots, but they would have been a real squeeze to fit into the space. So I decided to get a couple of 15l pots, and am happy with them. There is room to place them a little better, and is more room for air to circulate. I have used the Plagron growmix here also. The re-potting went off without a hitch, and I have given both 1.5 litres of water. I thought I would need to add fertiliser, but reading the product info I see that the grow mix has enough nutrients for the first three weeks. I purchased the Plagron algae based AlgalGro and AlgalBloom, but seems I wont need the veg fertiliser for long before I go into flowering, all going well... Oh yeah I gave them a dose of 'Ecothrive Biosys' a beneficial root-fungus and bacteria additive and got it in there on the roots - for that extra organic symbiosis thing. I am going to do some LST this week. I will tie down some some of the side branches. I have pulled the core from some scrap electrical cable I have spare, which will do nicely as it is solid core and not braided. The end of the week I intend to top the plants above the fifth node. This looks like it will be a tricky operation as the nodes are very close.
2 likes
comments
Share
Used techniques
LST
Technique
Topping
Technique
5
Week 5. Vegetation
5 years ago
6 cm
18 hrs
26 °C
6.5
No Smell
62 %
18 °C
18 °C
10 °C
15 L
1 L
150 cm
After growing slowly at first after the re-pot, the plants seem to growing really well again. I have topped the plants after the fifth node and have pegged some of the branches out horizontally. I went a little too hard on one and cracked/split one of the two main colas. Shit !. It is broken about halfway through the stalk, just after it branches from the top of the main stem. Bummer. I didn't even notice at first. the leaves still seem to be healthy. I will support it and hope it will heal. I need to build a scrog frame and string it up. Also need to decide how high to place the net above the top of the pots. I saw varying distances on various web sites. I think I will place about 8 inches (20cm). My limited height is a big factor here. I would like to leave myself some wiggle room in case the plants take a big stretch when they go into flower. As I'm such a novice I have no experience of how big these things will get. Have built a light frame with yet more scrap(but clean) timber I had going to waste. I have strung it with cotton parcel twine in a 4inch (10cm) grid. Screwed some wooden brackets to the corners of the cabinet and dropped the frame in. It is just at the top of the plants, so I am removing my LST stakes, and letting the plant grow through the net, so I can tie it down as it grows. The plants are really getting bigger than I had anticipated. Next grow will be a single plant in a 30l (6.5 gallon) grow pot, with the top rolled down a couple of inches.
2 likes
comments
Share
Used techniques
LST
Technique
ScrOG
Technique
6
Week 6. Vegetation
5 years ago
10 cm
18 hrs
26 °C
6.5
Weak
62 %
18 °C
18 °C
10 °C
15 L
1 L
150 cm
I am going to start the 12/12 with my 400w HPS this week. The plants are still growing well. Looks like the screen is nearly 70% full. I haven't done much tying down of the plants. Just a couple of shoots which were well through the screen. From what I have read, the plants will take a growing stretch when I put them into flower, so I think the time is right to make the switch. June 23 Started the 12/12 flowering regime.
4 likes
1 comment
Share
Used techniques
ScrOG
Technique
7
Week 7. Flowering
5 years ago
10 cm
12 hrs
24 °C
6.5
Weak
60 %
18 °C
18 °C
10 °C
15 L
1 L
20 cm
Nutrients 1
Alga Bloom - PLAGRON.
Alga Bloom 3 mll
So the plants have been under the new bulb for few days. Apologies for the photos, they just don't look great with the yellow light. Anyway, I have been busy each day trying my best to get the plants tied down and trained. The growth rate has exploded. The canopy is really full, though quite a lot of the now full screen are big leaves. I have seen many different opinions on whether to cut leaves. There are some monster sugar leaves. The result of my training has been semi successful. I don't like where a number of the 4 main colas have ended up - at the edges of the box. However I can see that there are now a lot of side shoots coming out where I have a branch almost level on the screen, and lots of light can hit the node on the stem. I am assuming these will become bud sites. I have begun to feed them too. I started to give 3ml Plagron alga bloom each in their 1l of water which they are currently getting daily. 29 June Some of the new growth looks a bit off. Very light green on the leaves, except for where the veins are. I am used to the new growth starting out light green but quickly gets darker as the leaves start to grow. I had the new 400W bulb a bit too close perhaps. About 6inches 15cm from the plants. It's in a cool-tube and is not hot at that distance, so I thought the more light the better. Hmmmm. ... 30 June Looking up the leaves off-colour issue has not given me a definite answer. Could be a- light burn, zinc deficiency or not enough magnesium. Will post a picture with q. July 1st Decided to give the girls a trim below the canopy. Removed a good few leaves and all the small sprouting stems which would never have made the canopy. About a dinner-plate full removed (Very scientific !!) I will give it another day I think before trimming off some of the leaves. I noticed today that I had turned off the 6" internal fan and when I checked them this evening after the light had come on that there were wet patches where there were two leaves tight together. That would probably be a great starting point for mould to start - something which I need to keep an eye on as the humidity seems to be a bit too high. 60-65%. I may need to install a bathroom type extractor to vent air out of the shed. Luckily I have one as had purchaced last year when I was initially going to grow. After I did my research though I realised it would be a bit too light for what I was going to set up. Ok thanks for the advice. Be surprised if it's nutrient lockout. Growing in soil and have been feeding under the recommended max nutes. Plagron growmix soil, with Plagron alga bloom. However having the light too close and watering on the lite side could have made the girls drink more than usual right, so would be eating more fertiliser as a result. Currently giving them 1l of water a day, and they ate in 15l grow pouches hmmm. Yes the humidity is a bit high. The outside air Rh is running at 75% this evening. Not sure if I can do much about it as the system is not closed, but I have turned up the extractor some more. The fan is meant to shift 400m3 of air per hour, and am running it about 30%, so for the size space I am exchanging about 400 times per hour - thats roughly estimated. Is this enough. I don't have any Iron specifically, but I do have some Iron fertiliser I use in a planted aquarium, I wonder if it is worth throwing some into my next water more hmmmmmssss. The agonies of the newby. ...😌
3 likes
comments
Share
Used techniques
ScrOG
Technique
Defoliation
Technique
Grow Questions
Dubdad
Dubdadstarted grow question 5 years ago
Leaf colour help. Hi all. I think there may be a problem with the new growth on my plants. They are 10 days into flowering 12/12. They look like they are too light. They veins are much darker giving them a stripey look. I had the light very close to them when it started. ?
Solved
Leaves. Veins - yellow between
Leaves. Color - Pale
Feeding. Deficiences
likes
Bloombuster
Bloombusteranswered grow question 5 years ago
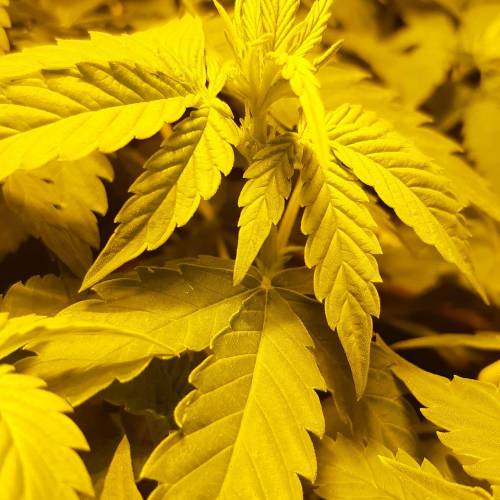
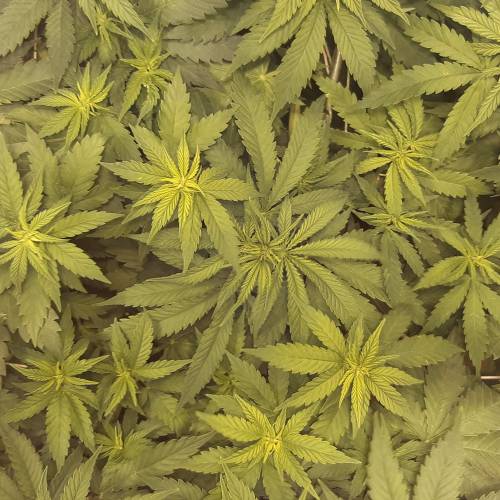
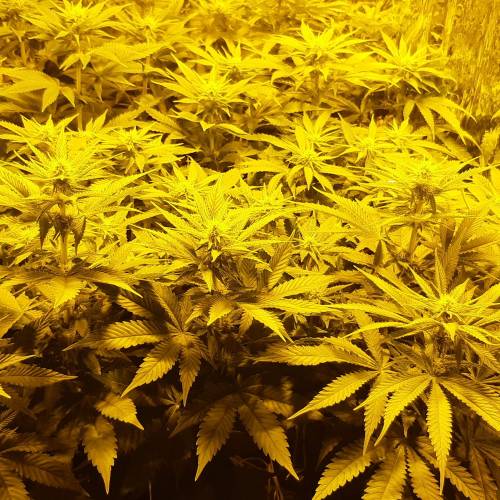
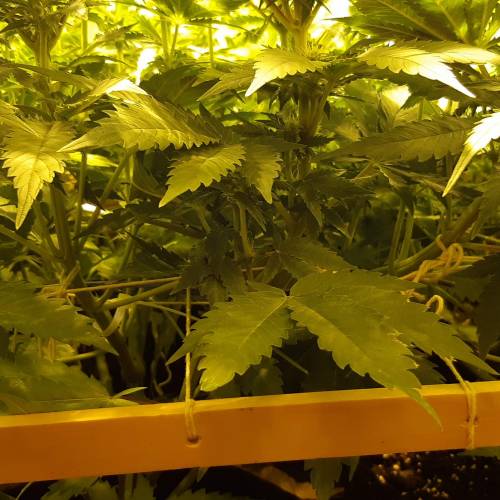
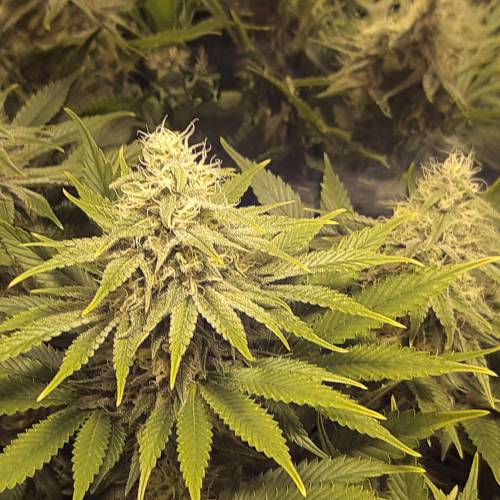
бро, твоей девочке тяжело дышать, слишком близко лампа, испытывает тепловой стресс и очень активно дышит, влажность высокая 60% и поэтому ей тяжело дышать. Постарайся снизить влажность до 40% и поднять лампу повыше, чтоб не было перегрева в точках роста. 👌😇👍 Удачи, бро!
8
Week 8. Flowering
5 years ago
15 cm
12 hrs
22 °C
6
Weak
65 %
14 °C
18 °C
12 °C
15 L
1 L
30 cm
Nutrients 2
Alga Bloom - PLAGRON.
Alga Bloom 3 mll
Green Sensation - PLAGRON.
Green Sensation 1 mll
Seems like both are doing well. I can really see some of the branches shooting up. Glad I kept them down a bit during veg. I have moved raised the light a little. I think the problem with some of the new growth was some deficiency, due to the plants really taking off and growing like little monsters last week. Also noticed my water was a bit high on the ph - actually coming about 7. I didn't have a ph down product, as the plagron information says that you don't need to adjust for ph when growing in their soil. I decided to use lemon juice to bring the water down to 6, before mixing in the nutrients. Started the girly early on the green sensation. Thought what the hell, if they are under-nourished I may as well go for it. Bud sites coming along nicely. The plant on the left is bigger than the one on the right - so the canopy is not perfectly level.
1 like
comments
Share
Used techniques
ScrOG
Technique
9
Week 9. Flowering
5 years ago
15 cm
12 hrs
22 °C
6
Weak
65 %
14 °C
18 °C
12 °C
15 L
1 L
30 cm
Nutrients 2
Alga Bloom - PLAGRON.
Alga Bloom 3 mll
Green Sensation - PLAGRON.
Green Sensation 1 mll
Going well this week. Both plants growing strongly. One slightly bigger. This is the plant with the slightly broader leaves. Gave both plants a bit of a trim. I removed any fan leaves which were starting to yellow. I also removed any shoots trying to grow bud, which were well below the canopy. The leaves which showed a striping are still patchy, leaving me to believe it was some type of light burn, as I read that the plants do not recover from this type of damage. The bud sites are starting to fill out. Can see tricomes forming when I look with a jewelers loop. Simple feeding and watering scheme seems to be working well. Only question I have is should I do some more defoliation. The plants are very leafy, and some of the buds are being a little shaded.
2 likes
1 comment
Share
Used techniques
ScrOG
Technique
Defoliation
Technique
10
Week 10. Flowering
5 years ago
20 cm
12 hrs
24 °C
6
Weak
65 %
14 °C
18 °C
12 °C
15 L
2 L
30 cm
Nutrients 2
Alga Bloom - PLAGRON.
Alga Bloom 3 mll
Green Sensation - PLAGRON.
Green Sensation 1 mll
Well, the girls are still stretching out a little. The flowers are starting to fill out and thicken up more, which is great. July 17 I will be away for a week, and the plants are starting to need more water/food. I have increased the daily quota to 1.5 litres per plant per day. I don't think that they would survive for a week without and water. So I have decided to saturate the soil with as much moisture as it will hold, get back midweek to fill them up again. I will know midweek if it works or not. I would hate to kill them of dehydration at this stage. Also leaving a few bottles of water with wicks made from strips of denim to try to keep moisture seeping into the soil. Well worries over. I'm back and the girls have been getting along fine without me. It's meant to be another 2 to 4 weeks of flowering left. I can't wait to see what the finished plants are like. Need to think about when to stop feeding also. Bugger !!! I just spotted two small shoots well under the canopy. They seem to have male flower balls. Crap. Only one of the plants though. It must have been the stress of getting a lot of water at once, then going without for a few days. Though neither wilted from thirst so I am a bit suprised/pissed off. I hope this won't ruin the grow.
likes
1 comment
Share
Used techniques
ScrOG
Technique
Defoliation
Technique
Grow Questions
Dubdad
Dubdadstarted grow question 5 years ago
Hi. It's my first grow and was wondering if I should stop feeding the plants nutrients a certain amount of time before the harvest date ? It's a soil grow and I am into week 4 of flowering. The seed bank says they need 45-60 days flowering. Should I only water at end week? Thanx
Solved
Feeding. Schedule
likes
Mr_Weeds_Autos
Mr_Weeds_Autosanswered grow question 5 years ago
Hey Growmie, Unfortunately, most seed banks get the estimated time of harvest of incorrect by at least 3 Weeks. You should feed the plant all the way until it's finished then stop feeding and begin the flush to insure the excess nutrients are out the soil. Hopefully, I answered your question and remember ..."Happy Growing" and "Free your mind one puff at a time"
Dubdad
Dubdadstarted grow question 5 years ago
Found what seem to be 2 hermie shoots. Is the plant doomed ? wk 4 of flower. Is this reversible ?
Open
Buds. Other
Other. General questions
Plant. Other
likes
Answer
CloneKingz
CloneKingzanswered grow question 5 years ago
Hey Dubdad, Unfortunately once it hermie's you can't change it. If you are growing with other female plants I would kill it as you don't want it to pollinate your other plants. If you really want to grow it you could isolate it from the other plants and finish flowering however you will probably have a lot of seeds with it turning hermie so soon into flower. Good luck with everything!
likes
Complain
Mr_Weeds_Autos
Mr_Weeds_Autosanswered grow question 5 years ago
Hey Growmie, Unfortunately, this can not be changed the plant has decided and is now a hermie, sorry. Hopefully, I answered your question and remember ..."Happy Growing" and "Free your mind one puff at a time"
likes
Complain
MicroHidroGrow
MicroHidroGrowanswered grow question 5 years ago
No way to stop this. You can try cutting the shots but that is really a lot to do, and there is no warranties that this will really works. But if you have other female plants near there, I think you should kill it. Good luck!
likes
Complain
11
Week 11. Flowering
5 years ago
60 cm
12 hrs
24 °C
6
Weak
70 %
16 °C
18 °C
12 °C
15 L
2 L
30 cm
Nutrients 3
Alga Bloom - PLAGRON.
Alga Bloom 3 mll
Green Sensation - PLAGRON.
Green Sensation 1 mll
Lemon Kick - PLAGRON.
Lemon Kick 1.5 mll
Plants still growing well. I have not chopped the plant which grew a few balls. I am glad. Watching her like a hawk, but have only found one other male flower, still unopened, roughly same location. Getting big and sugary. Got out and bought a bottle of plagron lemon kick. Just to keep the feed ph down. I know it's soil. I had been using lemon juice, but it's a pita to squeeze and measure, and cant leave in water for long or goes gucky. Here is some more pictures of the bud in progress. Humidity is a worry, but I am keeping the airflow up, it's a passive intake, so not sure how I can bring humidity down without sealing up the grow box fully, but then I will lose the replace air with all its co2. Outside RH is very high in my location. Godd strain holding up well, still putting on weight. Very little maintenance at this stage. Just daily water/feed.
2 likes
1 comment
Share
Used techniques
ScrOG
Technique
12
Week 12. Flowering
5 years ago
60 cm
12 hrs
24 °C
6
Weak
80 %
16 °C
18 °C
12 °C
15 L
2 L
30 cm
Nutrients 3
Alga Bloom - PLAGRON.
Alga Bloom 3 mll
Green Sensation - PLAGRON.
Green Sensation 1 mll
Lemon Kick - PLAGRON.
Lemon Kick 1.5 mll
Girls are coming along nicely. Frosty and twinkly, though still not really there yet, judging from what i can see of the trichomes. Bought a cheat x30 loupe, but it's not really clear. I should have sprung for a decent Belomo or Zeiss x10, though the zeiss are Very expensive. Have reduced their water/feed back to 1L a day as they don't seem to be quite as thirsty. Though look at the RH IT'S CRAZY at 80%, but the plants have not shown any sign of mould anywhere. Now the plants are generating some aroma the two pheno-types are giving off slightly different fragrances. The taller plant on the left hand side with the broader leaves is fruity with some nice spicy herb, and the right hand plant with the narrower leaves is very fruity with a lovely pineapple scent.
3 likes
1 comment
Share
Used techniques
ScrOG
Technique

Comments
Login

5 comments
Sort by
popularity
popularity
newest
oldest
MisterSix
MisterSixcommentedweek 125 years ago
Your 1st grow look super bro, trichomes are on point
Inganjawetrust
Inganjawetrustcommentedweek 115 years ago
Great looking bunch of colas you have there 👍
JP148
JP148commentedweek 65 years ago
Nice 🌱👍
GrowHound
GrowHoundcommentedweek 105 years ago
Looks great! Keep it up 😁
Burmese
Burmesecommentedweek 95 years ago
Hey buddy, First grow? You’ve killed it,man.Nicely done.Happy growing.. ✌️
Enjoying this diary? Follow for more updates!
DubdadDubdad
Follow Author
OR
First little growFirst little grow
Follow Diary
Prefer the old Diary view?
Go back to the old Diary view