
Likes
Comments
Share


@Ferinky
Follow
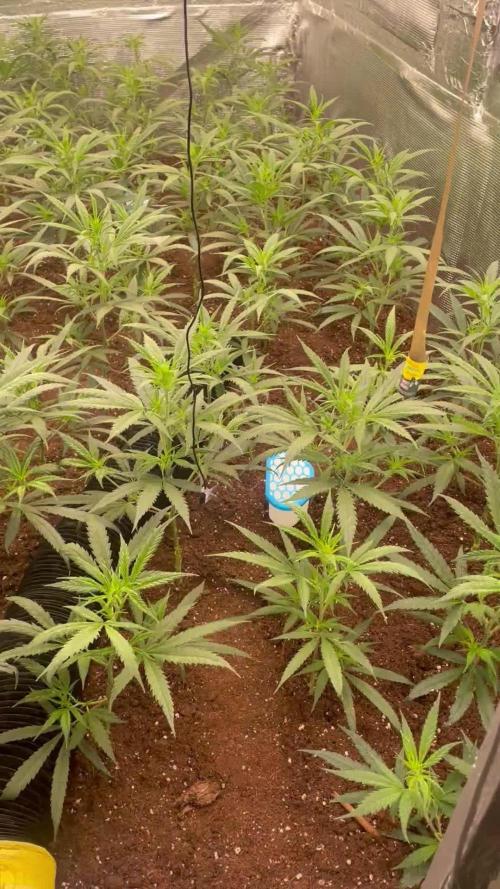
Hola y gracias por pasarte a ver mi diario.
Conocí esta variedad hace 20 años. En 2001, en mi pueblo, mi padre y sus amigos cultivaban una marihuana a la que llamaban "Madre", hacían crecer plantas de hasta 4 metros de alto y otros tantos de ancho, verdaderos monstruos del cultivo de guerrilla en las montañas del levante español.
Cuando, con 18 años la probé, supe que era algo realmente especial, era una época en la que los viajes a Ámsterdam eran habituales y de vez en cuando algún amigo traía alguna muestra de lo mejor que encontraba; pues bien, siempre decíamos que si esta "Madre" estuviese en los coffee shops Holandeses podría competir y desbancar a muchos mitos de aquella época.
Cuando le pedí a José, uno de los amigos de mi padre que mantenía la especie, que me explicase más sobre esta variedad me decía que sólo me la podía pasar en esqueje, ya que no habían estabilizado la cepa y las semillas tenían fenotipos muy variopintos. Estuve 2 años pudiendo cultivar dicho esqueje (hoy en día conocido como el Clon Mario), con muy buenos resultados, pero con 18 años mis habilidades como cultivador eran escasas, mi conocimiento sobre esquejado y mantenimiento de madres era nulo y acabé perdiendo aquel clon, posteriormente y por redadas policiales en aquellas montañas todo aquel que mantenía durante años esta genética acabo perdiéndola, conservando semillas que nunca llegaron al nivel de la cepa original.
Hasta que Mario Bellandi, creador de la variedad, y su banco de semillas Delicatessen Seeds consiguieron estabilizarla mediante semillas regulares y feminizadas. En 2014 compré un paquete de semillas feminizadas y el resultado fue más que bueno, recordando sin duda a aquella joya ancestral pero sin llegar al nivel del Clon original.
Esta vez cultivé la Reina Madre partiendo de 3 semillas regulares y el resultado creo que ha sido aún más próximo al original, lo cual es todo un éxito para mí. Una de las 3 semillas murió antes de llegar a la madurez y las otras dos resultaron ser dos hembras, muy parecidas entre sí. Una la puse en maceta de 50L y la otra en maceta de 20L.
Las plantas crecieron sin ningún problema excepto alguna carencia que presentó antes de tiempo, especialmente de nitrógeno.
Al ser un cultivo 100% orgánico y únicamente con riegos de agua del grifo sin añadir abonos líquidos era esperable, aunque el resultado final me deja muy satisfecho. Además, el hecho de añadir todos los nutrientes al sustrato me ha permitido facilitar la tarea del riego y no tener que realizar el lavado de raíces.
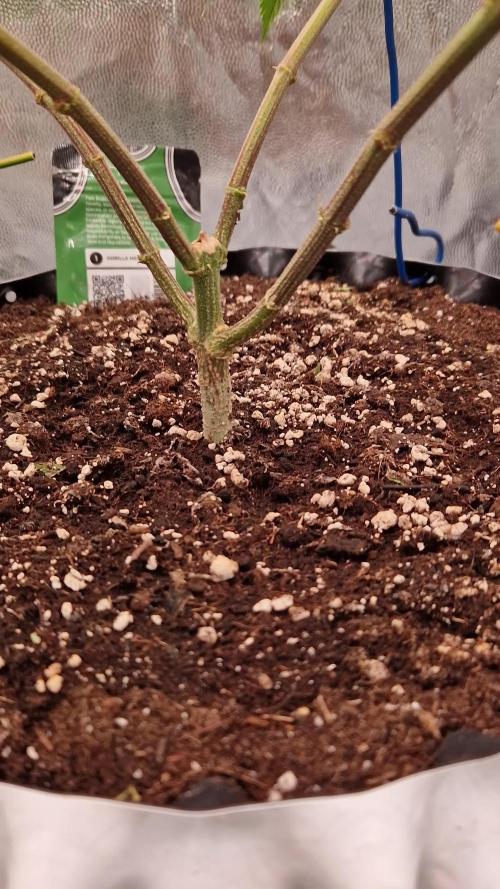
La planta que se desarrolló en una maceta de 20L ha producido 120g de cogollos secos, esponjosos, espigados y con una relación flores/hojas bastante buena. La planta que puse en maceta de 50L sufrió la podredumbre del tronco principal y tuve que cortarla antes de tiempo, desechando buena parte de la producción, aun así he obtenido de ella 80g de rica yerba old school.
El olor de las flores húmedas era bastante intenso y con matices cítricos y especiados.
Respecto a plagas y enfermedades ha sido muy resistente, no he apreciado signos de araña roja, pulgón ni trips gracias al aporte de harina de Neem en el sustrato.
Tampoco he sufrido el temido y habitual ataque de las orugas (ni la oruga de las hojas ni la del cogollo) gracias a las pulverizaciones en las fechas clave con Bacillus Thuringiensis.
Tampoco se ha visto afectada por el Oídio que normalmente aparece al final de la floración en la zona donde vivo, ni tampoco de botrytis , por lo que la pastilla de Micorrizas y Trichodermas ha funcionado a la perfección, no sólo reforzando el sistema radicular sino también frente a los hongos invasores.
El clima también me ha acompañado este año, vivo en una zona cálida donde la temperatura suele ser óptima para el cultivo de exterior de cannabis, el mes de mayo llovió algún día de forma agradable, junio, julio y agosto fueron especialmente secos, solo llovió un par de noches a finales de agosto, y septiembre también ha sido muy respetuoso lloviendo solo 2 veces.
Por todo esto, siendo la primera vez que elaboro un supersoil, estoy seguro que para la temporada 2022 repetiré el sistema, haciendo algunos ajustes a la mezcla para evitar estas carencias que he comentado.
Quiero agradecer a Growdiaries.com la herramienta que nos brinda a los cultivadores (en mi caso cultivador clandestino) para poder realizar el seguimiento de nuestros cultivos y como, en mi caso particular, ha hecho que mi motivación y trabajo hayan sido una constante semana tras semana, por lo que ha influido directamente en el buen resultado final de la cosecha.
También agradecer a todo el que pasó por aquí durante el seguimiento ya que me dieron el apoyo necesario para mejorar en mi cultivo.
Un saludo.
Ferinky


Likes
50
Share


@Reyden
Follow
Finalmente ho raccolto queste ragazze di @anesiaseeds e ora tutte e 5 appese nell’armadio con un piccolo ventilatore che punta vicino…la parte più difficile e importante è questa! Cercare di mantenere tutti parametri perfetti non è facile, sopratutto quando hai condizioni meteo non a tuo favore! La migliore è tenere una porta e una finestra aperte così da far girare aria pulita se fuori hai una temperatura di circa 18º/20ºC, questa settimana dovrebbe andare bene ed essere quasi 17ºC ma c’è un bel sole quindi terrò tutto spalancato! Questa White Runtz ha un fiore 🌺 enorme e pesante! Dovrà stare appeso un giorno in più molto probabile..altri 4/5 giorni e iniziano a pulire i boccioli 🌱💥💯

Likes
9
Share


@pascal_dop
Follow
Das Umtopfen war erfolgreich und die Pflanzen wächst und wächst und wächst .... und das obwohl ich sie ein paar Tage nicht gießen konnte 👏

Likes
5
Share


@AustinRon
Follow
TH 1Q2025 - Week 8 - Flower 5
(ON Haze X Original Haze) X Northern Lights #2
“Todd’s Haze”
Objective
- 8 Female Plants, Topped ONCE @ Flip, 12” when topped
- Modified Sea of Green
Seeds Wet: 1139PM, 28.2.2025
Germinated: 2.3.2025
Flip: 21.3.2025
Harvest: 77 Days, DATE: 6.6.2025
_________________________________________
__
Fri Apr 25, 2025
TH 1Q25 36:F:5:1
Cleaned Emitters - Replaced Pump
Cleaned Manifold Filter = TWICE
Replaced IRRIGATION Pump with mini-sump
Photosynthesis plus produces enough biofilm to disqualify from running in the reservoir.
- Remediate: Apply half diluted to watering zone, every other day. Include PCAL 1660 for Add’l Calcium and Phosphorous
- [x] CEASED PHOTOSYNTHESIS PLUS IN RESERVOIR
- The BIO film is ‘orange/pink,’ PSP is the SUSPECT.
- [x] Harvest Dehu
- [x] Refresh Reservoir - 2 Gallons
- [x] EC: 2.3, 2.4
- [x] Primer A & B: [ 31, ml]
- [x] Silica Skin GEN 3: [ 16, ml]
- [x] SLF-100: [ 10, ml]
- [x] 1900: Measure Runoff
- [x] Amount: [ 1250 , ml]
- [x] EC: [ 2.3, mS/cm]
__
Sat Apr 26, 2025
TH 1Q25 37:F:5:2
- [x] Replace Main Feed (1/2 Silcone tubing) with 3/8” Black Chemical Resistant
- [x] Refresh Reservoir - 2 Gallons
- [x] EC: 2.3, 2.4
- [x] Primer A & B: [ 31, ml]
- [x] Silica Skin GEN 3: [ 16, ml]
- [x] SLF-100: [ 10, ml]
- [x] 1900: Measure Runoff
- [x] Amount: [ 950, ml]
- [x] EC: [ 2.4, mS/cm]
__
Sun Apr 27, 2025
TH 1Q25 38:F:5:3
- [x] Lower Defoliation in Preparation for Intra-Canopy Lighting Install
- [x] Harvest Dehu: 3.5 Gallons (None Yesterday)
- [x] Refresh Reservoir - 3 Gallons
- [x] EC: 2.4
- [x] Primer A & B: [ 48.8, ml]
- [x] Silica Skin GEN 3: [ 24.4, ml]
- [x] SLF-100: [ 15, ml]
RUNOFF: [ 950, ml, 2.4/5, mS/cm]

__
Mon Apr 28, 2025
TH 1Q25 39:F:5:4
Observations
- @ 2.4 EC is making for DENSE GREEN in the leaves. We DON’T lack nitrogen. ;-}
- Some Nitrogen Curling on NL2 Dominant (Pheno #2) - Will REDUCE EC if doesn’t abate today . . .
- We have some White filmy scum forming on top surface of res water. Suspect Silica. Will clean out res TUESDAY and restart w/Out Silica Skin. If we’re clear FRIDAY - Start Re-adding until and unless white scum forms …
Reducing EC: 2.3 # Will reduce Day by Day to 2.1
- [x] Harvest Dehu: 2.5 Gallons
Runoff
- [x] EC: [ TBD, mS/cm]
- [x] Amt: [ 950, ml]
__
Tue Apr 29, 2025
TH 1Q25 40:F:5:5
- [x] Install Intra-canopy Light 50% Dimmer
Note: After H2O2 yesterday, and 1 cup (in about 2 gals) today - the amount of scum is REDUCED SIGNIFICANTLY. I filtered with hand strainer until there was no more film or particularate (there wasn’t a lot) - The overall appearance is better.
Have refreshed with 3 Gallons and Primer A&B Only (and SLF-100). We’ll monitor. If it stays clean, we’ll test again with Silica Skin Gen 3.
__
Wed Apr 30, 2025
TH 1Q25 41:F:5:6

Refresh Reservoir
- [x] Amount: [ 2, Gal]
- [x] Primer A&B: [ 32, ml]
- [x] SLF-100: [ 10, ml]
Runoff
Amount: [ 2, gal]
EC: [ 2.9, mS/cm]
R&R Reservoir (Rinse components w/ 45% H2O2)
- [x] Disconnect MAIN FEED Line
- [x] Disconnect, Remove, and Clean PUMPS
- [x] Flush Chiller
- [x] Clean Reservoir
Reassembly
- [x] Reinstall components
NOTE: We have a SMALL amt of white slate like precipitate - Most Likely Silica …
__
Thu May 1, 2025
TH 1Q25 42:F:5:7
Mix 1 Liter of CalPhos for HAND APPLICATION Tonight
CAL50K, 1 ml yields .5 EC (250 ppm)/Liter, or .125 EC per Gal
~16 ml’s/gal - ~2.1 EC
- [ ] Mix and ApplyPCAL 1660 & CAL50K
- [ ] Photosynthesis Plus
- [ ] Quillaja 60
- [ ] Apply ~ 120 ml/plant
- [x] CAL50K to EC: 2.1 (4 ml/qt)
- [x] For 2.1 EC: [ 16, g] Cal50K
*** RESERVOIR EMPTY!!! ***
After REDUCING Per Event flow in Half - we STILL Emptied the reservoir …
SINCE we ONLY HAD 2 GALLONS, We’re good (Catchment is 2 Gal)
Last night I cleaned the manifold filter ~ 7PM (Start Time) and reduced to 18 minutes TOTAL time (9 Events, 2 minutes/event)
Runoff
Amount: [ 7600, ml] # We Emptied the Res Overnight, at 3 min/event - dropped to TWO ~2300
EC: 2.9
Refresh Reservoir: 2 Gal (Reclaimed DEHU)
- [x] SLF-100: [ 10, ml]
- [x] Primer A&B: [ 32, ml]


Likes
5
Share


@Fefa128
Follow
Hey there growers!! Sorry for skipping flower so bad.. here are some videos of the ninth and tenth week.
No excuses, but someone stole from me back then and I didn't feel like making videos for a couple of weeks.
But the experience went on, the female plant reversed and it's pollinating itself with my help like you see in the videos. Sorry again for the Spanish audio 😅

Likes
34
Share


@The_Bearded_Grower
Follow
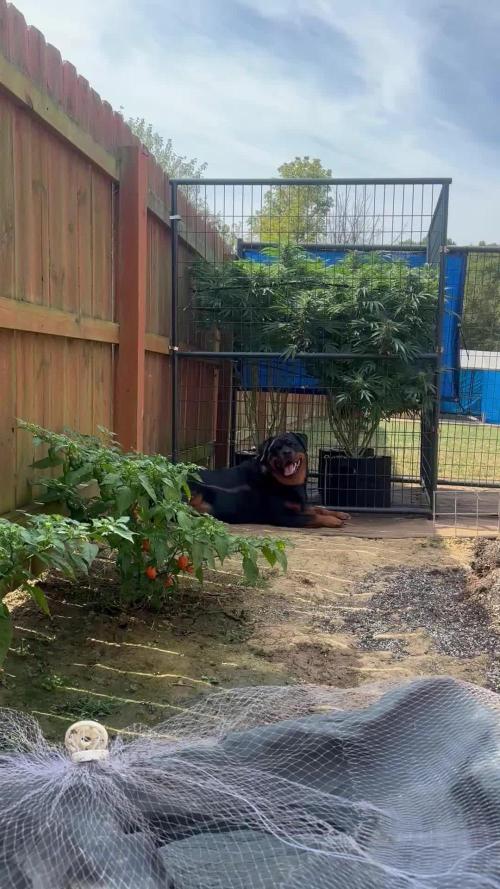
Day 114 harvest has gone exceedingly well unfortunately the vids of the harvest wont post but i will keep trying thanks for following the grow and i hope to see all of you in the next grow
Update a finally got the vids !!!
well holy crap its a good harvest again for just 1 plant 9 oz baby

Likes
10
Share

@TrickzGrowz
Follow
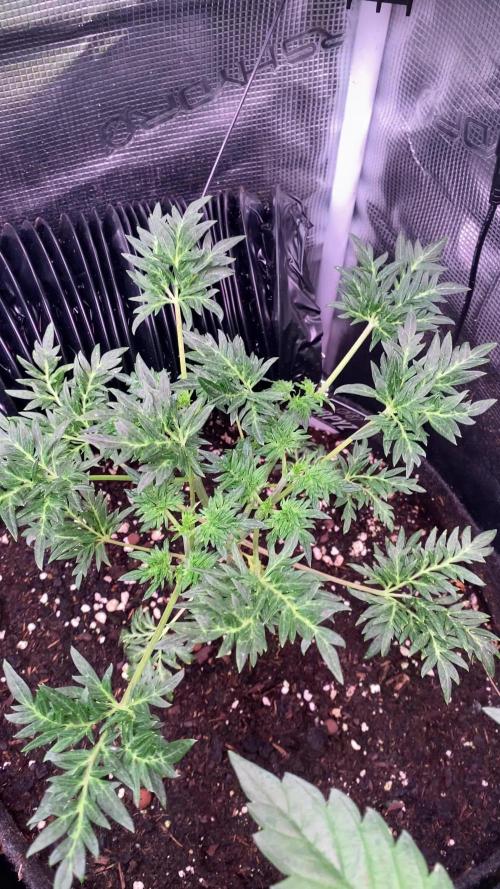
Die Blätter zeigen kleinere Probleme, aber ansonsten hat sie das umtopfen gut überstanden! Die Triebe sind oben sehr lila.
Spraymix alle 2 Tage.

Likes
3
Share


@MicroHidroGrow
Follow
Día 08 las plantas no están estirándose tanto cómo esperaba. La temperatura tampoco ayuda ya que hace mucho frío donde está el indoor. Pero tengo fé. Recién se empieza a notar el estiramiento.
Likes
11
Share


@Krissci
Follow
Day 7 - all plants need tidying up.
SO1 has the strongest colour & overall development so far... Frosty buds
SO2 is suffering from heat issues. But has the nice smell


Likes
44
Share


@Saint
Follow
This grow is powered by @SwissKush
Welcome to Week 7
Grow Area is 3feet-3feet same as 1M-1M
Day 43
Refilled with 5 Liters of water with nutrients
Clipped lower stems that were not able to get light, I chose ones to cut by their stem width.
Temperature is very high. 28-30° Celsius. But she is managing.
She is stretching so much, I don't know where to take lights, but I still have about 10-15 cms to lever.
I don't know what kind of monstrosity is this, but I love it ❤️
Day 44
Refilled with 5 liter + nutrients
Defoliated some leaves for better light access.
Buds are forming, can't wait for it to start exploding
Day 45
I changed the light schedule from 20/4 to 18/6 due to high temperatures outside. It gets really hot where the tent is.
Refilled with 5 liters and nutrients. I was right about hot weather, it is the cause of so muh water consumption.
Here are some photos from different angles.
Crystals are visible. I can even see them shining on bigger leaves, but in smaller amounts.
Day 46
Traditionally added 5 liters with nuts, did not add Grow - First part today, I am experimenting checking on PPM, I think she is not eating all the Grow part and goes in to overdose. Saw couple leaves with burnt tops, but all really is fine, it's not even an issue rn.
Added ventilation, made myself from old nonworking portable air heater. Removed coils and everything, and keft onlt Fan inside.
Can't wait to see her explode, I think she is planning to do it quite soon.
I am amazed by how low smell she has right now, even though temperature is high enough, around 28-30 degree celsius.
Day 47
Refilled with 5 Liters
I saw difference between yesterday buds and today buds size. I think she will go turbo in the en of the week or in next week.
I think I got the temperature under control. Possibly, I will remove one or two hours from schedule, but I really don't want to. But if weather continues to push so hot, I think it will be the only option.
Day 48
She is starting to smell sweet 😍
Refilled with 5 liters
She is getting covered in glitter all around
Day 49
Final day of the week
Refilled with 5L. I will need to top up some nutrients.
Special Thanks to @Chadmeister for supplying me and helping me❤️
She is going strong, I already see buds getting thicker,
I can only imagine where it's going 🚀
Noticing more and more sugar all around.
I am amazed by this Genetics of Barney's Farm
And I somehow think this ain't no luck, this is standart for them ❤️🚀
Let's get this Massive baby to the moon 🚀🌕✨🌌
See you in the next week
Thank you for following and observing this diary 🙏🤜🤛

Likes
19
Share

@MrGrowDiarie
Follow
Day 42
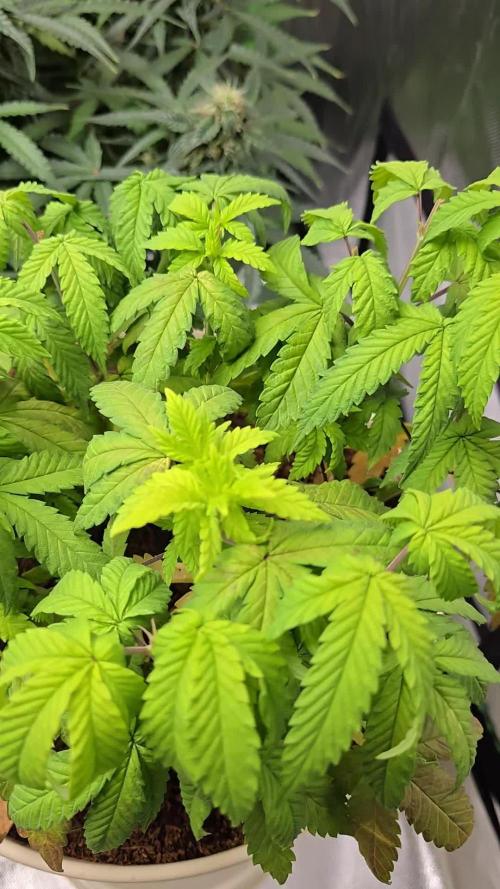
This plant has been topped many times (around 8–12), creating a very wide structure with lots of potential bud sites. However, it is currently in poor condition due to stress from overwatering.
Most of the leaves are drooping heavily, showing a clear lack of vigor. The color has faded from healthy green to a pale light green, with some areas even turning yellowish. This suggests that the roots are still struggling to recover and the plant isn’t able to take up nutrients properly.
Two days ago, I watered again after holding off to let the medium dry out. The plant has not bounced back strongly yet and remains weak. The canopy that once looked promising now looks tired, with leaves hanging down and a general lack of growth.
Given how stressed the plant looks, it may take considerable time to recover — if at all. Because of this, I’ve already started planning to grow a new strain alongside this one. This way I can still move forward with a healthy plant while monitoring this one to see if it pulls through.
At this point, the priority is minimal stress: careful watering, steady conditions, and patience. I’ll give it time, but expectations for this plant are now lower compared to the others.


Likes
54
Share


Likes
3
Share

@carlitoshaze44
Follow
Día 6 de diciembre ,tenemos una amanecida de gran niebla que se mantuvo en la mañana con ello una alta temperatura en la noche del cultivo amaneciendo este a 90% de humedad
Después del encendido de la luminaria y colocar dos pequeños humificadores de usar y tirar..en dos horas ,la humedad se mantiene bien.
55%
En el día de antes de ayer se le aplicó un buen riego.
Día 7
Humedad en el cultivo de un 60%
Hoy le e metido otro riego con todos sus nutrientes de vegetación y metiéndole un poco de floración
La EC 1100
El ph 6
Un ventilador dejó de ser oscilante para quedarse fijo.. hahaha meteré otro en unos días más grande y oscilante .

Likes
2
Share


@kissrubb
Follow
Buenas, buenas estamos en la semana 1 de floracion y las plantas comienzan ha estirarse y a mostrar su sexo, hemos aplicado diferentes tecnicas para maximizar la malla de scrog
