Likes
Comments
Share
@TightNugs
Follow
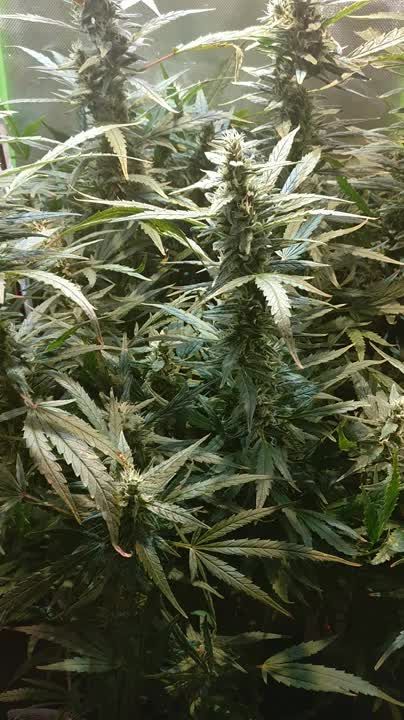
Flattened plant 1 to get an even canopy with some hst,seems to be responding well. No sign of flowering yet,bit more vertical growth needed now. Plant 2 just some lst.no issues so happy days 🤞🍁
Likes
12
Share
The SCROG net was installed on the last day of Week 6, I included a couple pics from that night, to compare with how the plant looked the next day, which was the first day of Week 7. My nerve damaged fingers caused me to be a little rougher with her while the net was going on than I like, but as you can see, she bounced back very quickly and was reaching for the light less than 24 hours after being mangled lol. I will continue to systematically defoliate the upper canopy every night or two for the next several weeks, and will completely strip most everything below the net. Every night or two I'll tuck any branches that need tucking, and will remove any fan leaves covering bud sites. She spread out pretty well in the net, and truth be known i probably could have gotten away with a 6 week veg after, plants are a decent size in the net with the stretch left to go. Flip happens at the end of Week 7 The manganese issue seems to be getting much better by the end of the week. Will keep my pH levels at 5.8 for the remainder of this grow, and any subsequent grows. I also devised a fan mount to save on space in the net. Instead of standing the fan, i simply cut a piece of 1x3 to length, drilled 2 holes in each end, large enough for zip ties to pass through. then I simply zip tied it to the tent poles, took the legs off the fan, and screwed the base to the board. I placed a piece of foam on top, as the screws were a shade long and I was afraid the small protruding tip would eventually puncture the tent. Works much better than expected. No movement in the mount at all.
Likes
27
Share
Hello Diary. A new diary, a new beginning. In the fifth farm we have three residents again, two Haze Berry Automatic and Fat Banana Automatic, both strains from Royal Queen Seeds. 😍 I would like to thank the team from the Royal Queen Seeds who have recognized my efforts in keeping a diary and greatly support me in what I love. 🙏 I always try to make a balance between sativa and indica, since I do creative work, I am a big fan of sativa, although in the evening, when my obligations are over, I like to relax with indica. So this time I planted two Haze Berry Auto that are predominantly sativa and one Fat Banana which is more indica. 😵 WHY HAZE BERRY? Haze Berry Automatic is the sativa-dominant successor to the legendary Haze Berry. Haze Berry Automatic inherited Haze Berry (Blue Dream’s) characteristic high. The sativa-dominant effects ramp up central nervous system activity and engage the mind. However, her flowers only contain a THC content of 13%. While this might seem comparatively low, it’s absolutely ideal for me. This makes it a great strain to use intermittently throughout the day. Haze Berry Automatic can be smoked in-between tasks or during a work break to produce a similar effect as a cup of coffee. It provides light stimulation and refreshes the mind for a more creative outlook. LET'S START FIRST WITH THE FARM SET-UP: Box - Secret Jardin DS120W 120x60x178 Lights - MIGRO 200+ Ventilation - Blauberg Turbo - E 100 Filter - Primaklima filter PK 100/125 Fan - Oscillating Koala Fan Humidifier - Beurer LB 45 Soil - BIOBIZZ Light - Mix Pot - 11L AirPot Seed - Royal Queen Seed Nutrition - BioBizz and RQS Organic nutrition LET THE DIARY START OFFICIALLY: 14/09/2020 Planting. I prepared everything I needed for planting, cleaned the farm and changed the filter. I put Primaklima filter - PK 100/125. This time I decidet for AirPots, I also used them in the first two farms, BioBizz-Light Mix is ​​already standard on my farm and Easy Boost and Easy Roots Mycorrhiza Mix from RQS as organic nutrition. Since the first farm I use only organic fertilizers and for now I have used BioBizz and RQS organic nutrition. After I put the soil in the pot, I added 50g of Easy Boost Organic nutrition and mixed it well with the soil, after that I added 5g of Easy Roots Mycorrhiza Mix and also mixed everything once more. I prepared 7 liters of water in which I regulated p.H with Plagron’s Lemon Kick, and soaked the soil well before making a hole in which I put the seed. Otherwise, the water would have pushed the seed much deeper into the ground. After the planting is completed, they enter their new home. The temperature in the Box at that time was 26 degrees and the humidity was slightly below 60%. I set the lights 35cm from the pots as Migro recommends. 14 - 17/09/2020 I sprayed the surface of the soil with water a couple of times to keep the soil moisture at the surface. Also the humidity dropped so I put on a humidifier for a couple of days. 17/09/2020 The first Haze Berry has sprouted, and I'm still waiting for the second. 19/09/2020 The other Haze Berry didn’t germinate, so I soaked the soil with water again and put the seed back on. I hope it works out this time. This is the first time since I planted that my seed has not germinated. Also the first Haze Berry got a liter of water with regulated p.H at 6.3 23/09/2020 The big day, the second Haze Berry sprouted the first one got watering. As for p.H. values, I always regulate, in my case I lower the value between 6.2 and 6.5. I removed the humidifier. Temp / Humidity on the farm - 26 degrees and 57% humidity. I would like to thank Grow Diaries for making germination week an option. I think that's a great thing. It will be interesting to follow the development of both Haze Berrys since the second one is a week late, but this time I will be photographing and filming just one plant in detail. See you next week.
Likes
12
Share
Likes
3
Share
👍👍 138g of dry buds for 1 plant is good 😁🌽
Likes
14
Share
@artems
Follow
The bright candy-like aroma is a treat for the senses, promising a flavorful harvest. Impressively, the abundance of trichomes at this stage is already a source of joy, hinting at the potency and resinous nature of the forthcoming buds. Excitement builds as the plant progresses, showcasing early signs of a rewarding harvest.
Likes
1
Share
@BruWeed
Follow
11/10 - comenzó su cuarta semana de floracion. Su evolución fue muy notoria, de un dia para el otro se desarrolló mucho. No tuve problemas en ninguna etapa, hasta el momento se encuentra perfecta. Los cocos son muy resinosos y grandes.
Likes
21
Share
Vegetation Week 3: Steady Gains, Environmental Harmony & the Art of Boring Update: 30.03.2025 What’s up, my Growmies? Week 3 with the Blueberry and Durban Poison was blissfully… ordinary. No drama, no breakthroughs—just the quiet hum of plants doing their thing. Here’s the low-key recap! Current Observations: Subtle Wins Leaf Development: The first true fan leaves are finally unfurling—wider, darker green, and more serrated. My Blueberry lady is slightly ahead of my Durban Poison babe! Stem Thickness: Those once-spindly stems now feel sturdy and stable, thanks to their exposure to light winds. Environment Report: Stability Wins The weather’s been a steady 10–16°C with occasional clouds. Plants are now outdoors soaking up direct light as long as possible (still bringing them in at night—better safe than sorry with these chilly temps!). The "Boring" Philosophy No news is good news! This week’s mantra: Don’t fix what isn’t broken. Watering Rhythm: Sticking to plain pH’d water (~6.3) only when the pots feel light. No overthinking, no overwatering. No Nutes Yet: Biobizz Light Mix is still feeding them plenty. No rush to disrupt the balance. Future Prep: Laying Groundwork Topping Plans: I’m planning to top them next week for the first time! I’ll decide spontaneously if the girls look stable enough, but I’m leaning toward waiting until Node 5 to minimize stress. Slow and steady wins the race—no stunting allowed! Week 3 Takeaway: Slow, stable growth means the plants are content. Sometimes, boring is beautiful. Until next time: Stay grounded, stay growing… and stay blazing! – Smoking_Joe_Frazier
Likes
6
Share
Shes growing and stretching this lady has started to flower let the show begin !!! She's stretched quite abit over the past week lets see what else she does !! Thanks for the continued support ! -Happy Growing!
Likes
327
Share
@FoTwenny
Follow
•••••••••••••••••••••••••• Sept. 28 - Oct. 4 •••••••••••••••••••••••••• CULTIVARS: •••••••••••••••••••••••••••••••••••••••••••••••••••••••••••••• WEDDING CAKE: STARTED = 8/10 • BLOOM = 10/1 RED HOT COOKIES: STARTED = 8/10 • BLOOM = 10/1 CHOCOLATE MINT OG: STARTED = 8/10 • BLOOM = 10/1 WILDBERRY: STARTED = 8/10 • BLOOM = 10/1 CINDERELLA 99: STARTED = 8/10 • BLOOM = 10/1 PEYOTE WIFI: STARTED = 8/10 • BLOOM = 10/1 SUGAR TITS: STARTED = 8/10 • BLOOM = 10/1 MONSTER ZKITTLEZ: STARTED = 8/10 BLUEBERRY: STARTED = 8/10 • BLOOM = 10/1 BLUE DREAM: STARTED = 8/10 • BLOOM = 10/1 HELL'S ANGEL OG X PLATINUM KUSH MINTS: STARTED = 8/10 • BLOOM = 10/1 COTTON CANDY CANE: STARTED = 9/5 • BLOOM = 10/1 •••• EXTENDED VEGETATIVE PERIOD •••• MELON GUM: STARTED = 8/10 GREEN GELATO: STARTED = 8/10 FRENCH COOKIES: STARTED = 8/10 SOUR LEMONAID: STARTED = 8/10 LSD: STARTED = 8/10 GORILLA x COOKIES: STARTED = 8/23 •••••••••••••••••••••••••••••••••••••••••••••••••••••••••••••• WEEKLY SUMMARY: •••••••••••••••••••••••••••••••••••••••••••••••••••••••••••••• 🙋‍♀️Fo' Twenny here!🙋‍♀️ Back with another update on the viewer selected multi strain SOG. If you're just joining us, we have these photo-dependant ladies vegging in our 48"x 24" VIVOSUN tent. I have been doing a lot of heavy defoliation and pruning the past week. I also made a few upgrades in the bloom tent and moved a few of the cultivars into bloom under 12/12. Also, I realized my BlueLab Conductivity Meter has the option to switch to EC. Since EC is the most accurate way to measure the nutrient concentration in a solution, I will now be measuring and reporting EC readings rather than PPM. I am honestly super stoked about every single plant in this run. That said, I think I am probably most impressed by the 🍭🎅🏻 COTTON CANDY CANE lady from Emerald Triangle Seeds. She is incredibly vigorous. She was started nearly a month after all the others (except the 🦍🍪 GORILLA x COOKIES) and has already caught up to some of the taller plants in the run. Special thanks to those guys for sending the freebies for me to try out! Definitely want to try more from this breeder! She is almost a month behind the other plants and is almost as tall as the tallest cultivars started on 8/10. All in all, everything looks great. Any advice, suggestions, or constructive criticisms are always welcome. Now, for the weekly break down! •••••••••••••••••••••••••••••••••••••••••••••••••••••••••••••• THIS WEEK'S BREAK DOWN •••••••••••••••••••••••••••••••••••••••••••••••••••••••••••••• 9/30 - Day 52 for Majority of the Garden - 🍭🎅🏻 COTTON CANDY CANE: Day 26 - 🦍🍪 GORILLA x COOKIES: Day 39 °°°°°°°°°°°°°°°°°°°°°°°°°°°°°°°°°°°°°°°°°°°°° 🎥 FILMING DAY! 🎥 •••••••••••••••••••••••••••••••••••••••••••••••••••••••••••••• 10/1 - Day 53/Day1 of Bloom for Majority of the Garden - 🍭🎅🏻 COTTON CANDY CANE: Day 27/Day of Bloom - 🦍🍪 GORILLA x COOKIES: Day 40 °°°°°°°°°°°°°°°°°°°°°°°°°°°°°°°°°°°°°°°°°°°°° 📸 PHOTOSHOOT! 📸 🎥 FILMING DAY! 🎥 👩‍💻 UPGRAYED! 👩‍💻 - Added a BOTANICARE 48" x 48" low-tide flood tray on top of six 4" tall cinder-blocks with a low-profile motorcycle oil-pan for the water to drain into beneath the flood tray. - I transplanted eleven cultivars into black 12" tall Active Aqua brand 12" x 12" square pots and inserted 3' fiberglass garden stakes into the center of the rootball near the main stem of each plant. Each stake goes to the bottom of the 12" pot. All transplants have nice solid root balls due to being slightly rootbound. I knew I'd likely run short on premixed soil, so I decided to transplant the largest plants first. Of course, I ran out of soil after 11 plants were transplanted. It seems like I used a lot more soil than usual with this method and in tgese pots. - I mixed a new batch of soil using the same recipe. I will give the five smallest gorls a few more days to grow taller. That will give this batch of soil a little time to innoculate. - I moved the 11 transplants into the 96" x 48"bloom tent under 12/12 lighting schedule. 🚿FEED DAY!🚿 She received approximately 1 gallon of solution. I mixed 12 gallons of solution for all the plants I have in flower. 1 gallon of that was then measured and fed to this cultivar. 👩‍🔬NUTRIENT SOLUTION👩‍🔬 ⬇️Mixing Rundown⬇️ The solution starts with 12 gal tap H2O through two kdf filters mixed in a 36 gallon reservoir. The solution is applied via wand sprayer powered by a submersible pump attached to a garden hose. Nutrients and additives are added to the reservoir in the order listed below and thoroughly mixed uding a plastic stir spoon. The reservoir is oxygenated by four 4 inch air stones. Start pH: 7.8 Start EC 1.0 TEMP: 74°F 4 ml/gal - Blue Planet Gold Shield Silica Supplement .5 tsp/gal - Fox Farm Gringo Rasta Cal-Mag 3 tsp/gal - Fox Farm Big Bloom 1.5 tsp/gal - Fox Farm Grow BIG .5 tsp/gal - Fox Farm Boomerang .25 tsp/gal - Fox Farm Wholly Mackerel .25 tsp/gal - Fox Farm Kelp Me Kelp You .0625 tsp/gal - Fox Farm Open Sesame pH: 6.3 EC: 2.8 Our target pH is in the range of 6.0- 6.6 prior to adding any microbial innocclants. pH already in range, no adjustments needed. 1 tsp/gal - Grower's Choice Recharge .6 ml/gal - Mammoth P. .5 tsp/gal - Fox Farm Kangaroots 1 tsp/gal - Azos pH: 6.4 EC: 3 •••••••••••••••••••••••••••••••••••••••••••••••••••••••••••••• SUPPLIES & EQUIPMENT CURRENTLY IN USE: •••••••••••••••••••••••••••••••••••••••••••••••••••••••••••••• • A/C: Whynter ARC-14S 14,000 BTU Dual Hose Portable Air Conditioner • TENT: VIVOSUN 48"x24"x60" Mylar Hydroponic Grow Tent with Observation Window & Floor Tray • POTS: Black 8"tall Active Aqua brand 6" x 6" one gallon square pots/Black 12" tall Active Aqua brand12" x 12" 3.4 gallon square pots • VEG/AUTOFLOWER INTAKE FAN: None (PASSIVE) • VEG/AUTOFLOWER EXHAUST FAN : VIVOSUN 6 Inch 390 CFM Inline Duct Fan with Variable Speed Controller • BLOOM INTAKE FAN: VIVOSUN 6 Inch 390 CFM Inline Duct Fan with Variable Speed Controller VEG/AUTOFLOWER EXHAUST FAN : VIVOSUN 6 Inch 390 CFM Inline Duct Fan with Variable Speed Controller • BLOOM EXHAUST FAN: AC Infinity CLOUDLINE T8, Quiet 8” Inline Duct Fan with Temperature Humidity Controller - Ventilation Exhaust Fan • AIR MOVEMENT: 6-Inch Lasko FBA 2004W 2-Speed Clip Fan • Bluelab PENPH pH Pen Fully Waterproof Pocket Tester • Bluelab PENCON Conductivity Pen Fully Waterproof Pocket Tester • Kolder Multi-Purpose Liquid and Dry Measuring Cup, 16-Ounce • Fox Farm Measuring Spoons • WATER TREATMENT: Tap H2O run through two AQUACREST Garden Hose Water Filters to remove chlorine and chloramine. – COMING SOON: Hydro-Logic 31023 1000-GPD Evolution RO1000 High Flow RO System, White (HL31023). • WATER APPLICATION: I use 2 different watering systems. The pump sprayer is typically used in early veg, between feeds, or for lighter feeds. Most feeds are usually run through the pump and reservoir because it's faster and easier when dealing with larger volume feeds. – 2 GALLON LAWN & GARDEN PUMP PRESURE SPRAYER. * I removed the spray head due to clogs and it's just faster. – Superior Pump 91250 Utility Pump, 1/4 HP in a heavy duty 27 gallon Tote attatched to a 10 foot garden hose to an Orbit Underground 56246 Green Thumb 9-Pattern Telescoping Wand. – Aeration of the reservoir is accomplished using a General Hydroponics HGC728040 Dual Diaphragm Air Pump 320 GPH 4 Outlet attached with standard aquarium air hose to four 4-Inch Air Stone Disc Bubble Diffusers. • VEG/AUTOFLOWER LIGHTING: 320w MosterBoard V4-PLUS powered by a MEANWELL 320H-48AB DRIVER. There are three V4-PLUS boards prewired and mounted on a 935x195x10mm black heatsink. Dimmer, UV Switch, and IR Switch included. Each board contains two hundred fifty two 3000k lm301h diodes + twelve Osram 660nm diodes plus 4 separately switchable LG UV 395nm diodes and 4 separately switchable Osram IR 730nm diodes. • BLOOM LIGHTING: Two custom mounted lighting units: Each mount has one 480w MEANWELL 480H-48B driver and one 240w MEANWELL 240H-48AB powering 6 KingBright Quantum Boards. Each board contains two hundred fifty two 3500k lm301h diodes + twelve CREE XP-E2 660nm diodes plus four separately switchable CREE XP-E2 730nm diodes and four LG UV 395nm diodes. Hanging between the two mounts are two additional quantum boards with two hundred fifty two 3000k lm301h diodes + twelve 660nm diodes plus four constant power 730nm IR diodes and four 395nm UV diodes. That's a total of 1680 watts of quantum board power in our 96" x 48" bloom tent. ⚠️ ALL DRIVERS MOUNTED REMOTELY IN AN AIR COOLED BOX INSTALLED BETWEEN THE FILTER AND EXHAUST FAN ⚠️ • SLMOTO Universal Oil Drain Pan, 2 Gallon (8 Liter) Capacity ABS Low Profile Oil Drain Pan w/Spout Fit for Motorcycles • Modified Botanicare Low Tide LT Black Tray - 4' x 4' - Modification: Cutaway at corners and used flex-seal tape to create a new edge that will be soft to fit between tent supports. She is supported by 6 Standard Cored Concrete Blocks (Common: 4-in x 8-in x 16-in; Actual: 3.625-in x 7.625-in x 15.625-in). ⚠️THIS TRAY WILL NOT FIT BETWEEN SUPPORTS IN A 48" x 48" or 48" x 96" TENT WITHOUT MAKING MODIFICATIONS TO THE TRAY!⚠️ • Blue Sticky Pads • Yellow Sticky Pads •••••••••••••••••••••••••••••••••••••••••••••••••••••••••••••• SOIL MIX DETAILS: •••••••••••••••••••••••••••••••••••••••••••••••••••••••••••••• All components were mixed into a 50 gallon tote that is kept in a warm environment to help innocculate to promote a vast and diverse microbial life in the rhizosphere. Once mixed, add 32-64oz water once every 7-14 days as needed. The goal is to keep the soil moisten without oversaturating. 2 Part - Royal Gold Tupur INGREDIENTS: Coco fiber, aged forest materials, perlite, and basalt 1 Part - Fox Farms Ocean Forest INGREDIENTS: Aged forest products, sphagnum peat moss, earthworm castings, bat guano, fish emulsion, and crab meal. 1 Part - Roots Organics INGREDIENTS: Perlite, Coco Fiber, Peat Moss, Composted Forest Material, Pumice, Worm Castings, Bat Guano, Soybean Meal, Alfalfa Meal, Fishbone Meal, Kelp Meal, and Greensand. Also contains beneficial mycorrhizal fungi: Funneliformis mosseae, Rhizophagus intraradices, Septoglomus desertícola .5 Part - Wiggle Worm Soil Builder Pure Earthworm Castings .5 Part - Ancient Forest Humus .5 Part - Coarse Grade Perlite Inocculated by mixing 1 cup of Extreme Gardening Mycos Watered with pH 6.5 h2O 1 Tsp/gal Real Grower's Recharge 1 tsp/gal Hi-Brix Molasses 2 tsp/gal Fox Farms Kangaroots •••••••••••••••••••••••••••••••••••••••••••••••••••••••••••••• •••••••••••••••••••••••••••••••••••••••••••••••••••••••••••••• Want to see more cultivars I have growing❓ Please, be sure to check out my other diaries & give me a follow! 👍👍 🙏Thank you for stopping by my garden!🙏 Peace, ☮️✌️ Love, 💚🤟 & Frosty Nugs! ❄️🌲 Happy farmin' my friends! ☺️🌱 - Fo' Twenny 👩‍🌾🏻
Processing
Likes
14
Share
Today 7/30/19, day 57 and the start of week 9. I'm still continuing to alternate between days with my pesticide treatment (especially after finding that bug living on one of hulkberries fan leaf) and thrive alive green daily foliage spray as a prophylactic solution against any possible pests or mold going into these last few dog days of veg. I will flush them with distilled ph'd water for two days this weekend in preparation for flower. Then I'll start them on some "flower fuel" bloom booster on top of my secret for success flower recipe at 1/4 of the recommended strength. Outside of that still no adverse issue to report for the end of the 8th week. After my last trim, they both have responded very nicely, I was kind of worried about fat banana stalled growth. But one thing I noticed when I topped her at the 6th node, yes the main stem stopped growing but it developed many bud sites up and down every stem. Whereas hulkberry was topped at the 8th node, she has mainly focused on developing long stems and only 2 or 3 bud sites along her stems. Even though hulkberry in structure, is much bigger than fat banana and has a way bigger root system. Fat banana is bushier and has developed way more bud sites than hulkberry. I can't tell which strain will yield the most at this point only time will tell! Also, a big shout out to "J"@RQS, thank you for the excellent customer service. Another reason why Royal Queen Seeds is top 3 in breeding!!
Processing
Likes
6
Share
@Treemos
Follow
Hi guys, sorry if I posted this week so late, but I was sooo busy! This week, I began to give two first doses of Flawless Finish, to start clean the soil (and unlock Indra from its nutrient burn). Aurora is growing really great, has a powerful smell and a white color when I get photo of her at night 😍 Indra began to grow again, after the use of Flawless Finish, the flowers are getting bigger and the smell is growing day by day, I will post her trichomes the next week! Enjoy the photos guys, and thank you all for the help :)
Likes
15
Share
Likes
10
Share
@Turbo420
Follow
This week I did a single topping at the 5th node. Along with this I applied low stress training and tucking to expose the new growth.
Likes
23
Share
@Spliffi
Follow
Germination 27 September 2023 Heya 🤙👍🤙🌱🌱🌱 In the heart of a humble garden, a miraculous journey is about to unfold. Beneath the soil's dark, nurturing embrace, a seed lies dormant, awaiting the precise moment to burst forth into life. It is a marvel of nature, a tiny capsule of potential, encoded with the blueprints of the plant it aspires to become. As the heavens open, raindrops penetrate the earth, quenching the thirst of the soil and signaling to the seed that its time has come. The seed absorbs this life-giving moisture, swelling as it takes in water. It's as if the seed is awakening from a long slumber, stretching its embryonic limbs for the very first time. Within this subterranean realm, the seed's outer coat softens, and a tiny rootlet begins to emerge. This is the radicle, the seed's first root, and it instinctively knows to journey downward, anchoring itself into the soil. It is the plant's lifeline, seeking out water and nutrients essential for growth. Simultaneously, a delicate shoot, known as the plumule, makes its way upwards, drawn by an invisible force towards the sky. It is a daring expedition, fraught with obstacles, as it navigates through the soil. Yet, guided by an innate sense of direction, it perseveres. Finally, breaking through the soil's surface, the shoot unfurls its first leaves, miniature versions of what they will one day become. These are the cotyledons, a pair of leaves that have been stored within the seed, packed with nutrients to sustain the young plant in its earliest days. As the sun's rays touch these fledgling leaves, photosynthesis begins. It's a momentous occasion, the plant's first breath, as it converts sunlight into energy. The seedling, still fragile yet full of promise, has successfully embarked on the first chapter of its life. From here, it will face countless challenges and opportunities, but for now, it stands as a testament to the remarkable resilience and complexity of nature. Thanks for reading🤙👍🤙🌱
Likes
14
Share
finally the scorching sun came having moved the plants from under the canopy outdoors a downpour created a bit of mold in a small part of the skywalker and also to the little cherry i later removed it and sprayed the plants with garlic infused water now i'm the bomb i'm fertilizing with long awaited organic vermicompost, the plants are perfect, i think i will delay the harvest for the cherry to make it gain a little more weight at the expense of the flavors the flavors are amazing absurd...i ordered some clones by freakshow humbolt seeds I also made new transfers with old seeds tried to germinate and they went splendidly.honey cream and special queen by royal queen seeds
Likes
64
Share
Welcome to the Smoking Tiki's hut! For this grow, I'm using some of the seeds I won at the Summer Buds contest from last year. I kept the seeds in my fridge door during one year. It worked very well because all the seeds successfully germinated after 48h! 😎 I used 3x3 seeds. I selected 2x3 seeds with the bigger root to put them in some pots. I will let them grow a bit and then select the 3 best plants to make it until the harvest. It's the first time I grow some Fast Buds under a light and in a controlled environement, I'm really curious to see how it turns out! My set-up: -------------------------------------------------------------------------------------------------------------------------------------------------------------------------------------------------------------------- - Mars Hydro TSW2000 (300W). - Tristar fan (30W) - Greenmigo dehumidifier (155W). - Compo Sana universal soil (2x40l) - Timer - Weather station + pH meter Have a nice journey through my grow diary!