


Likes
25
Share


@kizdog
Follow
DAY 85 - 92 (F31-F38)
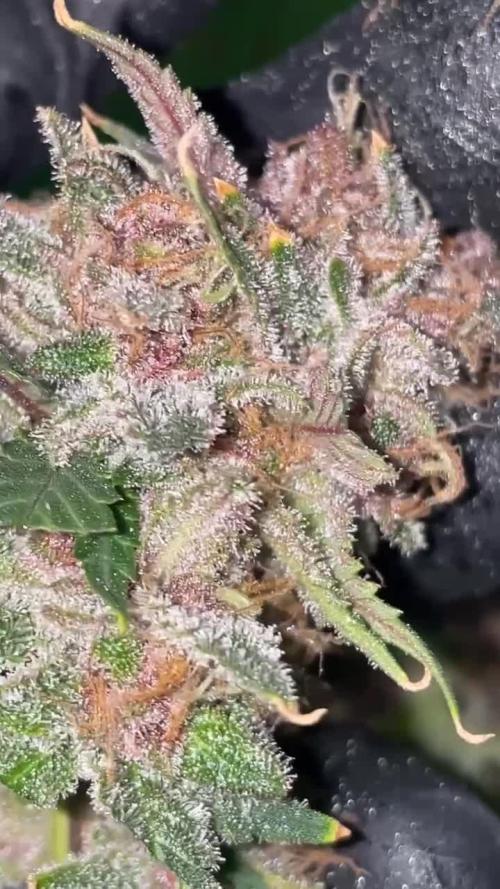
Lots of progress on the flowers this week. Not much stacking on her but the buds are super hard and covered in trichomes. Honestly the frost on her is incredible, even on the poorly half of the plant.
I did my best to cover the mold with the agricultural sulphur I bought, but I could only really cover the top of it. The mold is still exposed and visible in some places. I really hope the sulphur works.
I also added an extra circulating fan on the tent floor to increase air movement in the bottom half.
Thanks for reading growmies. I really appreciate having a community to talk to about this stuff. Our plants are all beautiful and deserve the best possible treatment. We should worship them! See u next week 👊💚🍃💨🌷
EC: 1.2
pH: 6.1

Likes
20
Share


@1TheSoloGrow
Follow
Hate that I had to chop earlier then I wanted but when life throws u a curve ball u have to adapt lol anyways she had mostly cloudy tricoms and smelt amazing 👏 but her she is I'll let u know the final results when it comes to dry weight. Also I'm revegging here 😆 🤣 😂 😹 she's one of my new mother plants now!

Likes
32
Share


@WildeWeed
Follow
This was a fun plant to grow. The trichome production was amazing and the last couple weeks she really packed on the weight. The trichomes changed from clear to milky to amber a lot quicker than I anticipated. However I had started my flush 2 weeks prior so everything seems to be top notch. I water cured a small amount and the high is GREAT!
Likes
6
Share


@Ieiogrow94
Follow
Eccoci qui...
Finalmente dopo uno stop per il lavoro torno ad aggiornare il diario con il capitolo finale...
Questa piccola mi ha stupito per il forte odore che emana è stato davvero un casino tagliare e seccare questa varietà in quanto l'odore è stato davvero pazzesco, colori come voglio io con foglie molte scure violacee.
Super resinosa e compatta per non parlare dell'odore, una cosa speciale!!! Sicuramente verrà riproposta!!!
Grazie ad Anesia Seed e ad Xpertnutrients per la collab e a tutti per il supporto🔥🌲❤️
NE VERRANNO DELLE BELLE

Likes
27
Share


@ohserp
Follow
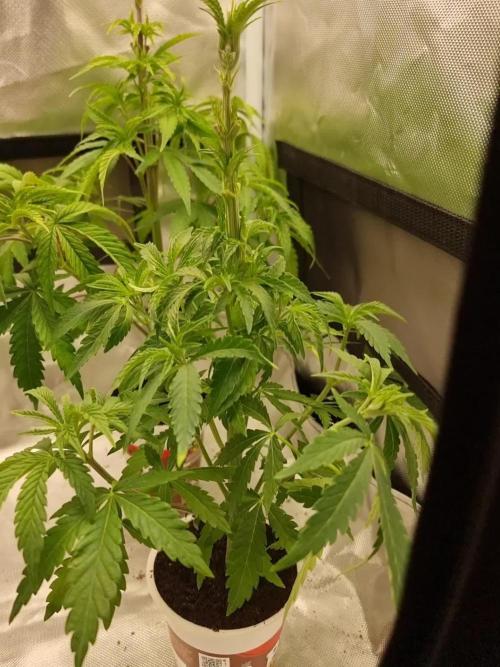
Growing big and bushy thanks to some early LST. So far so good, lots of pre flowers all over. Hopefully I will be seeing some buds here soon!

Likes
5
Share

@LittleBigTrees
Follow
Still feeding at full strength with 20% run off.
I've defoliated the main fan leaves.
Ill keep them rootbound untill I'm ready to re pot and switch to flower.

Likes
14
Share


@RakonGrow
Follow
+
Tag 65:
starting 30-70% watering rule
1.75L bottle water EC 0.35 + 0.35ml/L CalMag + Terra Flores 5.25ml/L Final PH 6.17
Tag 64:
starting 30-70% watering rule
1.75L bottle water EC 0.35 + 0.4ml/L CalMag + Terra Flores 5.25ml/L Final PH 6.20
Tag 63:
starting 30-70% watering rule
1.75L bottle water EC 0.35 + 0.4ml/L CalMag + Terra Flores 5.25ml/L Final PH 6.20
Tag 62:
starting 30-70% watering rule
1.6L bottle water EC 0.35 + 0.4ml/L CalMag + Terra Flores 5.25ml/L Final PH 6.20
Tag 61:
starting 30-70% watering rule
1.8L bottle water EC 0.35 + 0.4ml/L CalMag + Terra Flores 5.25ml/L Final PH 6.20
Tag 60:
starting 30-70% watering rule
1.0L bottle water EC 0.35 + 0.4ml/L CalMag + Terra Flores 5.25ml/L Final PH 6.20
Tag 59:
3.0L bottle water EC 0.35 + 0.4ml/L CalMag + Terra Flores 5ml/L Final PH 6.15
Tag 58:
add a growroom and tent video
---------------------- all values are weight in grams ( assumption : 1000g = 1000ml.) -------------
Day......State...Date Time..................Seed......messure..change...watering.....surplus.....DayLight.....Night.....within 24h
...57...bloom...13.11.2025 07:00.....Wurlz...........8211.......3101...........3101............-42
...57...bloom...13.11.2025 11:00.....Wurlz...........8466.........250............250
...57...bloom...13.11.2025 11:01.....Wurlz...........8018.......-448
...57...bloom...13.11.2025 18:00.....Wurlz...........7395.......-623
...57...bloom...13.11.2025 23:45.....Wurlz...........7066.......-329.................................................-1400
...58...bloom...14.11.2025 06:00.....Wurlz...........6865.......-201.......................................................................-201..............-1601
...58...bloom...14.11.2025 23:45.....Wurlz...........5271.....-1594.................................................-1594
...59...bloom...15.11.2025 06:00.....Wurlz...........5098.......-173.......................................................................-173..............-1767
...59...bloom...15.11.2025 07:00.....Wurlz...........8141.......3043...........3043..........-325
...59...bloom...15.11.2025 23:45.....Wurlz...........6748.....-1393.................................................-1393
...60...bloom...16.11.2025 06:00.....Wurlz...........6500.......-248.......................................................................-248..............-1641
...60...bloom...16.11.2025 07:00.....Wurlz...........7494.........994.............994...........-647
...60...bloom...16.11.2025 23:45.....Wurlz...........6067.....-1472.................................................-1472
...61...bloom...17.11.2025 06:00.....Wurlz...........5820.......-247.......................................................................-247..............-1674
...61...bloom...17.11.2025 07:00.....Wurlz...........7618.......1798...........1798............124
...61...bloom...17.11.2025 23:45.....Wurlz...........6186.....-1432.................................................-1432
...62...bloom...18.11.2025 06:00.....Wurlz...........5950.......-236.......................................................................-236.............-1668
...62...bloom...18.11.2025 07:00.....Wurlz...........7532.......1582...........1582............-86
...62...bloom...18.11.2025 23:45.....Wurlz...........6101.....-1431.................................................-1431
...63...bloom...19.11.2025 06:00.....Wurlz...........5853.......-248.......................................................................-248.............-1679
...63...bloom...19.11.2025 07:00.....Wurlz...........7604.......1751...........1751..............72
...63...bloom...19.11.2025 23:45.....Wurlz...........6163.....-1441.................................................-1441
...64...bloom...20.11.2025 06:00.....Wurlz...........5909.......-254.......................................................................-254.............-1695
...64...bloom...20.11.2025 07:00.....Wurlz...........7664.......1755...........1755..............60
...64...bloom...19.11.2025 23:45.....Wurlz...........6248.....-1441.................................................-1441
...65...bloom...20.11.2025 06:00.....Wurlz...........5989.......-259.......................................................................-259.............-1675
...65...bloom...20.11.2025 07:00.....Wurlz...........7718.......1729...........1729..............54
+


Likes
9
Share


@Prof_Weed
Follow
Okay, started to give her Final Part, EC 2.6 and Ph 6.0
In 2.5 weeks is harvest time
Top Bud smell very Lemon and are Rock hard


Likes
96
Share


@Tropicannibis_Todd
Follow
💩Alrighty then Growmies We Are Back At it 💩
Well folks we just finished up the last run and so we are bad to do it all over again 😁
So what do you say we have some fun 👈 We got some Z & Z 🚗 🚘 🚗 🚘 👉 From Exotic Seeds
Well we are just 42 days and folks shes doing pretty good 👌
It's been a crazy few weeks 👉and so I had to get creative and then i has some uptake issues over the last weekend 👈
So I gave them a light flush and then switched to there new brand of nutrients and began there new regiments 👌Just need to remind myself to take it easy 🤔
FC4800 from MarsHydro Lights being readjusted and chart updated .........👍I've added a UR45 to the mix👈
www.marshydro.ca
👉I am using Agrogardens for nutrients for my grows and welcome anyone to give them a try .👈
👉 www.agrogardens.com 👈
Agrogardens Cal MAG
Agrogardens Grow A+B
Agrogardens Bloom A+B
Agrogardens Bud Booster
Agrogardens PK13/14
I GOT MULTIPLE DIARIES ON THE GO 😱 please check them out 😎
👉THANKS FOR TAKING THE TIME TO GO OVER MY DIARIES 👈
Would you like to hang with the growdiary community 👉 https://discord.gg/gr4cHGDpdb 👈

Likes
16
Share


@HowtoBubatz
Follow
The cannabis plant is generally growing well and is progressing as expected during the flowering stage.
Despite the positive overall growth, brown spots have appeared on some of the leaves and I dont really know what it is.
While the appearance of brown spots is concerning, the overall health of the cannabis plant remains good. With careful monitoring and appropriate adjustments, the plant should continue to develop successfully.
It will be exciting to see how the plant progresses as it matures, even if its growth rate is somewhat slower than expected.

Likes
Comments
Share


@TheBulldozerSicily
Follow
Iniziamo un altro ciclo, la bella stagione è alle porte, anche quest'anno iniziamo indoor in idroponica e preparo 2 in vaso da passare in outdoor

Likes
8
Share

@cdxxbuds
Follow
Fruity aroma all over. This run came out better than i expected even though she took some abuse.
Drying with herbnow dryer.

Likes
37
Share


@RFarm21
Follow
Hello growmies!
25/08 - Alimentação Royal Gorilla # 1 : CE = 1,39; pH = 6,3
O gráfico representa a nutrição da RG#1 misturada com 2,5L de água.
25/08 - Alimentação Royal Gorilla # 2 (2,5L): CE = 1,33; pH = 6,1
-BioGrow - 3ml; BioBloom - 5,5ml; TopMax - 2,5ml; BioHeaven - 6ml; Activera - 5ml;
25/08 - Alimentação Queijo Royal # 1 (2L): CE = 1,36; pH = 6,2
-BioGrow - 3ml; BioBloom - 6ml; TopMax - 2ml; BioHeaven - 6ml; Activera - 6ml;
21/08 - Alimentação Queijo Royal # 2 (2L) - CE = 1,54; pH = 6,3
-BioGrow - 3ml; BioBloom - 5ml; TopMax - 2ml; BioHeaven - 6ml; Activera - 6ml;

Processing
Likes
5
Share


@Ensign420
Follow
Week 02 Introduction
This week has been a bit of a struggle. Had my first experience dealing with slime and brown algae. But I think adding enzymes and increasing the beneficial bacteria helped to fix the issue. Also experienced nutrient burn for the first time. My nutrient solution strength got as high as 671 PPMs. So backed it down to about 430 PPMs during the end-of-week reservoir change. Also cut Hydroguard (expired?), CaliMagic, and Superthrive from this grow. Now she's still stunted, but is starting to recover. Hopefully...
[START OF WEEK 02]
Day 01 - Monday - 08/10/20 - Total Days: 008
-----------------------------------
- [0830]: Still looks a bit yellow. But getting larger!
--- Solution strength was at 248 PPMs.
--- Just topped off with a bit of distilled water
--- PH went up to 6.1 so PH'd down to 5.8
--- Ran the top feed for a bit to wet the hydroton.
- [2130]: She's looking even more yellow now.
--- Even the new leaves are really yellow.
--- Decided to add more base nutes.
--- Added 4ml of Sensi A
--- Added 4ml of Sensi B
--- Now at about
--- Solution Strength went up to 304 PPM.
--- PH was at 6,
--- Also raised the water level a bit more.
--- I really hope it's a nutrient deficiency and not an over-watering issue.
--- Please live!
Day 02 - Tuesday - 08/11/20 - Total Days: 009
-----------------------------------
- [0830]: Looking less droopy. But still yellow.
--- Decided to do a reservoir change.
--- 4.5gal of distilled water
--- 8ml of Sensi Grow A
--- 8ml of Sensi Grow B
--- 8ml of Voodoo Juice
--- 4ml of B-52
--- 4ml of CaliMagic
--- 4ml of Hydroguard
--- 4 drops of Superthrive
--- PH'd down to 5.8
--- Solution strength: 302 PPM
--- Since I didn't want to risk over-watering the rockwool, I did not to do a top feed, may do one tonight after the sleep cycle (lights are still set to go off at 10am and back on at 4pm).
--- As I was doing a reservoir change, I noticed that the tubes and bucket were a bit slimy. Didn't really stink or anything. Is this normal? Maybe due to the Hydroguard and Voodoo Juice?
--- I hope she gets better soon!
- [2215]: Getting larger! But still yellow.
--- Also can see a root growing through the net pot! Tiny little thing but it's there! Will have to start dropping water once more appear.
--- After looking over a few DWC diaries using AN nutes, seems like my solution strength is still too low. Most around this stage average around 500 PPMs with about 4ml per gallon.
--- Top fed for a minute to wet the top of the hydroton.
--- Solution strength went down to 263 PPM.
--- Added 8ml more of Sensi A
--- Added 8ml more of Sensi B
--- Now base nutes are at 16ml for 4.5 gal of water.
--- PPMs went up to 411.
--- Still lower than 500 PPMs, but that's okay.
--- PH was at 6. Not sure if I should adjust PH using AN nutes. So going to not ajdust unless PH goes above 6.1.
Day 03 - Wednesday - 08/12/20 - Total Days: 010
-----------------------------------
- [0830]: Looks like more root growth!
--- She still looks yellow. But leaves are perky.
--- PH was at 6.2 so lowered down to 5.8.
--- Solution strength was at 394 PPMs
--- Since roots are still growing, I decide to lower the water level a bit. Now water level is a bit below the net pot.
- [2200]: Root is getting longer!
--- Slime is returning. Not sure why.
--- Solution strength: 357 PPMs
--- PH: 6.1
--- Decided to add an enzyme along with more beneficial bacteria to hopefully cure the slime.
--- Added 16ml of Sensizym
--- Added 5ml of Hydroguard
--- Added 8ml of Voodoo Juice
--- New solution strength: 430 PPMs
--- New PH: 6.1
--- Top fed for a minute.
--- This slimy residue is really freaking me out! I hope the added enzymes will help eliminate the slime.
--- Going to do a full reservoir sterilization/nutrient change over the weekend. Please survive until then girl!
Day 04 - Thursday - 08/13/20 - Total Days: 011
-----------------------------------
- [0930]: I think the enzymes worked! There is little to no slime now!
--- Although I think the root was also dissolved in the process. It's now just a little stub sticking just below the net pot. The enzyme is also suppose to dissolved dead roots too but guess that root was too weak? Not sure what happened there. But I think the slime is cured!
--- Solution strength went down to 395 PPMs. Decided to add more base nutrients.
--- Added 8ml of Sensi A
--- Added 8ml of Sensi B
--- Added 4ml of B-52
--- Solution strength went up to 598 PPMs.
--- PH was at 6.1
--- As long as the PH is between 5.5 and 6.3, I'm not going to use PH Up or Down. But still will monitor PH levels.
- [1715]: Checked up on her after her nap and shes looking alive but stunted. But no slime!
--- Decided to add some sugars to help maintain the enzymes and beneficial bacteria.
--- Solution strength was at 587 PPMs.
--- PH was at 6.2
--- Added 8ml of Bud Candy
--- Solution strength went up to 671 PPMs.
--- PH also went up to 6.3
--- Lowered water level a bit to hopefully promote more root growth.
--- Top fed for a minute.
--- She is getting bigger, but still looks yellow.
Day 05 - Friday - 08/14/20 - Total Days: 012
-----------------------------------
- [0915]: Leaves look a little burnt on the tips. Still no slime.
--- Going to back off on the PPMs to hopefully fix the nutrient toxicity.
--- Solution strength was at 632 PPMs
--- PH was at 6.3
--- Added/Removed water until PPMs were at 536.
--- PH was still at 6.3
--- Raised water up a bit, then top fed for a minute.
- [2200]: Looking better. Still yellow though.
--- Solution strength: 514 PPMs
--- PH: 6.5
--- Added PH down.
--- New solution strength: 518 PPMs
--- New PH: 5.2
--- PH was kind of high. So decided to PH down. Had to use quite a bit to bring it down. But eventually got it to drop down to 5.3. A little low, but so far, the PH has always gone up so wanted to start it really low.
--- Ran the top feed for a minute to re-saturate the top of the hydroton.
Day 06 - Saturday - 08/15/20 - Total Days: 013
-----------------------------------
- [0830]: She looks stunted. leaves are still yellow.
--- Solution strength: 514 PPMs
--- PH: 5.6
--- Top fed for a minute.
--- Not sure what to do at this point. Going to do another reservoir change soon. Hoping she lives until then.
- [2145]: Looking pretty much the same.
--- A bit of slime has returned. Since I've been diluting the nutrient solution, the enzyme ratio has dropped. So I guess this is expected.
--- Also noticed that slime build up was on the air-stones. Never really checked the stones so not sure how long that has been there. Looks brown too, which can't be good.
--- Going to do an H202 sterilization of the system (minus the net pot) tomorrow so did not add anything.
--- Lowered the water level to below the net pot.
--- Then top fed for a minute.
Day 07 - Sunday - 08/16/20 - Total Days: 014
-----------------------------------
- [0900]: STERILIZATION DAY!
--- Decided to skip today's night cycle for a deep clean.
--- I'm hoping that skipping a night cycle won't be too stressful.
--- Temporarily moved her to a new bucket.
--- Used about a half of gallon of straight distilled water to flush out the net pot.
--- Drained the system and wiped up all the brown sludge. Also removed the air stones and cleaned up all the goo.
--- Filled the system with 2 gallons of distilled water and at least 30ml of food grade hydrogen peroxide (35% strength).
--- Yea its a lot, but since I'm not going to sterilize the system overnight, I went with a really high doseage. Basically I kept adding until I started to see little bubbles start to form.
--- Then I ran the water pump.
- [0915]: Boiled the air stones in tap water for about 10 min. Then reconnected them to the airlines.
--- I let the air stones and hose soak in the sterilization solution for about 5 minutes so the peroxide can absorb into the stones. Then ran the air stone to help mix and agitate the solution.
--- Occasionally, I'd repeat the process of turning the air pump off for a few minutes to let the stones soak.
- [1000]: Covered the top two row of holes of the net pot with some aluminum tape. Hopefully this solves the light leaking in through the hydroton.
- [1200]: Used an old toothbrush and scrubbed the pump clean. Then drained the system.
--- Refilled with more distilled water and peroxide. Again added a lot.
--- Ran system again to sterilize even more.
- [1530]: Drained the system and refilled with distilled water to rinse.
--- Ran the system for a few minutes, then drained and rinsed again.
--- Did this a few more times over about an hour.
- [1630]: Added 4 gallons of fresh distilled water.
--- Added 15ml Sensi Grow A
--- Added 15ml Sensi Grow B
--- Added 12ml of B-52
--- Added 16ml of Voodoo Juice
--- Added 16ml Sensizym
--- Solution strength was at 430 PPMs
--- PH was at 5.6
--- I was going to add Hydroguard, but I think the bottle is expired. Since 2017 or 2018!? I think Hydroguard is good for up to 2 years from the date on the bottle or 6 months after opening. So not going to use from now on. I wonder if this could have contributed to the slime build up.
--- Also removed the CaliMagic and Superthrive too. Going to only use AN products to eliminate the chance of incompatible nutrients.
--- Placed her back in the bucket and top fed for a minute.
--- Here's hoping for the best. Going to let it ride until morning! Please feel better!
[END OF WEEK 02]
Likes
8
Share


@ThatsmyGrow
Follow
Frostbanger really impressed me; I think you can clearly see the Gorilla Cookies cross. I would love to grow this strain again and again.


Processing
Likes
5
Share


@Deli_Weed
Follow
Va un poco lento el engrosamiento de esos cogollos, pero la planta se ve bien en general, pudo haber estado mejor si hubiera recibido más luz creo yo, pero huele delicioso 😋 y tiene unos colores hermosos, ya quiero ver el resultado final 🌱