
Likes
Comments
Share


@Medicine_Tree_Family
Follow
Overall an excellent grow. Grew three total plants, they finished around day 75 from seed. Super happy with the size of thesr plants and overall yeild. They grow as advertised. Short and stalky, but nearly all bud. Picture perfect plants that smell super strong.


Likes
24
Share


@GirlGoneWeed
Follow
I would try growing this strain again if It was giving for free and this time I would attempt outdoor to see the difference. Im not sure if I had bad luck with my seed pack of if this strain just need to work on its quality in terms of resistance.

Likes
8
Share
@PapaTerps
Follow
Black Cherry Gushers - Barney's Farm
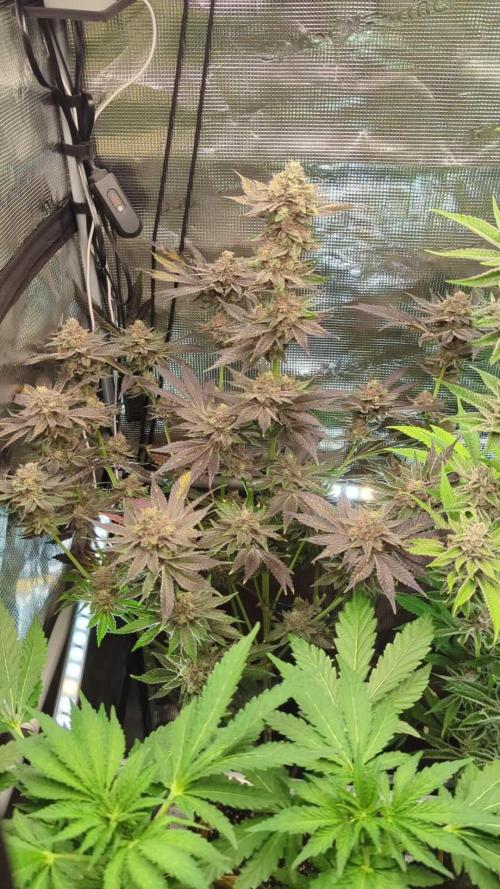
Day 106 - watered her with 5L of RO tap water with a reduced measure of Bio Bloom and Top Max nutrients, and then pH'd to 6.3. She's about eight days from harvest having spent the past 9-10 weeks on a 12/12 schedule; about 70% of her pistils have turned amber and her trichomes are mostly milky🤘🏻 Other than removing a couple of fan leaves from her top canopy, not much work... She has been an easy enough grow🙏🏻

Likes
59
Share


@Salokin
Follow
These ladies continue to develop very nicely and lucky stopped stretching pretty much in the beginning of this week and the buds are forming super nicely. Since I also don’t observe a stretch in flower anymore, I decided to feed pk13/14 for the next week. It continues to surprise me how hungry these autos are, much hungrier than my glookies fro example. Unfortunately I realized that the plant on the very right of the box produces much smaller buds than the other two. I am pinning that on the fan right above her, so have pointed it slightly higher, but I guess the damage is done:(.

Likes
16
Share


@VIPgrower
Follow
Forgot to add my room pics and details so I added a week just to show you don’t need a expensive grow tent so list grow room size 9x6x7 plus some thinking and tools to it all together and hardware
1/ double sided white and black Mylar $80
2/ duct tape had already and tuc tape red to seal joints of room $25
3/temp/humidity monitor $30
4/1000watt ballast and hps bulb and mh bulb $400
5/parabolic shade vertical $80
6/ temp / humidity controlers $100
7/pots $70
8/ nutrients $230
9/humidifier Vick’s x2 $130
10/arerator $40
11/fans 2 oscillating and one window $130
12/8 inch exhaust fan and all the fixings $200
13/ co2bottle yeast and co2 bag plus refills for bottles $200
14/ ec and oh meters for solutions $200
15/ plus miscellaneous items not mentioned $400 but you get the idea
16/ seeds Barney’s farms $90
17/clones from seeds from Barney’s farm off a friend of a friend thanks Johnny $80 👍
18/anything else I have forgot cause of my stoner brains learned a hole new with light and par and PPFD and dIL thanks

Likes
54
Share


@DogDoctorOfficial
Follow
And the time to defoliate this Mama as arrived, i finally manage to get my hands dirty and manage to get some air and light Going true this beast, i mean just look at the size of this auto, she is huge , and getting her fruits on the way, notice that she was needy so wen changing the water on the autopot reservoir i top feed her with some extra P and K just in case, i will repeat this if i fell needed <3<3<3
Biut for now just look at these beast and ho she is evolving so fast now that she is in full flower mode, heheh i know they say dont defoliate autos, but i also know me and i just love to try out what ever. They say its not possible to do and see for my self if is or is not possible, these time was defoliating autoflowers and i will fast know if was a good thing or not heheh lets see hihihi
Haded a mini video from me defoliating her and the rest of the sisters dividing room with her <3 <3 <3
As always thank you all for stoping by, for the love you guys put in the community, in to growing and it all, i am blessed to walk among all of you and am blessed with it all.
Genetics :
AUTO SOMANGO GLUE @ ADVANCED SEEDS
All info and full product details can be find in can find @
https://aptus-holland.com/
https://advancedseeds.com/
https://autopot.co.uk/
https://lumatek-lighting.com/
#aptus #aptusplanttech #aptusgang #aptusfamily #aptustrueplantscience #inbalancewithnature #trueplantscience #growerslove #dogdoctoofficial
With true love comes happiness <3 <3 <3 Always believe in your self and always do things expecting nothing in return and with an open heart , be a giver and the universe will give back to you in ways you could not even imagine so <3 <3 <3
More info and updates @
https://growdiaries.com/grower/dogdoctor
https://instagram.com/dogdoctorofficial
https://youtube.com/channel/UCR7ta4DKLFMg2xxTMr2cpIg
<3 <3 <3 Growers love to you all <3 <3 <3

Likes
Comments
Share

@SpaceCadet3000
Follow
Day 2: Fed with Epsom salt, beetroot powder, shilajit and aloe powder solution.
Day 3: Soil is too dry. Began adding extra water with a sprayer. About 1.5L between 5 pots in the morning and another 0.5L in the evening.
Day 4: Applied another 100-200ml plain water per pot using the sprayer in the morning. In the evening I fed with a solution of corn steep liquor, seaweed powder and soapnut powder.
Day 5: Top dressed with roughly 2tbsp sprouted seed blend per pot and watered in with roughly 500ml water per pot. Soil still isn't wet enough.
Day 6: Fed with roughly 400ml plain water per pot. Will use the sprayer later to feed more plain water in bursts, until each pot is as heavy as I want it to be.
Im going to begin sprouting one more batch of seeds, which will be toasted before top dressing. Then I'll probably just stick to feeding plain water or sugars until harvest.
Likes
35
Share


@Compassionate_Gardener
Follow
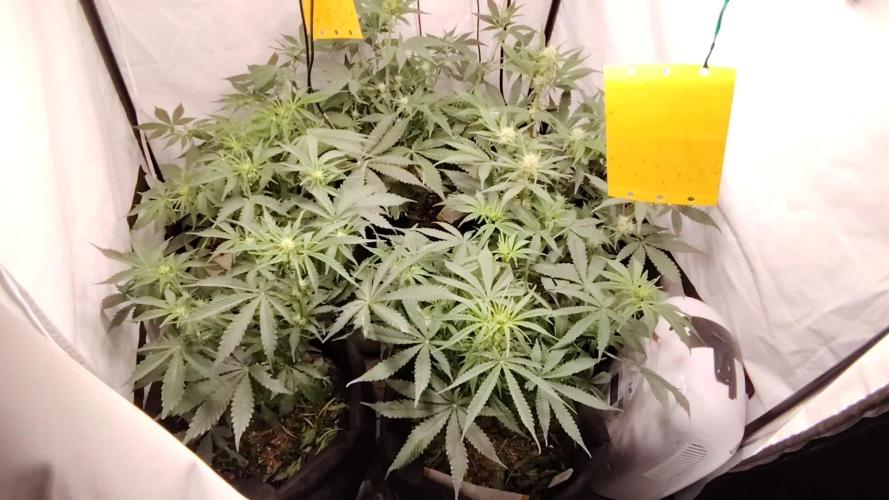
During week 4 (=flowering week 2) the 18 CANNALOPE HAZE plants from DNA-GENETICS grew like hell and started to develop their first white hairs (=female pistils of the plant). The speed in which the little white crowns appear is astounding to me, I LOVE IT! The lamps are now hung at the producer recommended distance of 22 cm (=LUMATEK) and 45 cm (=SANlight) and both run at 100% power (=no more dimming for now!). The difference between the left side (=Lumatek) and right side (=SANlight) can be seen clearly in the videos. The plants on the right under the Q6W-Gen. 2 LED-Lamps from SANlight have a darker, healthier green color and have produced VISIBLY MORE FLOWERS then the plants on the left side under the Lumatek PRO 600W. Lets see how this goes further next week...😎

Likes
6
Share


Likes
8
Share


@DoMoNe
Follow
Following RQS auto guide : https://www.royalqueenseeds.com/blog-how-to-grow-autoflowering-cannabis-n83
WEEK 3: VEGETATION WELL UNDERWAY #15 29.3. - #21 4.4.
#15 29.3.
-Nothing done on this day, except remotemonitoring
#16 30.3.
-Watered with nutes mix and with PH- mix
-Filled hudfr.
-Increased exhaust fan from 1/2 time on to 2/3 time on.
-Modified the old LST's and bent rest of the plants too
#17 31.3.
-Watered again, with nutes mix and with just water, 3liters.
-increased exhaus to be 100%
-Shutdown humidifier
-Tent now at 22c-25'c and about 40% hum.
-removed the 3in1 meter, was just bs...
-Otherwise growing nicely.
#18 01.4.
-Nothing done on this day, except remotemonitoring
#19 02.4.
-Nothing done on this day, except remotemonitoring
#20 03.4.
-Mixed all nutes to a 1,5liters , then mixed that with water to an 3liters and Watered with that solution, so about 0,75liters/pot
-more LST as the plants are getting bigger
-Removed humidifier from tent, as the hum. stays between 30-40% even with exhaust fan at 100% on.
-Moved the temp diode closer to side of strskllr pot, as it got "too" close to plant leafs
-Added pictures of LST and 2,5hours after it, noticeable change in plant directions, so immediately they are turning towards lights (as the should)
-Oh right, 'cause there is 2x purplematics, i kinda FIMmed the other with just my fingers, at least i got some leaf heads out, so might been fimmed might not been fimmed, will see if there is any difference compared to his mate in the same pot..
#21 05.4.
-Again a "last day of the week", this week must been "fastest", possibly 'cause again a day with "nothing done , just remotemonitoring" in diary also.
-Will start watering more next (0,5liters/24h/plant stated in RQS guide 'bout growing autos : https://www.royalqueenseeds.com/blog-how-to-grow-autoflowering-cannabis-n83 )
-Also next week should be the last week in VEG phase, there was already some minor smell in tent, even with coalfilter at exhaust line intake, but id say no flowering nodes yet visible, will take "close-ups" after i spot any (nextweek)
-Will not use Buddy next week, unless there is any visible flowerings, after that should be used accordingly.


Likes
12
Share


@ciansta
Follow
So the Northern Lights free seed from RQS ended up out living all 3 of the Dosidos’ “USA Premium” seeds that all died within the first week of sprouting, hopefully an explanation will be found for this as I have not been able to come to any conclusion as to what happened. Long live the lights amiright


Likes
68
Share


@Ferenc
Follow
So beautiful.....
Full fertilization started with the mix above the epsom salt is granulated so those little white balls are the epsom salt :) The little dried clementine is just decoration ;)


Likes
27
Share


@CannbellFarms
Follow
I’m overjoyed with the phenos this strain is producing, strong vibrant purples with some serious flavour profiles!
Scent Profiles we have:
Candy Lemon Sherbet 🍬🍋
Sweet & Piney Diesel 🍭🌲⛽️
Sweet & Tangy Tropical Punch 🏝️🥊
Alongside this, these beauties are the frostiest and the most insanely dense koala looking nugs I’ve ever produced!
Likes
14
Share


@Noon_Grows
Follow
Start of week 5 of flower and the girls are looking happy, starting to get a decent scent on them, definitely got that citrusy smell coupled with candy sweet... I can’t wait for it to finish now, 3-4 weeks and counting 😅
Likes
12
Share


@H2Smith
Follow
📅 23.04-21 (Flo day 57)
📜 trichome analysis: not ready to flush.
⚗️ 1.85
💦 6.2
🌊 40L
📏 cm
📅 24.04-21 (Flo day 58)
📜 removing 30l from the system, the plants drank 30l. 60l filling. EC dropped to 1.83 at 1:00 AM. Trichome analysis: not ready to flush.
⚗️ 1.88
💦 6.2
🌊 30L
📏 cm
📅 25.04-21 (Flo day 59)
📜 trichome analysis: not ready to wash. Plants have drunk 40l at 8:00 PM 50l at 11:00 PM
⚗️ 1.77
💦 6.2
🌊 50L
📏 cm
📅 26.04-21 (Flo day 60)
📜 Set Ph 6.1 to the Ph Controller.
⚗️ 1.79
💦 6.18
🌊 30L
📏 cm
📅 27.04-21 (Flo day 61)
📜 Trichome analysis: Not ready yet.
⚗️ 1.80
💦 6.10
🌊 45L
📏 cm
📅 28.04-21 (Flo day 62)
📜 drained 50 liter from the RDWC system. Objective EC 1.60. Add 175ml total care
⚗️ 1.78
💦 6.10
🌊 35L
📏 cm
📅 29.04-21 (Flo day 63)
📜 -------------------- Nothing to say
⚗️ 1.67
💦 6.10
🌊 40L
📏 cm
_____________________________________________________
📅 Day - 📜 Note - ⚗️ EC -💦 PH -🌊 Water -📏 Height
Equipment:
Idrolab 12 bucks
Chiller teco Hy500
weather controler with Co2 : PRO-LEAF BECC-B2
Bavagreen 720w
Bavagreen 720w
Bavagreen 240w
Bavagreen 240w
Nutrients and PH controller: PRO-LEAF PHEC-B2
Nutrients: Green House feeding - powder feeding hybrids | Powder feeding boost
Extractor: primaklima PK250-1 PK250-L1 x2
System and roots care: Idrolab Total care

Likes
5
Share


@TheWeedaltor
Follow
She was the “free seed girl” and she got last place available in the grow room 😬
Likes
5
Share


@Stankystan9
Follow
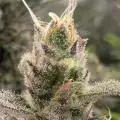
New microscope came in, just in time to start checking trichs on CP. I never realized how hard it is to keep a steady hand for a proper shot, so hopefully I’ll have better focused shots soon...
Appears they’re mostly clear, I like that couchlock high so I’m going for mostly amber but maybe partial harvest?
I don’t know. Comments, suggestions, opinions, all are welcome here. For now I can wait.
