


Likes
43
Share


@GODSGIFT_2005_JM
Follow
🍼Greenhouse Feeding BioGrow & Bio Enhancer
⛺️MARSHYDRO
The ⛺️ has a small door 🚪 on the sides which is useful for mid section groom room work. 🤩
☀️ MARSHYDRO FC 3000 LED 300W
☀️Also special thanks to VIPERSPECTRA P2000 (200W) & XS2000(240w) LED growlights
🌱 FastBuds 420

Likes
1
Share

@Organic_G
Follow
Kleines Süppchen gekocht um das Bodenleben nochmal anzuregen,
Bat Guano Flüssig
Fermakor
Zuckerrohrmelasse
2x Bannanenschalen
24h Sauerstoff zugeführt und eben die Hälfte gegossen, hoffe das es die jungen Wurzeln nicht verbrennt
Likes
1
Share


@El_gordito99
Follow
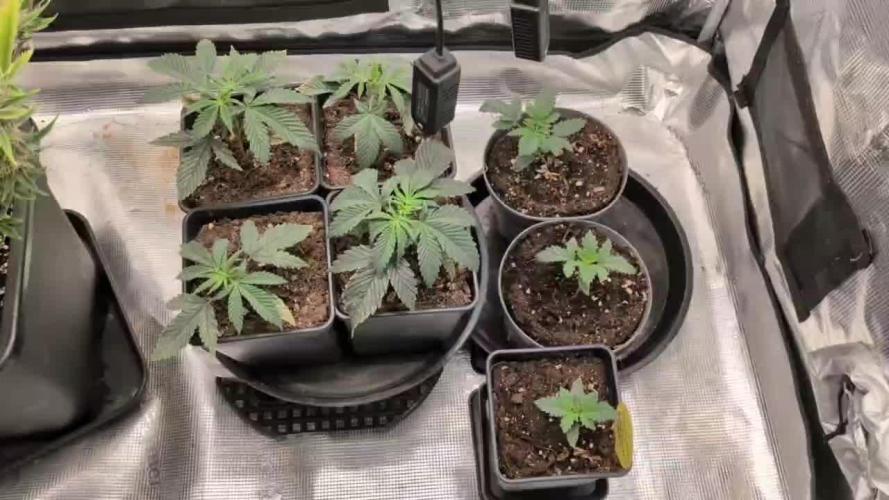
•Seconda settimana•
Ciao ragazzi !! Dopo i primi 15 giorni di vita (totali) le piante presentano una bellissima cera, sinonimo di irrigazione e nutrimenti corretti (nonostante il PH fosse alto).
Ricordo che mantenere livelli ottimali di umidità, temperatura e PH mette la pianta in condizioni perfette per poter aumentare il rendimento finale.

Processing
Likes
10
Share


@StarletBud21
Follow
Start of week 3 I believe the girls are doing good a few minor worries but that’s at ease for now I think , i have added nutes at a low level and will increase once I see how the plants react to the introduction of the nutes .. Looking into starting lsd on some plants but not too sure wether it’s to early or so . will continue to update the week but for now
Started lst on a few plants day 15 and seen good reactions by day 17 so quite happy with that and will continue this process I will also look into topping my plants as well but not just yet ... they seemed to like the nutes as well so all good week so far
Soo topping done on 4 plants wasn’t as scary as it sounded haha let’s see how they recover ! Going to combine lst as well now
Very good recovery it looks like and the end of week 3 looks promising with the plants
happy growing

Likes
8
Share


@Pifferson
Follow
This week was fun, had nutrient lockout on the one plant some signs on others.
Decided to flush from the top with two plants which is a terrible idea with autopots; the minerals build up in the soil and all I did was wash them down.
The plant that was looking the worse had some lower branches die after this so I cut them out.
Reached out to autopot and they were a huge help, flushed from the Rez and then brought my nutrients way down. I only just got an ec meter but I was at 3200 ppm when I started the flush and 150 by the time I added nutrients back in.
The two plants that I flushed from the top aren’t in great shape but they’re still alive, only 2 more weeks to go so hopefully this didn’t have too much of an impact on quality!


Likes
28
Share


@TheHighentist
Follow
It's officially week 4 of veg.
What a ride! These ladies DO NOT give up and neither did i.
Second grow, it is a learning curve.
With all the growth stunned, i am a bit impatient.
BUT the good news is the smallest have starting growing again.
Anyways...
👽👉19/9 New automation program for this week. (See pictures for app screenshots for automation and datalogger)
Temps - 21night/29day
RH% - 60RH night / 68RH day
My plan is to decrease the humidity at night, to increase the vpd.
The same goes for my light output and nutrients.
Changing the variables gradually over time.
👽👉20/9 I topped two more plants.
The growth is gradually getting better. They should be ready for their first real feed tomorrow. (Only top fed them last watering)
👽👉21/9 ** First real feed.
-They reacted well to a last lose dose top feeding, so this time i will give them a full feed, but same low dose.
-Programmed new automation based on VPD Graf (see pictures) Set to 1.0 VPD. // Inkbird app, i am adjusting the RH% to the temp in the tent.
-Did some experimental LST on one of the smaller ones.
Dont have a co2 meter, but have co2 bag. But it has not been added as a variable to the climate calculations.
👽👉22/9 The new automation program has proven efficient and working(for now). Now its interesting to see the plants adapting the constant VPD.
👽👉23/9 Did some more LST work to keep the tallest ladies at level.
👽👉24/9 Visiting the ladies and checking up on the lst work. Tucking in leaves, plotting my next move.
*Water day. they shared 5 Liter, where the bigger ones got more.
PH 6.4 - EC 1.52 (Last water was PH 6.4 - EC 1.37)
1.5ml/L Bio heaven+Bio fish. (Next time they will get 2ml/L)
👽👉25/9 Turned up the lights from 75% to 100%. Temps are about to rise higher. might as well let the ladies get used to it.
Likes
45
Share


@tresplantes
Follow
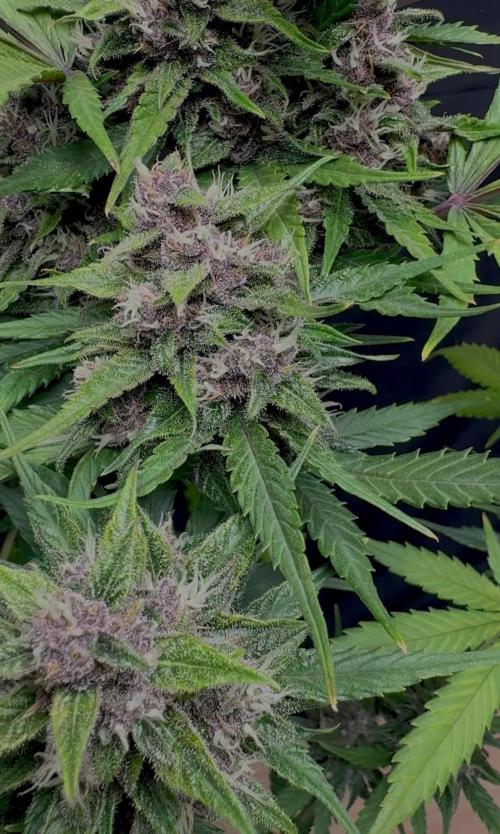
All at all Everything went Perfect Taste and Effekt are super nice
very Late small strech in flower like week 5 she Streiches 20cm Never saw that
Very nice Cross there Form ripper Seeds cant say nothing about the Stability because i only popped one seed but that one usually is a keeper will try them again anytime soon


Likes
4
Share


@Lazuli
Follow
So this plant grew during winter, i cant heat the room where the tent is so the only warmth was from my LEDs and dehumidifier, during summertime this strain finishes in around 10 weeks from seed, if u like strong smoke you should try her out
Likes
4
Share

@Thedibber
Follow
Few weeks left for this girl for its normal harvest window but I think shes a month off finishing but we'll see 👌


Likes
33
Share


@Ganjagrandaddy
Follow
Day 9 flowering: This plant has bounced back from potential composting material like its sisters. I am so glad i saved her and decided to go to the end. She is stacking her buds up beautifully. Due to her age , i think she had a kick start over her companions to maturity so flowered quicker. The node distances are perfect for joining up and creating fat, long colas . Very happy with this girl


Likes
63
Share

@ElNass
Follow
Harvest was completed after a full flowering cycle, cutting the plant at peak maturity. Buds were dense, resinous, and already showing a strong terpene expression at chop.
Drying was carried out slowly and in a controlled environment, prioritizing terpene preservation and overall quality over speed. Low temperatures and moderate relative humidity were used, starting with whole branches and then adapting the process based on bud size and density.
Due to the density of the flowers, internal moisture migration required close monitoring during the first days. Drying conditions were adjusted when necessary to avoid overdrying the outer layers while allowing moisture to escape evenly from the core.
By the end of the drying phase, buds felt dry on the outside while remaining slightly elastic inside. Resin production was very noticeable, with buds staying extremely sticky and aromas already opening up.
No signs of mold or off-smells were detected, only clean and expressive genetics coming through.
The buds have now entered the curing phase, where the final aroma and flavor profile will fully develop.
A final update will follow after 2–3 weeks of curing.

Likes
16
Share


@Hydrostyle
Follow
Hi Guys and Girls
I will do this challenge to 😎
I use a tiny pot 16 oz-0.43 l (i dont have a solo cup)
I hope my Bart Simpson will do a lot
I used soil with perlite+coco
For this challange i will use BioBizz nutriments and a lot of love.😍😍
Thanks to read me
Good grow 🤘🤘
Likes
47
Share


@BloodBath
Follow
Sour Wiz is still in veg. 7 weeks. Looking fantastic. EAsiest strain to grow so far. 0 issues and respond so everything well. Once I can sex I’ll separate and start planning to flower. Skywalker OG is still going great in week 9 of flower. STARTING to see a lot of bud structure and white hairs. Northern Lights is still surprising because it was so mutated and now its thriving.


Likes
15
Share


@Deli_Weed
Follow
Esta es mi primer planta que cosechó con éxito, y estoy muy feliz con mi resultado final 😄 obtuve una muy buena cantidad de flores premium con alrededor de 15% de thc (desde mi punto de vista claro 😅)
Tuve algunos problemas durante el cultivo, principalmente que deje que se estirara mucho, debi hacerle LST a la punta principal para que no siguiera aumentando la altura y tener más flores del mismo tamaño, las flores más bajas quedaron chicas y les faltó madurar un poco, también tuve problemas de sobrefertilizacion aun a pesar de que seguí las instituciones de los fertilizantes y de sus indicaciones que me dieron los de servicio al cliente, incluso ya teniendo en cuenta eso siempre use la menos de la dosis de la base ya hasta que crecieron más le fui aumentando, igual creo que es muy cierto lo que dicen de que “menos es más” a la próxima empezaré usando muy pocos nutrientes, aparte creo que si hubiera usado unos leds más potentes, las plantas hubieran aprovechado más los nutrientes, pero igual me sirvió de experiencia, pienso cultivar de nuevo esta genética y sacarle más provecho. Muy recomendada 👌🏻😁

Likes
Comments
Share


@Cloudfan101
Follow
First attempt at FIM failed. She bounced back just fine this week. She grows thick. FIM attempt #2 @ end week.
Mainline training going strong and continues to grow and is on her fourth and final node on each side.


Likes
Comments
Share


@BLAZED
Follow
Week 3 (27-11 to 3-12)
What's good everyone?
We started this week off topping the lady and removing the 2 bottom shoots.
The next day Santa came early 😁 Got 2 new clip fans and the AC5 Power strip from Spider Farmer.
The power strip has 5 outlets you can control in the app, they can be turned on based on a time cycle, humidity or temps.
It comes with a sensor that monitors light, temperature, and humidity.
And a soil sensor that monitors soil moisture (VWC), temperature, and electrical conductivity (EC).
It also has a light adapter to connect 2 lights, that can be controlled in the app aswell.
The app shows the current VPD, i try to keep this around 1.0.
In the middle of this week we increased the light intensity from 30% to 35%.
LUX: 13.000/13.500 to LUX: 15.000/15.500
This week's growing conditions were 17.9°C to 22.4°C with a humidity of 55.5% to 67.6% and watered 2 times with 0.5L.
See you next week!