
Likes
Comments
Share


Processing
Likes
12
Share


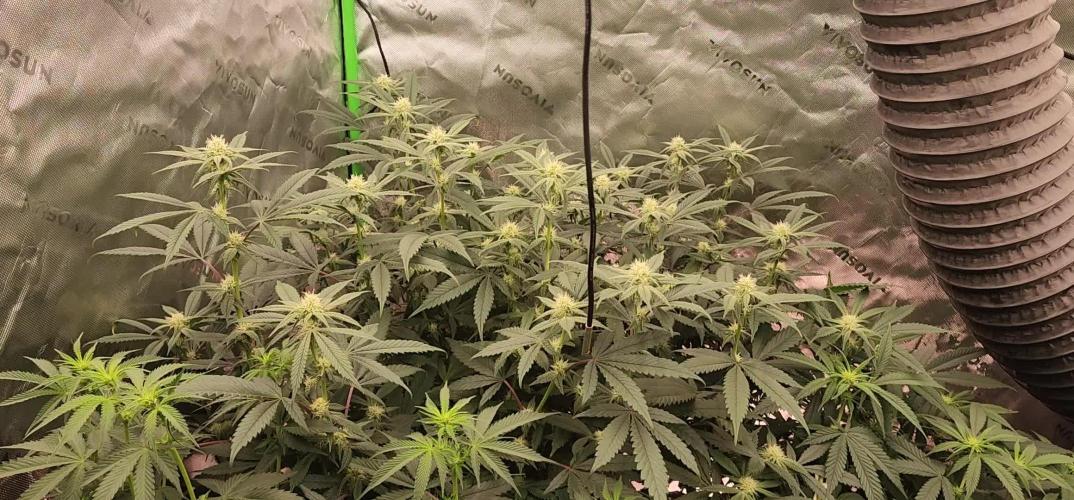
@therivernile
Follow
Temps were hard to control this week due to a heat wave and the fact I'm in a basement with no AC. I put the fans in the tent on too high a setting pointed right at the plants and they ended up with some wind stress which can be seen in the pics affecting the new growth. Bought a 6 inch inline fan to beef up the exhaust for the tent and this seems to have helped a lot.
I moved the tent to its final location to allow access to ventilation so I can pipe the smell outside when the flowering starts.
I started low stress training on both plants this week. I decided not to top either plant but I will for the next grow to see how it affects yields.
I also fixed the other viovsun tent that had a broken zipper track and only one slider. Hopefully I can use it in the future for flowering photoperiod plants.

Likes
24
Share


@el_cultivito
Follow
Added yellow sticky fly traps to all cubes as a preventative measure to avoid infestation of fungus gnats. So far none have been spotted.
Defoliated and did a little more LST to all the plants to open up the center and give more light to lower shoots.
Blue Dream 3 and Chemdawg 3 started showing some discoloration on the leaves (yellowing around the veins) and also the leaf tips curling down.
Did some research and came up with this...
Possible diagnosis:
- Yellowing around leaf veins could be a sign of Magnesium or Iron deficiency
- Leaf tip curling down could be a sign of Nitrogen Toxicity.
- Both could be caused by improper ph balance in water
Possible solutions:
- Applied Botanicare CalMag+ as a foliar feed and added some to the reservoir. CalMag+ contains Calcium, Magnesium and Iron.
- Diluted nutrients in reservoir to lower amount of nitrogen being fed to plants. Was feeding them at 1300ppm, lowered it to 1050ppm
- Tested runoff and saw it was coming out at 5.4pH so I increased the pH in the reservoir to 6.0. Now the runnoff is testing at 5.7pH, meaning that my rootzone is in the optimal range of 5.5-5.8
Well wait and see how the plants react to these slight tweaks. Hopefully we start to see a nice healthy even green again.

Likes
19
Share


@DeepRootsGrowTrees
Follow
DREAM SHERBERT AUTO / KANNABIA
HARVEST This week she was harvested overall a easy plant to grow that produces some trichome coverage buds that have a sweet aroma to them. Enjoyed growing this strain!! Stay Growing!!
Thank you for stopping by and taking a look during the grow it's much appreciated!!
Thank you KANNABIA!!!
Kannabia.com DREAM SHERBERT AUTO

Likes
3
Share


@DE_BW
Follow
Last week. She is an absolute beast! Can‘t wait to harvest her.
D79: 2l with Flawless Finish. Harvest is in two days
D81: Harvest. Will update in a week
Likes
51
Share


@cheetobreath
Follow
Res change on Tuesday Dec 22nd. Did 100% of GH Trio (plus calmag and armor si) bloom week 2, "early bloom" came out to 1180 ppm even after adding an extra 20% of bloom nutes. Was hoping for a little higher.
Last week my res pH kept dropping. I think I forgot to feed my left over nute solution from the previous res change. 😐 Maybe it's asking for higher nutes?
I'm working on an automatic top off system. Got a pump hooked up to a smart power strip and have a google routine to pump a liter (or two) of water. Wanted to set it up so I can go cabin camping for a day or two.
Update on 12/26, humidity seems high, just around 60%. Granted we had a warm up and rain. I'll keep an eye on it.
Likes
Comments
Share


@BruWeed
Follow
Se encuentra perfectamente bien. En toda su etapa no tuvo ningún problema.
Los cocos ya se encuentran pesados y con muchos tricomas.
En estos dias estare publicando mas imagenes de como se encue

Likes
144
Share


@1Right_Angle
Follow
Aug 22
- plant fed yesterday a.m., then got rained-on ALL NIGHT
- “week 2 Flower”, end of the week will see a Defoliation of sorts. Plant was Schwazzed re: 70% removal of Fan Leaves on day 1 of Flower. Targeting day 20 (we’re at 15)
23rd
- plant grew 6cm, basically over-nite!!! Wow
25th
- Microbe Tea brewing for tomorrow
- Pistils are appearing…
26th
- rain overnite, plant is “still”Dry-side of Medium, breakfast time; 1 gal. Posted above.
- !!! Cali Crasher finally exceeded expectations and has surpassed the One Metre tall mark. Measured from the orig height, of the original soil via green wire for LST poking through the side of Fabric pot. Its a beaUtiful plant
*** tested the run-off from the Feed this morning, its been a while. Run-off = < 3000ppm, so the plant was flushed till ppm dropped below 1500. Yep, it took 5 gal of pH’d water. The Last gallon (5th one) included the bloom nutes, a 2nd time, due to the Flush. That final gallon equaled 1000ppm
- next week sees a Large-leaf schwazze on 31st (20days since orig schwazze). Any key, medium-sized shadow-maker gets yanked as well. Still gonna call it a 70% schwazze
28th
- last day of week 2 in Flower
- Nutes for Breakfast 1gal
- really happy this beast climbed over the Metre-mark this week

Likes
61
Share


@WhiteEdge
Follow
30.04.2024
Continue into week 9
Clean nutrient tank for the last time...This is last week of flowering for almost all girls.
Electrical Conductivity (EC): 0.8 for this week..
Purple Lemonade: First pheno is insane! Shape, size ,color, bud hardness, appearance, frostiness' all attributes to become photo model!
Beautiful and high odor in the room!
Lighting Parameters: PAR Map: Maximum PPFD is 800, minimum PPFD is 550.
VPD: Ranges from -0.1-1.1
Daytime Temperature (DT): 23-24°C.
Nighttime Temperature (NT): 19-20°C.
Leaf Temperature: 21-22°C.
Light Distance: 45-55 cm from the plants.
CO2 Levels: 700+ ppm.
HLG Scorpion Diablo: Set at 60%, positioned at a 45-55 cm distance.
Girls drink less water, so for this week and till the end of flowering new misting timing's
Daytime: ON for 50 seconds, followed by 30 minutes OFF.
Nighttime: OFF for 50 seconds, followed by 45 minutes OFF.
Nutrient Tank (NT):
pH: Maintained between 5.80 and 6.00. Stable PH, small drifting up and downs
EC: 0.87
Temperature: 19-21°C
Likes
16
Share


@valiotoro
Follow
Blessed with the result as you can see the buds looks fantastic💎
The trim was super easy(make sure you have enough gloves)😂
Now 7-10 days on the dry rack then see you in 2025 for the smoke review
Take care😁


Likes
26
Share


@MG2009
Follow
03/13/2021
Side branches are developing nice, I may do a little more lst to help lower tops to catch up before flowering starts
Ps.
Couple videos uploaded
Day #6 doing some bending, and broke a branch off so I dipped in rooting powder,threw it in some vermiculite soaked with Bonide Garden Rich Root & Grow 4-10-3 with (IBA) Lets see if she will root! Fingers crossed🙏
Likes
18
Share


@Chubbs
Follow
420FASTBUDS
FBT2106 WEEK 5
Wow what a big diffrence fron last week till now. They both almost seem double in size and are still moving upward. Over all health seems amazing as I don't see any issue's. I did up there feeding to now 1-2 liters every 2-3days as before was only 16oz. They're drying out just as fast so I know they are doing good as far as water/feed intake. I bumped up the GH Flora series 3 part nutes. I kept the Gro at 1tsp/gal but decided to add more of the Micro & Bloom to a 1-1/2tspgal so will see how they handle it. If I had to take a guess if they're like anyother Fastbuds amazing strains, they wont skip a beat and ask for more. Happy Growing

Processing
Likes
3
Share


@Canadian
Follow
Day 71 from seed the plant seems to be coming along nicely and flowering stretch has come to a end . I cut some of the lower branches that were carrying some flower because there was no way they were going to develop on time with the higher branches because of lack of light penetration at that lower level and since nothing well happened to those lower branches she can start concentrating her effort and energy on to the higher buds.
Thank you for reading I will continue to update have a happy grow.

Likes
15
Share


@DRO420
Follow
Flowers are really starting to get big. The Lotus boost nutrients have helped amazingly.
Likes
29
Share


@Grey_Wolf
Follow
Testing for Connoisseur genetics
Outback haze #1
7th March 2022
Welcome to week 23 😀
Both of these ladies are looking fantastic as they progress into the blooming stage 💪
Absolute monster on the left is my favourite of the two but the other isn't too bad either .
Neither have needed any feeds with the soil providing plenty of nutrition at this stage.
100% sativa's or in this case haze are fairly low maintenence when it comes to feeding .
chuck in some manure or something ( I am using guano ) and they will happily grow along nicely .
Did you know that Connoisseur genetics are looking for new testers for their newest strains??
to be considered you just need to have had a few diaries with harvests
Thanks once again for stopping by 👍
*****Major Update 10th March ***** Plant two developed ball sacks along with her pistils so unfortunately I had to pull her out and destroy the plant.
I know some people might think I could have tried removing the sacs and giving the plant a chance .
But I am trying to make myself some F1 hybrids and do not want any Hermies anywhere near my females .
Now because this strain has Thai genetics there is always that chance they throw "nanners" but usually later in flower
so for this one to show itself right on the start of flowering is enough for me to pull it , burn it with fire . Or in this case I'm gonna let
the sun solarise it and then it'll be mulched with other plant materials from my garden.
Likes
4
Share


@420rollweek
Follow
Seeds directly In coco jiffy
Bruce banner seed spend more time then other 2 to get out...

