
Likes
Comments
Share


@cal917
Follow
light feed ,girls are just costing nice and easy. Trying to go less on the nuts. feeding a lot of microbes and teas. they were transplanted in ff OF so they have plenty of nutrients for at least 30 days.


Likes
11
Share

@Mimi420
Follow
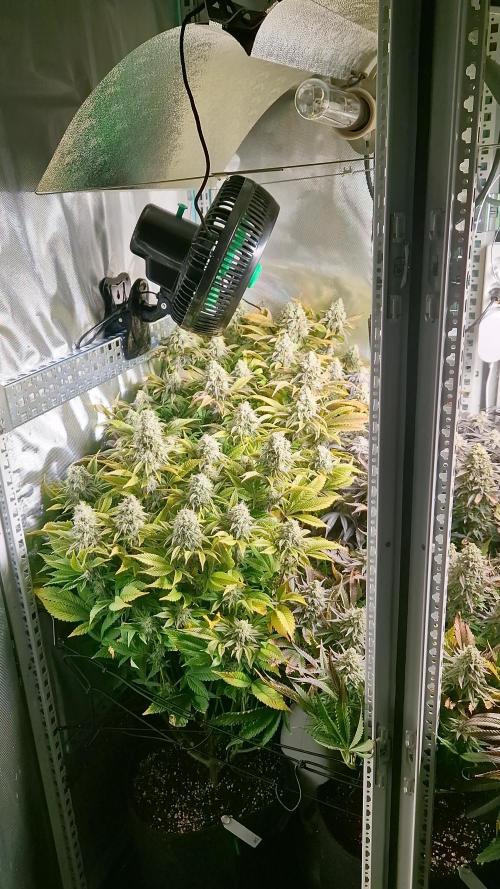
Day 49 of flower — Harvest season creeping up
Yo — quick GD drop from my 120×80 SCROG. Plants are looking proper: fat, frosty colas everywhere and the tent stinks so good. I’m switching to water-only from here — flushing the last stretch. Trichomes are mostly cloudy with the odd amber speck showing; I’d say the whole lot will be ready in ~7–14 days depending on how the last swing of amber develops.
Big realities: my garage is cold & wet (nights down near 5°C, RH ~80–85%), so humidity’s been the constant headache. Ordered a Spider Farmer heater to push intake under the canopy but delivery got delayed — super annoying. To avoid chill I’ve had to cycle the inline fan overnight and run a tiny cabinet heater to keep temps around 15–17°C, but humidity still spikes. Zero perfect conditions here, just making it work — and honestly the cold gave me some gorgeous colours on the buds.
Notes & general vibe: buds are tacky as hell — every time I touch a cola my fingers go sticky with resin. Little amber popping on the tricomes now, mostly milky — perfect for couch-locky daytime/ evening smoke depending on how much amber develops.
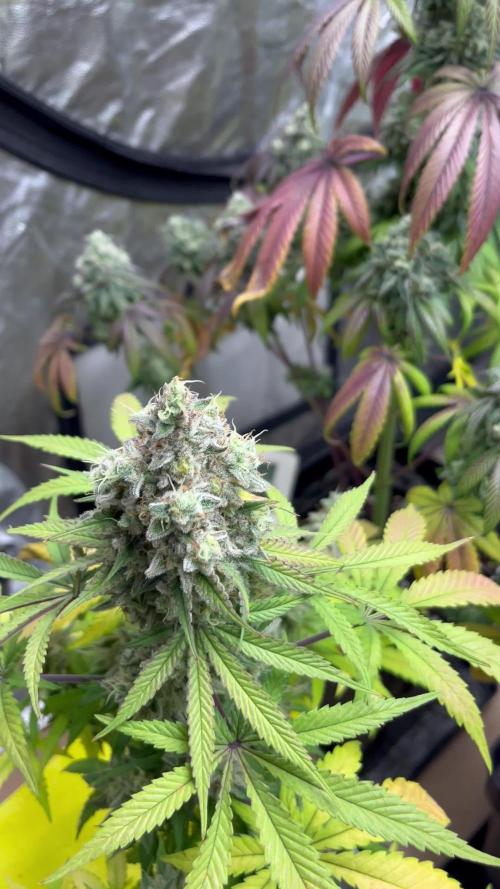
Strain-by-strain snapshot (positions + quick notes)
Back-left — Wedding Cake (Portland)
Nice chunky cakes, early fatteners. Lots of resin, big rounded colas. Colours starting to deepen on leaves, smells super dessert-y under HPS — heavy trich coverage, finishing fast.
Back-center — Kush Crasher
The Kush genetics show: purple/burgundy stacks and dense nodal buds. Slow to bulk but super frosty now. These ones are gonna be super sticky and couchy — big terp punch expected.
Back-right — AK-47
Classic heavy producer — loads of colas, reliable chunky structure. Stretches a bit less, packs resin fast. One of the more even finishers in the tent.
Front-left — Double Krush
Longer skinny colas but dense calyxes — nice structure for my net. Terp-forward, stacking trichs well. Good contender for chop in the next week.
Front-center — Wappa (PARADISE) — main cola boss
She’s my star. Main cola is packing insane weight and is the most consistently chunky plant in the line-up. Colours are gorgeous — deep purples, dark greens, and a thick resin coat. Wappa’s bulking like a champ and will be one of the fattest buds in the harvest. Massive praise for this one — she’s the poster child for this run.
Front-right — Detroit Runtz
Frost city — tiny sugary calyxes and lots of sparkle. Slightly looser than the Kush lines but super resinous and fruity-leaning. Good final week filler.
Quick operation notes
Water-only from now on (flushing).
Trichomes: ~mostly milky, some amber; keep checking under loupe.
Humidity = main enemy. Heater + proper intake/exhaust under canopy will help once the SF unit arrives.
I’ll do final clean-up lollipop & remove any really dead/dying leaves before chop.
Final thought — for an amateur out of practice I’m stoked. Learned a few lessons (humidity control = everything), but the tent’s delivering fat, sticky, colourful colas. Wappa deserves a medal — she’s the queen of this round.
Green vibes✌️🌿


Likes
Comments
Share


@WeGrow
Follow
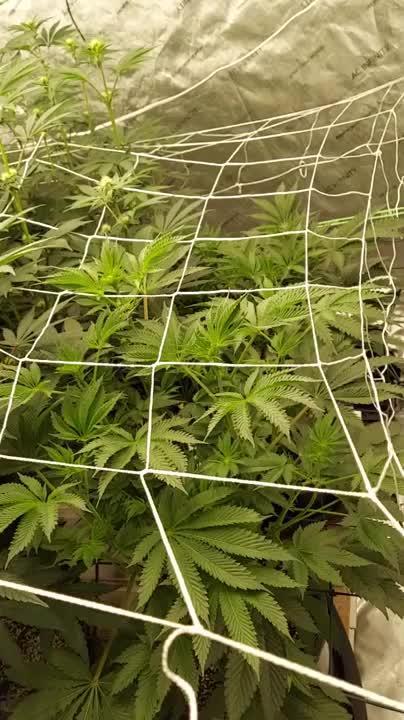
2 weeks of flowering (currently 12.5h light) are done and the plants are doing well! I have upgraded the grow box a bit, I now have a TAPO sensor for humidity and temperature that automatically turns off/on the ventilation system
Tomorrow the automatic watering system will be installed, more pictures will follow.
Update: Watering system added, took me quite some time to install but figured out how I can make each plant get the same amount of water. It is a cheap wifi system from Aliexpress, 25€.

Likes
19
Share


@eldruida_lamota
Follow
Que pasa familia, puesto que la compañera y yo estamos bajo mínimos, hemos decidido proceder a un lavado de raíces temprano, y un estrés hídrico para limpiar raíces y estresarla un poco.
Todo va sobre ruedas , puesto que el Covid afecta al confinamiento, decidimos cortar las gorillas estos días siguientes para secar y en nada tener algún bote para subsistir 😂🤣.
-El estrés hídrico es reducir cada riego la cantidad de agua, para que la planta se estrese y escupa tricomas sus últimos días.
Esta variedad de sweet seeds es INCREÍBLE, aun cortándola pronto me parece que los resultados son inmejorables, su olor a melón me encanta y se ve repleta de thc.
Nos vemos en la cosecha fumetillas, y mucho ánimo para todos.

Likes
21
Share
@eldruida_lamota
Follow
Que pasa familia, vamos con la novena semana de floración de estas Gomu Gomu Mango feminizadas de HighBreed.
Vamos al lío ,se colocaron en macetas de 7 litros definitivamente.
El ph se controla en 6.0 , la temperatura la tenemos entre 24/20 grados y la humedad ronda el 50%.
El ciclo de Floración puse 12 horas de luz, el foco está al 100% de potencia.
De momento va creciendo, tiene buen color, van madurando guay, ya van desprendiendo aromas dulces.
Comentar que superaron el estrés hídrico porque subí par de grados por la noche y va volvió a comer normal .
Gracias a Agrobeta por el kit para la temporada, unos jefes, siempre apoyando 💪.
- os dejo por aquí un CÓDIGO: Eldruida
Descuento para la tienda de MARS HYDRO.
https://www.mars-hydro.com
Hasta aquí todo, Buenos humos 💨💨💨
Likes
7
Share


@Messypies
Follow
2/3 plants doing good. 1 plant however has a calcium defficiency showing as orange spots on 2 of the fan leaves.i have added 2 ml of cal mag in with their new nutrient feeds to help offset.
I have been watering normally without nutes for the first 3-4 weeks. The defficiency has resulted from me using soft tap water which contains very little calcium.
Since adding, no new spots have appeared so fingers crossed
Only using half reccomended dose of nutrients at this point to ease them In to feeding

Likes
31
Share


@TheHighentist
Follow
23/5* Water day 275ML with Biobizz Grow and Fish-Mix
-Temps 24-25 Day / 21-23 Night
-Humidity 70-75% RH
Correction to LST / Letting the bigger restraints go
24/5 Freed them of LST as i want to let them grow higher
-Temps 24-25 Day / 21-23 Night
-Humidity 70-75%RH
25/5 Showing good growth
-Temps 25-27 / night 22-24
-Humidity 70-75%RH
26/5* Water day 275ML with Biobizz Grow and Fish-Mix as usual
-Temps 23-25 / night 22-24
-Humidity 70-75&RH
27/5 - Got my humidity controller
-Temps 23-25 / night 22-24
-Humidity 72% (+-5)
28/5 - Did some super super cropping and a bit of light "Chiropractic" (Kyle Kushman method) and a bit of lst on the branches i wanted to get more light
-Temps 24-26day /22-24 night
-Humidity 72% (+-5)
29/5 Water day*
As a first time, i watered them before they went to bed, as i wanted to give some nutrients to get over the supercropping stress
275ML (+ 2ml/L Fish mix + 2 ml/L grow)
-Temps 24-26day/22-24night
-Humidity 72% (+-5)
***********I will put them into flowering in about a week***************
Light to plant distance:
d.28/4 53 CM to light (kept the same distance rest of the week 1)
d.2/5 50 CM to light
d.3/5 42 CM to light
d.7/5 40 CM to light
d.19/5 38 CM to light
d.22// 34 CM to light
__________
My lights distance and PAR value:
24" / 60 CM = 237 PAR (umol m2s1)
18" / 45.72 CM 412 PAR
12" / 30 cm 811 PAR
6" / 15.24 CM 1816 PAR

Likes
14
Share


@Growbody
Follow
Herzlich Willkommen zu meinem Grow der Lemon Cherry Cookies Auto von FastBuds. Der Strain hat beim American Autoflower Cup in Los Angeles 2025 in der Kategorie Best Auto Hybrid den 2. Platz belegt. Wenn der Name hält was er verspricht, ist das genau das richtige für eine Naschkatze wie mich.
Für den Grow wird ein 20 Liter ROOTiES Stofftopf verwendet. Und die Bio Hanferde von Sonnenerde wird verwendet mit der Bio Faser zum Mulchen. Die Bio Hanferde habe ich noch mit Monster Bud Mix für Living Soil von BIONOVA und Zamnesia angereichert.
Tag 35: Die Lemon Cherry Cookies Auto von FastBuds geht in die Blüte. 1,5 Liter Brunnenwasser gegossen.
Tag 37: 1 Liter Brunnenwasser gegossen.
Tag 39: 1 Liter Brunnenwasser gegossen.
Tag 41: 1,5 Liter Brunnenwasser gaanz laangsam gegossen. Die Blüten wachsen unglaublich schnell.
Schön, dass du meinen Grow angesehen hast. Schau mal wieder rein. 🌱😎

Likes
2
Share

@00110001001001111O
Follow
:
Total Days - 62
Total Flower nights - 22
Overcrowding is playing out. HST is done by end of this week. Plants are healthy and likely predisposed to be taller plants, but overcrowding did not help. Better canopy management would have helped.
Likes
6
Share


@I_Identify_As_A_Dan
Follow
Start of week 4 for Space panda
Shes really getting quite frosty!
Also put the other pheno into fliower 2 days ago or so

Likes
28
Share


@GodZilla_Owner
Follow
The plants have already been topped. Today, on 25-05-2024, two large leaves were removed, covering the sprouts.
The LST was done at the same time.
Likes
13
Share


@quigley
Follow
Cruising. Kept the nutrients the same as last week as the plants are going a bit slower than advertised by crop king and Sonoma seeds. Looking like flowering will take ~10 weeks when all said and done.
Minor amount of defoliation done. Will be the last time to make sure I don’t stunt these autos. And ONLY defoliating. No pruning as I’m too afraid it will stunt the plants.
Lots of buds forming now. Plants looking great. Noticed that the sun shines through my windows for several hours and directly onto the plants so I have started opening up the tent everyday and letting the sun shine on them. Helping to ripen the lower buds and have them be less larfy when all said and done. This does cause the plants to drink water like no other so have had to up the volume on fertigations.
I’ve been using a LUX meter to check and make sure top colas aren’t getting too much light. The thing works great! Well worth the purchase.
My mothers on the other side of the tent are big so need less light and as a result I have been able to move two of their lights in close to the flowering autos. The additional light is definitely helping bulk up the plant. Currently over the two plants there is (as listed) an HLG 135w Rspec, an HLG 100 V2 3000k, an HLG 65 V2 4000k and a Mars Hydro TS600. Tons of light!
I’m in isolation as 2 of my housemates got COVID. As a result, I have a LOT of time to spend babying these plants and it is paying off.
See you next week!


Likes
3
Share


@erpiccione69
Follow
very good week, after a slow start this lsd from barneys seeds its exploding! by getting bigger day after day, next week i will probably top the plant and start the training!

Likes
332
Share


@OrganicNature420
Follow
Germination date 🌰 10/03/2021
Day 71 🌱 18/05/2021
Strain 🍁
Purple Matcha, Humboldt seed bank
Nutrients 💉
Advanced nutrients
PH perfect sensi grow A+B (veg)
PH perfect sensi bloom A+b (flower)
B-52 (through veg until week2 of flower)
Voodoo juice (🖕🏻)
Tarantula (🖕🏻)
Piranha (🖕🏻)
Sensizym (all the way through)
Rhino skin (🖕🏻) add first leave for an hour
Big bud coco (week2+ of flower
Bud xfactor (🖕🏻)
Nirvana (🖕🏻)
Bud igniter (first 2weeks of flower)
Overdrive (last 2weeks of flower)
Flawless finish (flush week)
RockHoldings Rockresinator(week2+ of flower)
Vitalink calmag
Set Up
⛺ amazon special 1.2m x1.2m
💡 spiderfarmer sf4000
📤📥 AC infinity 6inch
💧 10lt dehumidifier
Notes🗒️✏️
Final week of full nutrients done, will start to lower e.c this week and add overdrive. Apart from the slighty burnt hairs she looks 👀 and smells 👃 amazing. It smells alot like fruit loops the cereal, very sweet. Buds aren't massive on this strain but their rock solid and beautiful to look at. I can see this being a easy strain to chop up when its done and I cant wait to do it again.
%100 recomend this but not for a newbie and if you struggle with over heating 27+. Will do this in the winter to gets it full potential.
Thanks for following and liking means alot ❤️👍🏻
Sorry for the shit pics this week, phones dying slowly. Took some more and deleted the rest. New phone ordered
Follow PharmaZ his account is bad ass and very handy for tips and tricks. Worth a follow guys and girls 🍑
Stay turned and happy growing fam ❤️🍁🌱👍🏻
New video ❄️❄️❄️❄️❄️❄️❄️ cant wait to bury my head in this strain when its done

Processing
Likes
2
Share


@Munchiesfrommars
Follow
Highly recommend and already started a 2nd grow of this perfect strain Auto Brooklyn Sunrise
You can check my new report on my profile page
The best taste ever
The best mood and very happy and powerful all day
Amazing smell of citrus
Amazing look
Best strain from autos that I have ever grew.
Super lucky with this !
Processing
Likes
14
Share


@PlantGod
Follow
Day 30 Feb. 18th- I feel like everything is going great
-all plants are now in final 7 gallon containers..have used a lot of soil!
-I have been tying the plants down as much as possible
-March 2nd will be 42 days and I think that is when I will switch to 12/12
-Day 35 Feb. 24th- I need trellis netting soon
I retie branches constantly for inner growth
HULKBERRY and GREEN GELATO are growing similar...LSD and ROYAL GORILLA are growing similar!
-Very interesting!!
* I have color coated the plants like I should have a couple weeks ago
-GREEN GELATO has all green pipe cleaners now...HULKBERRY has all yellow pipe cleaners.
very long branches and small inner growth
LSD is in all purple pipe cleaners. tying it down has done wonders! it has awesome inner growth!
Now the ROYAL GORILLA in all orange pipe cleaners! This plant is a pain in the ass lol. The inner growth and spacing is insanely close!!! so many shoots all tightly together. I have tied down anything I can. Unsure how it will work in budding next week


Likes
8
Share


@Shadowpup369
Follow
These two did great even through a lil stress they still came out on top. I almost want to run it back but I think it's time for something fruity maybe, maybe having a terpene profile that helps initiate a more stone heavy affect and be indica heavy.
Likes
17
Share


@mistercaqp
Follow
This week the leaves were removed again so that the flowers all get the same amount of light. I had to tie down one of the two plants, otherwise it would grow too close to the light. The growth phase is now definitely underway and the plants are concentrating on forming the flowers. The flowers have already become much thicker and the first leaves are sugared :) No fertilizer was added this week, just 2ml/l Neem Oil.
Likes
2
Share


@Marihuanizenlapues
Follow
está semana fue de lluvia y sol, lo cual aprovechó mucho la planta para seguir desarrollandose saludablemente
Hoy aporto 400 ml de nutrientes en un te orgánico con enraizante y thricodermas.

Likes
28
Share


@Myrcene_Dream
Follow
-Added last top dressing of Gaia Green power bloom
-Defoliated a bit of the lower and larger leaves