The Grow Awards 2026 🏆 


Likes
Comments
Share
@HighZenBerg
Follow
Welcome back at week 3 in vegetative stage of the Sensi Amnesia feminized by Sensi Seeds.
She did a good progress during last week and developed 5 nodes already. I will give her a little more time before I top her and start the manifold.
She is very thirsty in her small pot. I think I will repot her in her final pot before I start mainlining.
So far, the conditions seems to fit. 26 C during day and 20 C at night with 50% humidity.
Leafs and new branches developed good and she is a strong lady without any issues.
Day 23: I repotted her into an 17 Liter pot with BioBizz Light Mix and it was absolutely necessary because the root mass of this lady was insane. Almost the whole pot was with white, healthy roots. I never experienced such a strong root structure in only 3 weeks from seed.
She will get 2 days of recovery time before I will top her.
Day 26: She got her second cut to develop 4 new main stems.
I started my first attempts in mainlining this lady. Hopefully she will recover fast and respond good to this technique.
Keep in touch !
Cheers HighZenBerg

Likes
43
Share
@MadeInGermany
Follow
Hey everyone .
This week she has developed further :-).
They look beautiful and are bursting at the seams 😅.
The water tank was also completely reprocessed and replaced.
Next week something will be cleaned and trimmed below. As usual, it smells very good 😍.
I wish you all a lot of fun with the new update, stay healthy and let it grow 🙏🏻👍
You can buy This Strain at :
www.Zamnesia.com
☝️🏼☝️🏼☝️🏼☝️🏼☝️🏼☝️🏼
Strain
Gelato clone from mother (Zamnesia )
☝️
Genetics: Wedding Cake x Gelato x Gelato 33
👍
Vega lamp: 2 x Todogrow LED CXB3590 COB 55 W
1 x Sanlight S2W 62 W
💡
Flower lamp : 2 x Todogrow LED CXB3590 COB 55 W
1 x Sanlight S2W 62 W
💡 ☝️
Grow Aero System : Growtool 0.8
☝️
Fertilizer:
Canna Aqua Vega A + B , Canna Aqua Flores A + B , Rizotonic, Cannazym, CANNA Boost, Pk 13/14, Canna Cal / Mag, Canna Ph - Grow, Canna Ph-Bloom
☝️🌱
Water:
Osmosis water mixed with normal water (24 hours stale that the chlorine evaporates) to 0.2 EG. Add Cal / Mag to 0.4 Ec Ph with ph- to 5.5 - 5.8
💦 💧

Likes
12
Share
@EmeraldLakeCannabis
Follow
Great week again. Clones showed more great signs of growth and are quite healthy. Today I repotted them to the final 5 gallon containers that they will be spending flowering in. We should be going into flowering within the next couple of weeks, I will be monitoring growth and performing a pre-flower strip. Updates as they come, of course.
Likes
13
Share
@Flowers_By_Irene
Follow
Partially drained the tank at the start of the week and topped up with ro water and 1ml of final solution per Litre. Last 2.5 days were in darkness.
I trimmed the majority of fan leaves before hanging up to dry in the tent today. Started out trimming with the plants in the tent and soon realised it would be much easier to just cut them down whole, hang them upside down outside the tent and trim them up a bit.
I have a small dehumidifier and a small fan heater setup in the tent and they have been keeping a humidity level of about 60% and a temp of 16 Celsius for the last few days while the lights have been off. I figure that's a good starting point for drying and I can increase the temperature if needed, that will drop the humidity also.
Intake fan at the bottom and extract fan at the top are running constantly as they have been since the grow started (low power 4" fans).
I might add back in a fan for circulation depending on how the drying goes, or maybe even trim or hang the plants better to get more airflow around the buds


Likes
9
Share
@TiRobotProds
Follow
Nous somme à la 6ème semaines de floraison tout se passe comme prévu les bourgeons continuent de gonflés les paramètres sont excellents 24 degrés en température 55% en hydrometrie.
- L'ajout de RQS guano a redonner un coup pouce à la plante les bourgeons ont sacrément gonfler aimer et regarder par vous même. Cet semaine sera aussi la dernière irrigation avec nutes. Ce run est l'une de mes préférée.
Léger carences en azote post-stretch cela es dû a un faible apport de celui-ci mais rien de grave cela indique les derniers semaine de vie de cette dame le rinçage sera simple et éfficace.
L'odeur quelle dégage es fortement fruité cela sent le 🍬 🍬. A plus pour d'avantge d'informations.👍🏼

Likes
7
Share
@Eddjack
Follow
Inizia a esplodere di gemme non sono molto grandi ho sbagliato in passato e la piccola ne ha risentito. Ora però si e ripresa e piano piano si sta facendo valere. manca ancora un po' alla fine del ciclo non vedo l'ora di fumarla tutta !
Dajeforte growes

Likes
31
Share
@IndicaVibeMe
Follow
Love the nugs coming In.
12/9/23 - Update, the Royal Dwarf auto is very tint. She's only 1 foot tall and already has 25 bud sites! I'm very happy with the flowers coming in, no 🍌 nanners or hermie characteristics! She's 100% female, and fits her name "Itty-Bitty"


Likes
49
Share
@masterofsmeagol
Follow
7/11 Got half in of rain last night. Glad I didn't water. Ph of rain water is very acidic. Added supports to the blueberry cheese in the 50. I just used string and went diagonal and attached to the cage. Wrote a ton but it disappeared. Anyway looking at previous diaries I was wrong about senescence. It wad the life cycle of those earwigs that did that to my plants (see other diaries). This soil mix is amazing. These plants gave only gotten like two small feeds of big bloom. I showed my commercial buddy and I'll keep it between us what was said but it made me feel really good. I'm considering either expanding the cage in one direction with some lumber I already have or moving a couple outside tge cage. That way I have more room. He said he's seen plants structurally similar reach huge heights (14f) so I'm just trying to avoid future problems. I at least need to get the trellis on. I hope poor that's food enough. Did a real nice video this morning but nothing wanted to upload and it just uploaded the same one twice. I'll try again and hopfully it will go up. If not I'll put it up tomorrow.
7/12 Dad has surgery this morning. I did a quick video and took some pictures. I need to do some rearranging with the plants and cut a pallet to fit in the back. Then I can put a vertical trellis up. Haven't decided if I'll add on to the cage, remove a couple plants or just rearrange things but I'm leaning towards the later. They will need water again and I'm wondering if I should start nutrients but everything looks so good. By this time on past diaries I'd be losing all my leaves bu now. MI think it wad part ear wigs and part to many nutes. This soil mix is taking these plants through veg. I'll probably do a feeding soon but it will be organic and it will he small like a big bloom or ancient amber. Im leaning towards not using growbig this year as my plants seem to be doing great without it. We'll see. I'll keep this updated.
UPDATE: Went back over and gave plants a full watering. Some were slightly drooping. I was going to add nutes but decided against it as I didn't see any deficiency. So far NO Earwigs! I comed through the plants and I did find a jpn beetle which I happily killed. I mixed up 8 gallons of water and gave it to the 11 plants so it wasn't quite a gallon a plant. I need to rearrange the plants so I have room to move around. I also need to cut another pallet and use the spaces I'm not. Trellis needs to go up.
7/13 I think I've got the watering amount down. Now just to find how often which will depend on weather. I've watered very little this year. They loved that gallon. I was going to use big bloom and kelp me/you but looking at my garden I decided not too. My buddy asked what i was addingvthings for and to wait fir what i added to do what I wanted it to do. I see no nutrient deficiencies so why add anything? I think this soil mixture will get me all tgexway through veg. I dont plan on using much in fliwer either. Definitely good genetics. I really need to cut that palley and move the 1 10gallon to the far back coener. It will open thibgs up so much better. The garden looked so beautiful this morning. Getting very aromatic. I started untangling trellis netting but had to leave. I'll update what I do. Happy growing folks
UPDATE: Went back over as I had a slight intuition that I needed to check the garden. I found and killed at least 7 jpn beetles. That's what's been making holes. They tried to escape and bounced off a tarp but I got it. I went through the interiors and found two pillars. If these beetles are gonna be around I'm ordering a net. I'm also close to positive I'm going to extend my cage in the back a few feet. Things are getting unmanageable in here. My buddy said I'll be having problems soon if I don't do something. I'll document what I decide to do.
7/14 Found ONE jpn beetle in the garden this morning. I can manage those well enough. The birds help too. I check my garden multiple times a day so I manually remove many pests. However I've noticed some thrip damage on a leaf and a leafhopper damage on "A" leaf so there are "some" pests around but not enough to spray shit. A couple wasps were doing there job while I was there. Supposed to get thunder storms after three and tonight. Supposed to get over a half inch of rain tonight. I lifted the bags and decided to hold off and let mother nature take care of it as the bags weren't totally dry. Only problem I really have is space. I AM moving that 10gallon (that's the same size as some 20's) in the back. There's 27in not being used and a few feet the other way. My buddy cautioned me that I'm going to have problems since my plants are so crowded. I agree with him. I spoke with me father and we have most materials to extend my cage four feet in the back. I think that's my plan. I'll extend the structure before the stretch then I can put up the supports. We'll see how this goes.
UPDATE: Went back over to check the girls as I had a feeling I ought to. When I got there I saw that a couple of the blueberry cheese were pretty light (liftng the smart pot) but the others seemed to be fine. ONE 10th planet was light like that and the purple punch in the 10 gallon was as well. Each plant thar needed it got at least a half gallon of water. I'm waiting to see if we get the thunderstorms and the half inch of rain. I watered the MASSIVE blueberry cheese in the 50 but I only gave it 1 pitcher which is like 1/4 gallon or so. Don't know why I even gave it that. Looked fine but the soil WAS pretty dry. Next year I'm giving myself way more room. I was running trying to chase these jpn beetles. This time I have the dawn and water and a measuring cup to knock them in. This ain't my first rodeo. I did notice some bright yellow streaks on a leaf edge and I'm hoping it's not septoria. I doubt it but I have an anxiety disorder and I worry. I hope I can get the cage extended sooner rather than later. It's getting hard to move in there and more importantly I can't take any more plant pathogen problems. I'm considering starting a plant doctor regimen just to be safe.
7/15 Got a bunch of rain last night. No jpn beetles in the garden and not really much damage. I did notice this (I think it's leaf hoppers) that leave those dots close together on a leaf so it appears I've got a variety of pests. I'm considering how to approach this. I mean the damage is very minimal but I don't want it to get out of hand. Another thing I need to look out for is leaf septoria or any other fungal pathogens. I believe that has been part of my problems in the past. I think that's what caused my earlier grows to drop all their leaves so quick. I think I'm being overly cautious but its very crowded in there. With my father just getting out of surgery the girls will need to wait a little bit before before I can extend the cage. I could still cut the pallet and move the 1 10gallon and that would give more room. I rearranged a LITTLE BIT so they have a little more room but I've really got to get this cage extended.
UPDATE: IT Rained so hard I had to pull the car over. We hydroplanned the whole way home. After working ob my house I went to see what the damage would be like. NOT A SINGLE BREAK THAT I COULD SEE. I took a video but since the wifi here sucks I'll have to upload it tomorrow. Walking around in the cage even if I cant get it extended I think I'll be OK. It obviously will open me up to lots more issues but at the very least I can reorganize before I build on. The 10 gal purple punch would fit perfectly in the back and I have a pallet I can cut to fit it in place. Putting that one back and pulling the others forward will be much better than what I've got going on now. I'm also thinking about running an extension cord and putting fans under the canopy or at an angle to keep the wind moving. Just thinking outloud. However after that storm the girls looked as happy as I've ever seen them. All happy praying to the sun, thankful for the much needed rain. Mother nature does a pretty good job with out me messing with it. I've noticed a couple interior lowest leaves turn yellow and die like a nitrogen deficiency but everything else is fine. Also noticed a leaf that looked like a p deficiency but again, it was the VERY bottom leaf on ONE plant. Again the rest of everything looks fantastic. I'll keep an eye out for anymore nutrient deficiencies and if anyone that reads this sees some please let me know. I should've taken stills since they looked so good but I got it on video.
7/16 It POURED last night and throughout the day. TORRENTIAL rain. The branch breaking sheet rain that us outdoor growers learned to fear. My plants aren't trellised currently. I know what I need to do now. I have a pallet to put in the back corner and I'm moving the purple punch in the 10 there. And pulling others forward where there's more room. Then when I extend it (it's gotta be done this week) everything g will be in their proper place and I can just throw on a vertical trellis. I also noticed more (leafhopper) damage on a leaf. Different leaf of the same plant so I'm considering spraying something. I have a number of products but I was trying not to use them. Luckily I have these diaries so I can look back and see certain plants reactions to certain nutes or fungacide/insecticide/nutes and the doses used. I haven't been using much but if my plants will remain cramped I'm going to start the plant doctor. I'm seeing more pillar damage too but BT is super narrow so I'm thinking when I fo spray for pests I might use cap jack and be done with it. Then I can apply the BT in flower if it's necessary. I took a video but I have to wait until tomorrow to upload. I took a quick snapshot though.
7/17 Despite the torrential rain I don't have any breaks. I'm noticing more pest damage though. Another leaf on the same plant had those closely shaped round circles. I forget what pest it is but it's there. Caterpillars are there I'm sure so I may do a preclcentative spray. Just unsure what I'm going to use. I lost a COUPLE very bottom interior leaves that look like they just got used up. After this rain I think think the plants might benefit from a feeding. Probably next water after they dry out. I REALLY need that cage extended. I expressed that today and it should be done this week. I'm looking for pallets today. I have the little one that I can put in the back which will allow me to move the 10 gallon and move the other forward. That will help some but I need more room. I'll update as I go.
UPDATE: GOT A SMALL PALLET AND IT FIT PERFECT IN THE BACK ROW. I MOVED THE PURPLE PUNCH IN THE 10 GALLON ONTO IT. I SHIFTED A BUNCHVIF THINGS AROUND. I ROTATED ON BLUEBERRY CHEESE 180 DEGREES SO IT WOULD FIR BETTER. CROP ROTATION IS GOOD ANYWAY. I TOOK VIDEOS AND YOU CAN NOW SEE THE ROWS MUCH BETTER. 2 WITH 3 and 1 WITH 4. IT'S SIGNIFICANTLY BETTER THAN IT WAS. I CAN GET AROUND ALL SIDES OF EVERY PLANT NOW. GRANTED THE LARGE 50 IN THE BACK IS GOING TO HAVE SOME TROUBLE BUT ILL JUST STAKE IT TO THE CAGE. IT WILL GROW TOWARDS THE SUN ANYWAY. IM SUPRISED I DIDN'T LOSE A BUNCH OF LEAVES AFTER THIS RAIN. MOVING THINGS AROUND AND LOOKING ON THE INTERIOR OF PLANTS I FOUND A COUPLE LEAVES THAT HAD BEEN USED UP. I REMOVED A COUPKE LEAVES THAT HAD DONE THEIR JOB. I'LL UPDATE AS I GO ALONG.


Likes
13
Share
@Robownz_53
Follow
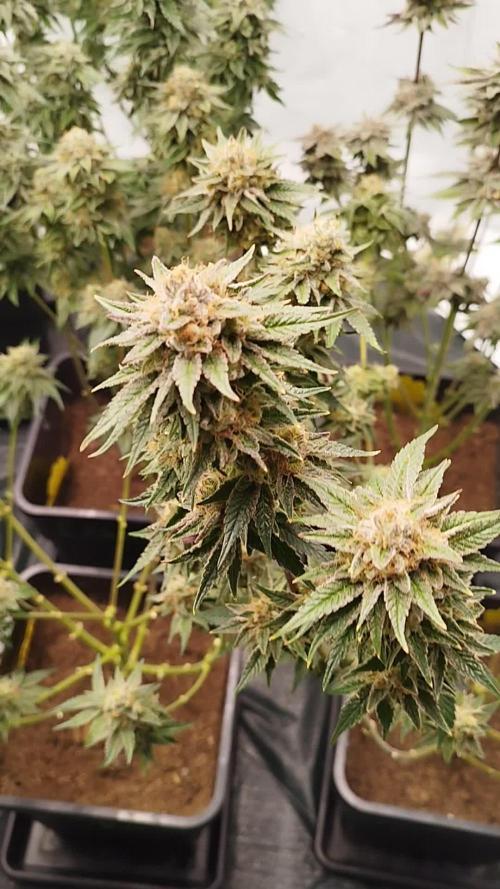
Not many changes this week buds starting to fatten and pistils are turning brown but trics are still clear/milky. Waiting on the first sight of amber to start the flush 👍🏼

Likes
4
Share
@HighstreetterpS
Follow
On fini doucement j'attends que la sénescence se face avant de récolter ça commence doucement la patience pour ne pas coupé trop tôt et aux rendez-vous 🤣


Likes
114
Share
@Anonymous_2022
Follow
Thanks for stopping by.. Please hit the like button if you like what you see and ill be sure to check you out too Growmies 🌱
First of all would like to give a BIG shout out to my sponsors for providing me with the necessary items for this grow 👍
🌟🌟🌟🌟Mars Hydro FC4800🌟🌟🌟🌟
Powered By Samsung LM301B Diodes: The Mars Hydro FC 4800 480-watt LED grow light is installed with high-performance Samsung LM301B chips, the top-bin horticultural diodes, to provide a high Photosynthetic photon efficacy efficiency of 2.85 μmol/j and a long-lasting color rendering capability, supporting indoor plants to grow and thrive.
High PPF Output and Uniform Light Distribution: FC4800 provides a high PPF of 1,366 μmol/S. The multi-light bar design and the dense diode layout facilitate an even distribution of grow lighting making PPFD optimized for Photosynthesis to achieve consistent growth in every part of the coverage range.
Exclusive Recipe Of Full Spectrum Lighting: The full spectrum is enhanced with blue and red light, in which the blue light stimulates plant growth and promotes the accumulation of plant-based phytochemicals; the abundant red light improves the maturing process and flower quality of the plants.
🌟🌟🌟 FastBuds Purple Lemonade FF ⭐️ ⭐️⭐️
Arising from a cross between purple and citrus Cali genetics, Purple Lemonade FF (Fastflowering) offers a complex high made up of perfectly balanced cerebral and body effects that are ideal for daytime use. Expect an extremely enjoyable high that boosts your mood while deeply relaxing your whole body and getting rid of muscle pain. This meticulous cross produces up to 550 g/m2 of some of the most beautiful purple buds, with pinkish and reddish hues that will catch everyone’s attention. The beautiful purple buds are ready for harvest in 7-8 weeks and come hand-in-hand with unbelievably sugary citrus terps that are just as refreshing as a cold lemonade on a hot Summer day. It’s the ideal variety for the sweet-tooth stoner seeking strains that deliver both in quality and quantity of resin
——————————————————————————————
👊👊👊👊Down to Business 👊👊👊👊
Week 5 from seed .. So this will be the last week veg for the tent and ill be switching to 12/12 flower power 💪
She’s moving great and all is good 👌
Will keep it short and sweet for this week .. Thanks for stopping by 🙏🙏🙏
Likes
23
Share
@SonomaSungrown
Follow
3/14 Transplanted pineapple meatball babies into 1 gallon pots filled with Down to Earth Potting Mix.
(I found out a few weeks later that this soil SUCKS for cannabis due to horrible drainage)
Plants are sitting under my Spider Farmer SF-1000 in a grow tent.


Likes
35
Share
@Santica_Garden
Follow
Also guys I have been filling these diaries out wrong and I have recently realised. Lol. But I will try and do better from now on. Happy Growing everyone

Likes
4
Share
@Aegon
Follow
สุดยอดมากสายพันธุ์นี้ ฉันรักมัน
ฉันจะกลับมาทำให้ดีขึ้นกับรอบต่อไป
แน่นอนเก็บโคลนไว้


Likes
1
Share
@Nickeluring
Follow
It is so very hot now every day here. All my girls are suffering from the heat and they need to be watered very frequently. I avoid drying them out completely.
Both plants are doing well in the heat. I prefer the structure of the mainlined plant.


