
Likes
Comments
Share


@GrowersParadise
Follow
Unusual late year warm weather has put a hurting on my grow. I intentionally did RDWC in winter to utilize cool temps for my res and not need a chiller, after having random 78 degree days, I’ve ordered a chiller.
The temps are a death sentence in hydro, I was adding ice to the res to battle it, won’t happen again after this chiller is put in. Definitely hurt the Apex plant, which has been a pain the entire grow.. it all started when Apex was a seedling, with its tap root growing up instead of down.
She looks sad, If she dies or falls too far behind, I’ll train the other three around to fill in the space. No visible signs of root rot but I’m suspicious after those temps, have treated with Orca, SLF-100, and Hydroguard. Worst case scenario, I’ll dump the system and sanitize as best I can.


Likes
16
Share


@gottagrowsometime
Follow
Welcome to my Black Jack..(After looking through my seeds and seen that my packaging for this strain. I've the normal Black Jack, not the FV)
I seen this strain in the Sweet Seeds List when asked to pick. And it was a year ago. And I picked it from its pedigree and the fact I didn't do a FV of any kind, nor have I still. (I am actually doing their OG high prize pedigree strain. Even better. I've the Cream Cartmel FV as I got confused)
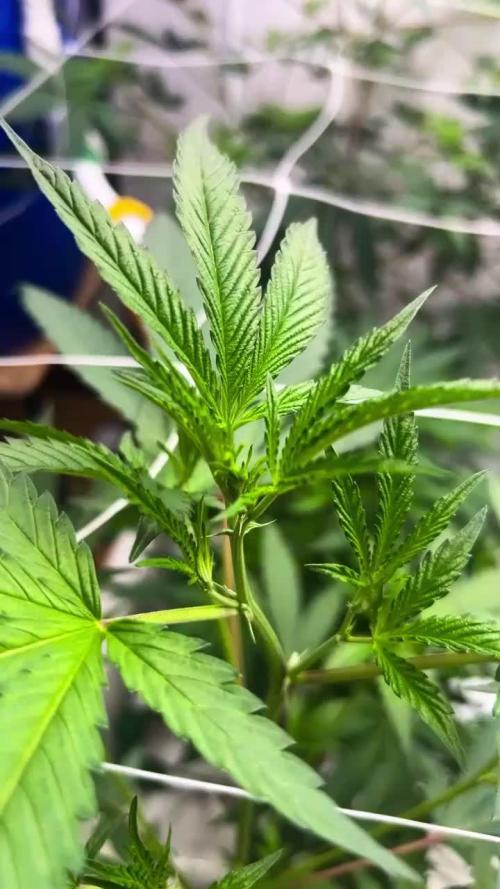
She is a healthy girl in day 35 now.
Really healthy. I Broke A few of her walls to bend it as it was all stacked up. (I've tons more pics of her progress hopefully I'll be able to pull up)
But, as you can see. Her structure was mainly stacked so she was shaped and I let her nodes go hard as they do when HST'ed not for the fact to get big buds, as that's not when HST Is meant for only. Super cropping requires a lot of early hst. (Its simple you just fell a node by rolling it and bending it to fall where you plan to shape for a few days you need to make sure if sticks as if she's in any stages of rapid growth. She'll just grow straight back upwards
Anyways. I've set her up nicely ill put her to flip soon.. After she pre flowers and does that full phase I'll HST and watch her few nodes explode. As she doesn't have a lot of foliage and I lollipopped a lot as you can see. Need to do plants with not a lot of mentinance as I've 21+ atm going.
Every plant is healthy.. all at different stages and going according to plan actually an extra week ahead on 3 autos that have already moved into the fattening stage.
FC 3000 is turned up to 100% and held at 40% away giving the autos 1000ish ppfd and allowing my whole tent to get more light. I've the light about 130cm up from the floor.
Nutrient wise. Looks like a lot. Well if I were doing weeks. Power roots, pure zym are given once every 10 days or so. Alga Grow was stopped on day 30. I did give her she fish force only today. (Day 33 and 2 weeks ago) Terpinator will be applied in a few days and will be every 10 days or so until soft flush (water feeds for a wk, no run-off). ALL NUTRIENTS ARE EVEN DAYS APART AND ENZYMES AND POWER ROOTS ARE USED AS FOLLOW FEEDS. No ph'in as this is organic. TERPINATOR IS 6.4 WITH MY WATER AND I GAVE THAT TODAY 3 DAYS APART FROM HER LAST ORGANIC PRODUCT (As they hold a ph of 4 some are 9. But its organic and true organic soil doesn't need ph'in) only additives need to be brought in line with soil needs if using synthetic nutrients and should not be given near anything that may clash. Rule is if you're giving a different brand/type organic/synthetic don't put them in the same pot that will allow them to mix there ph's as synthetic nutrients require a set ph in soil where as true organics don't.
Thanks to sweet seeds for giving me these seeds. Sorry it took so long to get to. Real hardy seeds. 1.3yrs old and they she looks great for a 33 day old lady.

Likes
45
Share


@chapadux420r
Follow
Wazzuuuup guy’s?
So it’s week 7, the lady’s are officially on the flowering stage!! (Since 4/10)
It’s all going very well, they are happy and so am I, been watering every 3-4 days with 1.2l each (before flowering I’ve watered with approximately 2l) and they have good colour and you can see some stretch. Well, not much but they are trained after all 🤷♂️🏻
Just some yellow leafs below the canopy but guess that’s normal, they are really needing some defoliation but I’m going to wait 2-3 weeks because I don’t want to stress them on this early stage
I’m thinking about adding the scrog net but I don’t know if it’s too late for that, what do you guys think?


Likes
21
Share


@growerflowerweed
Follow
BUENO ESTA SEMANA ESTUVO DE LOCOS OBTUVE UN EXCELENTE CAMBIO AL PODER MEJORAR EL PH Y EL EC DEFINITIVAMENTE ELLAS SE APRENDE MUCHO ME GUSTARÍA YA TIRARME A LAS PISTAS POR LO GRANDE PERO BUENO ESTAMOS EN EL PROCESO DE APRENDIZAJE VEO QUE EL LST TAMBIÉN LO HA DESARROLLADO MUY BIEN ESPERO ESTAR HACIENDO TODOS ESTOS PASOS A LA MARAVILLA MEJORE EL EC Y EL PH COMO ME ACONSEJARON MIS AMIGOD DE @sweet_seeds y creo QUE ESTO IRA MEJORANDO ESPERO PODER CONTAR CON ELLOS PARA UNAS NUEVAS CEPAS QUE QUIERO APRENDER MUCHO MAS GRACIAS DE TODAS FORMAS Y SI VEN ALGO PARA MEJORAR ME DICEN AL INTERNO BUENOS HUMOS CULTIVETAS DE APARTAMENTOS .........AAA LO OLVIDAD ESTA VEZ AGREGUE SOLO BIONOVA SOUL MIX Y NO AGREGUE EL EL ENRAIZANTES ES MUY BUENO NO TUVE NECESIDAD DE ECHAR MAS SALUDOS
Likes
19
Share


@Yessi_squeeze
Follow
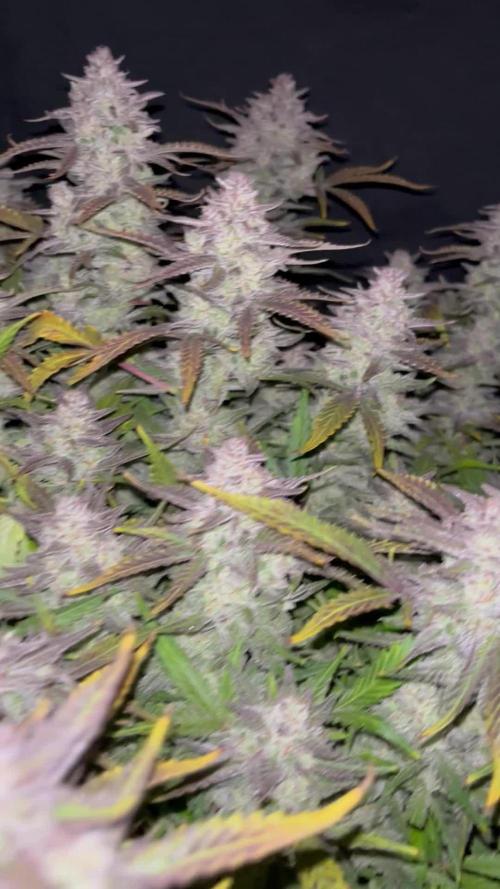
All same strain but growing differently due to different environments. Humidity issues resolved with dehumidifier. Runt had to be pruned and still so many buds. Single GG in tent is short and stocky ... Nice crystals. They smell wonderful.


Likes
30
Share


@SooSan
Follow
12/12 + 40 jours
Vu qu’il y a 16 plantes mais que sur growdiaries on ne peut mettre que 8 variétés j'ai divisé en 2 diaries pour le bas de la tente
1️⃣
🏠 90x60x90
☀️ FC-E 4800 => puissance a 20%
🍁
1x Black Bomb / Philosopher Seed
2x Amnesia Lemon / PEV Seeds
1x Blueberry / PEV Seeds
1x Blueberry / 00 Seeds
1x Wappa / Paradise Seed
1x Dark Phoenix / Green House Seed
1x Quick Sherbet / Exotic Seeds
1x Mango Cream / Exotic Seeds
1x Banana Frosting / Sensi Seed
1x Hindu Kush / Sensi Seed
3x Fast Mix / Sweet Seed
📎 https://growdiaries.com/diaries/122084-grow-journal-by-soosan
📎https://growdiaries.com/diaries/124052-grow-journal-by-soosan
2️⃣
🏠 30x60x50
☀️TS1000 => puissance a 50%
🍁 4x Quick Sherbet - Exotic Seed
📎 https://growdiaries.com/diaries/122080-grow-journal-by-soosan


Processing
Likes
6
Share


@w00tGrow
Follow
Plant is growing good, put scrog a bit higher and waiting for its flowering, it has showed it's sex and hopefuly starts flowering at least after a week. HPS lamp is doing its job perfectly, can't wait to switch it to yelow Sodium.


Likes
2
Share


@I_Identify_As_A_Dan
Follow
Day 35
Just wtf is this growth.. Shes already at the top of the light and i cant increase the height anymore 😅
I may have to bend over that main branch so she doesn't get burnt, but i don't know what else do yet.
Just waiting for the others to catch up in flower before i start feeling bloom nutes. (even though she already needs it.)

Likes
9
Share


@Serhiosaez
Follow
Saliendo ya flores como llemas de dedos y dirijiendo las ramas al sol que es una terraza y da el sol solo a un lado y hay van los se ven muy bien y estan creciendo muy contentas son 3 critical
Likes
88
Share


@Roberts
Follow
Strawberry Cake Auto has grown good. I battled with ph issues here, and there during the grow. She is really frosty, and has a strong Strawberry Aroma. I will post a harvest video if it allows me. If not it will be on my YouTube channel (link below). She did really good under the Mars Hydro FC4800. Thank you Mars Hydro, and Ganja Farmer. 🤜🤛🌱🌱🌱
Thank you grow diaries community for the 👇likes👇, follows, comments, and subscriptions on my YouTube channel👇. ❄️🌱🍻
Happy Growing 🌱🌱🌱
https://youtube.com/channel/UCAhN7yRzWLpcaRHhMIQ7X4g

Likes
Comments
Share

@SolitudeCorners
Follow
📓 Cultivation Diary: The 12/12 Flip & Transition Week
📅 June 5, 2026 (Veg Day 17)
Irrigation/Reservoir: Prepared a full 100L reservoir refresh.
Nutrients: Kept the feeding aggressive with a double dose of vegetative nutrition (x2 Nutrient formula) to ensure the root zones and plant tissues are fully stocked with elements before the transition.
Canopy Observation:the canopy is thick, uniform, and fully occupying the table space. The trellis net is officially filled out, and the lower branches are strong and rigid.
📅 June 6, 2026 (Day 1 of Flower / Bloom Week 1)
The Flip: Officially switched the timers to a 12/12 photoperiod (Lights ON at 6:00 PM / Lights OFF at 6:00 AM).
Schedule: First irrigation shot triggers exactly 1 hour after lights on (7:00 PM), followed by a shot every 1.5 hours.
Volume: Configured the drip stakes to run for 1 minute per shot, delivering 5 shots total per day. This provides roughly 450ml per plant per day, creating excellent target dry-backs overnight to force vigorous root searching.
📅 June 11, 2026 (Day 6 of Flower / Bloom Week 1)
Irrigation/Reservoir: Bumped reservoir capacity up to 110–120L to keep up with increased transpiration as the plants begin their post-flip stretch.
Nutrient Recipe (TargetingpH 6.0 EC 2.5
Water: 110–120L
Athena Cleanse: 120ml
Silica: 220ml (Essential for stem strength during the stretch)
CalMag: 10ml
Athena Bloom: 600ml (Adjusting base to target 1.2–1.3 EC from Bloom component)
Athena Core: 400ml
Irrigation Adjustments: Increased the shot duration slightly to 1 minute and 15 seconds to match the accelerating growth pace.
The early flowering stretch has officially begun. The tops are noticeably pushing past the trellis net layers, and the node spacing remains tight and stacked. Leaf color is an excellent dark green with healthy, bright yellow-green shoots driving upward at the growth tips. No signs of stress or stalling from the schedule shift.
Likes
54
Share


@rhodes68
Follow
3/11 Week 11 a day early due to schedule - Day 26 of Flower
Buds building very well no signs of any deficiencies and the tips are ok so leaving all nuets as is.
Halfway to projected harvest date according to Fast Buds, I believe them from what I am seeing.
Having some humidity issues due to our funky weather.
Humidity running higher than is safe on lights out , 60-70%, so installed one small dehumidifier but getting a larger one today to add to it.
That is the extent of our problems so aint beechin guys
One final comment here, these Fast Flowering photo strains seem tailor made for growing indoors.
The flowering times, the way they grow and the lack of strong odors even with larger buds just impresses the crap out of me.
👍 Fast Buds
3/12 - 27/Flower
Continue to stack up the buds I had to raise the lights one click to keep em at 16" on both lights.
The increased feed PPM is showing in rapidly growing buds.
No changes in feeding at this time.
My wife has sweetly pointed out I messed up reading the calendar.
This is day 27 of flower
😜
Yeah it was real good for 23 days too LOL
So FB pegged 45 days of flower on the FF7 , with 18 days remaining.
Flush could begin in 11 days at the soonest.
Which consequently is when I drop the seeds for the last grow before my vacation. 😉
3/13 Day 28 Flower
Raised the lights up a bit, want better dispersal from the two light sources and since there is now almost too much light this seems wise as the buds continue to stack up.
The two light together are 1100 and 700 umols at a minimum so with 1800 Umols (the same as a 1000 watt HID) I can afford a dispersed pattern of light sans hot spots and dark corners.
Multiple light sources is the way to go no doubt now. maybe pics later if I've time.
Pics
3/14 Day 29 Flower
Ye though there be no toilet paper in the land we do have buds...
This virus thing is just insane aint it.
Why toilet paper I wonder...
Anyway increased PK to max 5ml/gal as I see no toxicity and they are building like crazy so feed em.
This is the last week for the PK booster cutting it out in a few days, plenty in the pot to carry her through the flush.
No other issues to comment on pretty easy grow so far.
Pics

Likes
40
Share


@Teamdirtbag2
Follow
Plants are going into flower. I took night time pics so you can see them sleep. They are a all looking great. This girl is looking great she is 24 inches.
Very nice branching on all three plants. I should defoleate and remove some of the bottom branches now.
Likes
84
Share


@bioaccessory
Follow
Не прошло и 8 недель, как растишка наконец зацвела🌿, при этом резко прибавила в росте. Снизил дозу базовых удобрений до половины таблицы, и всё вроде пришло в норму. Кстати, общение с супортом AN оставило неоднозначное впечатление, мне даже показалось что у них на вопросы отвечает бот😃
Уже вижу, что досвет нужно было чуть выше закрепить, но мне пока лень лезть в эти джунгли, может быть позже отрегулирую правильную высоту, уже когда полностью прекратится рост растишки.
В остальном всё хорошо, жду появление одуванов. Только вперед и только вверх! 👆
upd 02.11 Представляю соседок: в левом дальнем углу тёзка LSD от MasterSeeds, ей я на раннем этапе делал FIM-подрезку, которую она толком не заметила, уже 90см и сильно прёт дальше, видимо придется ломать макушку. В левом ближнем углу Super Skunk от Seedstockers, в начале пути сильно тормозила, сейчас вроде нагнала остальных.
👉планирую добавить еще один досвет😎 - диоды deep red специально для цветения, на отдельной планке, оставайтесь на связи👈
Спасибо, что заглянули, и будьте здоровы! 🙏
Продолжение следует ...😶
Likes
5
Share


@Bamz84
Follow
No Complaints No Issues Or Problems In The Garden...just being watered PH 6.0 and cal mag for now☺️

Likes
27
Share


@adam_pawloski87
Follow
This week went really great! Plants are looking super healthy today at day 22 from seed!! Today they got a dose of just pure water phd at 6.5 ! Temperature an humidity has been staying pretty stable everyday, staying around 70-75 degrees and 58-61 % humidity!! Can’t wait to see what these girls do this week ! Hope you all enjoy , an had a great safe weekend! Peace love an positive vibes to y’all Cheers 😶🌫️💨💨💨If there’s any questions, please ask me 🙏🏻
Likes
3
Share


@Nat889
Follow
Purchased a new night which is 24 inches from the plant. The bottom two leaves have started to turn slightly yellow. The PH levels have not changed. I may have over watered, but I don’t believe I did. Not quite sure what is going on here. She has taken off in growth this week compared to the last.
She is on a 18hour light schedule and taken out into the sun from 12pm to 6pm and then back under the lights. I am not overly sure of how much water is required.
Likes
15
Share


@Organic473
Follow
Defoliated her and fed her more guano… first time using Budswell also. It's the dry season here in the Caribbean so i keep watering her daily.