
Likes
Comments
Share


@Ezzjaybruh
Follow
More puppo pics!
Haven’t seen dukie for a few days..
Couple more dukie baby pics
Some videos of Cooper licking and catching food off his snout. Hopefully they upload a properly.

Likes
20
Share


@CzAlmighty
Follow
Best flower 🔝
Strong flower. I love qualitty of HSO.
everyone recommend This strain. 💚
Thank for watch. ✌️🏼🔝🔝🔝

Likes
6
Share


@realganjasmoka
Follow
the 8th flowering week begins with a flush of 20l into a pot of 15l. the plant looks too green for the phase we are, so i needed to do this now. i stopped fertilizing also, but not royal sugar. in the first pic you can see a really smart method to do a flush. the flush brings the EC level from over 2000 to 1100 uS/cm. if there is need i'll repeat it few days before harvesting.

Likes
7
Share

@RBG
Follow
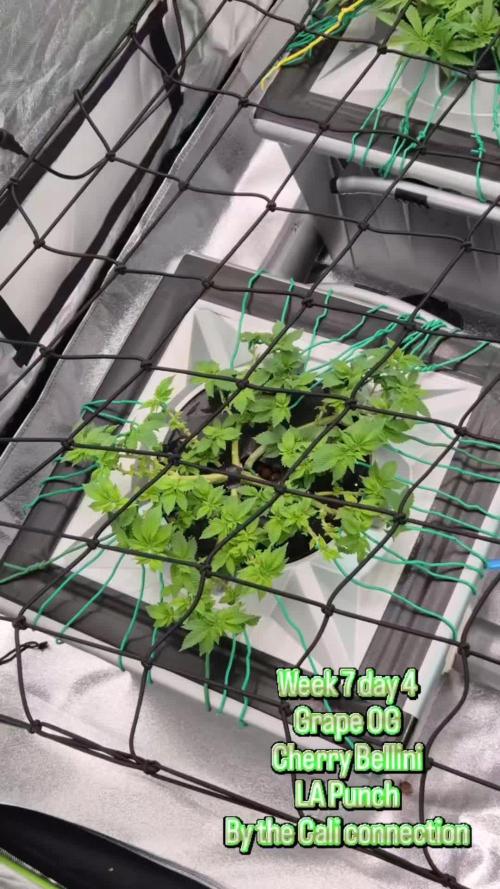
🌿 LA Punch by The Cali Connection 🌿
Week 7
Flower-day 2
16/10/2025
Nutrient change
Floramax veg 1: 1L
Floramax flowering enhancer: 400ml
Floramax organabud:400ml
Floramax rezin: 100ml ( around 1/4 dose)
Floramax cal mag: 100ml
Gp3 pro cal: 100ml ( unfortunately ran out and won't have any until next week )
Gp3 massive bloom: 100ml
Cyco platinum series silica: 200ml
Sleeps with the fishez: 400ml ( half dose system shock testing to see of this minimises/prevents problems per nutrients change like i was having )
Ph 5.9-6 - EC 2.2-2.3 ( Floramax wants e.c of 2.4, so I'm doing .1-.2 under for now to see how she responds
LST and Defoilation is finally done on her, LA punch might get another LST tweak and a couple more Defoils. Unsure yet she's staying very tight so its a little harder to gauge how she'll respond
I thought I should add, with the way I lst, I like to get as much defoilation out the way before flipping to flower that way all she does in flower is just get fat and lovely. Seemed to work well coming from only doing Autoflowers so just using that knowledge and implementing to my photo grows and tweaking it
Likes
41
Share


@KAPT_SAVE_Da_HOE
Follow
Gave more Sucranat frying leaves and light burn. Finishing up Forbidden Runtz soon as she is chucky. Hoping she'll put on more weight, if not oh well. Sour Stomper is catching up and feeding more now. She's starting to fill out a bit. She's still 6 days behind her sis but doing alright.


Likes
54
Share


@GarciasGarden
Follow
WELL LADIES AND GENTLEMEN!! My beautiful KOSHER KUSH #1 is already being flushed and will be chopped this weekend!! All these amazing colors are just starting to devour the plants with yellows purples and oranges inching closer and closer to harvest!! I will only be growing TOP SHELF FLOWER for my local dispensary after they reached out to me and pre ordered all of it!!
I’m using some flawless finish on a couple of the feedings for flush and the other plants are still on a steady dose of flora bloom/ micro , terpinator , and cha Ching .. after a couple more feedings I’ll start flushing the rest of the girls and making sure no more nutrients is left in those pretty buds!! Till next week guys!!


Likes
29
Share


@lefthandedJ
Follow
SO..........................the girls are doing okay. I can only expect so much, given they're in 5 gals (except for LB), and half of them didn't get a good start. It's a nice experiment, for comparison sake. I don't think there's any bad plants here (of course, I don't think there are any bad plants ANYWHERE, EVER), just some early bloomers and some that still need some time. I've been feeding them with Tiger Bloom and a seaweed/kelp additive, and they've had two doses now of guano for top-dressing. Now I'm running out of room, should've planned better and left more room at the top of the bags. Never again with the 5 gals, they're great for indoor but way too restrictive for outdoor even way up here in Maine. I just finished LST again and they're looking pretty funky, but it's getting the desired result. GLad I kept some of them straight and didn't top, I want to see the difference in the end between nature's architecture and my twisted mess.
SO far, so good, but I'm a little worried about the Ph. Again, my solution is good (around 6- 6.3), but my medium still comes in at 7 even. Great buffering shit, but I really need to acidify the soil a bit more. I've got some PhDown, but I'm worried that if I drop the solution too low I'll burn the plants. On the other hand, it doesn't seem to have much of an effect so far at 6....
7/31 Update:
Gave the ladies another round of bat guano, 2 lbs. spread hroughout a dozen plants. Kinda worried that I used too much, but the first applications weren't enough so we'll see. Yesterday gave 'em a feeding of Tiger Bloom, today I watered the guano in with well water that I adjusted (using PhDown) to a reasonable 6.5. A good dry day, bright too, they should soak it up good today!

Likes
29
Share

@squalino
Follow
gorilla cookies 2 ème plantes
humide 615 grammes
sec 160 grammes. 10 grammes en moins pour les branches.
sec 150 grammes
principalement des grosses tête remplis, dure et grosses
odeur forte et effet lourd .plutôt envie de se mettre sur le canapé et regarder un bon film
conclusion
une weed puissante. relaxante a en devenir paresseux. idéal pour les soirées relax
odeur forte terreux. grosse production au dessus des100 grammes par recolte.
superbe plante que je recommande .
merci à tous de m'avoir suivi sur cette superbe plante .bonne journée.
Likes
3
Share


@hinterhofgrower
Follow
.
📹 : Full Video on YouTube @hinterhofgrower
🌱 : soft topping on day 17+20
💧 : 2l day 19
💡 : Dli: 20 mol/m²/d
🤔 : Finally, a plant is growing with wider internodal spacing, even though it's supposed to be Indica dominant.
There was the usual overwatering discussion on YouTube.
The soil I'm using consists mainly of peat with added perlite. It's also not compacted. In my last grow with this soil, it settled by about 5 cm in the 20L pot. The measured soil moisture reaches about 60% when saturated, but with my current watering pattern, it only reaches a maximum of just under 30%. I think there's always enough oxygen in the soil. I did, however, wait longer before watering this time.
The removal of the bottom pair of nodes was also hotly debated. In my opinion, it was exactly the right thing to do. I would have had to remove the large pair of leaves above them to give the two branches full light. I would have had to trim the next pair of branches down significantly to bring them to the same level. In my previous grows, this resulted in small, bushy plants. This meant the buds were very close together and therefore susceptible to mold. Furthermore, the lower parts weren't fully developed. This was something I wanted to prevent in this grow.
No more energy needed to be invested in the small branches, allowing the plant to focus on photosynthesis with its large leaves. The result is a uniform canopy.
Likes
2
Share

@DogDoctorOfficial
Follow
👑 Godfather OG – Pheno A
Week 5 | The Giant Begins to Wear Her Crown
Welcome back to another chapter of the 8×8 Adventure!
One of my favourite things about documenting every single phenotype individually is watching how differently each plant interprets exactly the same environment.
Same room.
Same lighting.
Same feeding philosophy.
Same genetics.
Yet every plant develops her own personality.
Godfather OG Pheno A has quickly established herself as one of the giants inside the tent, standing proudly above many of her neighbours while beginning the exciting transition into flowering.
She’s becoming impossible to ignore.
⸻
🌱 The Journey So Far
For those discovering this diary for the first time, welcome!
This entire project is being grown using the 12/12 From Seed method.
Rather than extending the vegetative period before changing the light cycle, every plant has received a consistent 12 hours of light and 12 hours of darkness from the very first day of life.
This allows every phenotype to determine its own natural timing.
Instead of deciding when flowering begins…
…the plants decide for themselves.
That is one of the most fascinating parts of this entire experiment.
Although every plant shares the same environment, no two stories have unfolded exactly the same.
⸻
🌸 The Transition Has Begun
This week officially marks what I’m considering Week One of Flower.
She’s living in that beautiful transition where vegetative growth hasn’t completely stopped, but flowering has clearly taken over.
Fresh white pistils are now appearing throughout the canopy, confirming that reproductive growth is well underway.
Those delicate white hairs are the first visible signs of future flowers.
Over the coming weeks they’ll multiply rapidly as each flowering site develops into what we all hope will become dense, resin-covered colas.
It’s one of the most exciting stages of the entire grow.
Every day brings noticeable changes.
⸻
🌿 One of the Giants of the Room
Standing at approximately 75 cm, Godfather OG Pheno A has become one of the tallest plants in this entire project.
Her structure is beautifully balanced.
Strong stems.
Excellent internodal spacing.
Healthy branching.
The Low Stress Training carried out during the previous weeks is now beginning to reveal its purpose.
By gently bending stems and opening the canopy instead of forcing aggressive structural changes, light is reaching more growing tips while the plant continues developing naturally.
Every adjustment made earlier is now beginning to pay dividends.
Sometimes patience truly is the best training technique.
⸻
💧 AutoPot Feeding System
This phenotype is growing in one of my AutoPot systems.
The AutoPot works through a remarkably simple but effective device called the AquaValve.
Rather than operating on timers or pumps, the AquaValve automatically refills the tray only after the plant has consumed the available nutrient solution.
In other words…
The plant decides when she wants another drink.
This creates an incredibly stable root environment while reducing fluctuations in moisture and nutrient availability.
As flowering begins, the feeding program has also evolved to support the transition.
Bloom nutrients have now joined the schedule while maintaining enough vegetative support to fuel the final stretch before the plant focuses entirely on flower production.
⸻
🌡️ Environmental Conditions
The room continues performing exactly as planned.
Current averages include:
• Day temperature: 31.1°C
• Night temperature: 25°C
• Relative humidity: 67%
• Nutrient solution: 21.6°C
• Root zone: 21°C
• CO₂ concentration: 639 ppm
Humidity remains slightly elevated during this stretch phase to support vigorous growth and healthy transpiration.
As flowers begin stacking over the coming weeks, humidity will gradually be reduced to create the ideal environment for dense, healthy blooms.
Maintaining environmental stability is every bit as important as feeding the plants themselves.
Healthy plants are built through consistency.
⸻
📷 This Week’s Gallery
This week’s photographs document her progress from multiple perspectives.
Close-up shots highlight the first pistils emerging across the growing tips.
Side views reveal her impressive vertical growth and balanced branching.
Bird’s-eye views showcase an increasingly even canopy thanks to the weeks of gentle training.
I’ve also included updates from inside the room together with controller readings to continue documenting every aspect of this project as accurately as possible.
Watching the room evolve week after week is becoming just as rewarding as watching the individual plants themselves.
⸻
🔮 Looking Ahead
Over the next week I expect the stretch to continue as flowering becomes fully established.
More white pistils should appear across every branch, and the first true flower clusters will begin forming as the plant shifts more energy toward reproduction.
Training will remain gentle, with only small adjustments made where necessary to maintain an open canopy and maximize light penetration.
The real building phase is only just beginning…
…and I have a feeling this lady has plenty more to show us.
⸻
💚 Thank You
Thank you so much for following another chapter of this 8×8 Adventure.
Every diary, every photograph, every update is part of a much bigger story, and I’m incredibly grateful to everyone who chooses to be part of it.
A huge thank you to:
💚 GrowDiaries for giving growers around the world a place to document, learn and inspire one another.
Zamnesia for providing the incredible genetics behind this phenotype hunt.
🌱 Plagron for supplying the nutrients that keep these ladies thriving.
💡 Future of Grow LED for providing the light driving every stage of development.
🌿 TrolMaster for helping maintain a stable environment throughout the entire grow.
And finally…
Thank you to everyone reading, commenting, supporting, asking questions, sharing advice, or simply following along.
Whether you’re a grower, a learner, a supporter, or just curious, you’re part of this adventure too.
I’ll see you all next week as Godfather OG Pheno A continues her journey from vigorous growth into what promises to be a spectacular flowering run.
Growers love and happy growing, everyone! 🌱👑💚
Likes
11
Share


@PanGrower
Follow
Do not pay attention to the temperature on the thermometer in the middle, it lies by a couple of degrees. I have a good thermometer on top of the box that shows the temperature.
Day 29: After a terrible fracture, we see that the plant is beginning to recover. I'm honestly disappointed because it makes it very difficult for me to train mainlining and it will also increase the amount of time it takes to grow.
Day 30: It looks much better already, I could superprune the right branch, but I don't want to stress it. I will try to bend the right branch harder, I will bend the left one a little in the morning the next day, maybe early.
Day 31: This morning I cut the lower leaves, photo in the evening and continued the LST training after the injury. Photo in the evening.
Day 32: I am completely sure that the plant has moved away from the stress, but we can see on the left circle, the right bud (and side) slowed growth.
Day 34: I saw traces of salt on the tips of the new leaves, so now I pour water with regular 15 PPM.
Likes
12
Share


@TgOgFaRms
Follow
Week 5 Update: Challenges and Optimism! 🌿💪✨
Hey there, fellow growers! 👋🌱 As we dive into the fifth week of this thrilling journey, I must admit that I've encountered a few obstacles along the way. But fear not, for challenges are merely opportunities in disguise! 🌱🚀
Currently, three of my plants are still looking a bit droopy, a consequence of my underfeeding mishap. 😔 However, I've taken decisive action to rectify the situation. I've increased their water intake from 0.5 liters each to a generous 1 liter each, provided every two days. Hydration is key! 💧💦
Let's talk environmental conditions. The temperature within the grow space ranges between 20°C and 22°C, maintaining a comfortable and optimal range for our leafy companions. The humidity levels hover around 60% to 68%, thanks to the diligent work of my trusty dehumidifier. Kudos to technology! 🌡️💨💨
In light of the recent droopiness, I've temporarily adjusted the LED power to 75%. It's a careful balancing act to ensure the plants receive the right amount of light without overwhelming them. We're all about finding that sweet spot! 💡🌿✨
Interestingly, I've noticed a similar issue with droopiness during my previous grow with sour stompers. Could it be a recurring pattern? 🤔 Moreover, upon activating the dehumidifier, I made an intriguing discovery. The CO2 levels have soared over 900ppm! It seems I've stumbled upon an unexpected correlation. I'll certainly be investigating this further to unravel the mystery. Science at work! 🔬🌿🔍
Well, my fellow enthusiasts, that wraps up the highlights for this week. Let's remain optimistic as we eagerly await our plants' recovery and resurgence. I have faith that they will bounce back stronger than ever, for nature has a remarkable ability to rejuvenate. 🌿🌱💚
Remember, challenges are but stepping stones on the path to growth. Embrace them, learn from them, and continue nurturing your green wonders with love and care. Together, we shall conquer any hurdle that comes our way! 😜💪🌿🌟
Wishing you all an incredible week of growth and exploration. Happy growing, lads! 🌱🌿✨😄
Likes
1
Share


Likes
6
Share


@Mr_nugs_lover_David
Follow
Looks suuper frosty at the beginning of third week,producing resin even in the fan leafs,crazy gorilla strain by original sensible seeds,already starting to stink man,she's being grown 100% organically. I'll start using bio pk by biotabs from the 25th day of flower

Likes
22
Share


@dillande3
Follow
Hello, Day 77, Flower Phase , PGK, Final weeks of flower phase ongoing, Plant starting change color some leaves I can see some purple colors and mostly yellowish color. Trichomes still slightly cloudy and buds looks grate, smells also like tropical Mango ))) Temp is ok and TH also good at 65% these days. Thanks.
Week 11 - Flower Phase
Day 76 - 18/01/23
Day 77 - 19/01/23
Day 78 - 20/01/23
Likes
49
Share


@Roberts
Follow
FBT 2401 is starting to stack. She is not gonna get really big due to my errors. I will get a nice sample of the flower for sure. Everything is looking good now. Thank you Medic Grow, Athena, and Fast Buds. 🤜🏻🤛🏻🌱🌱🌱
Thank you grow diaries community for the 👇likes👇, follows, comments, and subscriptions on my YouTube channel👇. ❄️🌱🍻
Happy Growing 🌱🌱🌱
https://youtube.com/channel/UCAhN7yRzWLpcaRHhMIQ7X4g
If anyone needs to purchase fastbuds here is a link for my affiliate program
https://myfastbuds.com/?a_aid=60910eaff2419
Likes
115
Share


@DogDoctorOfficial
Follow
Greetings, fellow cultivators! Week 2 in the flower chronicles of our majestic Cherry Cola Auto is unfolding, and the botanical saga continues with astounding vibrancy. Our green queen, having transitioned seamlessly into the flowering stage, is unfurling her blossoms with an elegance that's truly mesmerizing.
Last week, the anticipation for flowering reached its peak, and oh, what a sight to behold! The once-prominent bush has metamorphosed into a lush haven of blossoms. The topping technique from earlier weeks worked wonders, and the result is a dense and intricate network of bud sites, promising a bountiful harvest.
The freedom granted to our Cherry Cola as we removed the training supports has allowed her to grow wild, like a botanical ballet of branches reaching for the heavens. The bushy bliss is a testament to the success of our training endeavors, creating a flourishing green symphony.
Speaking of success, the decision to venture into topping during the vegetative phase is proving to be a game-changer. The multiple colas that have emerged are like a crown atop her green majesty, and I find myself in awe of the structural beauty it has introduced to the plant.
In the nutrient department, the shift to P-Boost and Topbooster has been a key player in this unfolding floral tale. The phosphorus boost is working its magic, contributing to the formation of robust buds, while Topbooster continues to enhance the overall flowering response, promising an end product that's nothing short of spectacular.
I can't help but marvel at the visual delight our Cherry Cola presents. Every day brings new growth, and the energy in the tent is palpable. It's not just a plant; it's a living masterpiece in constant evolution.
As Week 2 in the flowering stage comes to a close, the Cherry Cola Auto stands as a testament to the joy of cultivation. Topping, training, and nurturing have led to this vibrant spectacle. Stay tuned, green enthusiasts, as the floral drama unfolds in the coming weeks!
Genetics Cherry Cola Auto @Fast_Buds @fastbuds_genetics_official @fastbuds_official @fastbuds_espana
Nutrition: @aptusholland @aptus_world @aptus_
Love, Care, and Attention: @dogdoctorofficial
As always, thank you all for joining me on this journey, for your love, and for it all. My horticultural odyssey would never be the same without you. Your love and support are cherished, and I feel both honored and blessed to have you in my life
Likes
23
Share


@Firepharmer
Follow
Tents all set up now with 2 futur vert flora max 660watts 1 futur vert uva led bar..


Likes
14
Share


@LokalGrenz
Follow
Had some humidity issues been watering with spring water until I get something to filter the tap water
Jan.8th amnesia haze 1 got bit taller so I did some more LST


Likes
11
Share


@MadeInGermany
Follow
Hey everyone ☺️.
It gets more beautiful from week to week 😍👍.
I have them all this week Sprayed again properly with neem oil in the veggie phase ☺️.
There have been no trips for 2 weeks, but prevention is better 😀.
Because of the neem oil, the plants look very dark and shiny, which I really like when they shimmer like that 😝.
I didn't do any training these days, that will be done again the next few days 👌.
it was watered twice this week with around 0.6 l per plant.
The Ph / Ec measuring device was also recalibrated.
Otherwise there is nothing to report for this week and we'll see you again with the next update ☺️👍.
I wish you and your families a Merry Christmas 😊.
Stay healthy and let it grow 🍀
You can buy This Strain at :
www.Zamnesia.com
☝️🏼☝️🏼☝️🏼☝️🏼☝️🏼☝️🏼
Strain
Gelato clone from mother (Zamnesia )
☝️
Genetics: Wedding Cake x Gelato x Gelato 33
Vega lamp:
2 x Todogrow Led
Quantum Board 100 W
💡
Bloom Lamp :
2 x Todogrow Led
Cxb 3590 COB 3500 K 205W
💡💡☝️🏼
Soil :
Canna Coco Professional +
☝️🏼
Fertilizer:
Green House Powder Feeding
☝️🏼🌱
Water:
Osmosis water mixed with normal water (24 hours stale that the chlorine evaporates) to 0.2 EC. Add Cal / Mag to 0.4 Ec Ph with Organic Ph - to 5.5 - 5.8 .
