The Grow Awards 2026 🏆 


Likes
Comments
Share
@Martymar021208
Follow
Trichomes are starting to amber and I habe already begun Flushing at this point I'm am just waiting for them to tell me they are down before I turn the lights off for 48 hours before harvest

Likes
4
Share
@Krissci
Follow
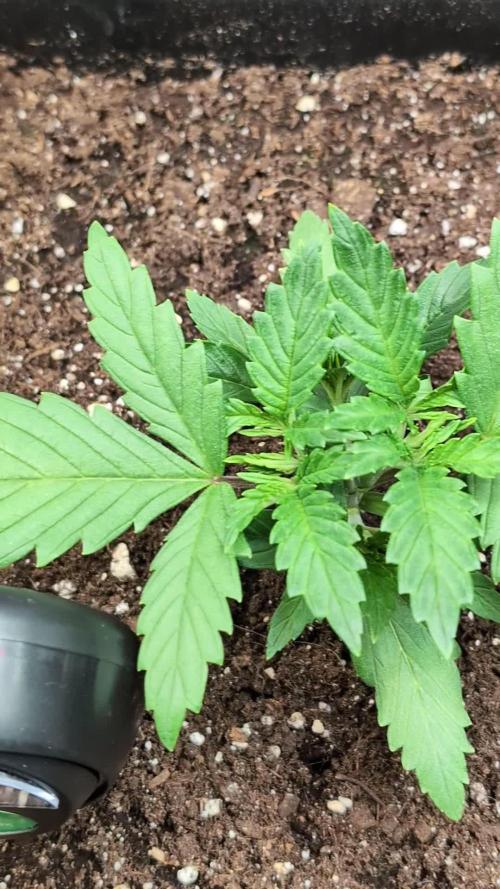
Day 4 - light LST training. This window is very small to Train correctly and not lost any main stems..the knuckle tends to solidify quite quickly and begins to swell if feed properly...making bending by the knuckle risky

Likes
6
Share
@GrowInBavaria
Follow
VT16 – 12.10.2025
Die Pflanzen entwickeln sich insgesamt eigentlich ganz gut – vielleicht etwas langsamer durch das Topping, aber im Großen und Ganzen bin ich zufrieden. Leider habe ich bei zwei Pflanzen erste Mangelerscheinungen festgestellt, und zwar einen Cal/Mag-Mangel.
Ich vermute, dass durch das Gießen nach dem 1/3-Verfahren ohne zusätzliche Nährstoffe die Reserven doch schneller aufgebraucht wurden als gedacht. Die Erde ist außerdem noch relativ feucht bzw. im mittleren Bereich, was das Nachgießen etwas erschwert.
Trotzdem habe ich mich dazu entschieden, vorsichtig rund um die betroffenen Pflanzen etwa 650 ml Nährlösung zu geben. Ich bilde mir ein, schon erste Verbesserungen zu erkennen.
VT17 – 13.10.2025
Heute habe ich bei allen drei Pflanzen die vier Außentriebe mit Pflanzenhaltern weiter nach unten fixiert. Das habe ich in früheren Runs auch so gemacht und damit gute Erfahrungen gemacht.
Man hätte eventuell noch etwas warten können, da die Fixierung jetzt ziemlich nah am Stamm sitzt – aber ich denke, das ist halb so wild. Alles in allem bin ich mit der Entwicklung zufrieden.
INFO:
Ich habe die beiden Pflanzen mit den Mangelerscheinungen nach dem Düngeschema der dritten Woche gegossen – mit Ausnahme von Cal/Mag, das ich um 0,5 ml erhöht und an meine Wasserwerte angepasst habe.

Likes
22
Share
@UnorthadoxDude
Follow
Hello everyone and welcome to week 9 and day 57 for these two Fast Buds Strawberry Bananana Autos.
These two have gone mad!
Beyonce is 81cm tall and well into flower as you can see.
Solange on the other hand was 118cm tall and had passed the light so I super cropped her two tallest colas a few days ago. She is now 98cm
Fertigated 10l 4 days ago and 7.5l today.
Day 60: Fertigated 10l
Day 62: The plants are now too big and/or heavy with bud to move out of the tent to photograph, and so with thanks to @growbigorgohome who suggested it, I have got a selfie stick to do in-tent photography. It's not great but it's better than nothing! Hopefully the videos will show plenty of details. Anyway I am starting to routine again now, the plants haven't gone more than 3 days without feeding, and I should be back to every other day again now. These two girls are really amazing. Beyonce is way ahead in terms of bud development, but Solange vegged longer and stretched more she was so massive I had to super-crop two colas! Anyway they are really motoring along now, I think Beyonce will be ready 2 weeks before Solange. Despite it is only day 62 we are rapidly approaching the end game here.
Likes
7
Share
@Cannabis_Sativa
Follow
Mid/late flowering buds are sticky and strong like rock but too baby

Processing
Likes
16
Share
@Fergie
Follow
hey guys so here are my c.c girls coming along nicely was away for a few weels so wasn't able to do updates had a friend watching over them while was away and starting 5o fill out nicely . i am literaly just back so will intro nutes this week for flower stage , defo got the cookie smell coming from her


Likes
10
Share
@CanarianGrow92
Follow
Week 7 for the ztrawberriez from fastbuds 420!!!
We gave the last week of xpert nutrients feeding and will continue now with only water, harvest time is soon and at the moment the buds are looking great, nice smell in the tent and the buds are nice and covered in trichomes!
The plants are not that big but of course i have quite some plants together in the tent
and 7 liter pots so they stayed a little smaller, next time i will do maybe less plants but with the bigger 420 fastbuds airpots!
Likes
7
Share
@braxat420
Follow
No pruning, no lollipopping, nothing. She's growing wild and loving it. Smell is starting to come in and it's really satisfying.
Likes
39
Share
@Randyb4
Follow
This was a good week we say alot of growth and they seem like they've all recovered from the bad ph. Day 29 I topped Plant B and day 31 I topped the rest of them. Gave them 4 cups of water with 1 ml of calmag in it. Ph was at 6.4.
Trying to plant some of the tops because why not. If they grow they grow.
Day 33 I Transplanted into 1 gallon pots because the roots were filling and coming out of the bottom of the solo cup. Still in fox farms happy frog soil. Sprinkled some "great white" mycorrhizea in the soil. Transplanted went good.

Likes
12
Share
@GREENPHOENIX6262
Follow
*Update* - Took a L on the first seed I dropped last week. dropped 2 more yesterday, Pics have been updated and germ dates as well.
Both seeds germinated nicely!!!
* Quick 4 day seedling update, See uploaded pics above* - 08/04*
*Day 7 Update, See below for specs*
Introduced Raw (NPK) Veg Part 2
Coco topped with worm casting and perlite
Light run - 18/6
Temps High 70 - Low 80's - Humidity - 78-91%
Moderate on the Myco
Frequent but light water feeds - Qtr Gallon each - Moderate coco top soil saturated.
Processing
Likes
37
Share
@Marquise_ao_Sul
Follow
After 15 days of strong wind and rain weather, i quit my planta in the woods...but they are though ... ONLY with 5 weeks.:-)
i moved to new home. i'm a Litlle sad because i have to quit my indoor growing...
for another hand i going to Start outdoor way
happy grow

Likes
8
Share
@NordicClosetGrower
Follow
Tested a micro humidifier in this box too and it went horribly wrong, just flooded everywhere. Mind you, it did raise the humidity a bit :D More testing next week.
Likes
29
Share
@Zurban_Poison
Follow
Hi all!
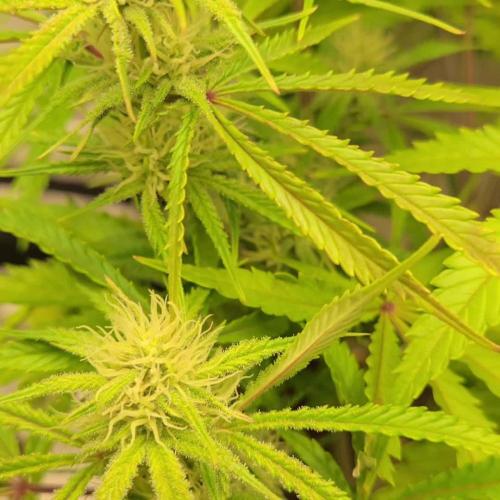
The plant develops excellently! everything is just perfect for her. shape color scent of trichomes! all !

Likes
4
Share
@CanadianFillmore
Follow
Not much to say right now, will update in about two weeks with the dry bud weight and the taste/smell/smoke profile. I'm hoping this strain is as tasty and potent as the smell, stickiness presents itself to be.
Update June 19, 55 grams on the scale. Very impressed with the hardness and density of the buds. They are pretty sticky too! The smoke is okay, but not great tasting and gets harsh towards the end of the joint. For people that like to make extracts, rosin, etc, this strain might be right up your alley.

Likes
7
Share
@RealGrowDiary
Follow
Day 49
Flower development is clearly advancing, with buds getting noticeably denser and stacking nicely along the branches. Trichome production has increased significantly, giving the flowers a frosty appearance.
Pistils are still mostly white, with a few beginning to darken, indicating mid-flower progression. The leaves remain healthy overall, with good color and no major signs of nutrient deficiencies or stress, Minor fading on some lower leaves is normal at this stage.
The plant maintains strong structure and stability, and the canopy remains well managed inside the tent. Aroma is becoming stronger day by day, showing good genetic expression. Overall, the plant is healthy, on schedule, and showing great potential as flowering continues.


Likes
8
Share
@La_VecinaCannabica83
Follow
Crecen sanas y bien. He añadido un led de 100w Spider Farmer sf1000 💡 🕷️ 🧡
Veremos los resultados
Likes
6
Share
@Walter_the_Ragamuffin
Follow
More Fantastic Grow News! They have been still doing great and developing the flowers and buds - I am VERY happy with how everything has been turning out! When opening the tent you are immediately hit with the subtle smell of maturing, ripening ganja - Each flower has a mixture of white hairs, orange hairs and an incredible amount of frosty leaves and trichomes. I notice that my Cherry Gorilla x Sol Sonic #2 is sprouting the red hairs faster than the rest - I hope she can hold off until the rest of the girls are completely finished!
The Cal-Mag seems to be working - I am noticing dark, dark green leaf color right next to the biggest buds - I am guessing that this is the Cal-Mag doing its thing. I see that the leaves that were damaged from the deficiency are slowly turning back, however I feel as it is this far along, the plants are most likely focusing on the flowers rather than the leaves - which seems to be what I wanted. The dark color next to the buds give me hope it was a good remedy.
When touching each of the flowers, you are left with a VERY sticky, leftover goo than stays on your fingers. Each flower smells extremely distinct - which is somewhat unexpected. This just goes to show you the power of phenotypes! These seeds came from the same dispensary bag, and each one seems to be just a little different. You can especially see what I am talking about from the Macro shots I took this week - look at the descriptions for the full breakdown. Wish me luck! I am slowly approaching week 7 - 8 when I am going to be starting my flush process (I think?) Appreciate all the input, likes and follows!
Likes
19
Share
@Sato_Growing
Follow
Low stress training has began to 5 of my plants and i will do the rest of them in this week.
Grow running perfect with good conditions. Plants are looking heathly and respond well to my nutrients, and i will start to incrense the nutrients i am giving to the plants.
Watering 0.5 L water each plant every day for this week with the following nutrients
4L Water with
Micro Grow Bloom B52 VoodooJ Rhino Tarantula
1ml
1ml
1ml
1ml
1ml
1ml
1ml

Likes
6
Share
@Juannabico
Follow
Hoy finaliza este hermoso proceso de cultivo, que por descuido y falta de medidas tenemos una cosecha polinizada que dará origen a un curuze entre la Jack Orange de Gea seeds y una Runtz de Mr.Q seeds; se observa unos cogollos no tan compactos ni gordos, asumo que esto se debe a la falta de estimulantes para el crecimiento de los cogollos y la polinizacion de la planta feminizada, que gasto sus energías en la formación de semillas y no en engordar cogollos.
La planta entra a secado en oscuridad en un habiente controlado, para proceder a retirar las semillas y utilizar el material vegetal ya seco y rico en tricomas en la extracción de rosin.
En el corte de la planta en su estado ya maduro, obtuvimos una planta de 55 cm de altura, con aroma fuerte, colores vivos, con cogollos llenos de tricomas
