
Likes
Comments
Share


@Tropicannibis_Todd
Follow
Start of day 98 ...... January 15 2022 Start of week 14 ........ 72 DAYS INTO FLOWERING
😕 LOOKS LIKE THERE GONNA GO A LITTLE LONGER THEN EXPECTED ? 😕 Gonna be honest , I didn't expect it to go over 85 days but here we are ........
( I BELEIVE IT HAS ALOT TO DO WITH THE SIZE OF MY GROW MEDIUM , AND THERE HEALTH AS I AM RUNNING 45 LITERS OF SOIL MEDIUM) .... SHE SEEMS TO WANNA RIPEN ON HER TERMS
( OMG THEY SMELLING GREAT ) !!!!!!!
Check out the full grow video on latest weekly update
Super Exceptional Growth Daily
Still adjusting LST when needed and leaf tucking.......
Water Only when needed but its drinking more every otherday and adjusting lights when needed......
Rain Water Only .......
( DAY 26 AND BOTH NL 1 & NL 2 SHOWED PREFLOWERS )
( DAY 49 AND RESIN PRODUCTION HAS STARTED )
( DAY 57 , EQUIPMENT FAILURE , main FAN , over heated😡 tripped breaker , reset light timers , lost a DAY, REPLACED new Main Fan 😁 back up running 👌)
( DAY 70 DID ITS FINAL FLUSHING TODAY TO GET RID OF ANY BUILDUP )
( DAY 77 AND IT SHOWS A SLIGHT DEFICIENCIE MAYBE A CAL/MAG GETTING CLOSE TO END OF LIFE ) IM ALSO DOING VERY LITTLE, SLIGHT DEFOLIATION
( DAY 101 AND ALL IS GOOD , THERE FATTING UP )
DAY 101 .....NL 1
SHOWS SOME CLEAR TO MOSTLY CLOUDY RESIN HEADS , LOOKS LIKE THERES STILL AWAY TO GO😩😩 .......
DAY 101 .....NL 2
SHOWS MOSTLY CLOUDY TO MILKY RESIN HEADS ( 💀 PROBABLY PEAK THC LEVEL 💀 ) , AMBER IS JUST GETTING STARTED , GETTING CLOSE BUT SEEMS MORE TIME NEEDED...... VERY CLOSE ( AS I WANT SOME % OF AMBER 😁 )
I hope you enjoy my growlog...
(Who the hell is TropiCannibis Todd😎 Well This is not only my FIRST AUTOFLOWER but my FIRST GROW in over 11-12 Years😳 I Grew from 2002-03 TO 2010-11 , I'm back nahnahnahnahnah , Been a fun grow , learned alot , and it looks like I am gonna have a great harvest with some great smoke....... who new 😁 )

Likes
14
Share


@goeser
Follow
slowly starting to get a setup.cstep by step. first time indoor.
cant wait them to be bigger and start flowering

Likes
25
Share

@BettyFlores
Follow
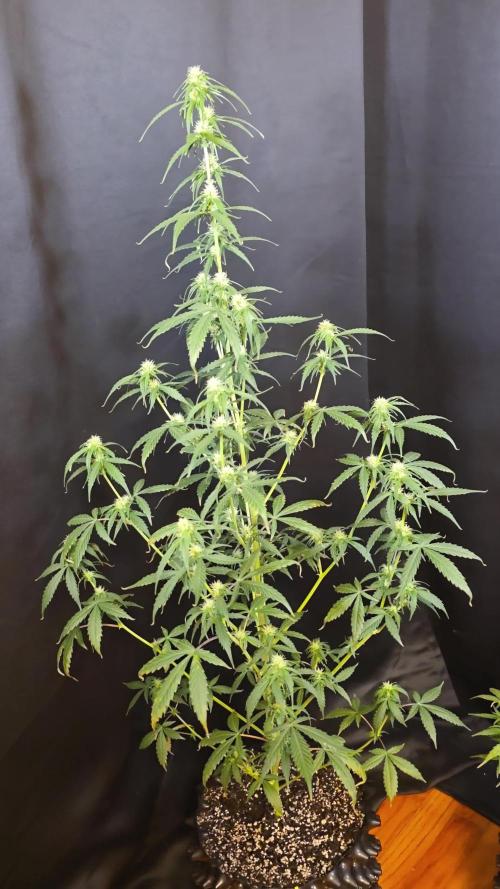
08.05.2026 Die Original Skunk Auto von FastBuds lässt im Moment nichts zu wünschen übrig! Eine ganz tolle Pflanze, die mit den widrigen Frühjahrsbedingungen exzellent klarkommt. Sicherlich braucht sie nicht mehr allzulang, denn sie ist bereits von Trichomen überzogen. Ich freue mich auf sie, wenn sie denn mal erntereif wird
Happy growing 🌸 💜

Likes
18
Share


@Greenfox89
Follow
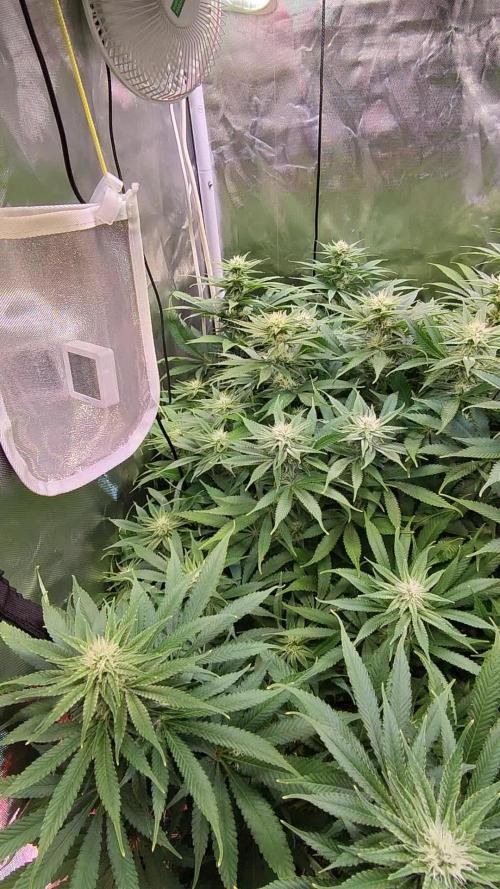
Hallo everyone 🦊 so i got question? Would you defo this plant? Im not sure about it cause i read that cutting leaf of stress they to much and dont have the time to recover? I just put the seed in the soil and let her do the rest.
Maybe helping a little bit her to finish the flower as perfect as possible would not be so bad
🥦🦊
Thanks for all advice.
Grazie
Merci
Danke
Dankje well
Obrigado
Muchas Gracias
✌️
Likes
10
Share


@Yolka
Follow
This week is just water, no stimulants.
For the rest of the week, just water. It looks already ripe, although the passport says another 1-2 weeks.
The smell is very strong - my old filter can not cope.
What do you say, when Harvest?.

Likes
2
Share


@EtnoGrow
Follow
this is the beginning of the 4th week along with the publication of the end of the 3rd week, this is how the fourth week is received, another intensive pruning that has no choice but to do it due to the size of the indoor, which is working great for us and we believe that I will always work like this, I am happy, here then the pruning of its results a little before and after and how it is receiving this fourth week, with the threads I touch a little bit of hair I hope it does not affect much but all in favor of opening the field to all the branch buds alike.WE CHANGE THE MESH FOR A BETTER ONE AND OF THE IDEAL SIZE AND AGAIN WE USE THREADS THAT HELP US VERY WELL, WONDERFULLY


Likes
54
Share

@Natrona
Follow
Godfather OG- MSNL
👉Sponsored Grow 👈
W6F3 11/9-15
This week I had to increase watering on GFOG #2 4.5 liters and #1 3 liters.Since NYC Diesel leaves look so dark green with some clawing and all the gals in the tent are receiving the same nutrients as NYC Diesel, I determined I ‘ve overfertilized. The Godfather OGs have some leave with mottling so to be cautious I gave them Calmag the first time and the second only PH 6.15 water with a 1 gallon flush. I defoliated some large fans that were damaged by low cal mag. GF OG #1 has roots growing out of the base of the stalk.
Stay green, growers love 💚🌿
💫Natrona💫

Likes
252
Share


@BudBoutique
Follow
Welcome to Bud Boutique Grow Diary - really appreciate all your love and support :)
Dont forget to check out my other current grows!
🗓️ THE END:
- After 14 Day of drying with around 15-16°C and 60% rh its finally time - LETS TRIM
- beautiful lemonenen smell while trimming
- bud full of Trichs all over (shinning like diamonds)
- 1/3 Phenos Ive didn't catched up that good with calmag
- Curring them in Grove TerpLoc Bags
- Watch out for my upcoming smoke review!
Thank you for staying with me - This wonderful Journey finally come to an end. The next run is waiting already 💚
___________________________________________
--- 🌱 Strain ---
🏷️ LEMON DRIZZLE by Barney's Farm
https://www.barneysfarm.com/lemon-drizzle-649
---💡 Lighting ---
💡LUMATEK ZEUS PRO 600
https://lumatek-lighting.com/zeus-600w-pro-29/
--- 🥗 Nutrients and Feeding
* 🍸 PLAGRON Algae Baseline grow/bloom + Additives: Power Roots, Sugar Royal, Pure Enzym, Silic Rock, Power Buds, Green Sensation
* 📅💪 baseline grow/bloow: 4ml/l & additives: 1ml/l each
https://plagron.com/de/hobby/produkte
--- 🏭 Grow Setup ---
* 🏠🌿 Indoor: Homebox 120x120x200cm (4x4)
* 📐🌀 PrimaKlima exhausting Fan 1180m3/h (running on 60-80%) & Can Light Filter 800m3/h & 1x Fanbox 1x Dyson fan for Air circulation
https://primaklima.com/de/shop/ventilatoren-de/ec-ventilatoren/pk160ec-tc/
https://canfilters.com/products/filters/
All Likes and comments are highly appreciated!!!
don't forget to check out my Instagram: budboutiquee
- Bud Boutique
Likes
17
Share


@sunshinegroww
Follow
So finally topping time has arrived she’s been topped and so far doesn’t show signs of care just keep growing ,big difference from last week getting bigger day by day now
Likes
42
Share


@CBD_Sweden
Follow
Week 15 / 6th week in bloom :)
One more week done, and even closer to harvest! Both my girls are looking great and starting to smell quite strong, I just love it!

Processing
Likes
8
Share


@Wasoh
Follow
Compre humidificares por aliexpress a bajo costo y mejoro la humedad del indoor.

Likes
4
Share


@CheeRz
Follow
Unfortunately I can't post as many pictures this week because I'm on vacation. Of course the ladies will still be well taken care of. 💚💚💚

Likes
35
Share


@MadeInGermany
Follow
Info:
Unfortunately, I had to find out that my account is used for fake pages in social media.
I am only active here on growdiaries.
I am not on facebook instagram twitter etc All accounts except this one are fake.
Flowering day 11
since time change
to 12/12 h.
Hi everyone .
The lady is developing beautifully :-).
The buds start to grow .
I added 2 g GHSC Bio Bloom per l coco.
Otherwise everything was checked and cleaned as usual.
Have fun with the update and stay healthy 🙏🏻
You can buy this Strain at :
https://www.exoticseed.eu/
Type:
Herz Og
☝️🏼
Genetics:
Larry OG X Kosher Kush
Indica 60 % / Sativa 40 %
👍
Vega lamp:
2 x Todogrow Led
Quantum Board 100 W
💡
Bloom Lamp :
2 x Todogrow Led
Cxb 3590 COB 3500 K 205W
💡💡☝️🏼
Soil :
Canna Coco Professional +
☝️🏼
Fertilizer:
Green House Powder Feeding
☝️🏼🌱
Water:
Osmosis water mixed with normal water (24 hours stale that the chlorine evaporates) to 0.2 EC. Add Cal / Mag to 0.4 Ec Ph with Organic Ph - to 5.5 - 5.8 .

Likes
6
Share


@DrShotzUK
Follow
BANANA PURPLE PUNCH - 420 FAST BUDS
This plant started off stunted and looking all round unhealthy but I gave hear time lowered her nutrients and she’s come right back to life forming nice dense dark purple buds …
The smell is amazing she smells of berries and lemony woody gassy smell. Nothing like banana if you ask me!
Cannot wait to smoke this strain
DRSHOTZUK
Likes
2
Share


@Ninjabuds
Follow
Man, that Skunk Apple runtz plant is giving me some trouble. It's still really small and hasn't grown much at all. I think I might've messed up a little because the leaves are looking kinda rough. Hopefully it can bounce back.
Well, it's Christmas again. This year feels a little different, though. Maybe it's the snow blanketing everything, or the way the tree lights up the whole living room. Either way, it's cozy and warm, even when it's freezing outside. I'm really looking forward to seeing what Santa brings. I hope I get that new video game I've been wanting. But most of all, I can't wait to spend time with my family. We always have so much fun
This past week was a good one for the plants. They started the first week of their stretch, and they've already grown a decent amount. I can really see them filling out. It's cool to watch them grow so fast. I can't wait to see how big they get by the end
I always get a little worried at this stage, like they're not gonna get as big as I want them to. But then I remember how they always end up surprising me. By the end, they're always perfect.
Likes
11
Share


@Keep_it_Cleannabis
Follow
Transplanted early this week. This girl showed her pistols under 24hr light so I'm guessing the genetics for her are strong. I plan to let her go and take a few clones. She also got switched to 18/6 light. She is absolutely Killin it

Likes
6
Share

@Gnrlymsntrp81
Follow
They are both doing good. So far no problems, perhaps having to remove some little branches but WE will see.
They are drinking 5 liters a day. I think I will stop giving Nitrogen by the end of that week. Other than that everything Runs smooth.

Likes
15
Share


@Drgreenthumb627
Follow
day 14 flower and those buds are just starting to peak out! the plant is happy and healthy :)


Likes
6
Share


@Kendoda
Follow
My final week is here. She’s fading out, id like to have seen her hold her colour a little longer although the leaves around the bud sites are still a nice green colour.
buds are tight and dense. More to follow as the week goes on.
Update….
I’m 7 days into drying, she’s starting to dry at the heads and gets more sticky the further down the branch. Next grow I’ll definitely lollipop to the top 2 nodes as I’ve found she’s a little “airy down below”. I’ll strip the branches in another 5-7 days.
