Likes
65
Share


@Roberts
Follow
Gold Sativa from Quebec Seeds germinated, and sprouted right away. Temperature may be a issue. But will see once plants get some foliage going. Growing her in a New Level Hydro bucket link below. Also using the SE5000. I did have it on 40 percent. But after seeing stretch I turned to 60 percent now. Thank you Spider Farmer, New Level Hydro, and Quebec Seeds. 🌱
SE5000
https://amzn.to/3qFpAML
Spider Farmer Official Website Links:
US&Worldwide: https://www.spider-farmer.com
UK: https://spiderfarmer.co.uk
CA: https://spiderfarmer.ca
EU: https://spiderfarmer.eu
AU: https://spiderfarmer.com.au
Coupon Code: saveurcash
Thank you grow diaries community for the likes, follows, comments, and subscriptions on my YouTube channel. 🍻🌱👍 Happy Growing 🌱
https://youtube.com/channel/UCAhN7yRzWLpcaRHhMIQ7X4g
www.newlevelhydro.com

Likes
2
Share


@DELTA9_CANNABINOID
Follow
En esta nueva semana, he subido la dosis de Bio-Grow 1ml/l más, la planta en sí a desarrollado un tronco grueso con grandes hojas, lo que viene siendo una índica. No presenta ningún defecto, carencia o exceso.
Espero que en 1-2 semanas empiece a tirar pistilos, os traeré las mejores fotos y videos que pueda, dulces fumadas máquinas.💀.


Likes
8
Share


@Enochian
Follow
Quiet week in the flower tent this week. Got couple new additions in the form of a humidifier for lights out and a Vivosun Aerolab THB. Both are welcome tools. The Aerolab seems accurate on temp and humidity but is consistently a couple of points off on VPD, which means I just deduct .2 off the value shown to give me a closer value to the true VPD. Useful even though inaccurate. Otherwise nothing to tell. The buds are getting bigger and swelling but I do believe she is giving her all. Here's to next week. :-)

Likes
105
Share


@PEAKYPLANTERS
Follow
Hello weed green thumb friends
My experience with these girls was fascinating, although as often happens the phenotypes seem to be totally different... there is always one who is born to become your favorite 😜
My favorite girl has grown some WONDERFUL flowers and I am so impressed with her huge resin filled flowers.....mmmmmm I can't wait to get my mouth on them 😋

Likes
34
Share


@Mr_Motalovah
Follow
Hello Growers and Tokers! 👋 👩🌾 🧑🌾.🔥💨
Sorry for the delay on the updates. ** THIS TEXT SERVES FOR WEEKS 14-18**
I had ALOT of problems with this lady these past 4 weeks.
Really bad weather, rain, wind, blazing heat, cloudy, temps going from 17-35C every other day for 2 WEEKS straight.. very sketchy! World's going to shit y'all!
Also had a Spider mites battle for 3 weeks and finally got rid of them.
And on top of that, all of the pictures I had weekly were deleted off my pc..
Only have a few for each week, luckly found those on my phone.
I've been watering 2L every other day for the past 4 weeks.
Some days less.. about 1.6L beacuase there just wasn't enough sun for her to drink up.
On week 16 there were some crazy-ass MFing winds. I'm talking gone with the wind style.
As I had the spider mite problem, I didn't want to bring her in the house and risk those little fuckers finding their way to my grow room.
(As I have that section perfectly isolated and pest free, wanted to keep it that way.)
The result of not bringing her inside?
The bottom branches that weren't tied down properly because I didn't think they would be damaged as the balcony has a little wind breaker on the bottom half.
But to my surpise.. all three branches snapped and broke, So i decided to go ahead and take them off.
I know it isn't much info for the past weeks, but It's what I've been battling with.
The buds are airy as a result of all the stress, don't look to appleaing to be honest.
My other two GSC came out GREAT, awesome lovely dense buds but those were different conditions.
I'm just finishing her to harvest because she made it through a big battle and deserves to be harvested as a champion she is.
Keeping in mind this was just a balcony experiment to see what I can and can't do with this balcony..
I'm not too worried about the final outcome. Luckily she pulled through so i'll make some hash with what I harvest.
I'll also be joining the FastBuds Halloweed contest with this lady before harvesting and I've got the perfect idea... 😏
Hope you all enjoyed the update and again sorry for the long delay on this one.
You can check out my other diaries of indoor ladies.
Take care out there!
One Love!

Likes
17
Share


@gottagrowsometime
Follow
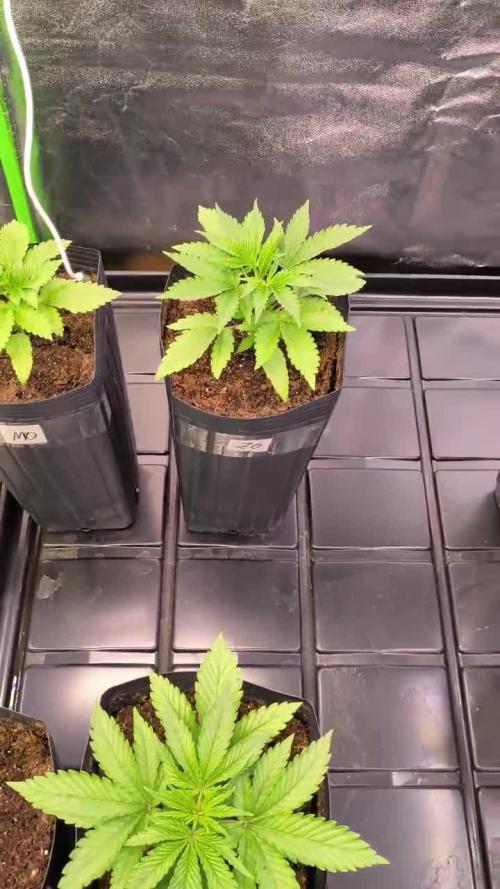
Candy Cream Go Fast Kannabia, 16-17 weeks in. She was stuck in a small for for faaaar to long. She vegged well. But took along time to reach out its roots. But she's turned into a beautiful plant. I'll try explain as best I can until I find device with full veg pics
Veg weeks 4-6-------2l pot
She grew & grew as much as the 2L would allow. She was the biggest 2L pot phenos I've ever seen. She starting sexing & took ages to recover back into full veg.
Veg weeks 6-10------18L pot
She took a long time to recoup. As she started sexing on me. It took over a week or more to start growing again, as she was in the 2L pot. But she kicked off into a rapid spurt of growth.
Flipping wait weeks 10-13
Took nearly a month before I started seeing full pre flower. I expected as much. As I brought her back from from nearly sexing it took about a week to get back Into any form of veg.
HEAVY FLOWER 14-17
Flower weeks Weeks 10-17 Sadly I can't find my device with all the pics. These are what the pics ive took in the pastv3 weeks. She's roughly 4-5 weeks into flower & doing really well. She took about 3 weeks to go into preflower as it grew so many shoots after I uppoted from 2L to 18L from veg week 6 or so. (Far to late for this fast mover). So, the pre flower you see there. That's the 4th of Feb. That took 4 weeks or so to FULLY flip. But if not rootbound, she's UBER QUICK.
Veg nutes were used right up until it started ro sex, and was kept under my p1000 / hs1000 light/tent right up until I got tired of putting it into my dark room
DISCOUNT CODES L
20% off Kannabia & Xpert Nutrients with code: GGST
20% off Oringal Sensible Seeds with code:GGSTGD
20% off Zamnesias entire catalogue with code: ZAMMIGROW2024


Likes
11
Share


@Lahuertade_Bototo
Follow
🌱🌱🌱Continuamos este cultivo, con esta hermosa cepa de FastBuds, Girl Scout Cookies Auto, en sus primeras etapas como plántula.🌱🌱🌱
👨🍳Nutrición👨🍳
Se mantiene el sustrato LightMix de Biobizz levemente húmedo, para estimular el crecimiento radicular se hizo un primer riego (250ml) con 0.08 ml enraízate (Plagron power roots) + enzimas 0.13 ml (Plagron pure zym) por el contorno de la plántula evitando el tallo, luego se humedeció el sustrato levemente con un aspersor (15-20 ml agua declorada).
En el tercer día de la plántula se le da 550 ml de solución con 0,17 ml de Plagron Power Roots + 0,28 ml de Plagron Pure Zym, debido a que respondió de maravilla al riego inicial y seco el sustrato, seguimos estimulando el crecimiento radicular, sin nutrición NPK adicionada.
Cuarto día solamente se abre una rejilla de intraccion pasiva en el indoor, la plántula se ve a gusto y saludable.
Sexto día se riega con 550 ml de solución, 0.2 Power Roots + 0.3 Pure Zym sin adición de NPK, solo el alimento del sustrato light mix biobizz. Responde de maravilla a los riegos que se le dan por el borde de la maceta para estimular las raíces, crece de manera vigorosa y seca en 2 días el sustrato.
🚀Equipamiento🚀
Indoor de 60x60x159 cm y una iluminación BlackCob F320, se activa solamente 1 modulo (160w) a 75cm para estimular su crecimiento pero evitar estrés lumínico
Acompáñenme para ver los resultados de este hermoso desafío, un saludo cultivadores 🔥🔥🔥
Likes
23
Share


@Firepharmer
Follow
In to week 7 now starting to flush!!
Very impressed with this run 💚🌱💚🌱
I’m now running the Futur vert 30 W uv led for 5 hours of the 12/12 with the Futur vert flora max series

Likes
2
Share


@BackyardGrower23
Follow
Another week of rain storms! She was a trooper and stuck through all the wind and rain! Starting to see some good secondary growth from the LST. Shes bushing up so quicly, so i removed some more big fan leaves that were blocking some sunlight to the middle of the plant.


Likes
51
Share


@eldruida_lamota
Follow
Que pasa fumetillas, ya estoy de vuelta y traigo la quinta semana de floración jaujas, que aromas que desprende esta variedad, y como tricoma 🔝, que más se puede pedir.
Bueno por pedir, que no se caigan del peso de las flores en semanas que salga cantidad pero que no caigan 🤣.
Buen porte andan también con buen color, y las flores están prietas prietas 💎
.
La humedad esta al 45% la temperatura está entre 21/25 grados , y como siempre el ph , ya que es de lo más importante,está en 5,8/6,0.
.
AgroBeta:
1 ml x L Flowering black line , vía radicular.
0,2 ml x L Beta shark, vía radicular.
0.5 gr x L mega PK , vía radicular.
0,8 ml x L Terminator, vía radicular.
0,5 gr x L Engordacogollos, vía radicular.
0,3 ml x L Tucán , vía radicular.
0,1 ml x L Betazyme, vía radicular.
0,3 ml x L Tricoma, vía radicular.
0,05 ml x L Gold Joker, vía radicular.
0,2 ml x L Silver, vía radicular.
.
Hasta aquí todo familia 🕸️ , un saludo y buenos humos fumetillas💨💨💨.
Likes
45
Share


@AsNoriu
Follow
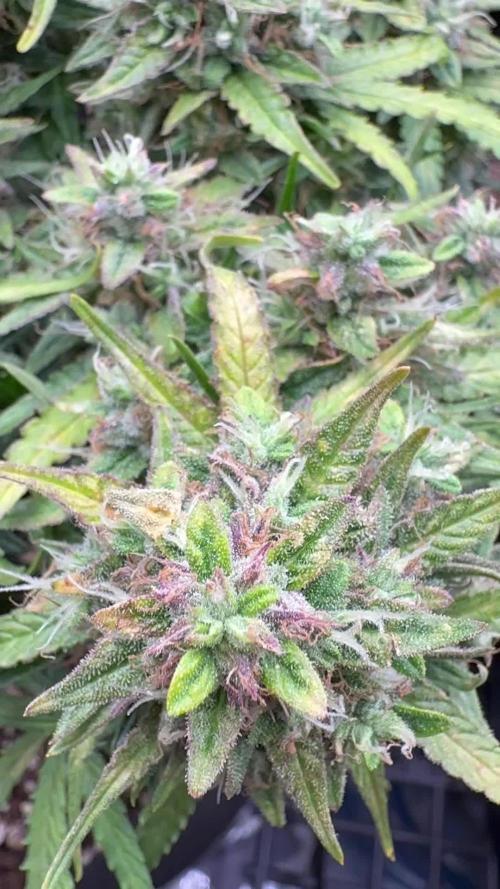
So its day 149 and its time for Girl to go ...
I left her for 72 hours of darkness, trichs are milky with 30% amber.
She started to flower on day 2 . So i kind off hoped for her to mature quick....
And on day 64 of flower she is done, one of the fastest girls. I could push her like a week more, but she is fading and i dont like to slaughter buds while triming , because i dont like yellow leaves ;)))
Two records left in longest diary, one for harvest, one for result.
Amazing journey ...
Happy growing !


Likes
23
Share


@Mosquito_Haarlem
Follow
Een nieuwe week en ze is bijna aan het eind toegekomen.
Ze krijgt nu alleen nog mineraalwater van Spa Reine met flawless finish.
Buds zien er heerlijk uit 😋
Ik zal deze week nog verse foto's updaten.

Likes
3
Share


@mquintero7
Follow
Missed 7th week. She looks very well, big and strong, in the process of creating big buds, lots of hope for this one.