The Grow Awards 2026 🏆 


Likes
1
Share
@mauigrown
Follow
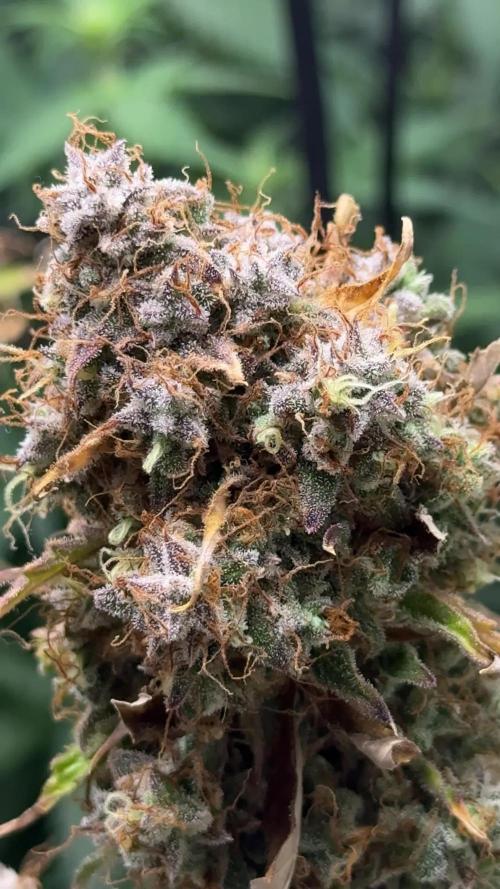
Week 8 is finally here! We changed up the nutrient feeding to the week 8 on the feed chart.
I am diluting everything at a 50-40% rate to keep EC within acceptable ranges of 0.8 - 1.1 EC.
I started adding Terpinator to the mix and I do notice a significant smell increase vs. without it. I am going to keep using this as I think it is a great supplement. I did figure out that even though on the bottle and on the specific feed chart, it says it is a light formula that will have minimal impact on EC and will not burn your plants at the recommended rates - it will!
First time mixing up my nutrients with terpinator, I had to dilute it because the EC was too high. I put the recommended amount in my mix, and checked EC and low and behold it was high. The next feeding I did a 50% dilution rate and that seemed to be ok if you are diluting your other inputs properly to compensate.
ALWAYS make sure your EC and PH are in check prior to fertigating your plants.
I am watching the trichomes on a daily basis and am looking to harvest sometime this week or next. I plan to dry it in the tent it is growing in as it has AC and good airflow. Once they are done drying, they will get trimmed up, lightly vacuum sealed and stored in the freezer.
Updates will be coming throughout the week!
Likes
1
Share
@Anthonythegrower
Follow
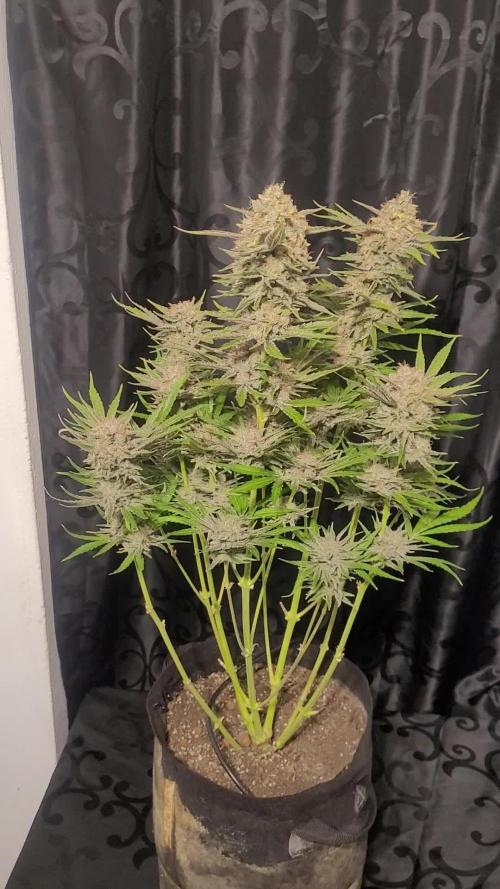
It’s another week of flowering for my plant, and it’s turning out beautifully. You can slowly see purple colors appearing on almost all the buds. All the buds are covered with tons of trichomes — I can hardly believe it, such a beautiful plant.

Likes
3
Share
@TruTraTri
Follow
Didn't do wet weight, so I suppose something like that.
Great strain. Somehow not so many trichomes, but it feels like glue was poured all over the buds. (!)💪💪💪💪
65g dry. ~20g popcorn. I pressed the popcorn cold. Not the best material, and I was too lazy to pick up stems and remaining leaves. Nonetheless 3.2g. Nice.😎😎
It took a while for her to build up, but she did!
As the Zkittlez was going crazy... this is my favourite Greenway strain, up until now.
Recommendation for small setups!👌👌👌
“Your brain has turned into cottage cheese.” — Weird Al Yankovic
Likes
14
Share
@MG2009
Follow
03/13/2022
Love the colors on Grape Skunk #1 others are not as purple, again i forgot Biscotti Skunk and lemon og.
03/14/2022
Uploading Biscotti Skunk pic's
I'm really loving 3 particular girls this run,all plants are exposed to PW intentionally I need girls that can take PW with no issues and three plants are spotless. The first is the only Biscotti Skunk that was female of 5 cloning for outside run but will do great in basement without PW issues. The second is lemon og spotless, and the third is the grape skunk thats got most color the second tallest of the grape skunks, cloning for testing in New England zone 7 should get at least one if not all 3 to finish before cold sets in.

Likes
46
Share
@eldruida_lamota
Follow
Que hay familia, vamos con la sexta semana de floración de estas Candy Rain de Zamnesia, para el concurso POWER BUDS Plagron x Zamnesia CONTEST.
Las flores van formandose progresivamente y empieza a desprender unos aromas bastante dulces, también empiezan a tricomar bien y a madurar.
Esta vez regué con una aplicación de Sugar Royal, 1 ml x litro de agua, Alga Bloom 2 ml x litro y Power Bud 0.8 ml x litro, Green Sensation 0.8 x litro, por supuesto controlando siempre el Ph, que ahora mismo lo dejamos en 6.
Tragan alrededor de 1 litro por planta cada 48 horas.(3 riegos semanales).
La temperatura máxima está en 21.5 grados y la humedad está entorno al 50%.
Hasta aquí es todo, vamos viendo estas semanas como se forman y progresan nuestras flores.
Os comento que tengo un descuento y para que compréis en la web de Zamnesia de un 20%, el código es ZAMMIGD2023
The discount 20% and the code is ZAMMIGD2023
https://www.zamnesia.com/
Hasta aquí todo, buenos humos 💨💨💨

Likes
5
Share
@Originalgrower051
Follow
Lst e troca de fotoperiodo para 12 horas de luz e 12 horas de Escuro

Likes
9
Share
@CampaCavallo
Follow
sempre più bella la nostra amica misteriosa🎄🤪
Qualcuno di voi sa dirmi che specie è?

Likes
28
Share
@DreamIT
Follow
Sponsored by:
🎭ZAMNESIA SEEDS🎭-💡VIPARSPECTRA💡-💐GREEN BUZZ LIQUIDS💐-🛠️WEDRYER🛠️
4/9 hello growrez, I'm back with the updates. unfortunately it was another shitty summer and the heat is not over yet, but even if slowly here we are. My bell runtz has stretched out of proportion. the branches I held have stretched a lot and are starting to bloom. today I bathe with fertilizer in the fourth week of flowering
__________________________________________
Personal advertising (contains affiliate links)
__________________________________________
🦄Zamnesia boasts the most complete and accurate site where you can find everything related to cannabis and the "psychedelic" world. Autoflowering, feminized seeds, mushrooms, salvia divinorum, afrodisiacim of everything, and more! ( no affiliate link)
✅https://bit.ly/Zamnesiaseeds
__________________________________________
Did you know that Green Buzz Liquids fertilizers are 100% vegan? A complete line of products ready to give the best to each of your plants! Visit the site and see my journals to see how they work 🦄
🤯 And with the code "dreami t" you will immediately receive a 15% discount on your purchases
✅https: //bit.ly/GreenBuzzLiquidsPro
__________________________________________
👀 Are you looking for a good lamp to start with? 👀
🌞Viparspectra has something more than the others, take a look at their site.
⏩ Use "GDVIP" for an extra discount or "DREAMIT3" for an extra 5 %% discount
👀 Search for it on Amazon
✅Amazon USA: https://amzn.to/30xSTVq
✅Amazon Canada: https://amzn.to/38udUVe
✅Viparspectra UE: bit.ly/ViparspectraUE
✅Viparspectra USA: bit.ly/ViparspectraUS
______________________________________________
🌈 Tired of blowing on your weed hoping it dries quickly? Check out the Wedryer website! You will find a well-made accessory that will help your weed dry in just 8-10 days without the annoying risk of finding mold or other annoyances! (no affiliate links)
✅https: //bit.ly/Wedryer_
______________________________________________
📷🥇Follow the best photos on Instagram 🥇📷
https://www.instagram.com/dreamit420/
Backup
https://www.instagram.com/dreamit4200/
🔻🔻Leave a comment with your opinion if you pass by here🔻🔻
🤟🦄💚 Thank you and good growth 💚🦄🤟
Likes
4
Share
@Phatlad187
Follow
Week 2 of flower plants are growing perfect with no problems small buds starting to form struggled with heat abit but they still going strong nice and green one of them at streched more than others
@growerchoice @SHOGUN COCO A 4ml/L
160ml
@SHOGUN COCO B 4ml/L. 160ml
@SHOGUN ACTIVE BOOST 2ml/L. 40ml
@SHOGUN CAL MAG 1ml/L 20ml
@SHOGUN ZENZYM 2.5ml/L. 100ml
@SHOGUN KATANA ROOTS 0.2ML/ 8ML

Likes
16
Share
@MrWolfe
Follow
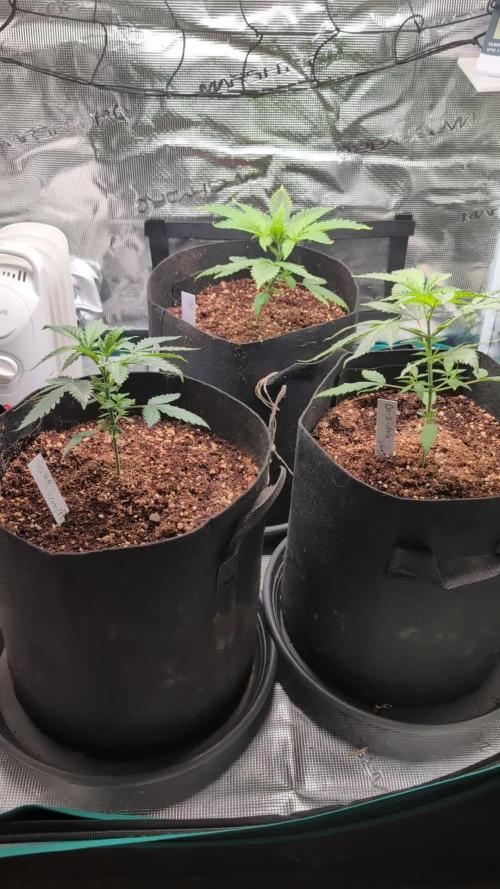
Last week of veg for this round, next Monday they will start 12/12 in the flower room and get stripped.
Watering daily and they are growing fast and looking great, can't wait to see how flower goes for these ladies.

Likes
5
Share
@Jays_Not_Here_Man
Follow
Started some LST early in the week for the slightly older plant, then later in the week with the other two. I was going to let them go Christmas tree style, but I can tell already they will out stretch the others. Ended up just bending the top and tying with pant ties. This should promote some busier plants.
Still figuring out the Correct Cronk Dosage, it’s pretty strong stuff, just trying to find the balance. Happy Gardening 🇨🇦👊❤️

Likes
6
Share
@Dargaville_Dukes
Follow
Topped the plants this week. I think the soil got a little too dry on the Dos-si-dos toward the end of the week. It started wilting. Keeping a close eye on soil moisture. I think I'll need to water more often as the soil this run is predominantly coco coir.


Likes
23
Share
@Elbernaweed
Follow
Las plantas se ven bien sanas con 25 días de vida, en breves trasplantare a tiestos de 5 litros para ponerlas a floración. Asta ahora solo e añadido estimulante radicular al riego y el sustrato es light mix. Ya e preparado los tiestos donde voy a trasplantar con el sustrato enriquecido,Como podéis ver la mezcla la ago yo mismo , intento dejar el sustrato esponjoso aireado y sin apretar,dejando que vaya bajando solo, si es necesario de aquí un mes le añado un poco más. Con esta mezcla de nutrientes e conseguido sacar cosechas abundantes y de muy altísima calidad! Intento que mis cultivos sean lo más natural y orgánicos posibles, utilizando fertilizantes respetuosos con el medio ambiente como el humus de lombriz o el guano de murciélago. Para prevenir hongos y ácaros suelo utilizar propolix y for-tec,que también son ecológicos y me van muy bien.

Likes
11
Share
@PanGrower
Follow
Do not pay attention to the temperature on the thermometer in the middle, it lies by a couple of degrees. I have a good thermometer on top of the box that shows the temperature.
Day 29: After a terrible fracture, we see that the plant is beginning to recover. I'm honestly disappointed because it makes it very difficult for me to train mainlining and it will also increase the amount of time it takes to grow.
Day 30: It looks much better already, I could superprune the right branch, but I don't want to stress it. I will try to bend the right branch harder, I will bend the left one a little in the morning the next day, maybe early.
Day 31: This morning I cut the lower leaves, photo in the evening and continued the LST training after the injury. Photo in the evening.
Day 32: I am completely sure that the plant has moved away from the stress, but we can see on the left circle, the right bud (and side) slowed growth.
Day 34: I saw traces of salt on the tips of the new leaves, so now I pour water with regular 15 PPM.
Likes
25
Share
@BudHaks
Follow
Apologies for not updating last week, I have just been really busy!
These last couple of weeks have been great - her growth is coming along very well. There are no signs of any deficiencies as of yet, what is your opinion!
In regards to defoliating and lollipopping - what growth would you suggest I get rid off?

Processing
Likes
14
Share
@DonPato
Follow
Fin de la semana siete y soló veo un proceso hermoso, lleno de gratificación, sin hojas quemadas ni exceso de nutrientes, todo se ha dado en las dosis justas de cada componente, los nutrientes orgánicos funcionan de maravilla. Creó que las palabras están demás después del registro gráfico.
Saludos a todos!
Don Pato.
___________________________________________
End of week seven and alone I see a beautiful process, full of gratification, without burnt leaves or excess nutrients, everything has been given in the right doses of each component, organic nutrients work great. He thought the words are there after the graphic record.
Big Hugs !
Don Pato.

Likes
4
Share
@Erich2025
Follow
This week i was transplanting the plant in a 11L pot. 2 days later I did some LST to prepare her for flowering. This strain is very resistent towards stress and is growing non stop. I aim flowering for next week on sunday when the plants are 6 weeks old.
🌴🍪🔥
Likes
23
Share
@420DeepGrow
Follow
Gracias al equipo de Kannabia, Marshydro, XpertNutrients y Trolmaster sin ellos esto no sería posible.
💐🍁 RS11:
Las variedades de marihuana son cada vez más grandes y mejores, y la Rainbow Sherbet #11 de Kannabia ha llegado para revolucionar tu mundo con su extraordinario contenido de THC del 30% y sus terpenos increíblemente deliciosos. Con una genética 70% índica, esta descendiente de la Pink Guava y la Sunset Sherbet ofrece muchas características interesantes, como su espectacular belleza. Sus cogollos a veces adquieren una tonalidad azul y brillan con una gruesa capa de tricomas, por lo que parecen piedras preciosas cannábicas.
Germina las semillas en exterior o interior, y prepárate para quedarte con la boca abierta. La Rainbow Sherbet #11 no necesita muchos cuidados para producir plantas robustas y vigorosas. Incluso los principiantes podrán conseguir un buen botín cuando llegue el momento de la cosecha, y los cultivadores que ya tienen experiencia no tendrán problemas para hacer que sus plantas rindan al máximo. Con un poco de LST podrás maximizar su producción, y tras 9 semanas de floración en interior conseguirás alrededor de 450-500g/m². Al aire libre, esta variedad puede generar hasta 500-600g por planta.
El nombre de esta variedad augura un montón de sabor, y la Rainbow Sherbet #11 cumple con creces. Sus cogollos tienen un aroma extremadamente complejo que convierte cada fumada en un viaje aromático. Las fragancias que más destacan son las afrutadas (principalmente a cerezas y bayas), así como las cítricas. Esta mezcla va acompañada de unos matices terrosos y especiados y de un toque de pino. Tras unas cuantas caladas, los efectos de la Rainbow Sherbet #11 aparecen con toda su fuerza, potenciando la alegría y la creatividad, calmando el cuerpo y la mente, y ayudándote a olvidar las penurias del día.
💡TS-3000 + TS-1000: se usaran dos de las lámparas de la serie TS de Marshydro, para cubrir todas las necesidades de las plantas durante el ciclo de cultivo, uso las dos lámparas en floracion para llegar a toda la carpa de 1.50 x 1.50 x 1.80.
https://marshydro.eu/products/mars-hydro-ts-3000-led-grow-light/
🏠 : Marshydro 1.50 x 1.50 x 1.80, carpa 100% estanca con ventanas laterales para llegar a todos los lugares durante el grow
https://marshydro.eu/products/diy-150x150x200cm-grow-tent-kit
🌬️💨 Marshydro 6inch + filtro carbon para evitar olores indeseables.
https://marshydro.eu/products/ifresh-smart-6inch-filter-kits/
💻 Trolmaster Tent-X TCS-1 como controlador de luz, optimiza tu cultivo con la última tecnología del mercado, desde donde puedes controlar todos los parametros.
https://www.trolmaster.com/Products/Details/TCS-1
📆 Semana 3:
Muy buena semana, he aplicado un riego solamente con agua de manantial para reducir la cantidad de sales acumuladas en el sustrato y ella se recupere del estrés que tiene. Se ha notado una mejoria .
Creo que le quedan unas dos semanas por estirar, parece que va a ser una buena cosecha.
Se mantiene un buen control del cuarto de cultivo gracias a @marshydro y @trolmaster.
Mantengo las dosis de 1/3 de nutrientes recomendados por el fabricante.
Potencia del foco 80%


Likes
9
Share
@Herbz_Unkraut
Follow
another resin monster from seedstockers, with a very special scent, full of flavors! grinded it smelled like peppermint, and vaped it has a great sweet creamy taste!