


Likes
Comments
Share


@Mz876
Follow
They’re really stretching and basically starting to flower but I’ll wait until next week to claim week one of flower.

Processing
Likes
1
Share


@nausicaahime
Follow
everything changed on week 4
grow tent and cob led came to show how a good light is important.
from now til last 2 weeks, only indoor growing
goodbye CFL's, you worked well.
+ LST and ferts (2ml + 0.25)
Defoliation started
Removed branches from 1st node


Likes
32
Share


@GODSGIFT_2005_JM
Follow
🍼Greenhouse Feeding BioGrow & BioBloom
⛺️MARSHYDRO
The ⛺️ has a small door 🚪 on the sides which is useful for mid section groom room work. 🤩
☀️ by VIPARSPECTRA (models: P2000 & XS 2000)
🌱 DUTCH HEADSHOP SEEDS:
www.dutch-headshop.eu
www.dutch-headshop.nl
ONE STOP SHOP
. 100% germination success on first try! with HUGE seed selection!
. Very friendly customer service
. Best bio-seed packaging
. Sells other products @ best prices:
. Nutrients
. Vaporizers
. Smoking accessories (grinders, cones)
. CBD Tinctures
. Resin Extracts
. Boveda humidity packs
. Ziplock bags
. Other health supplements such as:
. Lion’s Mane Organic Capsules
. Hemp Seed coffee


Likes
2
Share

@fadedgreentaurus
Follow
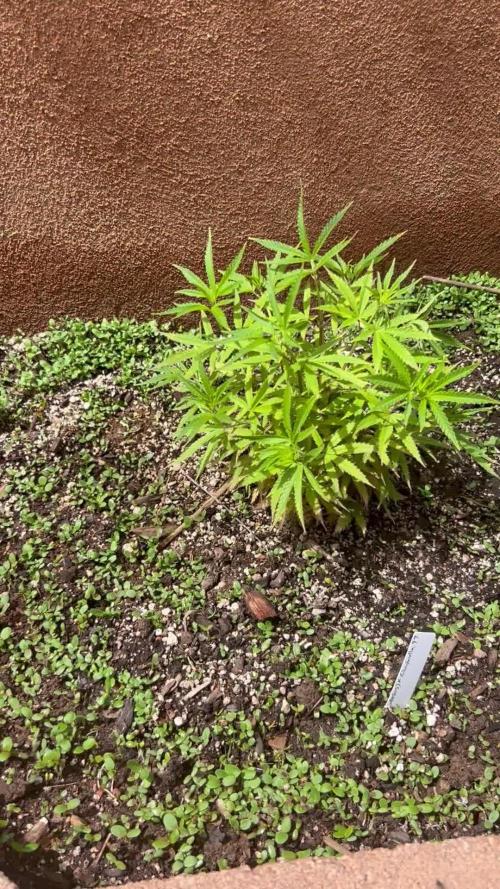
Something to note as the weeks go on is the placement of my grow space due to its east west walls planting late march early april allows me to get 2 pre flowering growths spurts out of 1 outdoor season and has directly contributed to huge success for me in years past. As of now preseason planning this grow is all coming to a nice crescendo. Soils happy cover crop sprouting hoping for scattered shower and the ability to collect rain water. Planning on keeping tea brewing as often as I can and sorta winging it, outdoor grow with an overnight work schedule makes for awkward documentation and work hours. Though this seems to be my most well organized. Grow as opposed to years past. Praying for lots of rain a humid summer and well timed pest management.
Likes
40
Share


@Mr_und_Ms_Lue_Roots
Follow
Für das unsere Pflanze, schon einige Tobolenzen hintersich hat, wächst sie gut. Unsere Pflanze hat einen Hagelschaden, leichter Schimmel an beiden Hauptstämmen(nass-kalt-Regenwoche) und 300 km Umzug in Wickefolie liegend im kleinen Peugeot 208 mitgemacht. Den Schimmel konnten wir mit einer 4 Tageskur (Brottrunk/Bio) stoppen.
Seit dem in der Spitze kaum Unterdruck in den Sonnensegelblättern. Zusätzlich starke Trocken und anhaltende Nass Periode erschwerte das Analysieren des Problems.
Durch ausmärzverfahren, angefangen mit reduziertem Gießen/ Normales Gießen und mehr Gießen und beachten des verhaltens darauf, haben wir uns so in den Wurzelbereich gearbeitet.
Somit Umgetopft von 20 in 50 l
Gut Gedüngt ca. 80 % des Schedule Schema BioBizz WK 3
Zusätzlich 2 x die Woche Mikrobe bzw. gedüngt, nen pfiff Juice und 0,06g CO2 in Pulverform (Tablette)
Ansonsten wässern wir im Moment (Heaven, Acti_Vera/ Cal/MG)

Likes
11
Share


@Paradox_1ste1
Follow
First time growing these Ayahuasca Purple. When i saw it first i liked it as a plant and as a bud in the end of the grow and i think and really hope i get really good results from it. If anyone has any tips for me i would be to happy to follow so i can improve the grow better. 🤞


Likes
7
Share


@UrbanBoer
Follow
I cannot wait to see how this beautiful Queen is going to look at te end of the flowering stage, she’s the closet I’ve came to LST in a manner I wanted this baby to grow, loving how brunches twirl around the twig, l have stopped growing Christmas tree shaped babies. I LST from the seedling phase right through to flowering, you should not forget that this plant can take stress, imagine it was growing in the wild, some stress in your plant’s lie is critical for positive growth, from my point of view my trees are going to struggle with big buds, because it does not have this thick stems.
Likes
4
Share


@el_cultivito
Follow
Week 11 (5/02/22 - 5/08/22)
Transplanted clones into 6" rockwool cubes
Killed off the mother plant
Likes
24
Share


@PrairieFrostGrow
Follow
*****Week 17 growth – March 27 to Apr 2, 2021 – Week 8 flower ******
We are in the first full week of flush now. Color change time and more swelling😃👍 This girl has been a little smaller in bud mass but she has certainly been looking like fire little dense nugs on her💪👍😃 The smells coming off are increasing and getting some pine or lemon notes as well as woody. Buds are really dense but the lowers are going to end up in extracts as she has grown tight in a way and it’s been a little tough getting some light down lower in her.
The girls are drinking well with being watered almost everyday. Moving into the phase of letting the pots dry right out before adding more water to ensure they are finishing all the nutrients in the media. Again, really just keeping them watered when they want it and taking pictures at this point😎
Little more detail…..
Mar 27/21, Day 50
- 4L plain water at 6.0pH
- fade is starting but she just isn’t going to lighten up as much as I would like by the time we get to the end......all is good though.
Mar 28/21, Day 51
- 4L watering today with RO water.
- 30ppm and 6.1pH
Mar 29/21, Day 52
- cold in the tent today so turned the heater back on to brin up to 77 degrees. It was holding at 74, a little low.
- nothing watered.
Mar 30/21, Day 53
- 4L watering with tap water at 5.8pH
- leaf edges darkening and showing some fade😃
Mar 31/21, Day 54
- watered late in the day with only 3L of RO water
- 25ppm and 6.1 pH
Apr 1/21, Day 55
- dry out day
Apr 2/21, Day 56
- light power reduced again and down to 300 watts.
- plain water with tap.
- 3L each 280ppm and 6.1pH
Through week 8 and going into 9 now. Still some nutrient to keep working on in the leaves......give them a little more time💪👍
Likes
11
Share


@thevaporino
Follow
Entramos en la 9 semana y seguimos con heladas en el exterior , las mínimas con luces apagadas son de 15º y las máximas con luces encendidas


Likes
2
Share

@Drehpaper
Follow
Woche 9
Tag 57-63 / Blüte Tag 29-35
Luftfeuchtigkeit 47,8
Tag 25,8
Nacht 21,3
PPFD 879
DLI 38
Höhe 55
VPD 1,38
Lampe Abstand 44cm
Lampe auf 80%
Die Daten entnehme ich immer am Ende der Woche von meinem Pulse Grow, kann nicht sagen wie genau die Werte sind.
Der PPFD Wert wird ab jetzt immer an den acht höchsten Punkten gemessen und der Durchschnitt ermittelt, alles bei einem offenen Zelt.
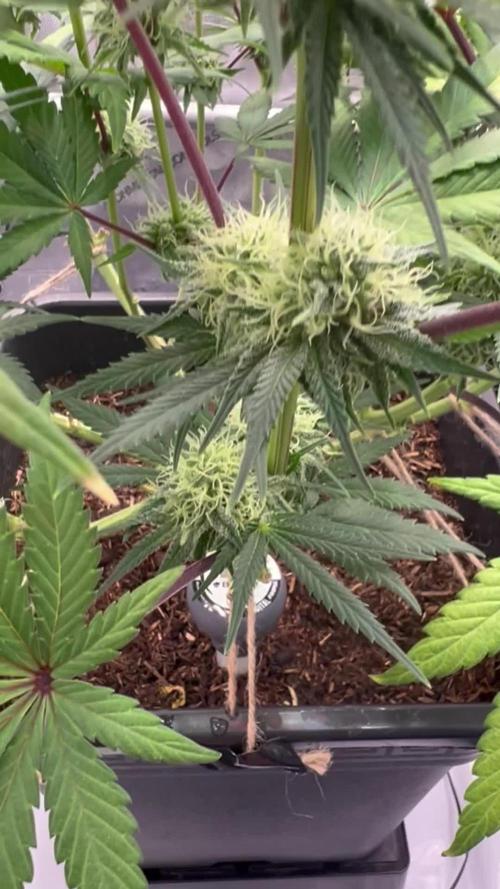
Anscheinend hat die Lampe zu viel Power und die Dame kommt mit der Nährstoff Aufnahme nicht nach. An BT 32 gab es mal 2ml/l PK 13/14 von Plagron. bin gespannt ob ich alles richtig analysiert habe oder ob ein totaler Griff ins Klo war :)
Meinte damit die Braunen Flecken auf den unteren Blättern siehe Bild!
In den nächsten Wochen könnte es mit den Temperaturen Probleme geben. Wird wohl die magischen 26 Grad Celsius überschreiten Tagsüber.
Da es mein Erster Grow seit mehr als 20 Jahren ist kann ich noch nicht viel sagen zur Genetik, scheint sehr stabil zu sein und kommt mit Stress bis jetzt gut klar. Paar Mutationen sind zu sehen Siehe Bilder!
Hab von einigen Kollegen gehört das die ganzen neuen Genetiken sehr sehr zickig werden können was ich zur PBR bis jetzt nicht sagen kann.
Ist das normal ? Blütenkelche auf der Blüte und aufn Blatt? Was sagt ihr dazu?

Likes
24
Share


@AsNoriu
Follow
Day 71. Took down all yellowing leaves, she is fading, but smell is nice, bulking up slowly and i am happy with how everything goes ...
That girl was under Mars TS1000 and light did its job PERFECTLY !
Still doubt, was it good decision to grow without food, overall look a bit meh ;)))
3 liters of 6.3 ph water in.
Day 76. 3 liters in, she was most thirsty from all 3. Started to fade rapidly like Icd few weeks ago, but looks okeish, still needs like 3 -4 weeks ...
Happy Growing !!!

Likes
23
Share


@SonomaSungrown
Follow
BOOMING.
Have had an unusual amount of thrips and noticed a few Katydid nymphs on Tuesday (7/22), so I hit everything with 1.5tsp Neem Oil and 1 tsp of Dr Brommers soap in a 1 qt sprayer.
I also decided to do my only planned dusting of Diatomaceous Earth.
Executed that on Wednesday, 7/23, and also top dressed with DE to attack larvae.
Thursday 7/24
Mixed up first batch of flowering top dressing.
I put it into a 55 gal garbage can and watered it to get the cooking process started.
Will only let it go for a week or so and then will top dress the girls.


Likes
6
Share


@Cannabis4Crohns
Follow
No watering needed in first week as pot dried out after germination. Light set low on 25% (approx 25W) and height is slowly reduced until it's 12" (30cm) from the plant. Lights on for 20 hours and off for 4 hours of darkness.

Processing
Likes
8
Share


@eldruida_lamota
Follow
Esa familia, estoy de nuevo por aquí, os traigo la última semana de crecimiento de estas candy caramelo de Zambezaseeds.
Estoy bastante contento las 3 son simétricas están creciendo en un tanque de 7 litros en los cuales aportamos el primer riego con nutrientes para solventar alguna carencia leve, sobre todo de nitrógeno pero nada como echarles de comer.
El ph está controlado, la temperatura no aumenta de 26 grados y la humedad la mantenemos por encima de 50%.
Cómo apreciáis, todo va sobre ruedas, veremos que tal se comportan de ahora en adelante, saludos fumetillas y buenos humos.

Likes
7
Share


@StoneyMelony
Follow
Overview of my grow:
Tent: Secret Jardin DS120 4 x 4 (120 cm by 120 cm)
Lights: 2 x 120 Watt CTlite c4 clusterled
Climat: Trotec Dehumidifyer 240 watt- 10L/24h
Filter: Prima Klima carbon filter PK2600
fan: 2 x Secret Jardin 20watt osc. fan
Pots: Gronest 4 x 11 liter airpots
Water : automated water system
PH: bluelab
Nutrients: Plagron cocos A + B
Plagron PK 13/14
ATA cal/mag
Epsom salt
no rights to music in the videos
Week 9. Frosty, frosty and strong smell. Very nice, watermouthing nice. It looks like trichome city on top of those buds. trichome clusters, maybe another week, get the fat lady. Fat and Frosty. Thanks for checking 😋

Likes
9
Share


@RhodiesGrow
Follow
Day 1: Popped. Temp: 75º RH: 82% + PPFD: 250
Day 2: Temp: 75º RH: 82% + PPFD: 250
Day 3: Roots showing through the bottom of the rapid rooter. Dusted roots with Tryfecta Myco Supreme (FoxFarms) and transplanted to 5 gallon pot w/ProMix HP. Temp: 75º RH: 78% + PPFD: 300
Day 4: 5-10ml ph 6.2 water feed. Temp: 75º RH: 75% + PPFD: 300
Day 5: Showing second set of leaves. Temp: 75º RH: 75% PPFD: 300
Day 6: Temp 75º RH: 75% PPFD: 300
Day 7: Temp 75º RH: 72% PPFD: 300 VPD: .42 KPa
Cosmo is looking quite strong for a week old little girl. She does show some signs of over watering. Yellowing leaves at this stage usually indicate wet feet. Will continue to mist spray a few times a day for the next week with no additional water added to soil.
