The Grow Awards 2026 🏆 


Likes
Comments
Share
@Sur_cannabico
Follow
Cursamos la segunda semana, aún aplicamos bajas dosis de fertilizantes estas pequeñas van bien hasta ahora
9 días


Likes
14
Share
@BlueDream123
Follow
Still at it. Now I have another tent on the go with some DWC and Autos

Likes
28
Share
@AlpenZilla
Follow
It really is an extremely fast plant. I have hardly been able to keep up with the normal fertilization scheme, and it seems to be very hungry for CalMag.
Despite the deficiencies, the result is surprisingly good.

Likes
26
Share
@XiggYgreen
Follow
Hi all growers and lovers of green 🙏💚🌸
Gorilla Girl XL Auto by Sweet Seeds
About this grow
All is beautiful and going the way I can only wish 💚😎
DLI is on 45
Happy growing I wish for all 💚😎🌸
Likes
18
Share
@thenotillwizard
Follow
Harvested at day 76, after 72h of darkness.
Very good yield!
3.3 pounds of dry buds + 1 pound of trim
The 2 keepers yielded 366 and 342g of premium quality smoke.
Very uplifting and energizing high :) Love it!

Likes
5
Share
@GERGrowDesigns
Follow
Dear Growers ,
Over the next weeks, we’re excited to share a very special project with you: Sensi Seeds Supreme Jack F1 Automatic 2025 Release
With dedication, knowledge, and hands-on practice, we’ll guide you step by step through the journey—watch with us as growth, development, and small wonders unfold before your eyes.
Whether you're a beginner or an expert, you are warmly invited to join, ask questions, and share your own experiences along the way!
Project Setup & Conditions:
• Brand/Manufacturer: Sensi Seeds
• Tent: 120cmx60cmx80cm
• Light: 2x 200 Watt Full Spectrum
• Humidity: 45%
• Soil: Narcos Organix Mix
• Nutrients: Narcos Products
• pH Value: 5.8
A Special Thanks To
Sensi Seeds
for the amazing collaboration, trust, and generous support in making this project possible. Your contribution is truly appreciated!
Congratulations on Your Own Projects!
We celebrate your growth, your creativity, and the passion you bring to the table. It’s truly inspiring to witness at Each visit .
Stay curious and keep up Growing —we look forward to welcoming you back for the next chapter soon!
Likes
3
Share
@The_Lonely_Farmer
Follow
So the one girl is a week ahead with the other 2 slowly behind as popped later date, will keep diary from the 1 main girl and add the other 2 in with description as go along
Entering week 2 for the main girl now with her being potted up shortly 🌱💚
Aptus nutrients are being used which atm seem very easy too follow I cant wait too start getting these girls flying 🤞
The other girls in there are humbolt seed co ice cream cake which are very slow atm and may open a diary for them or throw them in with this diary

Likes
22
Share
@handsammich
Follow
102.5g dry, top nug 13.3gs dry. Absolute beast of a plant especially as a freebie, had a good bit of fun with this one and it’s nice seeing improvement through each plant.


Likes
8
Share
@pzwags420
Follow
On day 1 I did another light defoliation. The plants are progressing as expected. The only issue I'm dealing with is fungus gnats... ugh. I will keep applying BTI weekly until the population is under control. On day 3 the plants are putting out more pistils and seem to have stopped or slowed down their "stretch" phase. On day 4 I'm starting to see some trichomes forming on the sugar leaves, no smell that I can discern yet. I also changed out my reservoir and applied a BTI soil drench. On day 5 I adjusted the PH of my reservoir down to 6.1. I also purged my blumat system to make sure there are no clogs as my reservoir has fertilizer particles due to my water heater causing separation. I must keep the water heater on as I am growing in the northeast coming into the cold time of the year and can't have my reservoir freeze on me. On day 6 I adjusted the PH of my reservoir down to 6.1. On day 7 I adjusted PH in reservoir to 6.1.
Likes
23
Share
@MotasKush
Follow
Strawberry Banana Reserva Privada DNA Genetics famous seeds and vegetation! Joy from beginning to end, especially their height to heaven. The smell of buds is smelled of dried bananas with a light tone of earthy strawberries and pine. I'm happy! I will give them a week to ripen and gradually harvest. The biggest plants I've had so far. Tribute to the guys from DNA Genetics! Grow Your Own!

Likes
11
Share
@Smokeitup091191
Follow
This week has gone well again end of the upcoming week I’m gunna give them one last strip down then just let her do her thing. She’s a big girl and the smell is amazing grapefruit peels with a very sour background can’t wait to try this girl as grapefruit is one of my favourites and this girl has it all 😍
Likes
24
Share
@TerpTurtle
Follow
Started the first few weeks spreading the plant out by hand a few times a day,
After transplanting from a 3 gallon pot to a 7 & as the center started to bush I went further into training and tied branches around the pot with soft garden tie.
Foliar feed a lite blend of Rhino skin & Flower kiss with a fine mist a few times a week as well as spinning the pots to promote even growth, vigor and IPM
Eyeing up to cut a few more clones to take before flip + cleanup lower canopy / defoliation🌱
BuildASoil 3.0
soil is organic input only.


Likes
12
Share
@AestheticGenetix
Follow
Can't upload as many great pictures as I would like. But she is cut and hanging as of 9/3/25


Likes
13
Share
@Drawer
Follow
A sad week, I found bud rot and had to take my plants out and do a big check and remove all dense underdeveloped growth.
It will be a pretty big hit on the yield I guess but the most important thing is learning and that I did.
The bud rot could spread due to my RH being 65/70 at nights and it used to be +80 before, + bad airflow.
I got new fans in the tent and my dehumidifier was ordered already but its not in yet.
On the other side, the plants are looking pretty damn good, they smell amazing
and 3 of the 4 plants is getting a very dense nug structure.

Likes
6
Share
@Young_agronomist
Follow
23.09.23- 85 день жизни .
Глобальных изменений не происходит , шишки продолжают толстеть и оплакать глаз . Это самое большое растение из тех , которые мне доводилось растить !
На данном этапе ее рост около 180-185.
Сегодня я подвязал и распределил все толстые ветки под лампы , из-за своих размеров они прогибаются под своим весом .
Теперь она получает все 300 w
28.09.23- 90 дней от прорастания !
Изменения идут медленно , цветы растут а листья желтеют . Думаю еще 2 недели и финишь !
Сейчас она очень огромная , а ее цветы размером с бутылку ✨🍁

Likes
10
Share
@Genussmittel420
Follow
manganese deficency is really eating her up quiet a bit.... defoliateing every 2-3 days because i just have to... wont add anything more so lets see how she goes from here

Likes
32
Share
@MadeInGermany
Follow
Info:
Unfortunately, I had to find out that my account is used for fake pages in social media.
I am only active here on growdiaries.
I am not on facebook instagram twitter etc All accounts except this one are fake.
Hi everyone :-)
I topped the lady again and will now leave her like that so that she can go into the flower chamber soon :-).
It was poured twice this week with 1 l each time.
Otherwise everything was cleaned and checked.
Have fun and stay healthy 🙏🏻
You can buy this Strain at :
https://www.zamnesia.com/de/5165-zamnesia-seeds-kalini-asia-feminisiert.html
Type:
Kalini Asia
☝️🏼
Genetics:
Black Domina x Purple Kush
👍
Vega lamp:
2 x Todogrow Led
Quantum Board 100 W
💡
Bloom Lamp :
2 x Todogrow Led
Cxb 3590 COB 3500 K 205W
💡💡☝️🏼
Soil :
Canna Coco Professional +
☝️🏼
Fertilizer:
Green House Powder Feeding
☝️🏼🌱
Water:
Osmosis water mixed with normal water (24 hours stale that the chlorine evaporates) to 0.2 EC. Add Cal / Mag to 0.4 Ec Ph with Organic Ph - to 5.5 - 5.8 .

Likes
6
Share
@PoshGrow
Follow
Welcome to Auto Alaskan Purple Grow by PoshGrow!
🍀 Week #6 2020 August 27th - September 3th.
General Info:
When planted: 2020 July 23th.
Week: 6
Days: 35 - 42
Last Update Day: 2020 September 3th.
Plants: 5 Alaskan Purple Auto.
Equipment:
Tent: MarsHydro 1mx1mx2m or 39"x39"x72".
Light: HLG 260w V2 Rspec QB Kit.
Exhaust: 4" 322 CFM fan + Viper Carbon Filter.
Intake: 4" 100 CFM Inline Fan.
Oscillating Fan:
Lower: 4" Ram Fan.
Upper: 9" Voxon Box Fan.
Humidifier: Taotronics TT-AH001.
Dehumidifier: Pavlit MD750.
Soil: NPK soil 40% Compost, 50% Peat Moss, 10% Agroperlite.
Pot: 7 gallon Fabric Pot x 5pcs.
Nutriens: Fox Farm Trio.
PH Correcton: Chemoform pH-Minus Granulat.
PH Pen: Cheap Chinese one, I callibrate it every time I use it.
Water pump:
Digital microscope: cheap Chinese USB X4, 1600X.
Comment

Likes
4
Share
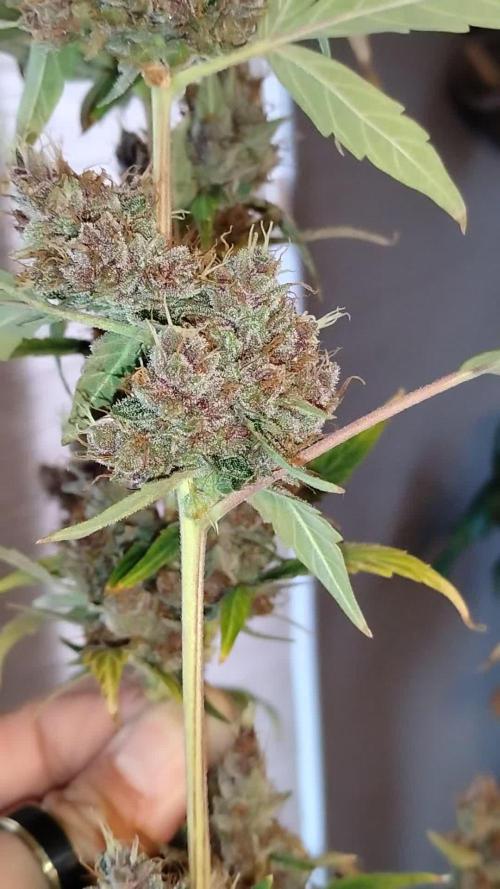
@smoking_hills9
Follow
Almost ready, want to give 1 more week for some brown trichomes. Otherwise it's ready. Tones of super nice dence crystal buds. Great genetics. Last few times watering with raw cane molasses or just water.
