
Likes
Comments
Share


@CannaReaper
Follow
11-05
Still falling behind, I haven't really been paying much attention to this Lil runt girl, but I'm still feeding her and semi attending to her
11-08
She seems to be coming along a bit more, buds developing slowly Bure surely, smell is getting stronger. Still a bit dark in color but she's been a weird one the whole time.
11-11
Flushed 11-09, still struggling to fully form but she's trying!


Processing
Likes
11
Share


@ganjaman24
Follow
They’re looking extremely healthy..gave em their first nute feed with the last watering seem to be doing fairly well..fimmed the GG and LST. Did not touch the unkown as it looks smaller to be the same age. Running GHE base line with few extra supplements.
****UPDATE****
Both are LST’d..might rethink the way I tie them. Going for a “coil” type look, we’ll see though. They’re looking great! Hoping for females!

Likes
7
Share


@Andres
Follow
she grows very well in her third week of flowering ... under a little temperature ... but she stays strong ... let's hope she offers us in the future ... outdoor ... she grew a little ... this week I eat only with tap water ...
Likes
71
Share


@Roberts
Follow
Quebec Blast is starting to bulk. I did a solution change today. Hopefully I didn't go too strong. She is growing in a New Level Hydro bucket, under a Spider Farmer SE5000 light. It is her start of 5th week of flowering. Everything is going as normal. Solution changes about 3 to 4 days apart. Thank you New Level Hydro, Spider Farmer, and Quebec Seeds. 🤜🤛🌱🌱
Thank you grow diaries community for the 👇likes👇, follows, comments, and subscriptions on my YouTube channel👇. ❄️🌱🍻 Happy Growing 🌱🌱🌱
https://youtube.com/channel/UCAhN7yRzWLpcaRHhMIQ7X4g
SE5000
https://amzn.to/3qFpAML
Spider Farmer Official Website Links:
US&Worldwide: https://www.spider-farmer.com
UK: https://spiderfarmer.co.uk
CA: https://spiderfarmer.ca
EU: https://spiderfarmer.eu
AU: https://spiderfarmer.com.au
Coupon Code: saveurcash
Www.newlevelhydro.com
Www.hygrozyme.com

Likes
2
Share

@Growfather2
Follow
Hello everyone,
This week i going to transplant 2 Afghan skunk plants to a bigger airpot.
Everything is going to schedule and hope to put one plant in flower.
Thanks for stopping by and have a nice day.
Growfather

Likes
5
Share


@CannabisAprendiz
Follow
sexta semana de floracion se aplica engorde paras las flores y llegar a tener una flor bien rellena por dentro , se sube parametro de co2 / sixth week of flowering fattening is applied to the flowers and get to have a well-filled flower inside, it goes up to CO2 parameter

Likes
28
Share


@No_Clout
Follow
Well it seems that she’s came back from def but ever since then she has been a pain, can’t leaf braid or LST because the side branches have 0 flexibility so ima just have to leave it be until then, again some weird leaf marks I’ve never seen before but I don’t know what it is but I’m sure it’s nothing serious

Likes
24
Share


@Saven
Follow
Start of Week 11. I'm DEFINITELY chopping this during this week. I have a photo in the tent with it, (also why it's been on 12/12 if you have been following along), and it's getting ready and I just want to dry it all at once so I can do a complete reset. SO... I took some better pictures of the plant. Enjoy.
PS: In some of the pictures, you'll see my other plant. The Flo White clone on the right side of the tent. :)

Likes
9
Share


@greenthumb86
Follow
day one of flush for most of these girls 😁 : update the only one not in flush is the afghan mass

Likes
12
Share


@Dayexpress
Follow
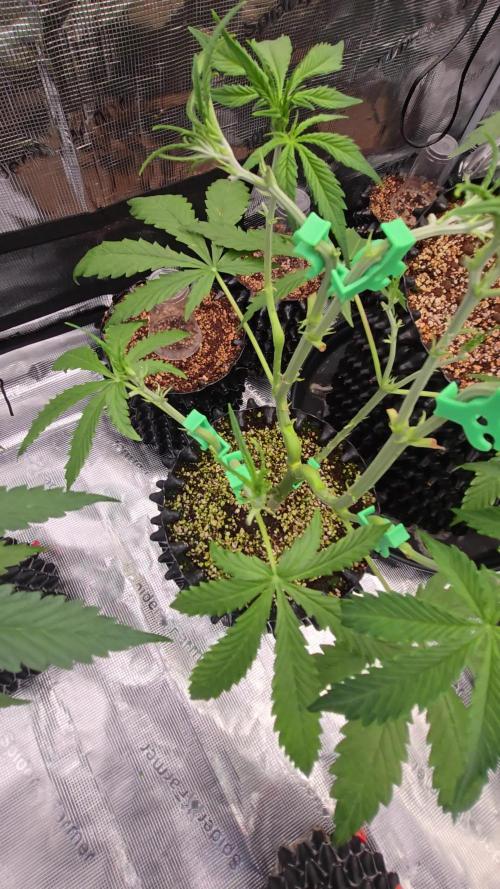
Im trying to keep training to a minimum this run i want her long and tall in this i gallon. She has her 2nd topping that should lead to eight tops. Shes very healthy and has taken each in stride.

Likes
8
Share

@CalGonJim
Follow
How RQS Compares to Your Standouts
Brothers Grimm (your "otherworldly" stars: Montel Iced Tea, Body Count, Bubbles Blueberry F4, Ricky’s Hash Plant, Black Tangi Tea)
These are landrace-influenced, heirloom-style genetics with exceptional resin, unique flavors, and structure.
They outperform RQS in quality, potency, and "wow" factor in your tents. RQS tends to be more commercial/hybridized for ease and yield, while Brothers Grimm prioritizes distinctive traits and consistency in experienced hands.
Humboldt Seed Company autos (your top autos for resin, especially OG Triploid)
Humboldt focuses on West Coast legacy genetics with heavy resin production.
Clearly superior to RQS autos in trichome density and overall quality. RQS autos are faster and easier for beginners but often lack the resin "frost" and depth you get from Humboldt.
Fast Buds (fast, flavorful, reliable autos — you like them a lot)
Excellent speed and flavor profiles.
You noted they're in a "different class" — fair point. Fast Buds emphasizes quick cycles and modern hybrids with nice terps, while RQS autos can feel more generic or require more coaxing.
Quick Thoughts on Your Observations
Brothers Grimm (Montel Iced Tea, Bubbles Blueberry F4, etc.): These are clearly the stars in your current setup. The strong smell, unique leaf morphology, and overall vigor in small pots show they're expressing well under your conditions.
They reward careful growing with quality that feels special — resin, flavor complexity, and effects that fit your low-dose, functional style better than most commercial lines.
Your homemade cross (Gelato 44 × Bubbles Blueberry F4 pollen = "Blueberry Knockout"): Nice work on your first intentional cross-pollination!
Getting viable seeds and decent plants from a garage-level cross is a real win. It’s not "pretend breeding" — it’s exactly how many great lines started. The fact that it turned out "pretty nice" is encouraging.
However, as you noted, combining a Royal Queen Seeds Gelato 44 (solid but commercial) with Brothers Grimm Bubbles Blueberry F4 (higher-quality, more unique genetics) creates a hybrid that can show the best of both, but also some inconsistency. If the RQS side brings easier growth but less depth, while the Brothers Grimm side brings the special traits, the offspring can be hit-or-miss depending on which phenos you kept.
RQS Gelato 44 / Mike Tyson 2.0 vs. Brothers Grimm: Your experience matches what many growers report. RQS lines are generally more "user-friendly" and higher-yielding for beginners or volume grows, but they often lack the resin density, terpene complexity, and unique expressions you get from Brothers Grimm. The Tyson 2.0 collaboration added hype, but in your tents it landed at 7/10 while Brothers Grimm hit "otherworldly." That gap in quality is why you're leaning toward sticking with the professional, boutique genetics going forward.
3/30 11:17PM Gelato 44 & Punch Pie were nice right off the tree the little buds put me right to sleep last night!! The Autos are 7-10 but the Photos are 8/10

Likes
5
Share


@LeedsCityFarmz
Follow
Not much to report this week so far. Slightly defoliated above the Scrog to allow more light penetration for the lower branches. Plants starting to stretch abit now but nothing to bad.
Likes
10
Share


@DeepRootsGrowTrees
Follow
MIMOSA ZKITTLEZ FF /
GANJA FARMER
WEEK #5 OVERALL
WEEK #4 VEG
This lady is a fast grower is how I must stay this week she's a plant that will take the training you provide to her I'm using the budtraining clips to help train her as well I've as topped her. Great genetics with this lady!! Stay Growing!!
Thank you for stopping by and taking a look it's much appreciated!!
Thank you GANJA FARMER!!!
MIMOSA ZKITTLEZ FF GANJA FARMER
.

Likes
10
Share


@420_Vamp
Follow
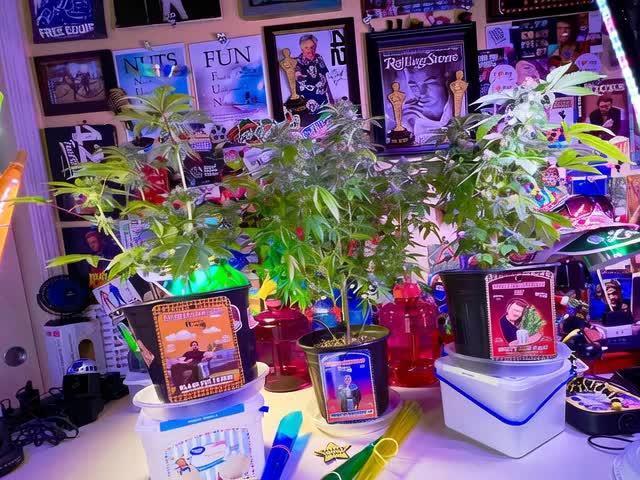
Steady as she goes..... 🎶🎶
I put the ladies on the flip a Week earlier than I anticipated on the schedule matrix
. I thought to myself best just get them done. 10 weeks from seed Vegging is enough. 3 weeks of that I count as seedling so 7 weeks Vegging.
Started the flip the night before rather than on the day.
With my micro I inspected the lady Phenom C on the right and 3 days at 12. Shows a tiny flower forming.
I haven't fed them this week so far that's why it's not been logged.
But after some experiments. with the TDS metre. I come up with a solution of 2ml grow and 5ml bloom for weeks 1 and 2. I have to say that the grow stuff is far more potent TDS wise than the bloom
The bloom is far weaker
the TDS value is 900ppm with that 2 week solution.
My 3-7 week solution is 2ml grow 5ml bloom and 2ml plant magic ok booster lands at 1300
I could maybe knock back the bloom slight by a ML but let's see.
Likes
Comments
Share

@Naujas
Follow
28 dienos!!! Mergaitė jau atrodo gražiau, jai auga tik kelios šakelės, turėtų išaugti gražus krūmas, džiaugiuosi, kad ji atsigavo, dabar lauksiu jos augimo šuolio, mergytė jau rodo lytį, tad manau, kad žydėjimas jau netoli :) sėkmės visiems.:)

Likes
42
Share


@m0use
Follow
So the increase in feed is going well and the plants are drinking more and more. I measured the heights of them and adjusted the lights as one of them was not level. might have been that way since last adjustment, I kept hearing some poping noises coming from the tent so could have been that as well.
#1 33cm
#2 28cm
#3 27cm
#4 18cm
#5 38cm
#6 43cm
#4 is much shorter then the rest of its peers, but we will see how it goes long term.
As I though some slight yellowing on leaf tips but nothing crazy, PH going in at 6.2 coming out at 6.49 not bad, matching the trend in EC difference. EC going in at 1.4 coming out aorund 1.0 So might want more food but more frequently vs more at one time. I could try and get into a new watering routine but I really don't want to. Something easy maybe to mix up a jug that I just give them between normal watering that has light feed in it and will not get runoff with it. The runoff to prevent salt buildup can come from the main watering.
Also found a weird looking something growing on plant #3 medium. Took some photos of it. Looks alien. going to let it grow, that plant is doing fine.


Likes
25
Share

@m0use
Follow
This is it, the time is here to chop the plants.
It looks like two of them could go a bit more, like a week or two, but if I do that then the other ones that are complete around 3-4 of them will be over ripe and they are already fox tailing a bit and not a huge fan of that. I have seen some clear winners in the tent for the self judged mini contest I have going on. Its going to take some time to judge them fully as I'll want a min 1month cure on some of thees strains.
Found some weird growth inside the boom+ product on the last feed, dumped it out and then when removing the label for recycling it noticed there was a weird [A] under the label, I don't know what this means, the product was fine when I opened it so this was a my problem but the [A] is a mystery.
Little photo and video flyby of the tent, tomorrow is chop and dry.

Likes
12
Share

@CheeRz
Follow
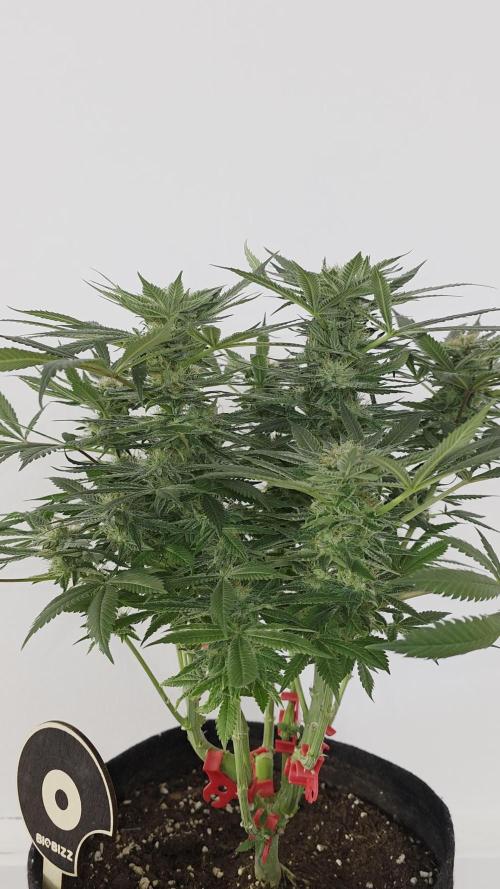
WEEK 11 - FLOWERING: Final Resin Peak
🌼 FLOWERING PROGRESS
We have entered Week 11 (Week 7 of Flowering), and the Permanent Bluez is showing her full genetic potential. Even though she stayed very compact at 43 cm, the resin production is absolutely insane now. ❄️ The sugar leaves are completely covered in white frost, and the buds are starting to swell significantly under the heavy feeding schedule.
📋 ENVIRONMENTAL CONTROL
The environmental focus this week remains on maintaining a warm and dry climate to support the final hardening of the buds and to maximize trichome development. The day temperatures are averaging around 27°C with a relative humidity in the 45-50% range. These conditions are specifically chosen to prevent any moisture-related issues during the final ripening stage and to push the resin production to its limit.
👃 TERPENES & AROMA
The smell is becoming incredibly pungent this week. As the resin matures, the Permanent Bluez is developing a complex profile: a dominant, sharp gassy/diesel nose with a sweet berry undertone. Every time I open the tent, the aroma is overwhelming. The Top-Max is definitely doing its job in enhancing these heavy terpenes. ⛽🍇
💧 NUTRIENT FEEDING & WATERING
I am maintaining the high-feed schedule to support the final swelling of the buds:
Calmag: 1.5 ml/l to support metabolic functions.
Acti-Vera: 5 ml/l for ongoing immune support.
Bio-Heaven: 5 ml/l for nutrient uptake efficiency.
Bio-Bloom: 4 ml/l to meet final phosphorus and potassium demands.
Top-Max: 5 ml/l to boost terpene profile development.
Bio-Grow: 1 ml/l for underlying plant vigor.
Parameters:
pH: 6.5
Humidity (RH): 50%
Day Temp: 27°C
💭 GROWER'S NOTE
"Week 11 and the frost is real! ❄️ The smell is getting better every day, with those heavy gas and diesel notes really taking over. I'm keeping the environment warm and dry for the finish to ensure the highest possible resin quality and bud density. Quality over quantity, always! ☀️ Keep it IZI 💚"

Likes
1
Share


@Bwright_315
Follow
A tale of two plant that are the same strain
Plant A is growing like a champ just waiting for tricone to be turn red10% but other then that not issues
Plant b I gave a hair cut and trim hoping the buds will fatten up also I love one of my light closer to see if that will help

Likes
8
Share


@Stems
Follow
My diary is a little late to the party as I just found this site. These are a White Widow cross that a friend gifted to me so I dont really know exactly what they are. Its my first time growing but with some advice and research I feel I'm doing ok. I wasn't comfortable topping so I just pruned some leaves and lower growth tips that won't get light. I'm not sure how old it really is so I'm just guessing here. Feel free to point out anything that needs work.