
Likes
Comments
Share


Likes
Comments
Share


Likes
3
Share

@Grower_Boris
Follow
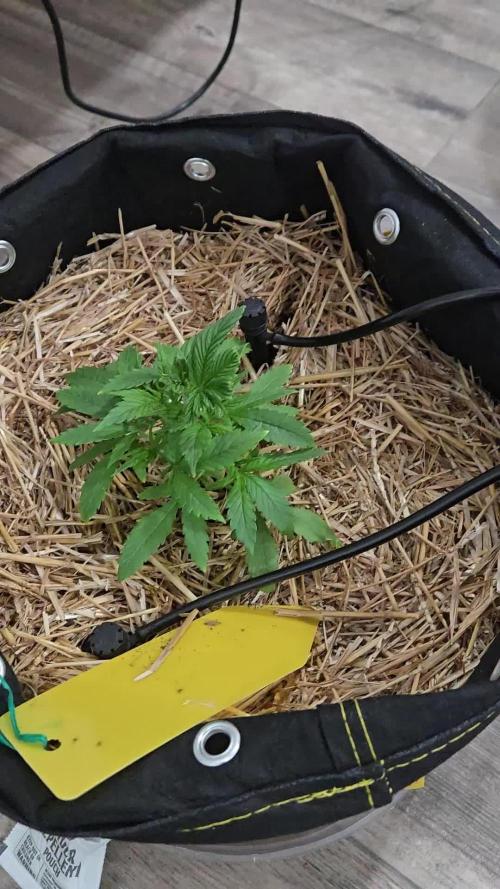
🌸 Tag 9 in der Blüte – 45 cm Höhe! 🌿
Ich find, die sehen richtig top aus 💪 – vor allem dafür, dass das mein erster DWC-Grow ist 💧🔥
Die Mädels schieben ordentlich und füllen schon richtig schön den Raum aus 😍
Was meint ihr, Grow-Freunde – läuft das stabil oder habt ihr noch Tipps für die Blütephase? 👀💬
#GrowFreunde #DWC #FirstGrow #Blütephase #HydroPower #GreenLove

Processing
Likes
6
Share


@Majormolasses
Follow
This lady clone of Durban has been bushing out really well very proud of how far she has come I wish she would stretch a little more now she’s about 10 inches tall and purple everywhere this is gonna be really fun to watch in flower 🌹 stay tuned Fam 💚🙏🍵🌱 just got her first compost tea. 3/21

Likes
17
Share


@FireRGB
Follow
Großartig gewachsen aber zugleich eine Pflanze Überdüngt. Ich war überrascht im Rückblick das schnelle und unaufhaltsame Wachstum. Da ich anfangs nur den Ph wert grob geschätzt habe habe ich glaube ich Anfänger Fehler gemacht und den PH wert ganz locker genommen. eine Pflanze hat die spitzen verbrannt und wächst seit dem relativ dünn und mager, trotzdem wuchsen sie stetig. Somit habe ich mir ein PH Messgerät angelegt. jetzt wird genau auf 6.2 PH alles angepasst.
Kann durch den PH wert oder dem Dünger das Problem entstanden sein?
LTS hat genial funktioniert und hat bei jeder Pflanze schöne Äste gebildet. es schaut fast schon aus als ob die Pflanzen in Blüte gehen wollen. Ich freue mich auf die nächste Woche!

Likes
12
Share


@Mr_Haze_Chile
Follow
Todo va bien es asombroso como las magnum a pesar de haber terminado el mes de crecimiento vegetativo siguen creciendo de manera exuberante! Se le aplicó una poda súper cropping + LST en la punta o tallo principal por así decirlo

Processing
Likes
61
Share


@Dunk_Junk
Follow
3cm vertical growth this week.
But she's got bushier too!
Just waiting for her to take off.

Likes
19
Share


@adam_pawloski87
Follow
Another fun strain to run from Fastbuds, Bruce banner was amazing at a total of 83 days , came out with some thick dense resiny coated buds , an very sweet smell! Has very tight buds with tight stems so it would def be better to tie her down an open her up for some LST ! I highly recommend y’all trying Bruce Banner out , you won’t be disappointed!!

Likes
17
Share


@Gordy
Follow
I took a ton of pictures this week. This plant is beautiful! The amount of crystals that she has produced in the last week is crazy. Overall the plant does't seem to be stretching much at all, and I hope that it doesn't seem too be too small.Considering this is a 10 week flower, I'm hoping that it should be a bit smaller than other plants that i'm seeing on here.
The smell has really increased this week. Just entering the room now you know that someone is growing in there. I do have a carbon filter going, but the smell seems to be coming more from the walls of the tent. Since this is my first grow, everything here is pretty cheap. Eventually I’ll upgrade to higher quality items.
I’m worrying that I’m watering wrong. Each week I water twice. Once with nutrients and once later in the week with just water. 4 liters of water each time. And giving all of the nutrients in that one feeding of 4l of water. Any feedback on if this is ok or if this is causing any harm to the plant would be appreciated.
I also seemed to solve the really high humidity issue this week. When watering in the past I wasn’t pouring it into the soil properly, and it was draining off to the side of the container, it would all run off and pool behind the plant and I wouldn’t realize. This week I took more time when watering and all water seems to have gone into the soil. Following the watering the humidity only seemed to get up to 63%. Previously it was around 74% for about 3 days. I think this is a win.
Goal harvest date is January 14th. Can’t wait!


Likes
6
Share


@CanadianFillmore
Follow
Start of week 3 of flowering. Bud site development over the last week was impressive! This girl is starting to smell and is already sticky to the touch. Hopefully this girl will stretch a bit more this week.


Likes
9
Share


@Dthebudguy
Follow
Pulled the plug on the small plants and putting effort into Pablo Escobar and Montreal auto .
Official grow diaries for each starting soon
Likes
18
Share


@NMGDOC
Follow
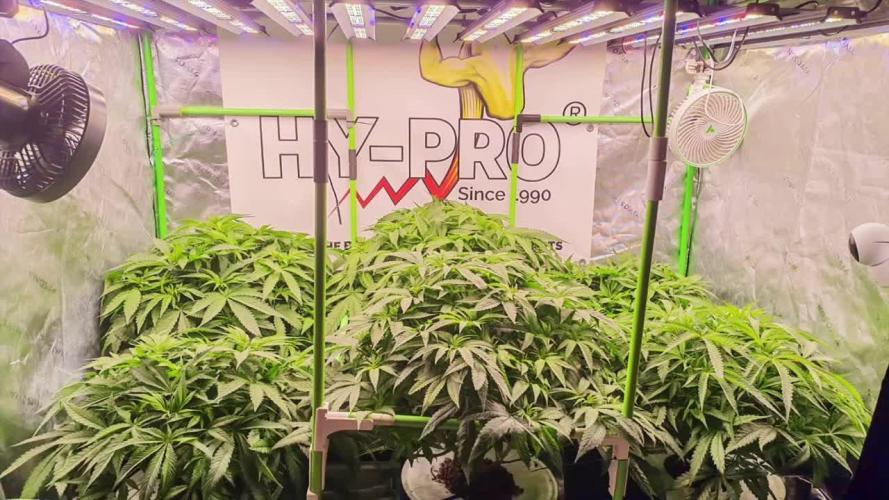
Don't pay attention to the small pots. I'm gonna do another diarie for them because they are in another week.
Now the regulation of humidity is great, i think that the plants do their own job regulating the humidity.
I'm in love with the @TodoGrowLed led, so easy to install. Here we are in summer and the temperatures dont exceed 27-28 C° inside. I put some ice pack inside the indoor and the temperatures were between 20-26 :)
In this week im gonna use neem oil with potassium soap, just for prevention.
Im newy, don't judge me jaja i don't know if the distance between the knots it's ok (also, i don't know if that is the right word in english jaja)


Likes
12
Share


@cookingwithninja
Follow
best cannabis I ever grew and smoked. Others agree. This is a cup winner I would win with no competition. 3 months harvested, 90% consumed. Will run more genetics and future cross, backcross. Feels like energy drinks, positive, 100% youre high and lit, extreme ripped. Smell is slight citrus, this is very sweet tasting and smelling because of my methods of growing. Oozing sticky like an industrial adhesive. Daytime smoke, ripped no couchlock. For heavy daily smoker this is above your level of comprehension, good luck finishing 0.5g session. 10/10 all categories.
4 months after harvest video macro, this is what 40% looks like

Likes
21
Share


@BrieflyGrowing
Follow
These two were the easiest to grow ever, not even one issue. Strong, fast grow and amazing terps.

Likes
8
Share


@4F1M6
Follow
This lady has been all flowers as she bolsters her colas. Stocky and bushy... I'm really liking the structre. Lots of branches and lots of bud sites. Of course I'm happy. Shes in great health just cruising along.
She got treated with Dr zhymes as a preventative. That will basically wrap up her treatments ...possibly once more with lost coast.
Upped the pk intake as she is blooming strong now. Gotta keep that engine well fuelled. Response was stellar. Happy happy happy lady.
Until next update. Happy growing and stay lit fam.

Likes
14
Share


@Do_it_Dan
Follow
This lady has picked up alot this week, going to maybe start trickling nutes next week and see how she takes off, happy growing and stay green ✌️ 💚 👌
Likes
57
Share


@Regenwurm
Follow
Ladie 1 wurde an Tag 68 gehackt. Man hat bei dieser Pflanze die allen anderen ca 14 Tage voraus ist gemerkt, dass Sie nicht sehr ertragreich ist. Alle anderen sind jetzt bei Tag 70. Die gemessenen Tage beginnen bei mir bei der Lichtumstellung auf 12/12, nicht bei der Vorblüte! So erkläre ich mir die längere Blütezeit. Die anderen Ladies legen an Volumen zu und entwickeln sich gut, aber Sie brauchen noch ein paar Tage bis zum flushen. Die Luftfeuchtigkeit habe ich jetzt zwischen 32 und 38 %RLF. Die Temperatur Nachts bei 17-18 Grad, Tags bei ca. 24 Grad. Die Tricome sind wie gesagt noch gar nicht Amber sondern zu ca. 75 % trüb. Der Geruch der Ladies ist stark, aber nicht extrem. Ich freue mich nach 2-3 Wochen fermentieren die ersten Buds zu testen ....✌️🏾

Likes
37
Share


@StickyFingah420
Follow
Una gran variedad, la verdad es que las 3 novedades auto que cultivé de este banco me sorprendieron bastante.
Cogollos hermosos fragante a frutas y dulce una combinación que te hará babear!