
Likes
Comments
Share


@LoganatorDude
Follow
I absolutely love to watch them grow! Especially that moment they hit their first growth spurt.
I started with RO water that is remineralized for drinking purposes. The ppm is only 18! My tap is 156! So considering they don’t need much water, I’ve been stealing some of our drinking water. The RO water starts at pH of 7. After I add the nutrients, ppm of 249 @ pH of 5.8 while soil is still sweet @ pH of 7
I think my days are off as a new week begins on the last day of the previous week. I am going to leave that for consistency.
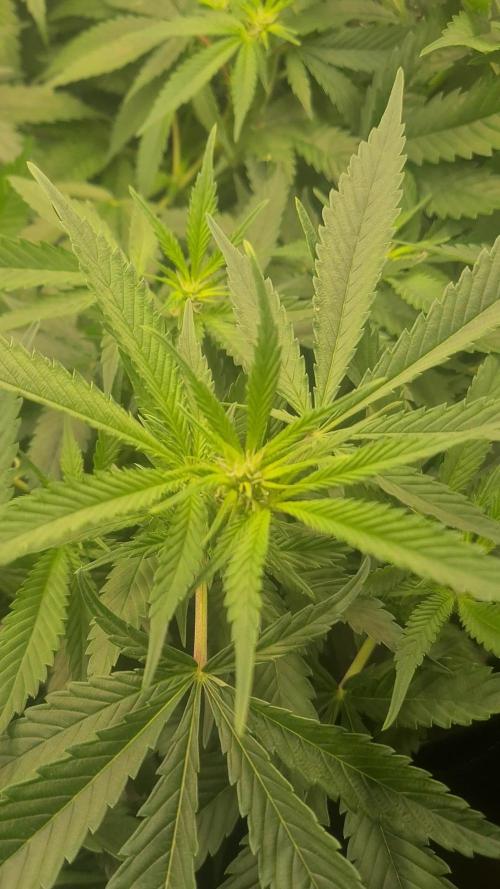
04/21 - Noticing some possible nutrient issues with the Fruity Pebbles for several days now. Going to see what she needs. Up front I’m thinking maybe just a super small amount of Amino Acids with a little Epsom Salt. Maybe she is struggling to access the nitrates from the neem cake. IF it’s a issues with nitrogen. We will see. Maybe she would benefit from some extra calcium?… Any ideas are greatly appreciated.
Day 22 and I am noticing how these girls have been burning up a lot of potassium lately, dealing with the wind and sun 💨 ☀️, getting pushed around all day.
I plant to top dress with some Kelp Meal pretty soon.
Day 24 -> 4/22/22- a quote from the weather on today’s red flag warning and dust storm warning.
“ HAZARD...Less than a quarter mile visibility with damaging wind in excess of 60 mph. SOURCE...Satellite imagery. IMPACT...Dangerous life-threatening travel.”
I’m keeping the girls inside today.
Day 26, I was planning to check the runoff on some of these girls, especially the fruity pebbles, however I messed that up as I also top dressed WAY too much of the seaweed bliss. So I flushed with plain RO water at pH of 7 until there was only slight coloration in the runoff. I didn’t check the runoff as a lot has changed with all that flushing. So next watering/feeding I will make sure I check the runoff on multiple plants.
So the seaweed bliss with its 17 on potassium, seems to be the most likely culprit for why there is a bronze-ish color on the inside of the new growth. Hopefully a foliar feed of Epsom salts can correct the problem. Inside tent, lights on LOW. Noticing similar pattern in all of them to a degree, most noticeable in the fruity pebbles.


Likes
43
Share


@UnorthadoxDude
Follow
Hello and welcome to week 8 for the quite amazing Nesia. She is growing as if there were no tomorrow... being the largest plant in the series.
Please check last week which is now complete.
Day 50: Fertigated 5l. Height: 56cm.
Yes you read that correctly. 6cm stretch in 1 day. Oh dear.
Also added a couple of carnivorous plants to take care of the odd fungus gnat.
Day 51: I've taken a long video and some better photos to demonstrate Nesia's size. She now measures 60cm tall that's another 4cm in a little over 12 hours. 😔 What a plant!
Day 52: Lazy day no measurements.
Day 53: Fertigated 5l - height 62cm
Day 54: Fertigated 5l - height 65cm.- Nesia is already my largest plant. Larger even than her majesty the Queen. She's not done yet. 3cm vertical stretch in 24h. It is Nesia's turn in the middle so I've trimmed all leaves that extended outward.
Day 56: Height 72cm. Nesia has continued to stretch and is extremely thirsty. She's taking about 5 litres a day at the moment. I fear she is not finished yet.
End of week summary: Nesia has continued to stretch fast and gained 22cm in height this week. She's now putting out a lot of pistils but the stretch hasn't slowed yet.

Processing
Likes
7
Share


@Cogollo_eu
Follow
**Encontrarás la traducción a español al final de la descripción**
From/Desde: 09/06/18 || To/Hasta: 15/06/18
From day/Desde día: 8 || To day/Hasta día: 14
-----WEEK SUMMARY-----
12/06/18: Video 0 & Photos 1 & 2
13/06/18: Photos 3 to 10
15/06/18: Photos 11 to 14
As you can see in the video compared with the other 2 strains, the only Think big that germinated is growing very weird (Next week you will see it better in the photos). The day 15 i maded a root semi-washing to it to see if it helps to the thinky, I don't know if it helped or not, but my feelings where that the plant didn't go better or worst after that washing, just weird vegetation growing, it's going to became a trully Dwarf plant.
The day 13th, the second Think Big shows it's cotyledeos, this plant is going to grow very weird too.
----APROXIMATED WATERING CALENDAR----
09/06/18: Draught
10/06/18: Draught
11/06/18: Draught
12/06/18: 0.5l solution with all week nutrients @ 0.8 EC PH6
13/06/18: Draught
14/06/18: Draught
15/06/18: Root semi-washing (4l water)
*****ESPAÑOL*****
-----SUMMARIO SEMANAL-----
12/06/18: Vídeo 0 & Fotos 1 & 2
13/06/18: Fotos 3 a 10
15/06/18: Fotos 11 a 14
Como podéis ver en el vídeo, comparado con las otras 2 genéticas, la única Think Big que ha germinado está creciendo muy muy rara (se verá mejor en las fotos de la semana que viene. El día 15 le realicé una semi limpieza de raíces por si era cosa de nutrientes, no se realmente si ayudó o no, mi impresión es que la planta no fue mejor ni peor después del lavado, simplemente siguió creciendo de manera muy muy rara. Está planta se convertirá en una auténtica planta enana.
El día 13, la segunda Think Big ya mostraba sus cotiledones, esta planta va a crecer muy muy rara también.
----CALENDARIO DE RIEGO APROXIMADO----
09/06/18: Sequía
10/06/18: Sequía
11/06/18: Sequía
12/06/18: 0,5l de agua con todos los nutrientes semanales @ 0.8 EC PH6
13/06/18: Sequía
14/06/18: Sequía
15/06/18: Semi lavado de raíces (4l de agua)

Likes
11
Share


@Amsterdamsonkruid
Follow
Its been a pleasure,
Looking for the best weed ever? Go and grow OMG the name says it

Likes
33
Share


@ganjaman24
Follow
She showed minor discoloration so I added very very little nute from GHE line of course AFTER checking and adjusting ph level first :)
Likes
47
Share


@KilgoreTrout
Follow
Everything is looking great. Except one pheno of the purple kush. Flowers aren’t stacking, still quite small especially in comparison and it’s not at all purple. Hopefully it’ll catch up during p/k week. which starts in a few days.
Most of my leaves are praying everything is healthy and happy.


Likes
3
Share


@JamesfaithCLW
Follow
Overall healthy plants would recommend microbe brew for anyone who needs a microbe feed
Keeping a consistent airflow on them

Likes
45
Share


@masterofsmeagol
Follow
8/14 Everything looked beautiful this morning. Seems like I've got the watering schedule down better. I do have one gmo that looks hungry so I need to increase nutes. At least on that plant. Toasted toffy has little spits that could be water marks, pests or septoria. I don't think it's septoria. In the pastvi lost far more leaves when I had septoria. I've been crazy busy. I'm surprised things are going this well. I need to put up the final supports so I can add to them once I've got big heavy buds. I was really stoked to see everything doing so well. The plant in the 50gallon is the furthest in flower. I'm so grateful to have the ability to grow high quality cannabis for myself amd my wife. There's nothing quite like it. That hash I made turned out great. I think I'll press it today. Supports will be done this week. Saw a few aphids on the plant I cut down. Earwigs aren't here this summer or there would be NO aphids. Plus when I cleaned out the insides this morning I found some dead leaves WAY in the middle by the stalk. They would've eaten that shit if they were here. Birds and other predators seem to be keeping pillars at bay. I'm not seeing the damage and when I do sfind one it's absolutely tiny like a newborn. I'll think about whether I need to spray BT.
8/15 That fucking cancel button always fucks everything out. I was done no I need to start over. Didn't water last night. Found pm on my gmo in the 30. Interior of the plant. Should've defoliated better and earlier. Oh well. I'll treat with k bicarb or plant doctor. I'll have to think about it. Other plants are looking good. Well they all are. I just hate pm. I can't isolate it due to local laws so it is what it is. Nothing I haven't dealt with before. Watered today. The middle gmo in the 30 got 1.5 gallons. The other plants each got a gallon. Including the one in the 10gal and 50 gal. Its supposed to rain but only like .1. I also chose to feed today. All plants got a gallon. I DID NOT WATER THE EVENT HORIZON IN THE MIDDLE AND THE SHERB PIE AS THEY WERE PRAYING AND HEAVY. I need to get these supports up. I'll update as I go.
Oh and one thing I remembered is that, I didn't properly sanitize the trellis nets I installed on the plant that has pm (non visible today but still). I harvested the plant that used that bet last year was harvested in two stages. The bottom I let go way later and ended up with a little pm on the stuff I left for hash material and it got some pm. I wonder if that's whete this came from.
8/16 Death in the family this morning. I couldn't decide if I should use organocide plant doctor or not. It's a systemic It's been discontinued and reformulated. It's a systemic fungicide. Instead I mixed two tsp potassium bicarbonate with a little dawn in a half gallon mister. I used gloves and defoliated everything that had pm on it. I checked the plants next to it and luckily it hasn't spread yet....but it will. I feel safer using the k bicarb. I'll do more research and try to find the best way to tackle this. I don't want to get rid of the plant and due to local ordinance I can't isolate it. If I can keep it to this one plantvthat would be fine. I'd just use it for extracts. So glad I didn't use all that netting and put up tjosr supports. I'll need to disinfect them if I decide to use them. We'll see. Plants are coming right along flowering.
WENT BACK OVER AND DEFOLIATED A BUNCH OF fan leaves and interior stuff to promote airflow. Still saw pm on that plant u had treated earlier with k bicarb. I can't isolate due to laws and I'm not willing to discard this massive monster cropped plant. So I'm going to treat it. I started by removing everything infected and improving airflow on that plant and all the others. I didn't make it to one event horizon. I plan to treat the infected plant with Organocide Plant Doctor since its what I have on hand and I've had good luck. It's a systemic. After I treat the one plant and see that it didn't hurt the plant I'll use a preventative dosage on the other plants. I've battled wpm several times. This is something I'm very familiar with. What sucks is it's totally my fault it happened due to grower error. This has set back me puttingvup my supports as well. Plants look good woth a haircut. Also the toasted toffy had some leaves removed with spots that looked like septoria. I think nutes havecreally kicked things in gear. Now there are little buds on plants.
8/17 BAGS still seemed heavy so I didn't water. It's been MUCH cooler. It's 63 at 9am. It would normally be 80 by now so maybe they aren't using as much water. I watered the the toasted toffy I missed last round but the Sherb Pie still had weight to it. I also watered the GMO on the far side and the one in the 30 as the seemed a little lighter. I looked in and I couldn't find a SPOT of powder mildew on the plant! I know it will come back but on this 100% rh day there isn't a spot I can find! I'm going to go check on them later today. Do some more defoliation and treat the plants with Plant Doctor to try to mitigate the spread of the P.M. Very suprised the k bicarb worked like that.
WENT BACK OVER AROUND 11. I WATERED THE TWO THAT DIDNT GET WATERED LAST TIME. THE EVENT HORIZON AND THE SHERB PIE. IT WAS COLD AND OVERCAST. TEMPS HAVE BEEN MUCH COOLER. SOON AS I WATERED THE SUN CAME OHT AND THE TEMP WENT UP. I WENT THROUGH THE PLANTS I MISSED AND SEFOLIATED LEAVES AND INTERIOR BRANCHES TO INCREASE AIRFLOW. SURPRISED TO STILL SEE NO PM WITH 100% HUMIDITY. I WENT THROUGH EVERY PLANT. ILL NEED TO GO TJROUGH AGAIN BUT TJIS IS MUCH BETTER. THE TOASTED TOFFY THAT MAY HAVE SEPTORIA I WILL TREAT TONOGHT WITH PLANT DOCTOR. I REMOVED ANYTHING LOOKING INFECTED. I LSTed THE BIGGEST BRANCHES WITH CLIPS TO THE BAG AMD TWINE. SO AIRFLOW IS MUCH BETTER. I THEN REMOVED A BU CH OF THE MIDDLE. I COULD TAKE MORE BUT ON OUTDOOR HARVESTS THAT LITTLE STUFF GOES IN EXTRACTS. I PUT A FEW HOURS IN TODAY. IM GOING BACK AND ILL TEST THE PLANT DOCTOR ON THE TOASTED TOFFY. BUT IF THE K BICARB WORKS THIS GOOD ILL JUST KEEP USING THAT.
8/18 It started sprinkling when I left this morning. I did more defoliation on a few different plants. Including the healthiest GMO. It seems like things should be further in flower but it is what it is. I'm not doing clones again. Only reason I did is because I lost my 72 seedlings and depleted my seed supply. I hate treating pm. Lost Coast Plant Therapy I'd really whete its at when it comes to treating pm. I might just order that. My commercial buddy told me that he wouldn't use the plant doctor and not to "spray shot all over my plants". He's probably right. I see something small and try to overcurrent. I dont see any more septoria looking leaves on the toasted toffy since I lsted it and removed damaged leaves. I was going to use the fungicide plant doctor on that and then use it ad a preventative. He's probably right. I've put a lot of work in defoliation and such. It WILL spread but it hasn't yet. I removed what I saw. I was going to hit it again with k bicarb but it said it should be weekly treatments.i hope I'm doing things right. I shouldn't be this worried about pm but I've got am anxiety disorder. I'll fully sterilize (AGAIN) my posts and trellis netting before I instal it. I'll probably go check on them later. It's hard to avoid pm with 100% humidity and 30° temp swings. I've got a few lights so maybe this winter I'll do indoor. I'll try to keep this updated. LOOKING BACK AT PRIOR DIARIES I GUESS IM RIGHT WHERE I SHOULD BE FLOWERING WISE. I JUST HAD A COUPLE REALLY EARLY PHENOS A COUPLE TIMES.
8/19 Defoliated some more stuff amd tried to improve airflow. Humidity is high and it was sprinkling earlier. I think we'll have showers. Not seeing much pm. MAYBE a little in the middle of that middle gmo but it could just be residue. I'll treat it again with potassium bicarbonate soon. If that doesn't work I'll switch up treatments. I've got citric acid amd some other stuff too. I almost ordered lost coast last night but decided I'd wait to try it out. The toasted toffy has SOME spots that look like septoria. It's the second furthest in flower and very indica leaning. It seems to be flowering vigorously so I don't want to fuck with it too much. I could use plant doctor on it and see what happens but I'm going to monitor for a few days after defoliating.
WENT BACK OVER AROUND 4 AND SHOOK OFFCTHE PLANTS. HADNT RAINED MUCH. BAGS ARE STILL HEAVY. THE TEN WAS LIGHT AND THE EVENT HORIZON BESIDE IT SEEMED A LITTLE LGHT AS WELL. I THINK IT MIGHT BE ME COMPARING THEM TO OTHER PLANTS THAT ARE SATURATED. SEEING HOW THEY BOTH LOOKED THE BEST IVE EVER SEEN THEM I HELD OFF WATERING. ITS ALSO SPRINKL9NG AMD GOING TO RAIN TONIGHT. ILL REASSESS IN THE MORNING. PLANNED ON USING PLANT DOCTOR ON TOASTED TOFFY BUT DECIDED AGAINST IT PARTIALLY DUE TO THE RAIN. PARTIALLY BECAUSE I PUSSED OUT. I WANTED TO FEED. IVE NOTICED SOME FADE AND PLANTS PUSHING AND TRYING TO GET OVER THE FENXE INTO FLOWER. THE TOASTED TOFFY AND THE UNKNOWN IN THE 50 ATE THE FURTHEST ALONG AND DEVELOPING ROCK HARD BUDS. GMO HAS A MASSIVE STRETCH. THINGS CHANGE DAILY. I WANTED TO GET A GOOD DOSE OF NUTES IN SO AFTER THIS LITTLE BIT OF RAIN WHEN WE GET THAT NICE SUNSHINE MY PLANTS WILL TAKE OFF!! THEY'VE BEEN PROGRESSING FAST DESPITE THE SHITTY WEATHER.
8/20 It's still sprinkling. It SAYS WE got zero rain yesterday but that's just not true. Today is supposed to be light showers with like .02 in 9f rain. I mixed up some water to check the plants. I figured a few would he light. The event horizon on the back SEEMED a little light. So did the one invthe ten. I realized it was just comparing it to the bags that were saturated. Still I ended up giving the event horizon in the back a half gallon and split the other half with the one in the 10 that dries out super fast. It's crazy. The weather just abruptly changed one day and I go from watering twice a day to hardly at all! Everything but the sherb pie and the seedling in the 10gal are vigorously flowering. Upping the nutes was a smart move. The seemed to like it. I'm gonna check later and as soon as I can I'll hit that toasted toffy with plant doctor. That's tied for furthest along in flower. I've done a bunch of research and I think this is the right move. I'll keep this updated. After this small patch of shitty weather we are goingvto get some sun amd these girls will EXPLODE!
WENT BACK OVER A FEW TIMES. LAST AT SIX. I DID SOME DEFOLIATION AND PRUNING OF PLANT INTERIORS. ITS ABOUT TIME TO TREAT THE TOASTED TOFFY AGAIN WITH PLANT DOCTOR. I CAN SEE SOME SEPTORIA SPOTS. I TREATED THE EVENT HORIZON THIS MORNING. IT GOT A FEW HOURS BEFORE A LITTPE RAIN WND THEN SUNNY AND 80. I USED BETWEEN A QUARTER AND HALF GALLON ON THE INE PLANT. I MAY NOT HAVE USED ENOUGH OF THE MIXED UP SOLUTION ONVTHE TOASTED TOFFY. IT HAD BEEN WORKING AWESOME AND NOW THAT ITS TIME TO REAPPLY I NOTICE A FEW LEAVES THAT LOOK INFECTED. OVER THE NEXT WEEK ILL BE MONITORING THE RESPONS FROM THE PLANT DOCTOR. I'M CONSIDERING APPLYING PLANT DOCTOR TO THE REST OF THE GARDEN. I THIBJ THE K BICARB HAS BEEN DOING GOOD KEEPING THE PM DOWN ON THE MIDDLE GMO. I HATE THAT I HAVE TO FIGHT DISEASES. IM NOT DOING CLONES AGAIN. AND IM GOING TO BE MUCH CLEANER. THE SHERB PIE LOOKS A LITTLE OVERWATERED AND HAS SOME YELLOW LEAVES BUT MANY HAVE TURNED PURPLE AND OTHER FALL COLORS. THE PLANTS ARE AGGRESSIVELY FLOWERING AND TEMPS ARE CHANGING. STILL IN EARLY FLOWER. IVE GOT A GOOD FEELING. IVE DEALT WITH MUCH WORSE AND CAME OUT GOOD.

Likes
15
Share


@ScouseCityLX
Follow
LST is going very nice and #2 has taken the topping well. As you can see, the auto flowers aren’t the only plants I have. I have a strawberry cough that will be flowering soon, meaning that the strawberry pie and GSC will be finished under 12 hours of light.
Likes
9
Share


@Growing88
Follow
La settimana è partita con qualche carenza dovuto al calcio e magnesio non fissato nel cocco,ho aumentato la fertilizzazione e sembrano recuperare bene,però ho notato che le due orange sherbet hanno malformazioni,sara dovuto alla bassa umidita al 50% ,le piante sono cresciute senza i parametri vpd,hanno solamente una finestra aperta e una ventolina che ricircola l'aria, sono già sotto attacco del moscerino del substrato e le sue larve,volevo cercare un predatore biologico per tutti gli stadi del moscerino del substrato, se conoscete un predatore che uccide il moscerino adulto,indicatemelo per favore 🙏


Likes
10
Share


Likes
18
Share


@KurbinTurbin
Follow
This strain was easy to grow, short and very bushy. The smell when drying has an incredibly strong earthy/chocolate aroma which is very pleasant🤤.

Likes
103
Share


@Natrona
Follow
SUNSET SHERBET
9/13-21
The transition to my new grow has been chaos. After reading the events of the last week you too will shake your head in disbelief, but honestly friends you can’t make this stuff up.
After germination on 8/30 Sunset was transplanted to her final 3 gallon pot on 9/3 because her early true leaves were brown on the ends which I attribute to the ph of the seed medium. I also cleaned and disinfected the AC Infinity 4X4 for this new grow.
The Frosted Guava that germinated on the same day did not make the transition. I started her replacement seed on 9/8 followed by germination on 9/12. The babies are starting in the 3x3.
Meanwhile, new fans arrived from AC infinity to replace the fans that weren’t working correctly. One fan made clicks when it rotated and the other did not rotate at all. These new models needed a different splitter than what I was using. Ordered that, now wait for the splitter. A splitter from Amazon arrived quickly and I moved the new gals into the 4x4 tent. Since I’m using controller 69, I set the program to seedlings which has high VPD. The following morning, moisture vapor was seeping out of the tent through the zipper as well as the controller port. It was basically raining in the tent with about 1.5 gallons of was on the floor. Clean up on aisle 2. While I was mopping the tent, the lights were flickering on and off. I just knew the electronics were fried. I reported the situation to AC Infinity. Working through each step determined that the lights were not impaired by the moisture. With each step, areas that could have been the issue were eliminated. Aha..The vent motor was burned out. They are sending a replacement. (note: AC Infinity is very responsive and at no charge to me, replaces malfunctioning equipment). My babies are back in the 3x3 until the new vent arrives.
But wait! There’s more! While all the issues with the 4x4 were going on Sunset Sherbet and Frosted Guava were in the 3X3. 9/13 The day after Frosted Guava germinated soil, I opened the tent only to find hundreds of bugs on the floor clustered in corners and in puddles (drippings from wet towel). I took the pots outside and flushed them with about 3 gallons of well water. Sprayed the tent with diluted vinegar water, wiped up the bugs then wiped the floors, and walls with alcohol and put the gals back in the 3x3 tent. It’s not over yet. 9/17 open the tent with more bugs on the floor. That did it.
Another transplant for both gals into brand new Happy Frog soil without any amendments. I put the gals on crates and put a humidifier in the tent until I move them to the 4x4. Autoflower plants do not like transplanting so I hope they have not suffered.
To help alleviate stress, I provided a light feed with Plant juice.
2 TBSP /gal plant Juice
Ph to 6.62
PPM 470
Water temp 70
Pics taken 9/18, 9/20 & 9/21
Sunset Sherbet 200ml with extra poured around the rim of pot
Frosted Guava 50ml with extra poured around the rim of pot
It can only get better from here.
Thank you friends for the visits, likes and comments, I appreciate you💚.
Sending love, light, and healing 💫
💫Natrona 💫

Likes
20
Share


@Mr_weed_pt
Follow
For one plant i am very happy how it grows and finish .thanks royal queen seeds
Likes
2
Share


@ChiTaN
Follow
The girls are doing great, Wedding Cake seems to be the most mature.Apart from the girl just mentioned, I'm betting the harvest season is about two weeks away.💪


Likes
23
Share


@Chi_K24
Follow
Hey folks, as you can see, the ladies did not do well after the transplant. I have have burned the plants a bit by spraying them down with neem oil as a preventive maint. The next few days after spraying, it got really hot and I belive the spray left too much oil residue for the plants to transpire. Also to note that I did not take time to harden the plants.
As usal watered the plants every 2-3 days with pH and mixed with 1tsb per gal of molas. New growth is looking good. I also topped them also.
Likes
41
Share


@Ganjagrandaddy
Follow
Day 42 Flowering: Hi all. Here we are past the halfway point and close to seeing some finished Fast Buds nugs. They have been starting to brown off the 1st pistols on most of the colas but the Six Shooter both look like they will be finished 1st. With the different growing styles used on them leading to different structures, it will be interesting to see which yields the most. The #2 has lots of nice forming shaggy looking tops and the #1 has more natural long colas.
The Mexican airline are similar to each other but # 1 is less advanced into flower I think. They have browning pistils but the # 2 is way chunkier and.developed .
What can I sat about rhe Strawberry pie that the video doesn't show ?. Wow this strain is a nice grower. The buds are nice and large with a fresh appeal to them even as they ripen. They are a 9 week (63 days) flowering strain so with so long to keep fattening and developing , I can only imagine their bounty of colas to come very soon. Well done fast buds
The fc3000 is doing a brilliant job and hasn't skipped a beat so far. The canopy has been so uneven and hard to please the needs usually but this has not held anything back now. The penetration is excellent and has helped develop some amazing buds not in direct light too. Roll on harvesting these amazing plants. Be safe and well growmies

