


Likes
Comments
Share


Likes
3
Share


@MicroHidroGrow
Follow
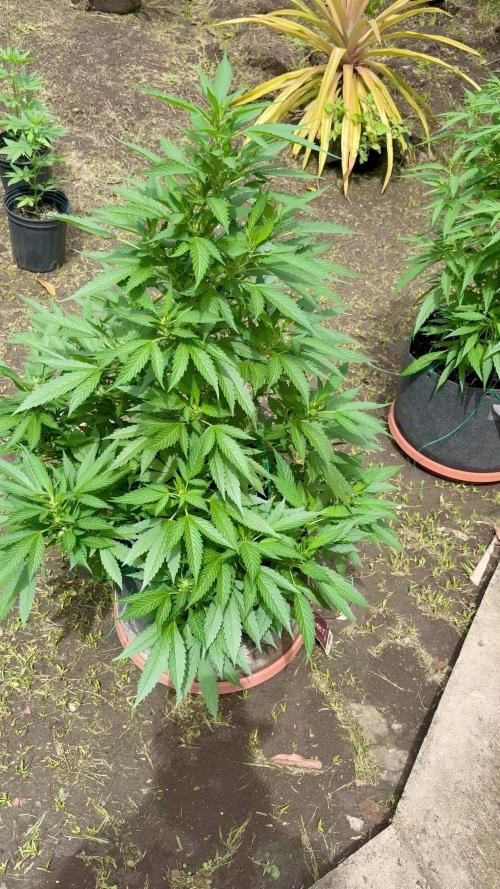
Día 26. Estamos en la 4ta semana. Por ahora mantengo la solución y la planta sigue creciendo pero ya está casi para cortar los esquejes. La semana que viene seguro estoy cortando, y ya tengo que preaparar todo para pasar al otro modulo del infoor.
Decidi dejar de aplicar HST y apliqué una recnica con colgantes que bajan las ramas y las mantienen perpendiculares al piso. De esta forma las ramas laterales empiezan a subir. Está técnica me ha dado muy buenos resultados anteriormente.
El crecimiento ha sido acelerado y las ramas estan bastante gruesas.
Mañana voy a cambiar la solución. Vengo realmente contento con los resultados. Este experimento me va a permitir saber cuanto puedo llegar a sacar de este espacio y ver si me permite armar un ciclo para poder llegar a la próxima cosecha con remanente para poder ir guardando variedades diferentes. De paso ya tengo una referencia de cuantas semanas toma hasta poder cortar esquejes, y así saber en que momento poner la próxima semilla.
Puse unas semillas bastardas que tenía, y las pienso mandar a la terraza a florecer directamente en el invierno. Otra experiencia que si bien no ha dado grandes resultados, ha sumado al stock. La semana pasada no llegué a subir mucho. Pero mañana hago un update de cómo se han movido las ramas bajas. En el último video se muestran bien las ramas que pretendo convertir en esquejes. Seguro saque varios, así que habrá para regalar si logramos que enraizen varios.
De por cierto las manchas blancad que se ven, es tierra de distomeas que ha quedado desde la aplicación en 2da semana.
Día 28. Termina la 4ta semana de crecimiento con un muy buen ritmo. Hoy cambié la solución y mantuve la formulación anterior (1g/L de feeding grow y 0,5g/L de green jungle bioestimulante de crecimiento). La planta está fuerte y ramificada. Sostengo que los esquejes se van a cortar un poco antes de lo previsto. Calculando que son 5 semanas de crecimiento y 1 semana de enraizamiento de esquejes, voy a tomar 6 semanas para preparar la próxima madre. Así que siendo esta variedad de unas 10/11 semanas de flora, voy a poner a crecer la nueva madre en la 4ta semana de floración. La planta tiene distancia internodal corta/media por lo que observo, así que es un detalle a tener en cuenta. Ya me empieza a dar la ansiedad de ver que todo va saliendo y quiero ya poder pasar a floración. Va a ser jna nueva experiencia hacer una planta desde semilla en hidroponía, ya que siempre hacía sólo esquejes y la madre la pasaba a tierra a florar en otro lado, debido a que por las raíces no podía sacarla del sistema que tengo ahora. Pero resolví eso y voy a ver por primera vez la potencia de la hidroponia en una planta desde semilla. Le hice corte apical a las dos ramas más largas esperando ver una mayor ramificación, ya que tengo un espacio de 1,2m x 0,55m por llenar y administrar. Espero que todo siga en marcha. Nos vemos en la 5ta semana desde mañana.
Processing
Likes
7
Share


@Acedily
Follow
Missed couple weeks of updating. Apologies.
K. Had to move the lady back under my homemade lights. The store bought just kept her trying to bunch up. Needed light through, didn't want to defoliate too much and she resisted opening up. She would actually straighten out the wire reaching for the SB.
Sooo, I spread my homemade apart more. I put her back under my direct wire, switchable lights, 5 settings from 2700k-5000k, 6 t8 tubes, 1800 lumens each.
Gave her a couple days. She opened right up for me.
The SB light high intensity, she was bushy, even after opening up, so at week 3, under homemade, she got some defoliation.
Learning more about light. I kept a minimal distance from top, center cola, to reduce it's stretch and allowed the trained limbs to catch up to it.
Now @12" from center cola, about 16" from rest of plant and light covers the entire plant. Using 1000w for her babies (clones.) They like it.
Using soil. And reading more. Prolly didn't need all the nutes I was giving. Doing well on 1nce weekly fish fertilizer and once weekly Gen Hydro Flora Series mixed for flower. The rest is ph'ed water.
Ozarka got expensive. Tried GV spring water. Has near 300 ppm, Ozarka <30. GV pH near and sometimes 10+. Ozarka 8.3 max. GV needs more pH down and it will rise again. I pH let set, then pH again. Pretty sure it's mostly calcium, since it's source is heavy with limestone. Calcium also appears to be a buffer. Ozaka's 8.3 mostly from the calcium, but ph's easily and holds well. Mixing = parts can get a ppm of 160 and pH of 8.7-9. then pH down. Saves a little money and some extra calcium. K done for the week. Bye, y'all.

Likes
45
Share


@AsNoriu
Follow
So its day 149 and its time for Girl to go ...
I left her for 72 hours of darkness, trichs are milky with 30% amber.
She started to flower on day 2 . So i kind off hoped for her to mature quick....
And on day 64 of flower she is done, one of the fastest girls. I could push her like a week more, but she is fading and i dont like to slaughter buds while triming , because i dont like yellow leaves ;)))
Two records left in longest diary, one for harvest, one for result.
Amazing journey ...
Happy growing !


Likes
14
Share


@Fat_Olsh_Farms
Follow
Day 42. General Hydroponics maxigro every other watering. Frosting up nicely.


Likes
40
Share


@Secretflower
Follow
Hello my friend,
...May 16 2022..Day N°55..
...Flowering day N°9...
Second week of flowering for my 2 Feminized Runtz Gum, 2 Feminized zkittzy Gorilla and 2 Feminized Banana Sherbet. They are fine and they growing healthy and stretching good.
I gave them water with some Hybrid powder from Green House Feeding.
I saw beginning of Cal/Mag deficiency so I gave them Cal-Green from Metrop, it's a super concentrated product, I got that bottle since 2 years.
My babys are under a Mars-Hydro SP 3000 at 50% of power and at 40 cm of the canopy.
www.originalsensible.com
www.mars-hydro.com
That's all for now my friends, thx for passing through here.
Wish you the best with your green projects.
See you soon..💨💨💨

Likes
6
Share


@IamCy
Follow
Week 3. This is where the fun begins. The smell is amazing.
The stretch is crazy and the stems are stiff like bamboo. There's no loss in terps. They're actually getting a lot stronger!!
Processing
Likes
23
Share


@HanzGrowz
Follow
Well they definitely made progress in the flowering dept over the weekend! I came back home to find a nice amount of bud sites and pistil growth all around.
Bubba ya gotten so big it can’t fit under my lights in the tent with fan & filter, so it’s now been moved to the other tent. Kind of fucks with my auto grow I had planned, but not much I can do

Likes
21
Share


@Insaniac_0
Follow
2/26 to 3/03 Veg Days 8 to 14
Week 2
Not much to talk about here. They took to the soil as expected with no issues.
Feed this week was 2 cups of 6.3ph RO water twice with 4 days between and 4 days after the last feed.
Feed plan next week will increase the amounts to 2.5 cups of plain-no-nute water with about 4 days between feeds. I still want to see the water run through, so if I need to use more than 2.5 cups I will. The idea is to water deep and through, but then make them search for more before the next feed, hopefuly spreading the roots out while doing it.
Likes
10
Share


@Cocogrow1234
Follow
Week 7 flower : I defoliated a little just to give bud sights more light .
Started flush on 6 1/2 weeks I’m just giving plain water and ph to about 6.0 . Watering everyday to about 20-30% run off and the ec of the run off is 1.0ec gonna be flushing everyday for next 1-2 weeks .
Likes
15
Share

@Organic473
Follow
I just continue to feed this girl as she wines down to her flowering stage. She is very healthy. No complaints.

Likes
5
Share


@GuroKC
Follow
Week 7 and 8 in the bag. One more light feed then the flush. Fall colors are coming in nicely and they are starting to purple up. They seem to have wanted a bit more water this week, had one plant start to droop before the watering but everyone perked up. Last dose of Great White microbes this week as well.

Likes
20
Share


@Luv2Grow
Follow
Day 71 - She just seems to get frostier everyday, it just keeps packing on. This girl has definitely been on of the frostiest I’ve grown yet. The smell she’s producing just smells like sweet citrus and really looking forward to the chop but will probably give her till the end of week 12. So she’s got about 2 weeks left and the next watering, she’ll be flushed and nothing but water till the end.
Day 72 - Not much I can say about this girl right now, just waiting for trichs to be right to chop. Will give her a flush tomorrow or Friday.
Day 73 - I wish I could get good pictures of the trichs but I never can. I’ve tried different attachments for my phone and everything else but nothing seems to work but either way no clear left and 100% milky but would like to get at least 20-30% amber before chopping but at least I know she’s ready at any time now.
Day 74 - Gave her a flush using Foxfarm’s Sledgehammer and no just letting her go until she finishes off. Still not really seeing an amber trichs so she’s definitely not ready for the way I like it.
Day 75 - She’s starting to show a bit of amber trichs now but only about 1-2%. She could be getting chopped next weekend but possibly sooner depending on how she finishes off.
Day 76 - Was almost ready to cut the girl today but decided to hold off till next weekend. She’s already bulked you’re quite a bit but gonna give her time to feed of the nutes in the leaves and see how much more she will bulk up.
Day 77 - Nothing new, just waiting to chop. Might give her another flush tomorrow or Wednesday, just to make sure all the nutes are out of the soil.

Processing
Likes
1
Share


@Smokehonja
Follow
Last ones to enter the Party of 8. Having a full tent looking very good. Ones a regular seed (pineapple x Wilson) others a Feminized seed (Sweet Zombie).

Likes
10
Share


Likes
38
Share


@Cariboo_OG
Follow
Utopia Haze is a rare heavily sativa dominant hybrid (90% sativa/10% indica) strain created through back crossing Brazilian Sativa strains. This tasty little bud took home 1st Place for Best Sativa in the 2008 High Times’ Cannabis Cup and for good reason – with its potent 18-22% average THC level and long lasting cerebral effects, Utopia Haze is one powerhouse smoke. The Utopia Haze high comes on soon after you finish your first toke, hitting you with a strong cerebral lift that infuses you with a sense of hazy relaxation.
Type: Feminised/Photoperiod
Cultivation: Indoor/Outdoor
Flowering Time (days): 70-75
Indoor Yield (g): Up to 650
Feminised Outdoor Harvest Month: October
Feminised Outdoor Harvest Month Week: 3rd-4th week
Aroma: Citrus, Woody, Pungent, Mint
Effect: Cerebral Lift, Hazy Relaxation, Sleepy
Welcome Everyone to the Final Entry of my Utopia Haze Grow !
There is so much to discuss ! I have been extremely busy as of late trying to get this Harvest together, but i am happy to have it here for you now !
I Seriously under estimated the amount of time, help from others, and my own necessary skills to pull this off.. and i still kind of screwed it up lol !
But its worth noting i have never actually done this before and trying to document it during....was extremely hard.
It is next to impossible to work an iPhone with rubber gloves on !
First I want to discuss everything step by step so before you jump straight into the comments on how the end product is so small in "quantity"
Rest assured i am happy with its"quality"...and thats all that matters to me because Life is a journey not a destination! and i have learned so much from this grow that I couldn't be any happy even if i messed some things up :)
But at the very least I hope you read through this entry in its entirety with an open mind and focus more on the process, rather than just the outcome!
I ran out of Ice & i was only able to wash three times..(normally I've heard you should go sometimes 5-6 washes)
Preparation is Key & things will be much better next round :)
Photos 1-22
These are pretty self explanatory but for those of you just tuning in now.. this is what happens to a very happy plant when you don't have the necessary tools to monitor key components of growing cannabis.. Ph, as well as EC levels play a very key role in the outcome of your grow lol that being said I was just able to save this plant by purchasing both tools but that doesn't mean the plant didn't suffer because of the prior events.. This was a Huge reason behind me choosing to turn this harvest into what i would consider
"Solventless Hash Rosin" from "Ice water extracted Bubble hash".
Pictures 23
The idea here is the process of using "fresh Frozen Cannabis" this has been discussed many a time online on such sites as instagram and here on grow diaries as well.. I personally have Never tried the process so i decided to try it out and make a judgement for myself..
Video 24
The Cannabis has now been in the freezer for 72 hours making it very well frozen.. as you can tell i struggled getting it all into the 25u Screen Wash Bag. One thing of note i would do differently is i will de-stem my next batch as i also believe this played a part in the amount of plant matter that escaped through the sieves.
Photo/Video's 25-28
The idea here is "ice water Seiving" & especially with the bags that I am using here that are only have screen material on the bottom portion of the bag it is very important to have spaces in-between the screens to allow the water to pass directly through the screens into the bottom bucket with the least amount of resistance.. because the hash is so extremely temperature dependant if it gets warm on the side of the bag.. it will stick there and not make it to the bottom to become use able product..
29
You do not need to use as much Ice as i used here lol... the idea is to keep everything very cold..i certainly achieved that but at the sacrifice of using so much that i ended up grinding product and producing "contaminants" but in the end they are just plant matter that i would be smoking when i rolled up my joint either way so.. I'm not super disappointed..
But it should be noted that what you want to achieve here is a Layering effect where you have the wash bag between two small layers of ice while the "water current" washes the Trichomes away allowing them to be separated by the screens setup below :)
Before Starting the machine you should allow some time (i.e.;10-12minutes pre soak to allow the product to become saturated) before the first cycle.
By video 32 I have just ran out of ice lol..
Video 33-34
Here I have a tip for you.. to separate the screens that you sieve through.. cut 5 gallon buckets to stretch them across nice and tight.. it'll make scooping your Bubble that much easier ! i learned this from the many "Frenchy" videos I have watched :)
Picture 35
Here in lays the problem for most people.. drying your hash without loosing vast amounts of "Terpenes" whilst also stay ever vigilant against mold !
Thanks to all those videos I've watched on youtube.. id like to think this was one of my most successful parts of this process..
Things to Note; Terpenes start to seriously evaporate at temperatures 68F or 20C
you need to stay as cold as possible whilst bringing the Relative Humidity in the space down into the 40-30% to stay away from that nasty mold !
I used my cold storage room in the basement.. with a dehumidifier running to keep the space at 45% RH & staying at a constant 15c.
All while spreading the hash as thin as possible across parchment paper, on top of the white screens with a fan moving air across both sides of the paper.
Pictures 36-38
These are some macros i took in the middle of my drying session I fell in love with the colour.
Yes i know the black spots are plant material but they will get caught when i bag the hash & squish the oil out.
Thing to Note; at this stage it is important to ensure you 'micro plane" the hash down as fine as you can whilst staying weary of the temperature... any "chunks" will hold pockets of moisture.. that lead to potential problems..ie; mold ...
Picture/Video 39-41
Successfully planed bubble hash ready to be bagged and Squished !
Picture 42
Ive decided to follow Pedro.. from Pedros Grow Room and double bag to be on the safe side so i don't have any blow outs.
So thats One 25u bag inside one 160u bag ! :)
Pictures 43
This is almost 3 grams of the bubble hash from above, already melting in the bag.. this is where i ran into trouble again lol things started getting to warm in the house and i was only able to get one of the three squish's i did on video :( things started getting sticky.
Picture 44
This is basically just a photo of the equipment I'm using; 3x5 LowTemp Cage in the frame I built myself, with a 20Ton bottle jack.
Something to note here is this is an older Lowtemp model with only a single heating zone which is which i have it closed here heating Both sides of the press :)
As well as the importance of having adequate pressure on your plates.. my rig is very overkill for the size of hash bags..lol
Video 45
Here is the lovely press video.. its didn't quite work the way i wanted either lol my directional folding wasn't quite tight enough for a big "drip" :)
&the Press was set to 65°c
Photo's 46-50 are pretty self explanatory :) I had a blow out.. but still managed to pull an 80% return from the hash once squished...& yes it tasted amazing :)
Was it worth it in the end... that could be debated.. for some..i understand..its not your thing, but for those of us that are interested in making our own concentrates.. free from Solvents...
I wouldn't make it any other way :)
If even ONE of you reading this diary finds it helpful to reference for ANYTHING.....even if its "what not to do" ill consider it a success !
Thanks again for tagging along on this garden adventure.. its been one heck of a journey !
Much Love from B.C. Canada,
Until Next time,
Cariboo


Likes
16
Share


@valiotoro
Follow
Blessed with the result as you can see the buds looks fantastic💎
The trim was super easy(make sure you have enough gloves)😂
Now 7-10 days on the dry rack then see you in 2025 for the smoke review
Take care😁
Likes
3
Share


@Bread_n_Buds
Follow
Our Tangerine Dream by Zamnesia is a strong piece because? I come from an area where mandarins reign supreme, when I was a kid the peels ended up covering the numbers of the first rudimentary bingo games. We all have a clear smell of mandarin in our nose and olfactory memory and we distinguish it from other citrus fruits, at least lemon.
I had a Jet Fuel that was strong with mandarin and my friends all went crazy for example, "you can feel the peel" they tell me. It's like this guys when a strain is good ok it has to be strong, but the terpene profile reigns supreme. It has to smell, remind you of something, have an olfactory configuration is essential in today's cannabis and those citrus ones are the most recognizable but the nuances between the citrus ones are pure love.
Remember that we are growing a plant worked with the indicated techniques and another left to grow without pruning to preserve its speed; in the previous/next diary you will find the other plant of the same variety.
In this diary we find it worked with the Main lining: we topped the third internode, we worked the very small brunches in growth trying to keep them low until the third internode and then topped again. We are topping the laterals, one was broken by mistake but we have enough brunches thanks to this topping on the laterals that I am improving also next week you will see...
Slow down the use of nitrogen during this technique, you may not need everything that is recommended by the producers. So, if the leaves become too dark or, worse, the tips of the leaves arch downwards and the leaf becomes "crunchy", it is time to lighten or stop the basic fertilizer.
Comparison is the salt of experience, so the plant in the other diary will be treated very differently, go and see it to compare.
We have started the Plagron fertilization program, we are in 100% organic configuration, the soil is recycled Promix + 1/3 fresh soil + 10% Perlite + RQS Mycorrhizae Mix (4 g in the mix, 1 g under the small fiber pot).
We fertilize with: 1 ml/l Power Roots - 1 ml/l Pure Zym - 1 ml/l Sugar Royal - 3 ml/l Alga Grow
We sprayed 3 ml/l Vita Race foliar fertilizer once a week.
https://plagron.com/it
We always have the excellent RQS mycorrhizae flowing in the soil.
https://www.zamnesia.io/it/5778-mix-micorrize-easy-roots.html
Taste this strain a little bit, it's a cross of legendary strains ---- // https://www.zamnesia.io/en/10966-zamnesia-seeds-tangerine-dream.html
Short Description Zamnesia // When legendary genetics are crossed, something exceptional can only be born. Tangerine Dream is the result of crossing classic strains. With citrus and sweet aromas and flavors, vigorous growth and euphoric and stimulating effects, Tangerine Dream by Zamnesia Seeds has it all. But don't take our word for it: order your seeds now and discover it for yourself.
You can find the whole world of growing at Zamnesia and much more take a tour of the site and you will find "all the best that nature has to offer" in various shapes and colors.
The whole world of growing and more is at Zamnesia: just take a look at the site and you will find "all the best that nature has to offer" in various shapes and colors.
The new strains are fantastic and the old ones are no exception...
-- // www.zamnesia.com
