


Likes
Comments
Share


@Ratch33
Follow
Substrate amendments & quantity per bag 22L
1. 15L Coco Substrate (CalMag Buffered)
2. Red Earth Wiggler - Wormcastings
65g
3. Lujae Dolomite Lime
15g
4. Cultera - Vermiculite
25g
After removing the 10L bag, I use my spray bottle to moisten the sides of the coir slightly. I then sprinkle Mycorrhiza to assist in a speedily transplant recovery.
I also sprinkled some at the bottom of the 22L bag as well
Transplanting Done! 🤙t2:
Note: The same method, amendments, quantity used to transplant (Jet Fuel) too. About 2 weeks after this one.


Likes
20
Share


@Skunklerman
Follow
Started to train the big plant, going to wait at least another 2 weeks to flip them into flower.
Watering every three or so days as I was able to bring up the humidity to near 60 and the pots have been staying nice and moist.
Hit with neem at beginning of week and will continue running an integrated pest management system with essential oils, neem (w bronners), mindful watering and overall grow tent cleanliness.
Current challenges; black fungus gnats (they have degraded since I cut back on watering and introduced sticky traps)
Likes
21
Share

@GoodTimesOrganics
Follow
Hi liebe Community and Welcome Back! 💚
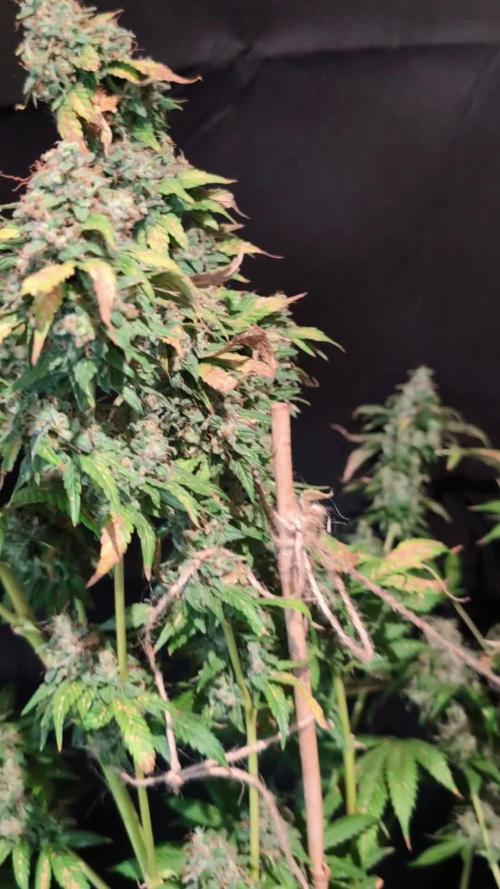
Woche 14 (Tag 108) im Vergleichsgrow!
Bio Tabs NL. vs. Weedefix (Stuttgart/ Germany)
Blütetag: 56 (BW8)
Durch Rückmeldung könnte ich nun herausfinden, welches Problem die Pflanze in der Vergangenheit hatte.
Es war ein Phosphor/ Kalium Überschuss. Bedingt durch die Zugabe des PK Boosters und der darauffolgenden Anwendung des PK Komposttees.
Auch im Bio Grow muss Mann berücksichtigen dass Mann es etwas übertreiben kann. Dabei hatte ich wohl einmal zu viel mit dem PKW Booster gegossen.
Das Vorgehen ist sonst das selbe wie immer. Rein nach Bio Tabs NL Schema 🤷
Die Blütenbildung ist dennoch beständig und gut ausgeprägt.
Der Trichomcheck sagt aus, dass die Pflanzen allmählich fertig sind.
Denke nächste Woche ist Erntezeit!
Ansonsten bekommen Sie aktuell nur Wasser.
Die Bedingungen im Growzelt sind in Ordnung!
—————
🌞 Temp: 26
🌚 Temp: 18°C bis 19°C
💨 RH: 54%
VPD: 1,71 kPa
💡ppfd: 830 mpm
—————
Likes
7
Share


@unclewoody3
Follow
Some of these were planted later but all doing good at all or not topped
Likes
92
Share


@DogDoctorOfficial
Follow
🌱 Weekly Report: Week 16 Flower – Gorilla Melon Highlights 🌱
Room Dynamics and Challenges
This week marked a pivotal phase as we approached harvest. The decision to harvest Gorilla Melon in two stages allowed us to navigate a potential mold issue effectively. The mold was confined to select areas of dense colas, which were promptly removed to protect the rest of the plant. This experience reinforces the importance of keen observation, especially in the final weeks.
Environmental Parameters
• Temperature: 26°C
• RH: 53.2%
• VPD: 1.57 kPa
• CO₂ Levels: 1067 ppm
• PPFD: 690 µmol/m²/s
• Solution Stats: pH 6.67 | TDS 695 ppm | Temp 18.3°C
The ThinkGrow LEDs and TrolMaster systems shone during this critical period, maintaining precise control over the environment. The addition of deep red and UV light at 100%, with whites at 50%, seemed to amplify trichome production, resulting in a frosty finish across the garden.
Highlights of the Week
• Fading Colors: The garden displayed a stunning spectrum of fading hues, signaling the end of the cycle. Gorilla Melon’s red highlights and frost stood out beautifully.
• Defoliation Success: The earlier defoliation efforts paid off, minimizing mold spread and allowing light to penetrate deep into the canopy.
• Trichome Inspection: The frost level across Gorilla Melon was nothing short of mesmerizing, a testament to her genetics and the controlled environment.
Gratitude and Community
A heartfelt thank you to the community for your support and engagement. The sponsors—ThinkGrow LED, TrolMaster, Aptus Holland, and ProMix Soil—made this run possible. It’s been a pleasure to share this journey with you all.
What’s Next?
With Gorilla Melon harvested, the spotlight now shifts to the other girls in the garden. Stay tuned for their individual harvest reports, smoke reviews, and more as we wrap up this epic series!
Discount Codes so you can save big on your next check out 💚💚💚
CannaKan- DOGDOCTOR 15% off
terpyz.eu - DOCTOR 15% off
The Neutralizer - PORKIT5-DOG 15% off
Fast Buds - DOGDOCT 15% off
As always thank you all for stopping by, for the love and for it all , this journey of mine wold just not be the same without you guys, the love and support is very much appreciated and i fell honored and so joyful with you all in my life 🙏
With true love comes happiness 💚🙏 Always believe in your self and always do things expecting nothing and with an open heart , be a giver and the universe will give back to you in ways you could not even imagine so 💚
Friendly reminder all you see here is pure research and for educational purposes only
Growers Love to you all 💚💚💚


Likes
2
Share


@mck47
Follow
Sprayed her 2x with magnesium + aloe vera in the last week & watered only with rainwater..
This one grows really nice. the structure and the growth is just phenomenal.
Put some old salad & leafs from defoliation on top of the soil for the worms.
Likes
2
Share


@Drtomb
Follow
Week 5 is about finished. I started the girls on the finisher product to help. Harden the buds, basically only another week and a half before I begin the flush.

Likes
11
Share


@AestheticGenetics
Follow
3/28/25 chopped and humidity was a little high starting off
3/30/25 have them drying at 60% and 70°
4/3/25 Still needing a day or so of drying to be at a stable humidity
Beautiful plant. Fan leaves with Triched out patterns visibly everywhere.
Even though i chopped quite a bit off of the plant, i still got quite a bit bigger yield than i expected. All sizable nugs.
Pulled 65 grams.

Likes
8
Share

@Mrs_Larimar
Follow
2025-11-30
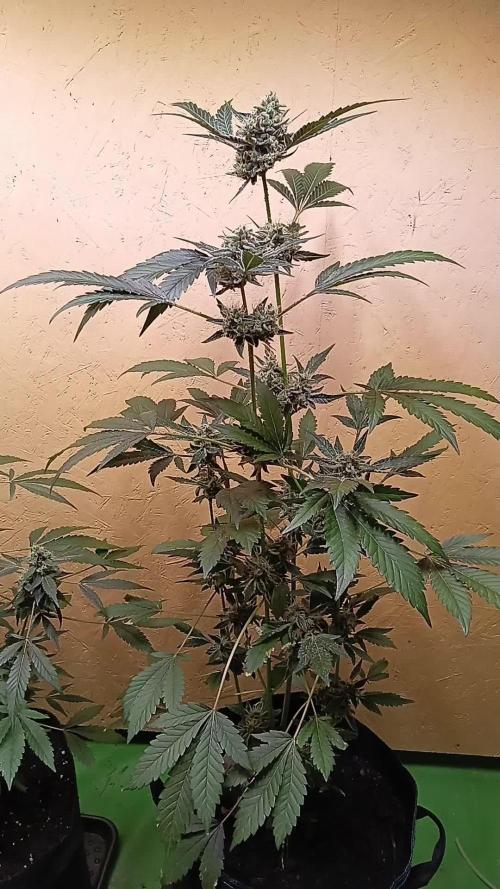
buds are swelling , the autopot plant is closer to be ready, shes covered in trichomes, and the pistils starting to change.
the handwatered Girl doing her best
Multi-Setup Grow Comparison - started September 8th, 2025
🌟 Strain Profile: Permanent Marker
🏆 Breeder Information
Genetics: Award-winning strain - Leafly's Strain of the Year 2023
Breeder: JBeezy @ Seed Junky Genetics
Potency: Up to 31% THC
Aroma Profile: Floral base with soap & gas notes
🔬 Experimental Setup Overview
Total Plants: 3 seeds
Goal: Comparative analysis across different growing methods
🌱 Setup Configurations
Setup #1 -Biotabs " water-only strategy"
Container: 35L Smart Pots
Nutrients: Biotabs "Water-Only" strategy
💧 Watering: Manual feeding schedule
📍 Location: Standard grow space
Setup #2 - autopot system
🏺 Container: 35L Flex Pots
Nutrients: Biotabs "Water-Only" strategy
💧 Watering: Autopot automated system
📍 Location: Autopot station
Setup #3 - Alternative Organic Method
🏺 Container: 35l flexpot
Nurients: Alternative organic nutrient line
💧 Watering: [To be documented]
📝 Note: Separate diary documentation
📊 Expected Outcomes
Comparative Analysis:
⚙️ Automation impact on plant development
Nutrient system efficiency comparison
💧Water management effectiveness
📅 Timeline Status
Current Stage: flowering
Next Update: Weekly progress documentation
🔍 Research Focus
This comparative study will provide insights into:
Automation vs manual care benefits
Biotabs system consistency across setups

Likes
6
Share


@4twentysupplyco
Follow
Germination was pretty good, we lost one of each strain. We soaked for 24hr then wet paper towel for 24hr then in a tray and dome for 2 days under a sun blaster 50 watt light for the first week or so


Likes
16
Share


@Dunk_Junk
Follow
Not got a lot taller this week, but she's pushed out quite a few leaves!
Likes
21
Share


@w33dhawk
Follow
Moin moin liebe growmies diese Woche war wieder ziemlich gut ich hab eine Lady bei der ich den Verdacht habe das sie einen tabacmosaikvirus hat werde die komischen Flecken weiter beobachten, da ich nach der ersten gabe von guano Grow das Gefühl habe, sie füllt die Flecken mit grün aus ( konnte ja auch ein Nährstoff Defizit sein)
16.04.22 heute gab es nährlösung 300 ml (extract, bat boost und microbes, Ph 6,5)
17.04 und 18.04 am Wachstum erfreuen
19.04.22 wieder giessen 500ml diesmal reines Wasser ( Ph 6.5) die Ladys sind durstig
20.04.22 zuschauen und am Wachstum erfreuen Ach ja und die wurzel Masse im Topf kontrolliert ist gut voll gewesen weshalb ich mich entschieden habe in dieser Woche noch um zu Töpfen (wollte eigendlich erst in Woche 4 umtopfen) aber die Flecken an dem neuen Wachstum sahen für mich im ersten Moment aus wie Nährstoff Mängel da war handeln angesagt
21.04.22 heute war Tag des umtopfen's habe meine 4 Ladys die im Zelt bleiben sollen in 8l stofftöpfe eingesetzt (sind zwar 8l stofftöpfe da sind aber ca 12-13L Erde die da rein passen bis der Topf voll ist) sollten sicherlich reichen wenn ich 8 bis 10 Wochen vegi fahre. Angegossen habe ich das ganze mit 500ml nährlösung ( extract, bat boost, grow und microbes)
22.04.22 heute war nur zu schauen und beobachten wie sich das Problem kind entwickelt, für nächste Woche steht dann endlich topping an freue mich schon total endlich mit den Ladys zu arbeiten zu können
Euch noch ein schönes Wochenende und erfolgreiche ernten cu growmies
Update: Habe meinen kleinen Eimer zum Wasser aufbereiten ausgetauscht ist jetzt eine Oscar Tonne 23L Fassung Vermögen, ca 20 L wasser drinnen 2x Sprudel stein,eine aquarium Heizung und den Deckel habe ich mit löchern versehen. Die Schläuche für die Sprudel Steine habe ich am oberen Rand durch gezogen also auch dort jeweils gegenüber liegend ein Loch gebohrt damit der Deckel sie nicht ein quetscht.Wie in dem video zu sehen ist,sind die Löcher im Deckel damit das wasser vernünftig aus dünsten kann wegen dem chlor was enthalten sein kann da es ja aus der normalen Haushalts leitung kommt. Das ganze läuft 24/7 h und wird ca alle 14 Tage aus gewechselt und gereinigt

Likes
10
Share


@ohcibi
Follow
After a week of super stretch to today 52 centimeters which crashes the 100% growth mark finally bud sites became clearly visible. Now for the final phase. Water intake is massive. When I upped to 2.5l per plant per 2 days from before 1.5l I saw zero difference in how fast the soil went dry etc.
The plants stopped transpiring as much such that my humidity came a bit down. I was up to 60% at some times during the day. But it’s down to 50-55 again. Depends a bit on how often I vent the room.
Gotta have to have a final stress point which is that I might have too move. Will share some pictures of how I’ll pull it off. Stay tuned.
Likes
Comments
Share

@RooftopFarmer
Follow
Guava Sundae – Week 4 (Fast Buds Outdoor 2026)
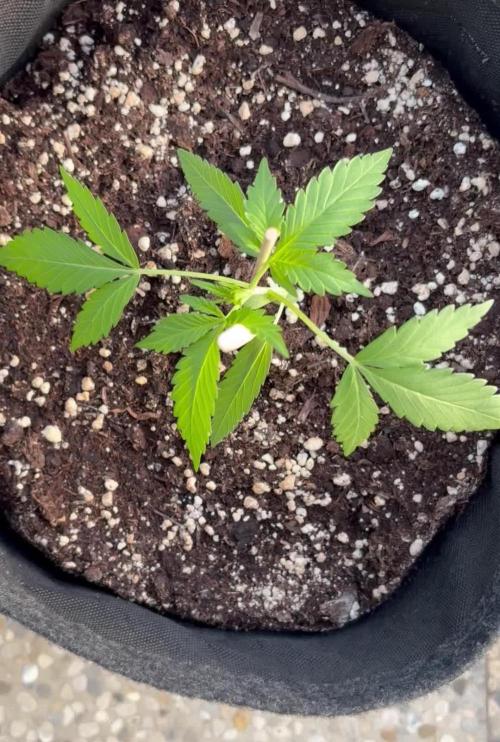
The weather has been fantastic again this week, so Guava Sundae is now 100% outdoors, day and night. She’s getting maximum sunlight and really seems to enjoy the full outdoor life.
As you can see in the pictures, she grew a bit crooked. I hope she straightens out soon. I used some simple sticks for support, but I’m still looking for a better long-term solution. She’s now around 7 cm tall with a beautiful vibrant green color.
I also gave her a light feeding of BioBizz Fish-Mix and BioBizz Calmag. I had deficiency issues last season, so I’m being proactive this time to keep her healthy. Any tips on how to straighten her out are very welcome!
Likes
10
Share


@Master_weeda
Follow
Bonjour à tous les padawans et maîtres jedis
Tout d'abord merci à @pyramidseeds de me permettre de faire cette culture en m'offrant les graines
Merci aussi à @lientec_led de m'offrir l'opportunité de tester sa toute nouvelle lampe Roccit 240w ainsi que organic nutrients pour l'engrais
MATÉRIEL CONFIGURATION
Box 80×80×160
Lampe led Lientec Roccit 240w
Ventilateur à pince 15 watts
Xiaomi Deerma humidificateurs 5L
Hygrometre thermomètre
Extracteur PROFAN 107 m3/h - 100
Prise programmable électronique ×2
1 pot carré noir 11 litres
Engrais organic nutrients
Substrat biobizz ligthmix
Fil de fer et pince coupante
Microscope
Petite balance de précision
CULTURE ÉTAPE PAR ÉTAPE
J'ai tout dabord fais germé ma graine avec le easy start de Royal queen seed et je suis agréablement surpris car franchement le taux de réussite est très élevé (18 graines sur 20) simple d'utilisation et très efficace.
Une fois la plantule sortie et d'une hauteur de 2 ou 3 centimètres je la prend délicatement et la place directement dans son pot définitif. Je préconise des pots allant entre 10 litres et 15 litres pour des autofloraisons cultivées en intérieur.
Le pot aura été préalablement préparé avec 80 grammes de big plant de organic nutrients que je mélange avec les 11 litres de substrat
Je dépose la plantule dans son pot définitif je recouvre un peu de avec de la terre je tasse légèrement et j'arrose pour garder le substrat humide pas plus
Je place ma lampe led 300watts à environ 90 centimètres de la plantule avec un cycle de lumière de 20/4 grace a un programmateur car c'est pour moi le cycle de lumière qui offre le meilleur rendement pour une autofloraison.
Jour 1 préparation du substrat
Avant transplantation définitive je mélange 80 grammes de bio stimulant bib plant de organic nutrients et j'arrose avec 2 litres d'eau ph6.3 à laquelle j'ajoute 0.7 gramme de enhancer feeding greenhouse par litre d'eau

Processing
Likes
28
Share


@Elysian_gardens710
Follow
Something is annoying with this app. I cant take pics with it. Hopefully it just the app permissions. Nothing too exciting yet this week. #2 has been struggling getting adjusted to the new pot. Where #1 took off. Idk what the difference is apart from the training methods. Having said that I have topped number 2 and fimmed her lower branches hoping that a little encourage root growth.. I've also had to do a bit of re arranging. So these are now elevated the highest and under mostly 2x 50w auto cobs. They both have supplemental lighting coming from the 2 viparspectra LEDs I have near them.
Day 52:
Watered both the girls today. They're drinking fast! I water till slight runoff and they get about 2.5 gallons every 36hrs or so. Also we raised the cobs a bit up to 24" from them.
Day 53 & 54
Nothing to say for day 53. Maybe I think #1 is getting a bit rootbound. I say this only because her leaves are curled like they are over watered yet the plant is dry. And she went in a growth spurt last week.
Day 54
I picked up some soil for transplant tomorrow. I am putting #1 into a 10gal bag. #2 I haven't decided yet.
Day 55:
I transplanted #1 today into a 10gallon fabric smartpot. I mixed the bottom soil with Fox Farms Ocean Forest because we are getting ready to flip to bloom and ocean forest has more P&K and less N. And that's what we want. Hopefully she doesn't shock. I inoculated #1s roots with Azos during transplant. Applying it gently and directly onto the roots.

Likes
5
Share


@BasedBuds_89
Follow
Bud sites have popped up everywhere! Cutting back on nitrogen and grow entirely, will only be using a tiny amount of Micro and Big Buds nutrients for the remainder of this grow. Loving the results. Will commence Lollipopping today.

Likes
28
Share


@Salgeezi
Follow
Ended up cutting all of the front left plant this week and majority of the back two plants. Guna let the lowers get some light for a few more days. Really noticing all the tiny ass buds. Hopefully I'll make something out of them. First run with a net and I just left way too many branches/bud sites for this size of plants they were. Buds look good though. Flushing last plant and will be cutting in a few days.
