Likes
Comments
Share


@ItalGrow506
Follow
Así cumple su 11va semana de vida y 7ma semana en Floración, esta semana han habido cambios en el jardín ya que al fin pude adquirir un tent, muy contento puesto a que es lo suficientemente espacioso como para meter 6 planta. La Amnesia luce preciosa en el tent, los capullos están bien pesados y llenos de resina, tuve que amarrar los capullos principales dado a que el peso de los mismos se llevaban las ramas para abajo. En esta semana se regó una vez con fertilizantes, en la solución de riego se utilizó: 3ml Flora Gro, 4.5ml Flora Bloom, 3ml Flora Micro y 3ml MagiCal. La solución de riego marcó 515ppm y 6.0 PH.

Likes
15
Share


@SuzyandSons
Follow
Iused clone x on the clones. No picture this week. Enjoy my cat instead.

Likes
3
Share

@BioGrowBayer
Follow
Die Pflanzen entwickeln sich weiterhin sehr gut. Blütenbildung schreitet planmäßig voran
Likes
2
Share


@Indicaianer
Follow
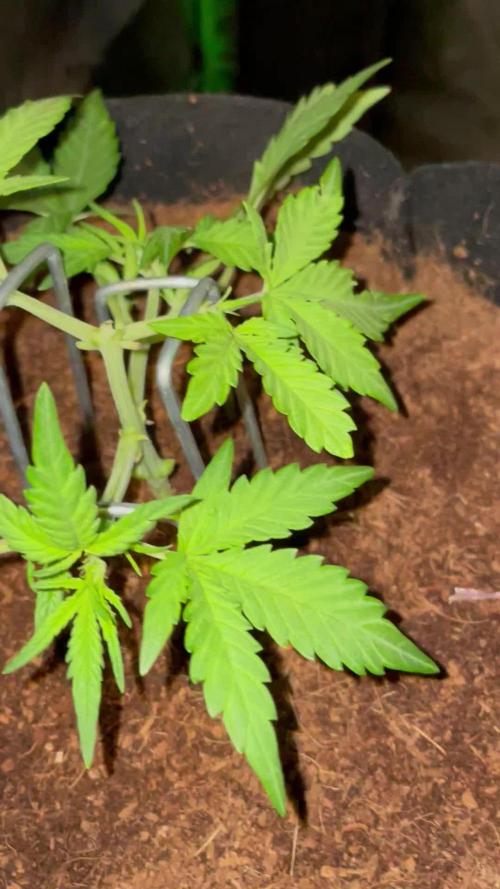
Die Samen wurden für 48 Std in Wasser gelegt, als sich die ersten wurzel zeigten wurden die automtiks in den endtopt (11liter) und die Feminisierten erstmal in einen kleinen Topf, wird später umgetopft


Likes
16
Share


@DevilishCherryBlossoms
Follow
Water only from here
1L at a time
13/09
- Watered @ 10:43
- Health inspection
14/09
- Watered with 1l
- Added extra Fan
15/09
- No water needed today.
16/09
- Watered till run down for flush
17/09
- No water today damp
18/09
- flushed
19/09
- Flushed


Likes
9
Share


@Bullbulator420
Follow
Day 40
They are into full flowering and I went at max with Advanced Nutrients;
4ml per lt.
With my t-Rex super soil i don’t need much ppm so I will give such amount of fertilizers only for this week.
Going back to 3ml per lt the next week.

Likes
62
Share


@Santica_Garden
Follow
So apart from the really low yields.... Which I expected from 80% Indica dominant strains just not that low considering how dense the Budz were. But I can say my growing skills have been consistently improving and it is showing with each grow.
With these ladies I should have definitely put them in a 12Litre pot or smaller and still would have gotten the same results if not better. So I lesson learnt for future grows..... To take into consideration the size pots I'm using on the strains I'm running! 👍🏾
But in all very great smoke, even more excited for the next rows that I have coming with the improvements I will be making. 👍🏾🌱💚
Another thing I will say is that I will be putting more effort into how I document my harvest for you guys.... More pictures, better videos showing off the Budz.... Not many pictures because I done smoked it all 😅😅🔥🔥🔥 but still I want to do better for you guys, I want to give people the best view/review of the strains that I run... The information will help someone that decides they might want to run this strain in the future!
Any questions guys just ask away 👊🏾😎

Likes
19
Share


@Iamdisabl3dsgirl
Follow
This week these ladies have blown up as you can tell one is a bit bigger then the other and one is shorter as her sister is exploding lol. Loving these 8 gallon self wicking pots from @grotechgarden
Thanks so much for these amazing genetics 420 fast buds!
Likes
79
Share


@JUNGLE_B4RNS
Follow
-Sensi Seeds Research:
The Sensi Seeds Research breeding project has created eleven cannabis seed varieties.
How? By combining new cannabis cultivars with a selection of strains from their long-established cannabis gene bank. For the first time in thirty-six years, they are opening the doors of the Sensi Seeds Research and Development Department.
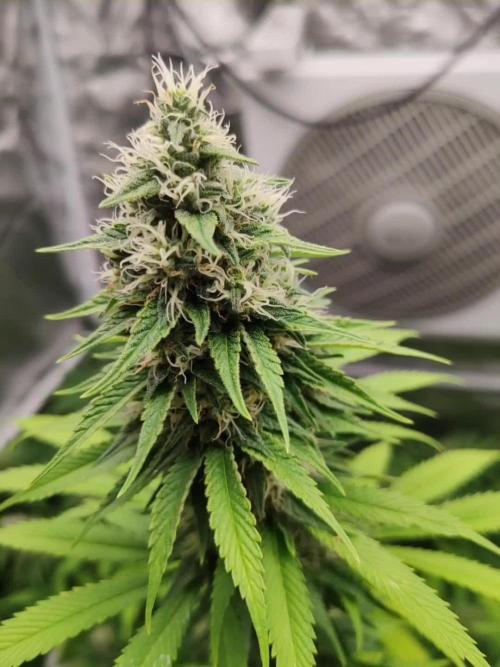
Week #13, week 6 of flowering :
Everything went well during the week, maybe except the fan falling down right in the ScrOG ... damaging some stems, but after tying them to some sticks it looks ok, I don’t really see any difference in the pictures by the way. Tough genetics, I’m really happy with all of them, I can’t complain on anything. There’s buds everywhere, all dense and hard, this is what I like. 👍
Reducing BIO Bloom ( not Organic Bloom ) just a bit for this week, it might be one of the last feeding with Alga-Max for some plants and probably the last feeding for a few of them, I don’t know yet all depends on how it turns during the following weeks.
👉Tip for new growers : you must stop adding any PK boosters 2 weeks before harvest ☝️
Mars-Hydro SP 250 is very effective. I’m growing 3 small plants between the ScrOG’s, was using my tubes for seedlings to give them a bit more light but nothing was really happening, they were having a hard life trying to grow some buds. But after just a lil bit more than a week under the SP 250 they started to make buds, getting fatter and denser, even the small nuggs in the bottom are getting some light which was impossible with the tubes !
(I’m looking for a job in the Cannabis industry as Master Grower, Mineralogist, Quality Control 🐞)
Likes
15
Share


@Witchcannabis
Follow
Sweet afgani #1 64gr
Sweet afgani #2 58gr
Admittedly, I was expecting more dry weight, but the bud quality is ideal.

Processing
Likes
17
Share


@Ashbash
Follow
Buds looking like buds now. Should just be fattening up for a few weeks now. Smells very nice (hard to tell which one is stinking) adding calmag to see if it helps with the leaves dying off. All looking good!
Day 59 added video of trichomes from multiple tops. Quite a few amber already hoping a couple weeks and it'll be down.

Likes
41
Share


@Organic_G
Follow
Sehen sehr schön und gesund aus.
Der Strech war echt heftig und jetzt sind die komplett in der Blütenbildung.
Fokus in Woche 1-6 der Blüte liegt auf BioMasse, danach wird die Temp und Lichtintensität stetig runter gefahren.
2x UVB Röhren mit rein gehängt, liefern pro Tag bisher 2-3 h ohne sichtliche Veränderung… wird auf jedenfall stetig gesteigert.
Hab 2x Entlaubt und ggf wird nochmal einiges entlaubt zwecks Lichtpenetration.
Vielleicht kommen noch Sidelights dazu.
Hatte auch sehr Probleme die RH im passenden Bereich zu halten da das Beet zu viel Wasser bekommen hat, seit 3 Tagen habe ich nicht mehr gegossen und nur das Wasser verbrauchen lassen.


Likes
7
Share


@Zaphod420
Follow
Been Flushing since day 60 and she has finally reached the end. REALLY like how she turned out and I think am about to but something really special in a jar!

Likes
74
Share


@420DeepGrow
Follow
Gracias a @James, Royal Queen Seeds y MarshHydro sin ellos no sería posible hacer este diario.
La Tropical Mirage es la última creación de los maestros de la cría de Royal Queen Seeds. Trabajando mano a mano con el DJ y productor Henry Saiz, nuestro equipo se propuso crear una variedad que sirviera como chispa de inspiración para las personas creativas de cualquier ámbito de la vida. Y ahora, por fin podemos presentar el resultado.
La Tropical Mirage desciende de la todopoderosa Zkittlez, uno de los híbridos más populares del mundo. Es el resultado de un cruce entre un esqueje seleccionado de la Forbidden Zkittlez y la Melonade, y es afrutada, edificante e inspiradora. Sus flores densas, alargadas y resinosas desprenden intensos aromas y ejercen un subidón energizante capaz de impulsar cualquier proyecto creativo, desde la música y las artes visuales hasta la escritura, el baile y mucho más.
En el cuarto de cultivo, la Tropical Mirage es rápida, fiable y muy productiva. Con una serie de cuidados básicos, esta variedad tan resistente te dará suficientes cogollos para mantener tu flujo creativo en acción durante todo el año.
🌻 🚀 Consigue aquí tus semillas:
https://www.royalqueenseeds.es/semillas-feminizadas-de-marihuana/647-tropical-mirage.html
💡 Mars Hydro TS 3000, como la lámpara de cultivo LED más grande de la serie TS, ofrece suficiente cobertura para un área de 4 × 4 pies con un precio asequible y rendimientos de calidad; a cambio, se puede aplicar tanto al cultivo doméstico como al cultivo comercial.
Potencia - 450w
Cobertura Vegetal – 5×5 pies
Cobertura de flores - 4 × 4 pies
La opción abrumadora para la mayoría de los productores que la aplican en tiendas de campaña.
Consigue aqui tu lámpara:
https://marshydro.eu/products/mars-hydro-ts-3000-led-grow-light/
📆 Semana 9:
Gran semana en la cual se ha incrementado la cantidad de resina, los cogollos se han hecho mas duros y los colores son para verlo en persona 😎😍.
Hubiera querido algo mas de masa vegetal en floracion pero por problemas personales no pudo ser. Estoy muy contento con los patrocinadores, gracias a todos
Últimos riegos con nutrientes 💣, dejo de aplicar Sticky Fingers y Bloom Booster y bajo la potencia del 100% al 80% con mi


Processing
Likes
6
Share


@8_SafeMode
Follow
Cookies N Cream Clone one from Zombie66 Clone two from ATMBKK