The Grow Awards 2026 🏆
Likes
Comments
Share
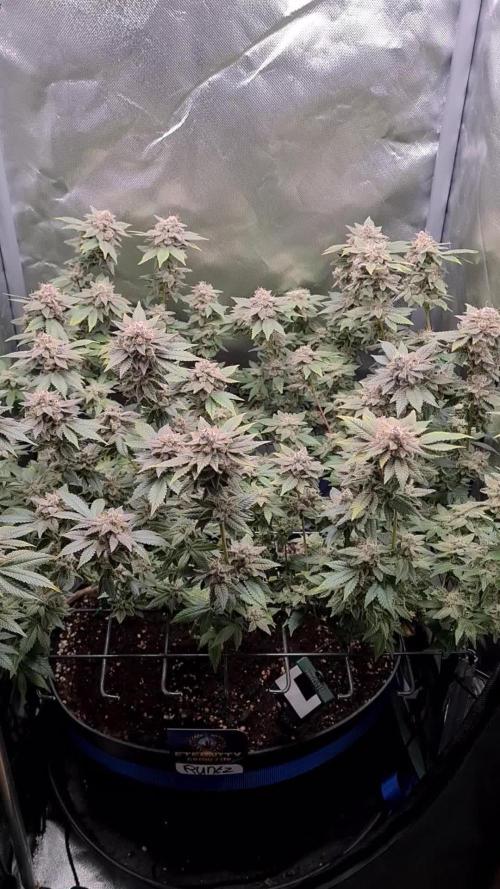
👉 This is the first staggered harvest I have done. The highest parts of the plant were definitely ahead of each lower level of flowers. So it made sense to give this a try. Also, there were so many sugar leaves in the flowers I knew I was facing some major trim time. So I started at the highest branch of colas and that was the main stem…what I call the Queen cola, on April 4. I was also very busy with work and life so I spaced out each successive branch by a day or two…or so. To harvest I would cut each major branch from the top down. There would be one major cola ( and best specimen) on each branch. That cola was trimmed so it was still on its stem and then weighed. I recorded the weight of the cola then assigned it a letter, put on a clothes pin, then hung on a rack. I would weigh the cola over a couple of days till it had loss 75% of it wet weight. I would cut from the stem for the final weight, then place in a jar with a hygrometer. I would monitor the jars and if they were above 62% I would take off the jar lid, then replace when humidity was back down. When stable I put a humidity pack in some of the jars, but not all, just to see if I can observe a difference after the cure. 👉 My last trim penance was served on May 1. Almost a full month. The first cola harvested is already being tested. I did a close trim and removed as many sugar leaves as possible. I think I spent over 10 hours in total. So glad I chose to stagger the job. I trimmed any frosty sugar leaves over a trim tray with a screen for a bottom. I also scissored a bunch of the larf buds into small bits to add to the trim. I made a nice small wafer of just trichomes with no plant matter. Very nice, sweet stuff. I’m letting the large pile of trimmed sugar leaves dry out till crispy and will hand grind them over that screen and press the kief produced into pucks. It’s green and has lots of plant material with it…but its still sweet, and a very nice topper to a bong or joint. 👉 There were a lot of nice buds of what I call secondary flowers. Those were on secondary branch ends mostly. These buds were placed on a dry net. After 24hrs, I placed them in a paper bag. When they had lost 75% of their wet weight they were put into a jar with a hydrometer. Almost everything that wasn’t a branch end flower was put in the larf bin. Lots of larf. I didn’t weight any of it dry and just the wet weight from a couple of branches. I plan on making bubble hash and extracts (oil and tincture) with the larf. Of course planning and doing are two separate issues. I have acquired all the proper gear and done lots of research. I am also experimenting with the drying environment. In the past I was using a direct fan to oscillate directly on the buds for 24 hrs. At 24hrs the buds were put in bags and also kept them in direct wind. After a couple of branch sets I decided to stop oscillating the fan and make the breeze indirect. I still put the buds in bags after 24 hrs and kept the wind indirect. It took a few days to get to 25% doing it this way, as opposed to 2 days in bags with direct wind. The slower is supposed to be better, but risks moldy buds. I’m not doing everything the same way so I’m curious to see if there are perceptible differences in jar aroma and taste. To further complicate things to eye-roll status, The staggered harvest should have improved the lower level of flowers to the same ripeness. I can honestly tell buds from the same plants taken at different levels. The lower ones are noticeably weaker. I won’t start testing to see if there is improvement till the flowers are at least 4 months cured.
Likes
14
Share
Note: At time of writing the Runtz has had 2 weeks cure, will update the review and rate it after 2+ months cure. Hermied a bit, has very few seeds so not too bad. Growth review: - vigorous grower during veg - solid stretch - medium internode distance - small sized buds - lower buds not too airy - very easy/not fussy - medium amount of smell - 80+ days flower (12/12) in hydro DWC under full spectrum led - responded well to various lst techniques Ease of growth rating: 9/10 General note: --> For me personally this strain NEEDS a good cure and is not worth smoking yet... It has a bit of a citrus grassy (not hay) taste, with some 'special' fruity smells to it that remind a bit of grapes/cassis. When grinding/opening the curing pots there is a pretty dank heavy weed smell so I think the quality will come out after a few months of cure... In its current state not worth smoking for the taste or effect after 14 days cure. --> Currently the effect is not very strong, easy to handle and I need a lot to feel a bit. The effect lasts for short compared to the average strains I smoke. Should develop more character with a longer cure. Hash making notes: - water extraction of the trim yielded 16g of hash (45mc-220mc) - rosin has a bit too much of a weird spicy grassy taste which make it a bit unpleasant, waiting till the buds improve with cure to try again - rosin color at 80c is yellow/white/beige creamy waxy, with hard consistency - rosin color at 95c is golden with hard consistency
Processing
Likes
9
Share
Likes
14
Share
This week went fairly well, but I became concerned with some leaves appearing crispyfried along the edges and some looking deficient. I finally started cutting my girls and I have to say, I felt ashamed at wounding my babes but hopefully it'll go the right way, guess we'll see!!! I also flushed my plants with ph Balanced water this week and going to only provide this to water/feed them for another few days for fear of nutrient burn and simply following the feed schedule for my nutrients. Also, I took some pics for the Christmas contest for Crop King Seeds lol hope you like them more than my Paw did! I want to send a big shout out to my Dad who is giving me advice based upon his UNCA Biology BS experiences... Thanks Paw!!! I also want to say thank you for all the likes and interest in my grow, much love yall! See you next week!!! What follows below is the transcribed daily notes from the images above! 12/9 Plants looking good, I fed/watered w/Sunday's Ph 6.2 6tsp/ga Big Bloom & 3 tsp ga Grow Big. Next time I'll flush. I don't know if my runoff ph is bad or good because the plants are eating leaving acidic runoff 12/10 Plant 1 looks so Good, might be time for LST soon 12/11 Plants all showing Improvement/Growth Plant 3 still slowest but she's still growing. Under grow lights I think I see fringe yellow tips. Still on track to flush w/Plain H2o next watering. 12/12 Flushing w/ PH Balanced H2O no noots. Plant 1 has a leaf turning yellow on half so went with ph balanced water w/no nuets to flush all. 3 Growing ok but still a little off looking 12/13 Moved inlet vent to point up and clip on fan to blow on girls. Plants look great after a day of plain H2O. 12/14 Plant one having a small bit of leaf burn on widest leaves and a weird dying on lower leaf. They looked bad under light so I pruned em. Turned up humidifier to 65% been running low. 12/15 Topped Plant 2 Rinsed all w/PH Balanced H2O. Nervous I took too much from #2 But my thinking was I went easy on 1 yesterday so go aggressive on 2 to view effects. 12/16 Trimmed 2 crispy leaves off Plant 1 used Bonsai paste to cover wounds, Plant 2 stem looks narrow@ base wider up top. Trimmed 2 sucker leaves (1st leaves) from Plant 4 Rinsed all w/ PH Balanced H2O Thats it! Thanks yall, see ya next week!
Likes
90
Share
@MrCOCO
Follow
Hi... Everything goes very fast ... I used the pinching method to increase my yield and the quality of buds also... 🍃🍃🍃now I keep my fingers crossed for the girls ...🍃🍃🍃 I think maybe a week and I will switch to flowering... 🍃🍃🍃 Happy growing 🍃🍃🍃
Likes
2
Share
@kissrubb
Follow
Buenas tardes growers, Estamos en la semana número 3 y media de floración, la fase de engorde la comenzaremos la semana que viene, bajaremos fertilización base y potenciamos el engorde y su dureza para dejarlos como piedras, las fertilizaciones se hacen altas al regar con agua de ósmosis inversa, hemos añadido una mejora en la calidad del agua, damos agua más rica y añadimos nosotros mismos los nutrientes controlando todos los estadios y lo más importante controlando los drenajes de cada riego para controlar parámetros y cualquier variación de ppm. Muy buenos humos growers
Processing
Likes
84
Share
--FRIDAY I mixed up a 1/3 strength batch of nutes plus a little bud candy to start up their high-carb diet and douched the bigger bitches pretty well. I gave a splash to the little girls too. I also mixed up a 1/3 strength batch of grow big and started foliar feeding everybody but the seedling.. I alternate foliar feeding with spring water misting a few times a day in total. --SATURDAY was a dry day. Only foliar feeding, and spring water for the seedling. all the girls loved their Friday dose...little gals notably bigger as seen in the photos. Tomorrow I increase to half strength nutes for the big girls and maybe the smaller ones if they look ready and continue my misting regimen. Tracking my package from Crop King..can't wait to get 3 more WW wet and max out my space! --SUNDAY the girls got some PH'd water and a couple of foliar feedings and a spring water misting. --MONDAY I received a package from Crop King Seeds! However, it wasn't my replacement White Widow AFs, but rather the Candy Cane AFs.that I ordered the same day...doh! Being the impatient fucker that I am, I put 3 CC's into a glass of spring water rather than wait on the WW's to arrive. The other plants already have such a head start that I didn't want to wait another minute to get the rest of the crop started. So, I've only got 2 WW's this go-round....c'est la vie. With any luck all three CC's will germinate and grow to specimen plants. I also mixed up a 1-gallon batch of 1/2 strength nutes and fed everybody...even the mystery seedling. DId a nutrient misting and lowered my lights about 2 inches and added a 100w (equiv) cool white CFL and 120w cool white LED to the mix. They and the 3 x 50w blue/white Par38s remain on when the primary light and ventilation fans turn off for a couple hours of CO2 "bathing" PPM's get up to about 1200 by the end of the 2 hours. and temps climb to about 87 before the ventilation and primary light kicks back on. I might increase the "night phase" to 3 hours once there's a lot more vegetation in the tent so as to really dose them with C02. The mystery seedling overstretched immediately and has not been impressive at all....we'll see...It's getting super-dosed with blues and whites, so maybe... TUESDAY: dry day....foliar feedings only. Dropped the 3 CC's into wet paper towel...fingers crossed. WEDNESDAY (July 4th): All 3 CC's popped! 2 had 3/4" tap roots, so they got planted. The other will get planted in the morning. Having learned my lesson from the WW's that didn't make it to the light of day, I created a mix of 60% vermiculite + 30% perlite and 10% happy frog and created "pockets" for my new seedlings in the center of 5 g pots. I mixed up a 1-gallon batch of 1/2 strength nutes and fed everybody. Mystery seedling is still pathetic..
Likes
62
Share
Esta semana los cogollos empiezan a engordar y a producir bastante resina. De las 20 dos si dos 33 e sacado 2 por hermafroditismo las demas van perfectas. Es muy importante estar atento las dos primeras semanas del cambio de fotoperiodo para sacar los ejemplares que tengan este defecto pero combiene siempre hechar un vistazo para que no se te arruine la cosecha. Los colores que esta cogiendo son espectaculares para quedarle 5 semanas aun. Os ire mostrando como continua☝️💪💯
Likes
11
Share
@DimJesus
Follow
Hola a todos 🙌 completando la cuarta semana con mucho progreso 🌱 Comencé el entrenamiento LST junto con el corte apical y se nota el crecimiento en las ramificaciones, corte apical realizado en el sexto nudo. Mi intención era aumentar la dosis de los nutrientes básicos para 4ml, un total de 10ml de fertilizantes por semana pero el volumen de riego no me lo permitió. Espero que esta semana se pueda 💪 Logré que las ramificaciones reciban bastante luz y hasta ahora está todo muy bien para ser mi primer indoor. Buenos humos 🍃
Likes
41
Share
Third week of flowering and she's still showing great progress. Starting to show pistols now. Day 64- NFTG mid flower feed Day 65- No watering. Bloom Khaos Foliar spray Day 66- Flush Day 67- no watering. Bloom Khaos Foliar spray Day 68- Mammoth P/Recharge/ Cal-mag feed Day 69-70 No water
Likes
25
Share
We are now in middle of week 11 and 1 plant will be ready for harvest in around 7-10 days.
Likes
12
Share
Checkout my Instagram @smallbudz to see the Small budget grow setup for indoor use, low watt, low heat, low noise, step by step. 13/12/2019 - Change the light schedule to 12-12h after 8 weeks of no signs of flowering I think is a photo not and auto. 16/12/2019 - Fed her 1.5l of 6.5PH water with 0,5ml of each: Grow, Bloom and Max, and 1ml of each: Heaven, Alga-mic and Vera, noticed about 10% run off, I use about 1/3 of the nutrient dosage on the chart, to achieve about 200/300PPM (500 scale). 17/12/2019 - Did some defoliation on the lower branches mainly.
Likes
Comments
Share
Likes
9
Share
@Medgrow93
Follow
Had mold at the very end so ended chopping then down early. Delicious smell. Smells like vomit or piss and gets stronger as they continue to cure.
Likes
6
Share
Super <font style="vertical-align: inherit;"><font style="vertical-align: inherit;">👍</font></font>
Likes
Comments
Share
La plantula sigue avanzando poco a poco
Likes
1
Share
Five plants were showing deficiencies last weekend, but had just watered so I waited until Wednesday to feed 2 tsp/gal Grow Big.
Likes
23
Share
Gracias al equipo de Kannabia, Marshydro, XpertNutrients y Trolmaster sin ellos esto no sería posible. 💐🍁 RS11: Las variedades de marihuana son cada vez más grandes y mejores, y la Rainbow Sherbet #11 de Kannabia ha llegado para revolucionar tu mundo con su extraordinario contenido de THC del 30% y sus terpenos increíblemente deliciosos. Con una genética 70% índica, esta descendiente de la Pink Guava y la Sunset Sherbet ofrece muchas características interesantes, como su espectacular belleza. Sus cogollos a veces adquieren una tonalidad azul y brillan con una gruesa capa de tricomas, por lo que parecen piedras preciosas cannábicas. Germina las semillas en exterior o interior, y prepárate para quedarte con la boca abierta. La Rainbow Sherbet #11 no necesita muchos cuidados para producir plantas robustas y vigorosas. Incluso los principiantes podrán conseguir un buen botín cuando llegue el momento de la cosecha, y los cultivadores que ya tienen experiencia no tendrán problemas para hacer que sus plantas rindan al máximo. Con un poco de LST podrás maximizar su producción, y tras 9 semanas de floración en interior conseguirás alrededor de 450-500g/m². Al aire libre, esta variedad puede generar hasta 500-600g por planta. El nombre de esta variedad augura un montón de sabor, y la Rainbow Sherbet #11 cumple con creces. Sus cogollos tienen un aroma extremadamente complejo que convierte cada fumada en un viaje aromático. Las fragancias que más destacan son las afrutadas (principalmente a cerezas y bayas), así como las cítricas. Esta mezcla va acompañada de unos matices terrosos y especiados y de un toque de pino. Tras unas cuantas caladas, los efectos de la Rainbow Sherbet #11 aparecen con toda su fuerza, potenciando la alegría y la creatividad, calmando el cuerpo y la mente, y ayudándote a olvidar las penurias del día. 💡TS-3000 + TS-1000: se usaran dos de las lámparas de la serie TS de Marshydro, para cubrir todas las necesidades de las plantas durante el ciclo de cultivo, uso las dos lámparas en floracion para llegar a toda la carpa de 1.50 x 1.50 x 1.80. https://marshydro.eu/products/mars-hydro-ts-3000-led-grow-light/ 🏠 : Marshydro 1.50 x 1.50 x 1.80, carpa 100% estanca con ventanas laterales para llegar a todos los lugares durante el grow https://marshydro.eu/products/diy-150x150x200cm-grow-tent-kit 🌬️💨 Marshydro 6inch + filtro carbon para evitar olores indeseables. https://marshydro.eu/products/ifresh-smart-6inch-filter-kits/ 💻 Trolmaster Tent-X TCS-1 como controlador de luz, optimiza tu cultivo con la última tecnología del mercado, desde donde puedes controlar todos los parametros. https://www.trolmaster.com/Products/Details/TCS-1 📆 Semana 5: Recuperada de estrés comienzan a formarse los cogollos, las hojas se llenan de resina cada dia y el olor es bastante fuerte. Parece que ha terminado de estirar. Practico una defoliación intensa para airear los futuros cogollos y dejar mas espacio en el cuarto de cultivo. Agrupo de nuevo las macetas en su lugar optimo para asi rellenar por completo la carpa @marshydro. Me quedé algo corto de nutrientes pero estoy muy contento con los resultados, cada vez le voy encontrando mas su punto optimo. Siempre es mejor quedarse corto que pasarse.
Likes
5
Share
@Ensign420
Follow
Greetings fellow growers 🖖 and welcome to my first grow ever. This adventure actually started several months ago when I decided to stop buying flower from dispensaries and just grow my own bud. How hard can it be!? This is actually my second seed of this strain. The first bean sadly died due to over watering (sorry girl, RIP). I was literally watering the cube to the point where water was dripping from the bottom, then heavily sprayed the humidity dome and tray with the vents completely closed. Everyday. Multiple times. I never let the dome or try dry out. So after about 8 days of not sprouting, there was a funky smell of rot. So that was that. Later I learned that rockwool retains a lot of water and can easily drown seeds. So a wet/dry cycle is best for rockwool germination. So even after hours of researching and digging through forums and tutorial videos, I was still under prepared for this journey. Did not consider how delicate the germination phase is. Oh well. Lesson learned. Reset and try again! I hope everyone is safe and stoned during this corona crisis. Just like everyone else in the world, I want this pandemic to be over with. But in the meantime, let's grow some weed! 🖖 [START OF WEEK 01] Day 01 - Monday - 08/03/20 - Total Days: 001 ----------------------------------- - [0830]: Light Schedule: 24Hrs/0 --- Soaked cube in 5.5 PH water for 10 min. Did not shake water out. --- NO NUTES! Only PH'd down to control the PH levels. --- Did not use the default hole (way too deep). --- Flipped cube upside down and made a shallow hole for the seed (less than 0.25" deep). --- Placed seed in and pinched hole close. No additional water added. --- Sprayed the tray and dome with straight water (5.5 PH). --- Vents are cracked opened a for ventilation (about 1/4 opened each). --- Distance between the light and tray was 53" --- AC was set to 80 °F --- Exhaust fan was set to 86 °F --- Room average temp was at 85 °F --- Dome humidity was at 85-99% when sprayed. --- Allowing to completely dry before respraying. - [2200]: Dome and tray were completely dry! Sprayed only tray and dome with more water. Day 02 - Tuesday - 08/04/20 - Total Days: 002 ----------------------------------- - [0845]: Sprayed dome and tray in the morning. Everything was dry. --- Hoping for the best! - [2130]: Everything was dry again, so sprayed dome and tray at night along with a light spray on the cube. Day 03 - Wednesday - 08/05/20 - Total Days: 003 ----------------------------------- - [0830]: Everything was dry again. Resprayed dome and tray. Slightly sprayed cube. - [2125]: Hooo damn!! She popped! Am little stub is visible! Resprayed dome and tray again. --- Still going 24/0 for lights. - [+0033]: Just checked up on her and I swear she grew a bit taller! Getting excited! Day 04 - Thursday - 08/06/20 - Total Days: 004 ----------------------------------- - [0845]: Wow! Went from a little stub to fully sprouted overnight! Everything was pretty dry again so resprayed dome and tray. - [2200]: Tap root is visible! Over 1" long too! Just resprayed dome and tray again. -- Going to prep for hydroton transplant tomorrow! Day 05 - Friday - 08/07/20 - Total Days: 005 ----------------------------------- - [0930]: She keeps growing! -- Added a bit of CalMag to the spray bottle (8 drops to 650ml of distilled water). Resprayed dome and tray. Water was at a 5.4 PH with 141 PPM. - [1045]: Prepped the bubble bucket with 4.5gal of water. Water is high enough to reach about 0.25" above the bottom of the net pot. --- Added 3 drops of Superthrive --- Added 3.5ml of CaliMagic --- Added 2ml Hydroguard --- Then PH'd down to 5.6 --- Solution Strengh: 120 PPM --- Water chiller is set to 20 °C - [1100]: Transplant time! --- Filled the net basket 1/3 with hydroton. When placed in the bucket, air bubbles are not visible, but are slightly below the surface (slight digging will reveal the water/bubbles below). --- Removed plastic on rockwool cube and placed in basket, then filled around and covered with hydroton. Making sure to block any light from passing through the net pot and into the nutrient solution. --- Covered with a half-bottle dome sprayed with the CalMag water from earlier. --- Hoping for the best! - [1300]: Raised Bucket 5" higher. Now light distance is 48" to top of bucket. - [1820]: Lowered tent exhaust temp to 76 °F --- Lowered AC to 75 °F --- Raised bucket even higher so light distance is 30" to top of bucket. - [2300]: Looking good! --- Sprayed dome and surrounding hydroton with more CalMag water. --- Attached timer to light! So new 18 Hrs On/6 Hrs Off light schedule. --- Lights On: [1600] (4pm) --- Lights Off: [+1000] (10am the next day) --- Decided to go with lights on during the evening/night and off during the later mornings/afternoon (the hottest part of the day) to see if temps can be controlled better. --- Please survive girl! Day 06 - Saturday - 08/08/20 - Total Days: 006 ----------------------------------- - [0800]: Everything was dry. Resprayed hydroton and dome. - [2000]: Here first night cycle seemed to go well! Get'n taller! --- Dry again. Removed the dome. --- PH went up to 6.5 so PH'd down to 5.7 --- Ran the top feed drip ring for a bout a minute to wet the hydroton and rockwool with the nutient solution. ---Too scared to leave the top feed on 24hrs (I don't want over water her and cause dampening-off). Will let dry before re-watering. - [2100]: After closer inspection, I think she's looking a bit yellow. --- Decided to add a bit of grow nutes to the bubbler solution. --- Added 2ml of Sensi Grow A --- Added 2ml of Sensi Grow B --- Solution strength after adding more nutes: 176 PPM --- PH went up to 6 --- I hope that the extra chelating properties of the 'PH Perfect' solution is enough of a buffer for proper nutrient uptake. Day 07 - Sunday - 08/09/20 - Total Days: 007 ----------------------------------- - [0800]: Water dropped a bit (mostly due to evaporation) so solution strength was at 190. --- Checked PH again. Was still at 6, so PH'd down to 5.4 --- Ran the top feed for a minute to wet the hydroton a bit. - [0915]: Since she's looking perky but still a bit yellow. So decided to up the nutrient concentration even more before lights out. --- Added 2ml more of Sensi Grow A --- Added 2ml more of Sensi Grow B --- Solution strength after adding more nutes: 199 PPM --- PH went up to 5.8 - [1700]: Checked nutrients. --- PH: 5.9 --- Solution strength: 202 PPM --- Added 4ml of Voodoo Juice --- Added 4ml of B-52 --- PH after adding more nutes: 5.9 --- Solution strength after adding more nutes: 238 PPM - [2130]: Decided to make a new foliar spray to address the continued yellowing. --- Started with 500ml of distilled water. --- Added 3 drops of CaliMagic --- Added 3 drops of Sensi Grow A --- Added 3 drops of Sensi Grow B --- Added 3 drops of B-52 --- Added 1 drop of Superthrive --- Solution strength: 164 PPM --- PH was at 5.9 and did not adjust. --- Gave her one spray. --- Also sprayed the surrounding hydroton. [END OF WEEK 01]
Likes
2
Share
So where I live we had a really bad storm it had knocked out my power for a full 24 hrs so I had to give them some extra attention to insure there was no mold or any pest with no fan rotation. Then I also had to put them back on there proper timer to get things back on a roll so far so good they still look and smell amazing wish me luck