
Likes
Comments
Share


@GreenHouseLab
Follow
Another 2 weeks to 18 days and should be able to wrap this one up. Looking promising considering only 330w was used, 36w/sqft. Its bud ripening time.
Pics are of Day 46 currently sitting at day 49 to be precise.
GHL

Likes
15
Share


@DaddyPrime2
Follow
5/28/24 oh damn baby, this cultivar is gonna be colorful
6/2 plant is still throwing out pistils but also chunking up quite nicely. I tried to create just mainly top colas. In description she should have a 3-5 nodal colas with disconnected nugs underneath that. But I only ended up with 3 node colas give or take but with maybe 2 more weeks if veg would've given me larger branches and bigger cola structure and can always cut the larfy.

Likes
30
Share


@XperencdGmanXG
Follow
You can see the nice healthy colour from the Seaweed foliar spray last week, Will keep that up bi weekly until first flower. Another 12 gal of water for each plant this week as there seems to be no end to this drought. Added blood and bone meal to keep the plant going well into the end of august. And the weekly Silica Foliar spray.
https://www.homehardware.ca/en/10kg-4-10-0-bone-meal-fertilizer/p/5025590?page=search-results%20page
https://www.homehardware.ca/en/12kg-blood-meal-fertilizer/p/5025554

Likes
14
Share


@Terp_Derp
Follow
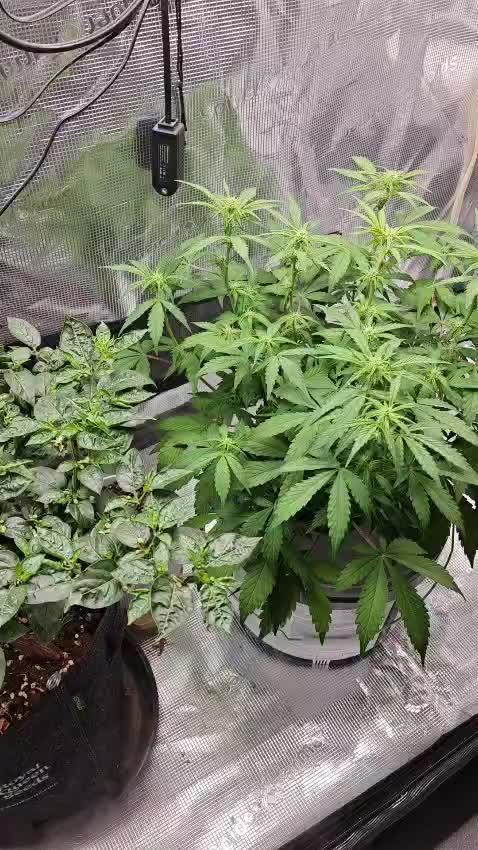
Working on getting these girls a bit bushier to fill up the pots a bit more before bloom.
Tried to top them both the same, but one grew two new stems (as expected) and the other grew 4... No idea what I did?

Likes
3
Share

@ChubbyBudBros
Follow
-
Day 43
Refreshed the tank today. pH was reading at 5.5 so seems like she is mostly drinking the water and not really the nutrients..I think. she's drinking a lot so the nutrients get a lot more concentrated. Gonna have to keep an eye on that. Think it's good that I switch to a schedule now of replacing the water reservoir twice a week now. Also checked PPFD, the top canopy is getting about 620 PPFD.
Day 44
Flowers are starting to set in nicely. She is drinking a lot right now, have to top up the 4 liter reservoir every day now it seems. pH went up to 6.4, so brought it back down to 6.0 now.
Day 45
She had another big stretch over night. I've raised the light a bit as she was getting close to it now and I don't wanna overstress her. She is still drinking a lot, topped up the reservoir with another 1.3 liters of ph 6.0 water. Will be doing a full water change tomorrow.
Day 46
Fully renewed the water today with new nutrients, I did put in a bit less of each nutrient this time, I'm seeing some minor leaf tip burn starting to happen. Seems to correlate with the higher bloom nutrient dose, so I will dial that a bit down from now on. Removed some fan leaves on the fastest growing stems also to slow them down a bit, a lot of the smaller stems are starting to catch up nicely now.
Day 47
Had to top up with 1.5 liters of water, she is definitely drinking even more now...after adding the water (6.0 pH) the pH was 6.1. She is still growing a lot as well, especially those side stems are catching up to the top of the canopy. I should probably do some lollipopping soon.
Day 48
Ph was down to 5.8 today, had to top up the water again with 1.5 liter of 6.0 pH water, which brought the pH up to 5.9. She is still stretching quite a bit right now. Also did my first defoliation today, I removed a ton of leaves but it looks like barely anything was removed because there so much foliage 😅.
Day 49
pH got down to 5.7 today. It keeps surprising me to see how much she drinks in one day. Was able to top up the bucket with almost 2 liters again. Made the water 6.1 pH which brought the pH in the bucket back up to 5.9.


Likes
53
Share


@Hempy_The_Kid
Follow
08/10/22 watered with Recharge.
Welcome to motel 6
More ladybug porno. Now have yellow ladybugs
8/14/22 this plant is a magnet for ladybugs 🐞

Likes
12
Share


@JeyGanesha
Follow
Prossime settimane via....anche queste forbidden runtz sono pronte da conciare,🤣❤️💛💚... quest'ultima settimana la notte la sto lasciando fuori in balcone per fargli un buon sbalzo termico..,,.......
Ho tagliato anche quest'ultima forbidden runtz

Likes
4
Share

@Philipp420
Follow
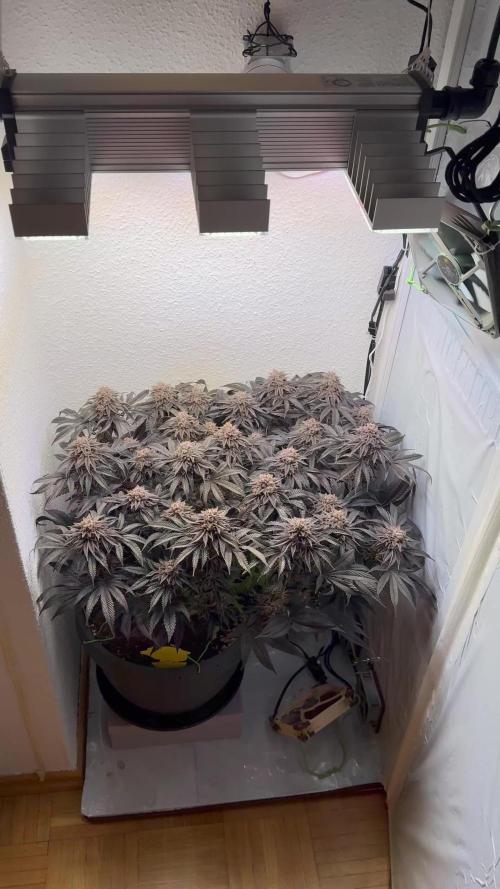
Erntetag:- Herstellerangaben: Ernte an BT 56-63
- Ernte hier: BT 71
Lampe Leistungsverlauf in % (von 190W) über den Grow und dazugehörige Durchschnitts-PPFD Werte:
- BW1-3: 40-60%, langsamer Anstieg von ca 400 auf 650 PPFD
- BW 4: 60%, ca 650 PPFD
- BW 5: 65% ca 700 PPFD
- BW 6-8: 75%, ca 800 PPFD
- BW 9: 70%, ca 750 PPFD
- BW 10: 60%, ca 600 PPFD
Trichome:
- Ernte bei circa 80% Milchig, 10% Klar und 10% Bernstein
Trocknung:
- Tag 1-2: 17°C, 60% RLF
Processing
Likes
3
Share


@CreoWeed
Follow
Hey guys,
Another Explosive week has passed and the plant seems to not stop growing, I have some side branches reaching 80cm while the main branch stopped at 68cm.
I really hope it can produce nice buds. At the moment it still a little bit 'empty' hoping week 7 will make the flower explode, I really hope so...
For now it's all, stay tuned and stay high nice people!

Likes
6
Share

@CalGonJim
Follow
1/19 1am MONDAY...TOO STONED TO TYPE..WHAT THE HELL IS THIS THEN..HEY SHUT UP....WAIT...IS THAT ME?😂
1/19 5 AM.🚨 I GOT THE HOLY TRIANGLE OF WEED THE WHOLE FUUCK'N TRAILER PARK IS HERE!!!!! Finally got black tea Tangie in the ground so Julian bubbles and Ricky are all growing with Montel and ice t.
1/20 1:20PM VEGING PERFECT AT 30 WATTS!!!
1/21 10:11 AM. The whole fucking park is here. Julian sprouted!!! Bubbles and Ricky are doing great. I’m gonna top them and then I’m gonna start them over from clones so they grow roughly the same time as Julian and I’ll keep the Ricky and the bubbles others as mother plants and I’ll just keep them going.
1/21 10:15 AM vegging 12 inches 30 W Samsung LED Mars Hydro light perfect
121 1:10 PM I moved black tea Tangie into the germination station. The 2 gallon fits in here just fine. This will be fine for germination.. She’s sprouted only after about 40 hours so she’s really strong.
1/21, 2:54 PM. I made a my own Star Wars movie. Special effects are incredible. It’s very removing made my own Obi-Wan.A CalGonJim Production 🎥🍿
1/21 11:56PM Stoned Genie bong arrived today. my 2nd from them. Nice, this one has an ice catcher. got here in 2 days. 👍
1/23 4:40AM Samsung LED's on AC Infinity humidity domes are too powerful for the dome BUT these things could power an entire grow in a smaller tent..... more fun designing things
1/23 5:51AM I got a video game recruiting idea for ice, Its called Duck Hunt.....goddamn auto correct, but you get the idea😈


Likes
12
Share


@Ganjagrandaddy
Follow
day 27 flowering: The Blue gelato has some beautiful forming buds on her that remind me of ice cream oddly enough. She smells nicely if sweetness. sticky to touch and healthy as hell. I am a little dissapointed with her node spacing and hope her bud sizes can make up for it. she would have been better in scrog than quadlined i think but lessons learned. Do love her look though.

Likes
18
Share


@Silverback_Guerilla
Follow
11/30:
I harvested the first 6 today, flushed 5 more for the second time, and fed everybody else for the last time.
I washed all the branches using the 4-step method ascribed by Doc Bud at High Times/420magazine and many other notable cannabis connoisseurs, with slight modifications:
4 x big plastic totes/bins
8 x ounces of 12% hydrogen peroxide (or 32 ounces of 3%)
2 x cups of concentrated lemon juice
2 x cups of baking soda
10 x gallons of water in each bin
Unless your tap water stinks, you're safe to use tap water for the procedure, but I used an inline carbon hose filter to fill my buckets.
Bin #1 - 10 gallons of water mixed with the hydrogen peroxide
Bin #2 - 10 gallons of water mixed with the lemon juice and baking soda
Bin #3 - 10 gallons of water as hot tap water
Bin #4 - 10 gallons of cold tap water
I was mainly concerned about removing as much lint and cat/dog hair as possible, but also rinsing off any residue left from all the various foliar applications of humic/fulvic acid, kelp, axiom, big bloom, and tiger bloom I did. First, I put my leaf blower on low speed and blasted my plants thoroughly, one at a time, replicating 50-60mph winds for about 10 seconds and watched as a whirlwind of debris and hair flew out the back door.
Bud-washing:
Pluck any necrotic plant material and any old fan leaves off while they're still on the plant. Then, take a handful of branches and submerge them in Bin #1 for about 30 seconds, agitating it, removing from water, submerging again, agitating, etc...then remove it and let it drip out for a few seconds...then repeat the process with Bins #2-4. Let it drip dry overnight with a little bit of airflow, then dry as you normally would...baskets, boxes, etc..
I hadn't watered these plants in a few days, so they were almost in draught, but after doing this procedure, they were fully hydrated(turgid) and seemed to have brighter colors than before. Nice!😍
12/1:
The bottom part of the closet seems empty with only 9 plants in there.. 😟
I cut the harvested plants up and put them into drying baskets in the top of my closet with a small oscillating fan on. I've got the temperature fluctuating between 68f and 75f and the RH is staying between 48% and 52%.
To do that, I had to take down the small light in the top of the closet to fit the drying baskets up there. So, I moved the 3 shorter plants still up there down to the bottom and put them on top of buckets. Now the bottom of the closet looks full again!😃
I'm anxious to finish up this grow so I can get busy growing the Fastbuds Fast Flowering Photo Testers!!! When I harvest the next 5, I'll flush the remaining plants really well and that will be all the flushing they'll get..I'll let them dry back out for a few days and harvest them. I've got to make some minor improvements to the garden (adding UV, blue and red/far red booster panels and intake fans) That should put me on track to start germinating them by mid-December if all goes well.
12/3:
...early a.m...
The harvested plants are already dry!?!?? And have excellent texture??? Wow..bud washing is for real..roughly 48 hours after I hung them to drip dry, and 40 hours after I put them in baskets in 50% RH/70f conditions with moderate airflow...usually takes 4 or 5 days to get a good slow-dry in the same conditions, so I'm convinced that this must be attributed to the bud-washing procedure. I'm sold!
Here's the talley so far:
plant #1 - 115g (plus 13g larf) - Candy Cane [F2]
plant #2 - 108g (plus 18g larf) - Candy Cane [F2]
plant #3 - 119g (plus 15g larf) - C4ndycaine [Candy Cane x C4]
plant #4 - 92g (plus 6g larf) - Candy Cane [F2] - the smallest plant in the main area
plant #5 - 112g (plus 22g larf) - Candesia [Candy Cane x Amnesia]
plant #6 - 75g (no larf) - Candesia [Candy Cane x Amnesia] - grown in upper area under 200w
...afternoon:
I flushed 6 of the last 7 plants for the first time today and harvested 4 more of them. I washed them and hung them to dry.....my dripping wet bathing beauties!😍
Likes
2
Share


@EyeMKing
Follow
Started the first top dressing of Gaia Green All Purpose and Power Bloom at a 50/50 ratio of 1tbsp/gal each.

Likes
220
Share


@CRiSPrGrow
Follow
Week 1 : Six Shooter Biotabs
running 3 six shooters one of them is in the biotabs line up, so far very easy although you do have to prepare a bunch of stuff, for the next four weeks it's nothing else so there's that which i nice. Basically, mixed everything acording to the label, i think i didnt add enough orgatrex but hopefully that's fine, just been struggling to keep the seedlings at the right humidity so i've been spraying them. Since i had the boom boom spray i decided to use it, and since i had so much of it left i decided to keep using it as a humidifier. so basically the seedlings oscillate from 20°C and 66RH to 23 and 63RH. giving a vpd of 0,5 to 1.1 depending on the wetness of the medium. the biotabs strains are all moist not wet (like the other pots) after one day , going to let it dry out then 2 more L per biotabs pot basically. i wonder how this little thing can grow into a plant sometimes 😂 that's it 🚀 Was a bit worried about this on as it really didnt like the wet medium and overwatering, doing much better now, main thing is don't panic and don't water before the medium is actually dry. 🚀
Likes
17
Share


@Dunk_Junk
Follow
The seed popped after ~48h and was planted directly into her forever home. A 20 litre airpot filled with new 6:1 compost:perlite mix.


Likes
4
Share


@Albargina
Follow
Otra semana mas, y sigo enamorandome cada día, las Blue Elite no paran de sacar resina blanca, y las Rica CBD estan hermosisimas, con grandes y gruesos cogollos, empiezo a notar las macetas de 3L y que la lámpara está ya para el retiro😬, aun así estan saliendo unas piedras con forma de cogollos muy interesantes😂

Processing
Likes
2
Share


@Ay_ef_see
Follow
Repotted veg area. Most are still babies. Will receive final transplants before going into flower in a couple more weeks. The clone I took from the sativa-dom is doing well, as is the og lemon x cupcake. Will veg these two for the longest, and will eventually end up in 5-7 gal pots. Also plan to take some cuttings from these two.
Two girls in flower are approx 21 days apart. I call them the supercroppeds because that’s what they are. Sc1 is on day 49 of flower a/o aug28 and sc2 is on day 28. Both seem happy and healthy. Believe there may be an abundance of nitrogen in sc1 as some leaf tips are burnt and folding back. Two plants about a month in veg have been put into flower as well. A sort of 12/12 from seed kinda thing.
I have been experimenting with the basics thus far. A sea of green will be underway in a couple more weeks, once these babies grow to toddlers. Been outdoors mostly, no nutrients. Plain Jane from Mother Earth. Comes out great each year. All unknown strain bagseed. A tad different growing in a 2x2 room.
Likes
86
Share


@PremiumBudsEU
Follow
Hello Growmies 😎😎
This week I start giving the plants a light dose of nutrients.
hopefully I can start with LST soon 😃💥
Thanks for stopping by friends, enjoy the week 🌱💚
Buy Mars Hydro FC 3000
https://marshydro.eu/products/mars-hydro-fc-3000-led-grow-light/
save some money with discount code: PremiumBudsEU

Likes
36
Share


@Hempface86
Follow
Zamnesia Seeds thank you so much for the opportunity to grow this amazing strain! She might not be the biggest but she's also a small pot with limited amount of organic nutrients but as they say you live and you learn.. I'm not saying organics aren't good I'm saying if you're going to do organics do it the right way or don't do it at all.. I will run this girl again in the future with my maxi balloon and turn her into a half pound plant because she smells amazing and he has these hues of green of blue of white of purple all blended into an amazing flower.. definitely check Zamnesia Seeds they have everything a smoker and or grower could ever need.. hope all is well God bless and happy growing ✌️😎 🍉🍬🔥
https://www.zamnesia.com/us/
