
Likes
Comments
Share


@Roberts
Follow
Big Jack widow grew great, and finish fast. She has some great frosty purple hues in her dense colas. The Viparspectra P4000 light worked great. I am Cutting her down, and will try to post a video here, but if it does not take it. The video can be found on my YouTube channel, link below. I learned a lot about the quality of water, and treating it properly this grow. So far roots on other grows has been great. This grow was saved by it just in time. Thank you Viparspectra, and Weed Seed Express. 🤜🤛💪❄️
Thank you grow diaries community for the 👇likes👇, follows, comments, and subscriptions on my YouTube channel👇. ❄️🌱🍻 Happy Growing 🌱🌱🌱
https://youtube.com/channel/UCAhN7yRzWLpcaRHhMIQ7X4g

Likes
49
Share


@masterofsmeagol
Follow
7/18 Plants are looking great. I was able to rearrange the plants so they have a little bit more space and so I can get around every plant. I have small random pest damage (i.e. I caught a four lined plant bug while hunting jpn beetles) but not enough h to warrant treatment. I will probably spray before flower. Sun's out amd plants were praying. I rotated a couple and it only took a few hours for them to "straighten out." I went to look again rhis morning and made the final determination to expand the cage. I'm looking for the 2x4's and the wire in the next couple days. The work that ive done now will but me sometime. I wonder how this rain impacted my soil.
7/19 Plants are looking fantastic. The stretch is starting. One purple punch looks like it's beginning to flower. I think I'm entering the transition period. Jpn beetle damage is evident but not significant. I defoliated a leaf with a a leafminwr or something in it. It's so much easier to get around the plants now. I'm seeing some chunks missing sporadically though. Went to the roses out back and found TONS of jpn beetleson top of each other reproducing. They destroyed that rose bush. I'm going to keep it as a trap plant. My dad's girlfriend wanted to spray it but that doesn't make sense as theflowers are all gone. Dad's grabbing the materials to extend the cage today I think. Right now I can get around every plant but the two big ones in the back. I just cant get to the backs of them and they are huge. Almost reaching the top of the cage. A 4'-6' extension will do wonders in flower. Can't wait.
UPDATE: Dad got the 2x4's and we assembled the extension and attached it. He's grabbing the wire as I type this. This worked out beautifully. I had no idea how big the blueberry cheese in the 50 gallon was! This extension (4ft i think) is PERFECT! Then I can get a little extra wire and pull it out if I wanted to. I think I have another 2x4 that I'm going to use in the middle. Lots of great pics and a video I'll upload tomorrow. Hot af today and humidity still super high. Even the commercial dudes was surprised I don't have wpm l and that judging by some of my plants structure that I may do better than I think. I certainly hope so. I WATERED 3 GALLONS OVER THE WHOLE GARDEN. The blueberry cheese in smart pots were drooping. They drink far more water than tje others. I would've given more but we are supposed to have thunderstorms. I left my back tarp off for the night. It will increase airflow and wind is down. I feel like this is going to be my year.
7/20 I updated and loaded everything on the app but notjing would save. Did it again in the website hopfully this saves
i didnt put it all up. Didn't water the plants today. Bags seemed okay weight wise. Good thing I did the extension yesterday because those three plants were drooping they were so thirsty. I focused most of the water yesterday on those plants that needed it. The others were somewhat dry but still had some weight. Like i said the blc drinks much more water than any of the other plants. I'm impressed with the growth I'm seeing. Especially since I have been being very stingy with the water and I've only fed like twice and that was just the kelp me/you and big bloom in negligible amounts. I'm watching for deficiencies. I'm just not seeing them. I'm picking up the wire and finishing the extension and then rearranging things. I'll update.
UPDATE: WATERED 4 GALLONS CONCENTRATING ON THE PLANTS THAT WERE DROOPING THE MOST. FINISHED ENCLOSURE AND INCREASED PLANT SPACE. TRELLIS WILL GO UP THIS WEEK. VIDEOS WILL BE UPLOADED TOMORROW.
7/21 I should've watered more volume last night. I noticed two plants that seemed much lighter than the rest. After some deliberation I gave them each a half gallon of water. One was the purple punch in the 10 that's huge amd the other was that huge blueberry cheese. I think I'm going to swap places with them, take out a pallet and get some other way to elevate that ONE plant and I'll have even more room. Then I'll add my supports. It's a dream working in there now. I noticed some small interior leaves being used up and dieing. I defoliated them but it was only a couple. I'll need to start nutes at some point. Doesn't need it yet though. I'm going to add some kelp me/you for the heat stress. I need to get the watering down better but it's more difficult when they each have different needs. I kinda have to read the plant. I'd rather be overwatered than underwatered. I tried to upload what I could but some won't.
UPDATE: I went over to clip off some fencing that was doubled up AND just to check on tge girls. Found two caterpillars (small but hairy so they were older not the inch worms and possibly what has been contributing to damage on those plants. Things are spread out so it will be harder for insects to move from plant to plant and I have better air flow. I worry that leaving my tarp off might lead to high winds and plants not able to take it buf I digress. I'll add supports later. Plants are huge and drinking far more water than I've been giving them. When I got there several were drooped right over and dry as a bone. The bags are essentially all roots now. I mixed up 8 gallons of water and split it between the plants. I gave less to the two Co trainer plants that weren't drooping and the 10 I watered yesterday that wasn't drooping but for the most part the ones that needed if got at least a gallon or more. The others a little under a gallon. It might rain A LITTLE tonight too. Oh, and since it's been so hot I added 1/2 tsp per gallon of kelp me kelp you to help the plants deal with heat stress. I also noticed that some of the very bottom interior leaves are being used up. I have a feeling ill need to switch to nutes pretty soon. Plus I need to suppirt those plants if I'm going to leave that tarp off and Gove them air. Took a video. But it won't upload here. I'll have to wait till tomm.
7/22 Didn't have much timevthis morning bit I dod a video. Boy those plants loved that water and that kelp. This morning everyone was standing straight up at attention. Supposed to get rain last night but didn't. Good thing I watered. I think I'm going to up the water next watering and then again to the 10% mark if necessary. Especially with the Blueberry cheeses. I'm noticing that a FEW INTERIOR leaves are showing nute deficiencies so I'm probably going to have to start feeding soon. I'll update later.
UPDATE: Went back over and cut off the extra wire. I'm going to need to water more volume. Specifically on two plants. The two huge blueberry cheese in 20 gallon smart bags dries out much faster than the rest. I'll have to out that on a different schedule or increase the amount given. Next watering will be 1.5 or 2 gallons a plant and it might be tomorrow from what I was seeing. It's super hot and with the added airflow the bags dry out faster. I also went through EACH plant looking for pests and defoliating old leaves that needed it. Plants are still nice and green but a VERY few older interior leaves are showing deficiencies. I know this is Normal especially since they are trying n g to transition to flower. I also saw pest damage on a couple plants. Four lined plant bug. I already found the one on the other plant and killed it but I'm considering doing a spray before flower. I'm thinking either captain Jack as a "catch all", BT which works great but mostly just on pillars or the organocide bee safe 3 in one pesticide. I also have pyrethium and other things. Thus far picking things off manually has been good enough. At the very least they will get an application of BT very soon.
7/23 Held off on watering this morning. Supposed to get thunder storms I DID split a gallon with two blueberry cheese that were the lightest in the 20 gallon smart pots. Thet drink way more. My water volume is going to need to increase. We haven't had nearly enough rain. I'm going to bump it up to 1.5 to 2 gallons each plant which will be 10% for the 20s and a little less for the others. I'm still seeing various pest damage. Nothing bad but I found another couples leaves that were chomped on by a four lined plant bug so I'm debating applying something tonight when I water. I'm also noticing old leaves being used up and some interior leaves showing slight deficiencies. It will be time to start nutes soon. I'll update as I go.
UPDATE: GOT THE FEELING I NEEDED TO CHECK THE PLANTS. SOMETHING DODNT LOOK RIGHT ON THE CAMS. WENT OVER AND EVERY PLANT BUT THE TWO I SPLIT A GALLON WITH AND THE PLANT IN THE 50 WERE DROOPED RIGHT OVER. LIFELESS. I SHOULD'VE WATERED THIS MORNING BUT I DIDNT HAVE TIME. I FIGURED THEY COULD WAIT UNTIL NIGHT. EACH PLANT GOT 1.5 GALLONS AT LEAST. I USED SIXTEEN OR SEVENTEEN GALLONS ON THE GARDEN. I GAVE EACH CONTAINER PLANT ONE GALLON AND GOT RUN OFF FROM BOTH. IM NOTICING SKIGHT FADING IN LEAVES BUT IM NOT INTRODUCING NUTES TO UNDERWATERED PLANTS. I THINK 10% IS GONNA BE TGE MAGIC NUMBER. 2 GALLONS EACH. EVEN THE 10 GALLON SMART POT. ALMLST AS BIG AS THE 30S BUT DRIES OUT QUICKER.
7/24 Plants looked fantastic this morning. Defoliated a few leaves that needed it. Showed my commercial buddy and he said things looked fantastic. Since the soils still holding nutes and I'm not seeing many deficiencies I may hold off on feeding. I'm starting early flower now. I will be using nutes soon. I think ive got the watering schedule pretty much down.


Likes
46
Share


@Daweed83
Follow
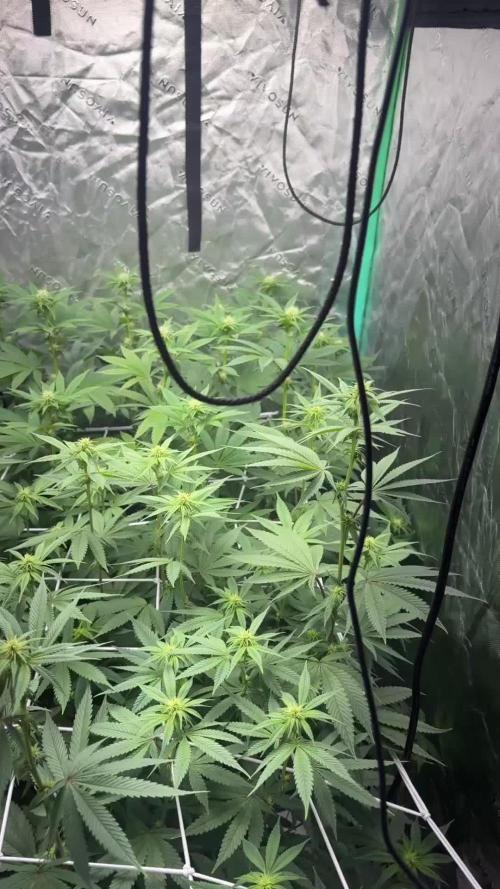
So i’ve learned this week that the plant at the back has “foxtail” buds which is probably due to some sort of light stress. Im not too worried about because apparently the quality isn’t damaged at all. Just very curious on why only one has it out of the 2 peanut butter. Anyway getting closer to harvest. Caaannot wait 😍🙏🏽
🖖🏽🖖🏽

Likes
13
Share


@reirrac1
Follow
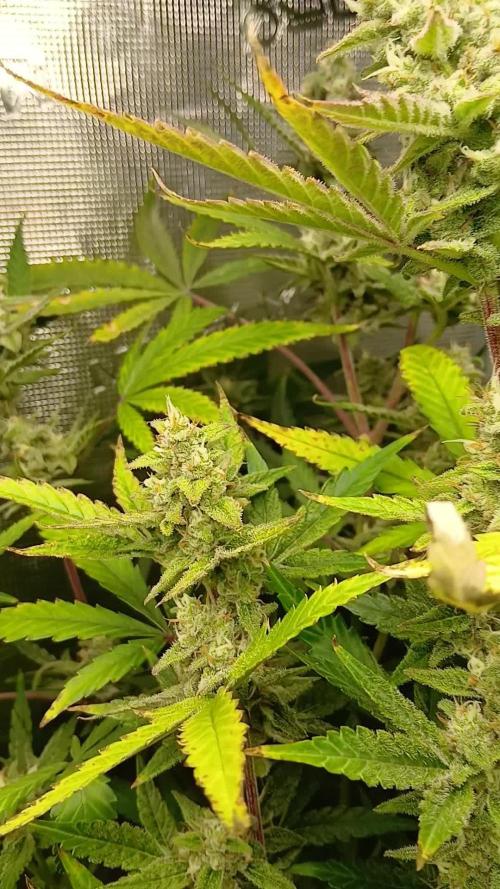
Been off here for a while, thought I’d update. She’s been battling some calcium and N deficiencies lately, so I’ve topdressed her with some dolomite lime and started giving her full strength feeds. She’s been thickening up quickly and nicely, and she’s smelling like cheesy BO but in a good way.

Likes
4
Share


@Red_finix
Follow
Very satisfied with this week's progress , buds are getting thicker, smell is stronger and the most important is that it did recover from the nutrient burn , it took it 3 weeks but it made it and grew new leaves. Very happy :)

Likes
48
Share


@Rangaku
Follow
On the wind down now , 1 more little feed then flush . She looks happy having the tent to herself .

Likes
22
Share


@knnabisgrower
Follow
En la 5ta semana aplicamos riego con fetilizante de crecimiento, con un p.h calibrado en 5.8 y observamos como vienen formando las dos nuevas puntas apicales mientras que se estimula el crecimiento de los brotes inferiores.


Likes
2
Share


@DrBud420
Follow
21.06.
OG KUSH# Day 56#
On the OG, thrips appeared in a couple of places, but nothing serious, I regulated it right away, and if it does, it can't do anything to the plant outside, except to slow it down a bit, but come on.
With a little delay because I'm a lazy stoned person, and in addition the responsibilities regarding the plants are already starting to grow, and I also have a lot of work around the garden and then I don't always arrive in time to release the update.
The plants are progressing well, but now they are already hungry, so the next watering is for food.
Two days ago they were topped for the third time, I also topped the two highest side branches.
Yesterday was the end of their eighth week, the pictures are also from yesterday.
Last night I sprayed them with SMC for prevention, but none of those pests can harm the plant outside as well as inside..first of all, the plants are much bigger, and therefore have much more leaf mass, and secondly, it is nature, there are many of them in nature, the only thing that can destroy them all are caterpillars during flowering and mold when the humidity is too high or when there are frequent rains, everything else does not worry me at all.
Tomorrow I will move them somewhere where there is a lot less grass because now they have already filled this space and they can't expand any further, so in order for them not to get too long and to go wider I have to move them where the grass and other plants won't bother them.
Stay High and Keep Growing!!!
Likes
8
Share


Likes
8
Share


@Ieiogrow94
Follow
Eccoci di nuovo qui!!!
Super eccitato per questa nuova collab con Exotic Seed, team davvero al top, che mi ha dato l’opportunità di testare questa nuova genetica e di condividere i progressi con tutti voi!!!
Come sempre partiamo nei bicchieri per poi travasare.. Questa volta verrà svolto tutto sotto la Lumatek Zeus 465 ProC, mi aspetto molto da questo ciclo!!
Purtroppo ho perso i file delle scorse settimane e dovrò reiniziare il report da ora scusate per il disagio
Settimana incredibile!!!
Grazie a tutti per il supporto ❤️🍀🔥

Likes
92
Share


@DogDoctorOfficial
Follow
Week 7 Veg Report 🌿✨
Hey Grow Fam! 🌱 Week 7 of veg is here, and let me tell you, the grow room is buzzing with life! Each of the girls is showing off her unique personality, and I’m especially stoked about the Papaya Zoap—she’s really coming into her own! The scrog net is nearly filled out just how I wanted it, and I can feel we’re so close to flipping to flower. The anticipation is real! 😁
But before we get to flowering, let’s take a dive into something that makes this grow so smooth—ThinkGrow LED drivers and cables.
ThinkGrow LED Drivers – Plugging Into Success 💡🔗
This week, I had a chance to work deeper with the ThinkGrow LED system, and honestly, it’s like a dream come true for efficiency. I’ve been using the TLD-4 Four Spectrum Control Channels Model One LED Driver, and let me break down how it works. The drivers attach directly to the bars—super sleek and no extra bulk. And, the connections? It’s a matter of matching the male and female connectors on the TDC-2 Daisy Chain Cord. It’s like a simple puzzle that snaps together perfectly. The TDC-4 cord takes it to the next level, connecting the top bars to the ICL-300 Inner-Canopy LED Bar, giving complete control and balance across every layer of my canopy.
Why is this important?
The driver-to-bar connection ensures that each LED bar is operating optimally, and the daisy-chain system makes it effortless to manage multiple bars without a ton of wires everywhere. It’s neat, efficient, and delivers even light distribution, which my plants are loving! 🌞
Are My Girls Ready for Flower? 🌸
When I look at the plants up close, it’s like they’re whispering, “Flip me to flower already!” 😆 Their growth has been so vigorous, each filling out the space with character, and that scrog net is almost fully covered. So, I’m thinking we’re super close to the big switch. Each plant has its own pace, but as a whole, the grow is looking fantastic!
Room Stats – Tuning Into the Environment 🌡️
The TrolMaster system is still killing it with data and control, making it easier for me to keep everything balanced. Here’s a quick breakdown of the week’s environmental numbers, and a few jokes along the way! 😜
• Room Temps: Max 25.5°C | Min 24.4°C (Keeping it cool but not too chill!)
• RH: Max 76.4% | Min 67.1% (Humidity stays right where it needs to be.)
• CO2: Max 832 ppm | Min 420 ppm (Shout out to that magical 420! 🌬️😂)
• VPD: Max 1.06 kPa | Min 0.64 kPa (All dialed in for peak veg mode.)
Light Levels – All in the Details 💡
• Max PPFD: 506 | Min 0 (because, you know, when the lights are off, it’s dark! 🌚😆)
Keeping the light intensity balanced, and using the ThinkGrow LED system to spread that goodness across the entire canopy, I’m seeing explosive growth. Those PPFD levels are perfect for this stage!
Water & Nutrients – The Lifeline 💧
• Solution pH: Max 6.32 | Min 5.78 (Keeping it in the perfect range.)
• TDS: 355 ppm steady (Every drop counts, right?)
• Solution Temp: Max 23.5°C | Min 22.3°C (Keeping things cool, just like the grow!)
And medium moisture? It’s a solid 100% thanks to my AutoPots and the genius of the AquaValve system. No electricity needed—just gravity doing its magic. It makes my life so much easier, and the girls are loving the consistent hydration! No more worrying about under- or over-watering.
Why I’m Obsessed with TrolMaster 📱
I can’t talk about this grow without shouting out the TrolMaster system. Every bit of data—whether it’s temperature, RH, VPD, CO2, light intensity, or pH—gets tracked and displayed in real-time on my app. It’s like having a grow assistant in my pocket, making sure I can monitor and adjust at any moment. The level of control I get with TrolMaster is out of this world, and it’s helping me keep everything dialed in perfectly.
Ready to Flip Soon 🌸
With the Papaya Zoap filling out so nicely and the rest of the plants following suit, I feel like we’re right on the edge of flipping to flower. It’s going to be a smooth transition, and I can’t wait to see these beauties bloom!
Stay tuned for next week, where we might just make that flip! 😉
Environment Stats Recap 📊
• Room Temp: Max 25.5°C | Min 24.4°C
• RH: Max 76.4% | Min 67.1%
• CO2: Max 832 ppm | Min 420 ppm (Seriously, shoutout to 420 again! 😂)
• VPD: Max 1.06 kPa | Min 0.64 kPa
• Light PPFD: Max 506 | Min 0 (obviously, when the lights are off! 😜)
• Solution pH: Max 6.32 | Min 5.78
• Solution Temp: Max 23.5°C | Min 22.3°C
• Medium TDS: Max 430 | Min 420 (I can’t get enough of these 420 jokes! 😆)
Final Thoughts 💚
This week has been a blast! Between the ThinkGrow LED system and the TrolMaster gear, I feel like I’m pushing the limits of what’s possible in indoor horticulture. Everything is dialed in, the plants are healthy, and the data just keeps showing that we’re right on track.
Shout Outs!
As always, huge thanks to TrolMaster and ThinkGrow LED for the amazing gear, to Aptus Holland for their top-notch nutrients and Pro-Mix for the best soil i have used so far. Big love to the seed banks, the amazing Grow Diaries community, and all my followers—you guys make this journey so much more exciting. Don’t forget to catch up on my social media, Instagram, and YouTube for real-time updates and exclusive content!
Stay tuned for more—next week is going to be epic!
DogDoctorOfficial Discount Codes so you can save big on your next check out 💚💚💚
Kannabia - DOGDOCTOR 30% off
SeedsmanSeeds - DOGDOCTOR 10% off
CannaKan- DOGDOCTOR 15% off
terpyz.eu - DOCTOR 15% off
The Neutralizer - PORKIT5-DOG 15% off
As always thank you all for stopping by, for the love and for it all , this journey of mine wold just not be the same without you guys, the love and support is very much appreciated and i fell honored and so joyful with you all in my life 🙏
With true love comes happiness 💚🙏 Always believe in your self and always do things expecting nothing and with an open heart , be a giver and the universe will give back to you in ways you could not even imagine so 💚
Friendly reminder all you see here is pure research and for educational purposes only
Growers Love to you all 💚💚💚


Likes
16
Share


@Naujas
Follow
looks like a girl, she's already recovered from the sting :) she looks healthy, she's really short :) but she has a lot of branches:) everything is going well:) good luck to you.

Likes
17
Share


@Salgeezi
Follow
All WAS well until I noticed severe foxtailing I guess you would call it on 2 of the girls :(. This leads me to believe it can be 3 possible reasons. My thermostat was mostly between 70-75 the past two weeks I'd say
I added a cheap heater BC my temps were steady in the mid to high 60s. Thermostat isnt the best and I opened the tent twice where the temp was at 86, for how long who knows. I check my tent several times a day tho.
Im running Bridgelux led strips which I brought up to 140watt last week at 15inches from canopy from the tallest branch. Doesn't seem like much at all for a 3x3 tent so I'm not sure about that. Brought it back down to 120W just in case
Not enough air flow. I had one computer fan (100cfm) running in one corner. That I had in my 2x2 tent which seemed to be sufficient. I forgot I was over doubling the space in the 3x3. Added another 2 fans.
From what I read there's no turning back from this issue. I hope I read wrong lol. Gave a nice heavy feeding of B52 aswell. Any comments would be greatly appreciated

Likes
170
Share


@Green_Man_420
Follow
YO!!!! Back to start another diary thanks to Royal Queen Seeds and James. Big thanks for hooking me up again with another fire selection of seeds.
I’m rolling the dice with this grow as the temps are not ideal but I’m running low 😂
Started the germination off today so I’ll come back and update once they have popped there little heads above ground.
Peace to all and again a big shout to James over there at RQS ✌️✌️
All seeds are up and in the tent. Let’s see how they go ✌️
Likes
16
Share


@NAG420
Follow
She is getting fatter by the day still have few weeks left on her. Ran into a phosphate deifications corrected it but leaves got burned in the process. Will be watching her closely. She had great bud structure and sugars on her wow frosty.
Processing
Likes
5
Share


@O_GrowTom
Follow
W5 D29 Aujourd'hui 1er jour de la 5ème semaine de croissance. J'ai rempoté la petite dans son pot définitif 30, 35 L environ.
C'est de la terre de récupération, j'y avais mis un peu d orties pour la régénérer mais rien de bien terrible on verra si l arrosage au thé de compost serra encore aussi efficace malgré le temps passé 3j. Je la laisse prendre encore 1 peu de place dans la tente, les racines envahir le substrat et elle partira en flo avec une Tropicanna poison qui est déjà 1peu plus développée et également ds le même type de pot et pour suivre une critical+.
Bon le monde à plus tard.


Likes
3
Share

@Trinidad
Follow
Day 77. Today I will harvest. This one did not get much attention, she was left to over stretch during veg and not the best feeding schedule in flower, however her buds are the most frosty I have grown thus far. Today was the 1st time i checked her trichomes and i saw some ambers, thats why i decide to take her down. Her smell is very sweet like apple pie. I will have to grow her again. I can't wait to taste her.