
Likes
Comments
Share


@guerilla
Follow
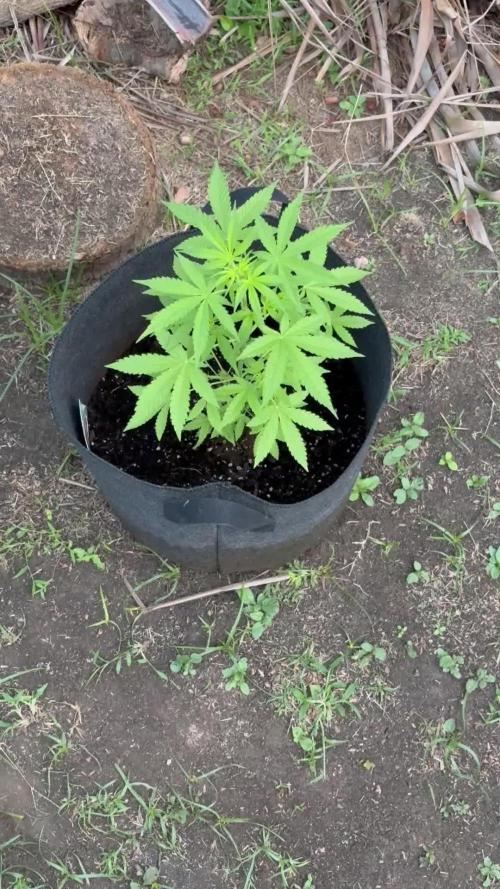
Very pleased with the SCHWAZZE
💚
Showing new growth and looking very happy!
💚💚💚💚

Likes
65
Share


@bypado_farm
Follow
Day 76:
Watered the plants 0.5L with nuts
909 ppm, 1921 us/cm, PH 6.4
Day 79:
Watered the plants 0.5L with nuts
875 ppm, 1861 us/cm, PH 6.4
Day 81:
Watered the plants 0.5L with nuts
864 ppm, 1831us/cm, PH 6.4
Flushed one plant with 10L clear water


Likes
16
Share


@Mrg7667
Follow
Another eventful week! Transplanted into 5 gallong pots. Its interesting to see that there hasnt been much vertical growth but allot of branchung out compared to how it was with the other lights

Likes
Comments
Share

@Organic473
Follow
She is doing her thing…I believe I saw some pre flowers which is expected after 3-4 weeks of veg.

Likes
10
Share


@HideAndFly420
Follow
Flowering period started, i added adv nutrients to biobizz line and i just have to understand the reaction of blue dream, i just think there is something too much.
I m not sure cause i'm experiencing problems with temperature and humidity too, so i can't exactly recgnize wich is the problem now.
i'll update next week hoping the problem will be solved.
Let's go!


Likes
7
Share


@Staffedition
Follow
Привет друзья.
Хочу познакомить вас с новым фотоцветущим растением от Smail_Seeds сорт ORIGINAL CHEMZKITTLEZ F1 reg.
Сегодня растению 58 дней.
Перевёл на 12/12 1.10.2023
Растение очень хорошо развивается, ни каких сбоев в генетике не наблюдается😀
Сорт выводим сами.
Смотри мой профиль, у нас всегда есть что то интересное.
Не забудь поставить лайк❤️, если понравилась как прошла неделя
И читайте наш TELEGRAM: https://t.me/smail_seeds
#Smail_Seeds 😀
Processing
Likes
68
Share


@themartian911
Follow
hello some news on vegeation day 29, she has developed well,i put more RJ and BG,
and u can see on one pic the branch that had cracked got in shape now it's cool 💪😬
peace. 😀👍

Likes
91
Share


@DogDoctorOfficial
Follow
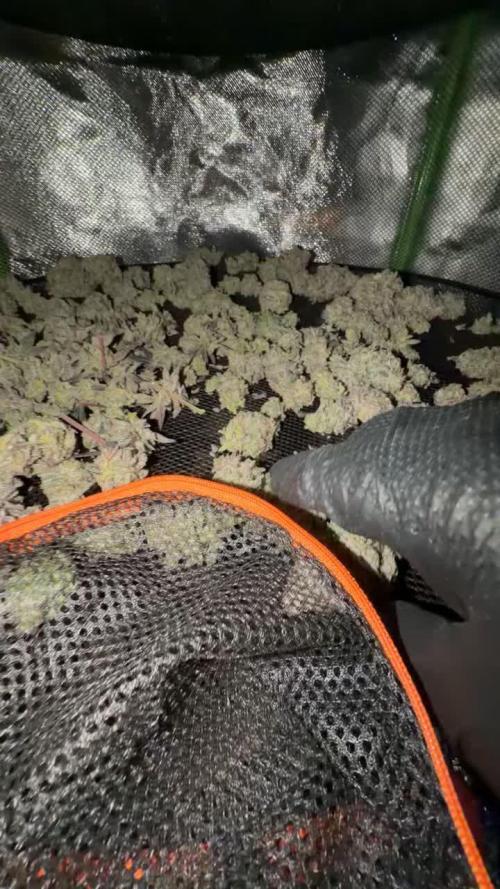
These one was a big messy jorney, everything happened from almost kinling them, to almost no space for them to grow, LED broken middle flower and still perform like the queen champion she is!!!
I am felling her mature over cycles , i am thinking of her like a wine vine that gets better over time , these one in my humble opinion its a must in everyones garden <3 <3 <3
Wen harvesting these one i felt the need to break it all apart to prevent bud raw or anything we do not want on our medicine, i like to hang them all and let them dry but in these case there was no chance i was taking that big of a risk with these big fruits all over the place, what a blessed run, my rack is completely full, there was no more space , i mean no more space at all hahah amazing , thank you thank you thank you <3 <3 <3
As always thank you guys for your love , your time, your support and it all, i fell blessed and i am truly thankful <3 <3 <3
All info and full product details can be find in can find @
https://www.zamnesia.com
https://aptus-holland.com
#aptus #aptusplanttech #aptusgang #aptusfamily #aptustrueplantscience #inbalancewithnature #trueplantscience #zamnesiaseeds #growerslove
With true love comes happiness <3 <3
Always believe in your self and always do things expecting nothing and with an open heart , be a giver and the universe will give back to you in ways you could not even imagine so <3 <3 <3
More info and updates @
https://growdiaries.com/grower/dogdoctor
https://instagram.com/dogdoctorofficial
https://youtube.com/channel/UCR7ta4DKLFMg2xxTMr2cpIg
<3 <3 <3 Growers love to you all <3 <3 <3
Likes
3
Share


Likes
4
Share


@SmileyIndica
Follow
I’m loving the Trichome development on this, Nana glue! Probably got a couple more weeks on her .im Definitely a couple weeks plus on the Hindu.

Processing
Likes
4
Share


Likes
324
Share


@Teamdirtbag2
Follow
She is doing her thing ... smell is very sweet , supper strong at, day, dusk, night, and morning ... always !!!
I have had Neighbors say" I can smell it" . ( ironlungs)..
And I can smell it myself .. she is looking great... pics are not downloading , I got a few to load ..
Watered with tap water ( garden hose ) ... I will water in the morning again .. it's going to be hot at the end of the week .... I was hoping for a low to come (low pressure = cooler temps ) ..I need some cooler temps.. but I have no control ..buds are starting to fatten up...and getting heavy ... I inserted wood dowels to hold some colas from leaning on the sides of the cage ...I will get more ... all things considered she is very happy .... but she is on a mission.. to look beautiful ....
This grow happened by accident.. It was not planned..
It has surpassed any of my expectation's ..
I have to say " this plant is a beauty "
She is just a little clone .. born 3/15/2017
Video music from Mendo Dope 👏👏👏

Likes
4
Share

@BlackForestGrower
Follow
It was a great last run.
It’s been a beautiful time.
My time here done now.
BlackForestGrower out. 🌲✌️

Likes
10
Share


@Chitown_grower
Follow
This tent is just crushing it this week! Everyone and their mother is covered in trichome-y goodness. These ladies definitely have that cookie-esk smell going on for them!

Likes
5
Share


@PhatRobs
Follow
End of week four. I cant believe the growth this last 7 days. Had to double check my calendar.
Pyramid seeds is one of my favorite seed companies, extremely hard to get in the states!


Likes
24
Share


@nonick123
Follow
Día 59 (29/07) Este cultivo no es muy entretenido con solo agua, asi que...
Le hago supercropping a todas! 😁 A ver como reaccionan!
Día 60 (30/07) Las plantas se están recuperando muy bien del supercropping! 😁
Todos las puntas hacia arriba! 💥
Come onnnnnnn! A por esa floración en 2-3 semanas!
Riego 500 ml H2O pH 6,75
Día 61 (31/07) Las plantas se han recuperado genial del supercropping y están lanzando TODAS las ramas hacia arriba 😍
Un espectaculo la fuerza de estas plantas! 💥
Redistribuyo las plantas, para ver si OnionOG está más protegida del sol, ya que consume muchisima agua y voy a estar en unos días fuera...
También reubico ligeramente la malla de sombreado, debido a que en mi latitud el sol empieza a incidir lateralmente por las tardes...
Riego 500 ml H2O pH 6,55
Día 62 (01/08) Vuelvo a redistribuir las plantas en el invernadero dejando a OnionOG todavía más protegida del sol directo, para tratar de disminuir su consumo de agua estos días que no voy a estar...
Pongo una protección "visual" en el invernadero en el lado que da a los vecinos (cara norte), porque he "cazado" miradas indiscretas...
Riego 500 ml H2O pH 6,55
Día 63 (02/08) Debido a que me voy de vacaciones unos días, adelanto el riego semanal con Té y la aplicación foliar de Kelp
Riego con 1 Litro de Té Vegetativo de Lurpe Solutions. Preparación: 24 horas con bomba de aire (oxigenación) con ingredientes:
Green Sunrise 8 ml/L + Insect Frass 16 ml/L + Hummus Lombriz 8 ml/L + Melaza 1 ml/L + Kelp Hidrolizado 0,25 g/L
Aplicación foliar Kelp hidrolizado de Lurpe Solutions a 0,25 ml/l
Día 64 (03/08) Cerrado por vacaciones
Día 65 (04/08) Mi amigo viene a casa a hacer un riego con 1 Litro de H2O pH 6,5
💦Nutrients by Lurpe Solutions - www.lurpenaturalsolutions.com
🌱Substrate PRO-MIX HP BACILLUS + MYCORRHIZAE - www.pthorticulture.com/en/products/pro-mix-hp-biostimulant-plus-mycorrhizae

Likes
62
Share


@ButterfliesLittleFarm
Follow
Hello Diary,
The first week of flowering is behind me and as you can see in the photos, the Medusas are developing very quickly.
The flowers have formed and now the flowering begins.
Trichomes appeared around the flowers on the leaves, which is a great sign for this stage of the plant.
What you can see is that the plants differ slightly in structure, one is taller with fewer leaves and a more sprawling structure, while the other is more of a bush shape with lots of leaves.
In the description of this strain, they should be equal in structure, which is not the case, at least for me.
I removed the humidifier so that the humidity in the air dropped to about 50% and the temperature rose to about 24 degrees.
Watering has become a little more frequent, which is to be expected given the size of the plants.
Here's what it looked like last week.
18/02/2023 - Day 25.
Watering. I prepared 5 liters of water, lowered the pH. to 6.0 and watered both plants with that amount.
21/02/2023 - Day 28.
Photographing and height measurement.
Medusa F1 #1 - 47 cm
Medusa F1 #2 - 40 cm
That's all for this week, see you soon and thank you all for your support.


