
Likes
Comments
Share


@BigBudWolf
Follow
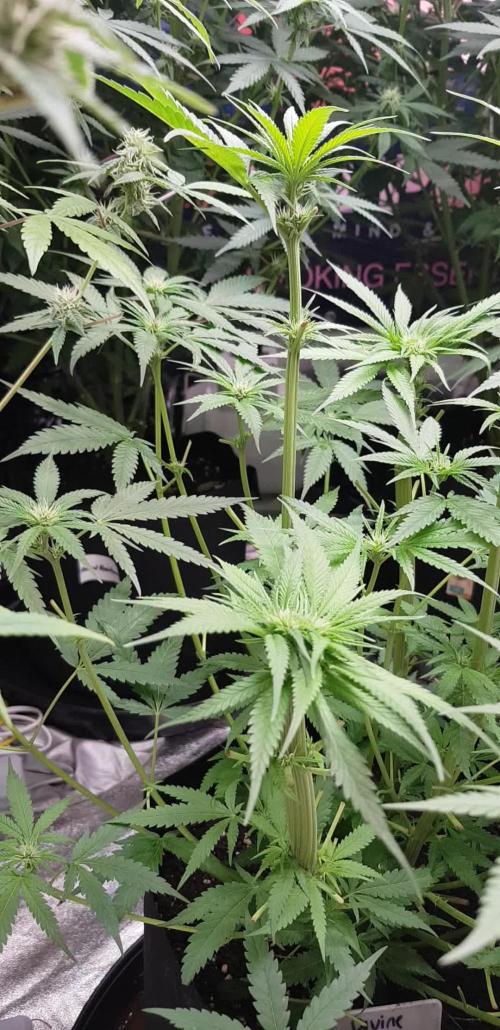
The plants hung in the grow tent with the exhaust fan running low for 10 days with an RH between 45-50%.
80 grams at trim from 3 Blueberry Autos.
For a first time grower, I tried to let the plants do their own thing mostly, aside from some lite defoliation and tucking. In doing this I see ways I can improve.
After curing for 10 days, first sample was not disappointing. (I intend to cure it at least 1-2 months.)
Sweet berry aroma when chopping up the bud. Smooth burn with white ash. Can get a hint of berry flavor in the smoke however it also is not ready yet. But I can almost predict the possible flavors after curing.
I believe a strain like Blueberry benefits from longer cures of a few months or more. I will attempt to give it as long as possible.
Overall impressed with the grow and look forward to the final smoke. Ready to apply what I've learned and improve on my next grow.

Likes
33
Share


Likes
2
Share


@GuniGugu
Follow
- slowly increasing nutrient doses toward prescripted BioBizz chart quantities, but still, every second and a half watering is pure water :)

Likes
7
Share


@semechkin
Follow
On the 5-6 day of the sprout, I gave a small illumination with philips UV lamps - a mini solarium for the face (140w like), literally 5-7 minutes no more


Processing
Likes
8
Share


@eldruida_lamota
Follow
Que hay de nuevo familia, mis green ak xL están dando sus frutos, no veas que bonitas que se están poniendo, floración algo lenta y variedad difícil de cultivar pero que si sabes realmente merece la pena.

Likes
6
Share


@RDWCGrowing
Follow
This brings the Journal up to speed. So going to start the 48 hour FLush this upcoming Sunday as well as going to move it to 48 hours of light insted of 48 hours of darkness. Then straight into the Freeze dryer to bring it down to 60% humidity in the bud and then to the curing jars. Going to be Timber 2 days into Week 9 of FLower.
1/20/2023
Week 8 (Day 5)- Flower- Day 107 overall
T - 2 days until start 48 hour Flush
T - 2 days until Start 48 hours of Light
T - 4 days until TIMBER!!!
1/22/2023
Week 8 (Day 7) -FLower- Day 109 Overall
Flush Day and 48 hours of Light. I subscibe to Dr. Bruce Bugbee's suggestion that production is under light instead of under darkness so I no longer do 48 hours of Darkness, I go 48 hours of light before Chop, sending my plants on a marathon run before I Cut. Here is Dr. Bruce on basics of lighting https://www.youtube.com/watch?v=ID9rE5JewVg
T-2 days until TIMBER


Likes
13
Share

@GERGrowDesigns
Follow
Welcome to Flower Week 2 of Divine Seeds Divine Rapier
I'm excited to share my grow journey with you from my
Sensi Seeds Project . It's going to be an incredible ride, full of learning, growing, and connecting with fellow growers from all around the world!
For this Project , I’ve chosen the Feminized Photo Strain Divine Rapier:
Here’s what I’m working with:
• 🌱 Tent: 120x60x80
• 🧑🌾 Breeder Company: Divine Seeds
• 💧Strain Info : 29%
• ⏳ Flowering Time: 6-7weeks


Likes
40
Share


@valiotoro
Follow
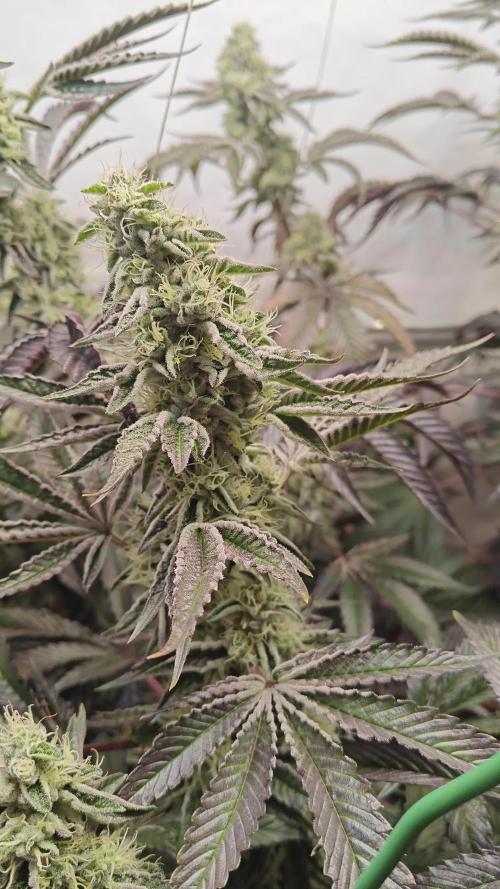
easy trim✂️
The buds are Absolutely perfect,exactly what i was looking for🤩
Green pheno : cookie,diesel & gelato🍪⛽️🍦
Purple pheno : flower,sweet & honey🌸🍯
After 7 days on the dry rack she was ready for the jar to start the curing process.😋


Processing
Likes
28
Share


@Bud_E_grows
Follow
Not much to update. Seen first set of pistols on top two nodes. Branches have definitely started their stretch, still early but might not grow that tall. Hoping for bulky 🤞🏾🤞🏾. Seeing what I believe is phosphorus deficiency could be needing flower feed but could just be wanting more, this is last feed of cal mag + week 3 foxfarm nutrients @50% dose. Going to switch to flower nutes @75% Temp 69.1-82.1•F
RH 40-51%
Likes
12
Share


@cookingwithninja
Follow
day 49 just pure water phed down.
it is day 51, morning before lights on, I might chop today. I use a zero water filter pitcher got off walmart. My humidifier is only a sonic wave. If you use regular tap water it will get gunky in a sonic humidifier. If you have a heat humidifier that boils the water the mist should be clean. These are the 2 types of water humidifiers. Researching best water filters this "zero water" also comes with a free ppm meter! yay! Other water pitcher brands; the water still has ppm. So water misted will still have ppm contamination. You can easily used distilled water only, and reverse osmosis. I just fill a 4gal office water jug with the pitcher and fill my humidifier when needed. I do not use a humidifier in my entire grow up to this point when I chop, I need the perfect rh or this whole effort can fail. growing up to this point only requires 20% effort, chopping now for the 2 weeks dry is this 80% of crucial determination, succeed. A lot of tasks are required today for a clean chop. I feel confident, observed my cross seeds with pink paradise and one with a slightly open caylex looks dark enough for successful germination. I figured 8-16 seeds may be created, 3-4 buds were potentially pollinated. Many growers don't understand when creating genetics with female/female there is a slight chance of herm. You lose 50% of your genetic function. Just water last 2 days, no humic no folvic, 1st time entire grow ha!
There is a lot of cleaning to do, remove the trees, clean the entire tent and environment with bleach water, hacksaw.
I am very proud of my grow. I have sampled 3 of the strains, dr. thunder legit made my lips numb but it could have just been the terps removing my skin cells from the sticky filter, no lie. This is my best grow to date. I did this for you, and to document hype or not under the best conditions I could give my plants, full max potential, although I wish I had more lights, I am not looking for industrial lol, this is how I grow. Learn a lot on youtube and podcasts there is many good content and I may dab into it. You can have a room full of growers and you have 1 seed in your hand, they will all tell you that their way is correct ;) and the best way. Oreo is stinky AF, Bridal is just amazing glad its massive, just not into sativa but the test seemed slight sativa with majority indica, pink untested, dr, thunder just a lip numming plant aha, its very nice, all 4 amazing appeal like advertised, and excited for next run. Either crosses from this or other copycat genetics.
I will give you beautiful glamout shots today, the sizes of the plants, My guesstimate bridal 1lb, thunder 1lb, pink, 0.4lb, bridal 0.5, I am ambitious off 640w lm301h, and 4x 20w blurples daisy chained.
day 51 4 chopped see you in a few weeks :D


Likes
18
Share


@KushSlayer
Follow
All apple og’s are ready to smoke. My favorite was indica, couple hits from the bong and it will put you sleep. Strong strain and good genetics from pure instinto

Likes
73
Share


@Lukush
Follow
Hey growmies, wut can i say,the flushing is doing good, I'm really happy and really excited to test this strain she is amazing and the smell ove strawberry 🍓 is so good and intense in the air 😃😃
Hope you all enjoy mi diarie and if you do hit that like button or leave a comment below.
Thanks and have a good one 😀😃
Led =MARSHYDRO SP3000 AT 100% OF POWER
TENT = MARSHYDRO 120x60x180


Likes
1
Share

@Trichoma
Follow
@ 1.5-1.6 kPa
The plants have a strong, sweet skunk aroma, and when you smell the flowers directly, you also detect a zesty orange scent.
The buds are quite heavy for the plant, it would have benefited from a ScrOG net or additional support.

Likes
14
Share


@TheBudWhisperer
Follow
Week 2 of veg is in the books. Despite making some changes and dropping back to a 300w fixture, also upping the nute ratios - growth has been pretty decent for a single first week of veg. Got some yellowing on the leaves which is somewhat concerning. Again, hopefully rectified now that we’ve regulated to more acceptable temps and humidity. All are fairly uniform to start and the new bucket system has been issue free which is a bonus. Figure another week to the fim and then another week of veg before the flip. All on pace to get em to flower as quick as possible👌. We’ll cull as soon as able - if we pick up 3/4 spaces after losing the males that would greatly assist to free up some more space elsewhere and move in some new fems that have been backlogged recently. Finally back to focusing on quality buds and it’s and great feeling👍.
Strain details
She’s a mix of a particularly strong Northern Lights, crossed with a Spicy Bitch sativa hybrid. The hope is that we’ll be able to combine the overtly narcotic effects in the NL and mellow it out somewhat with the quality daytime sativa effects found in the SB.
Both strains feature numerous grower qualities. Both parents possessed vigour and resiliency, the SB particularly colourful in late flower. These beans were the product of a shotgun breeding run that presented an unexpected opportunity so there’s quite a bit of testing that should flow from the various F1’s we’ve produced.
Likes
Comments
Share


@Dankmark420
Follow
Still no pictures but plants progressing nicely and is starting to really show different growth patterns