The Grow Awards 2026 🏆 


Likes
54
Share
@GarciasGarden
Follow
SOOO I got a surprise!!! LAST MINUTE I find out that this bi*** decided she wanted to hermie and I ended up getting a LITTLE BIT OF SEEDS in the lower buds I mean it’s barely any bit I still don’t even know how it happened? No MALES at all ! But other then that great strain smells great and looks beautiful!

Likes
63
Share
@AsNoriu
Follow
Day 43.
so main change, i lost my mobile and i had really loads of photos and videos of ex grows. i blacklisted it, but still...
from now i will reduce amount of post and updates, it is stupid, but i cant risk ...
Girls all week on diet, looks like only one Gorilla is starving a bit and would need more, but in my plans last watering with molases this time only.
They already had runs with silica only. cal mag only x2.
Think worm castings was an isue, control garden grows really fine, will be my smallest plants ever, they will have 3 weeks in total for veg.
Happy growing and dont loose your mobiles, huge pain ....
Day 48. Gorillas are really nice and i cant denny it, but ....
Cookies are worst experience ever...
They just dont want to grow and show up new issue the second you fight one....
I even made control garden with more than years old beans of Incredible Bulk and bagseed Strawberry Cough. Both strains grow ok, but not Cookie !!!
Thats honestly wrong genetics, unless someone prove me wrong, open for your advices ...
Hard training again, still on pure water diet with calmag or silica or molases as small bonus while no feed for two weeks + ....
Lights are out because training took longer than i wanted. ...
Next week they go to 24 hours darkness and light is changed to 12/12. That was last week of really hard training, now i will wait for green mass of leaves to cover stems and hope they will make some buds ;))
Choose your beans wisier than me ...
Happy growing !!!


Likes
7
Share
@NandB
Follow
Raised lights an inch and switched to FF Grow Big 10/ml/gal. Working on getting humidity up and temp down, such a conundrum. Added humidifier outside the tent next to the vent in. Plants look really good. The Pineapple Chunk is the biggest still but a little less dark green than the Presidential and Fruity Pebbles. Fruity Pebbles was the smallest but at the end of the week it seems to be almost as big as the Presidential.
Likes
27
Share
@valiotoro
Follow
Pheno 1 dark purple : On the nose, it reveals a sharp burst of fresh lemon, layered with a powerful eucalyptus aroma that’s both invigorating and camphorous. A truly refreshing and vibrant terpene profile😈🍋
Pheno 2 Green : this one is a real surprise! If I close my eyes, it’s like Nutella! It’s as if you’ve just walked into a kitchen where hazelnuts have been freshly roasted 🤤🌰
Pheno 3 light purple : It’s a mix of the first two with a hint of amarena cherry at the end🍒🍧

Likes
9
Share
@SeseGrows
Follow
Home Interior 90x90//
Do Si Dos 33 - Barneys Farm + Sour Diesel + Roadawg
//Semana 6 // FLORACIÓN
- Grotek Nutrients.
- Lumatek LEC 315w+ 💎 .
LEC 315w —> 100%

Likes
17
Share
@CanabisLoverHobbyGrower
Follow
Well what an eventful week, after trying to get her to bounce back, the smoothie has been put out into my outdoor grow house, if she finishes I'll take it as bonus buds, had to weigh up the pros and cons and figured giving the zkittles all that free space and concentrate on her would be best,.. first run on autos so you live and learn,.. zkittles is now on a adjusted week 9 feed, dropped the bio grow by half and just knocked the others down a little but, don't want to go through the same thing again with her,... she looks well though, what do you guys think?.. 🤔 day 56, roll on next week 👌👍🤞
Likes
65
Share
@Dendegrow
Follow
Week 4 update! 🌱 Week 3 is done, and the ladies are now three weeks into their flowering phase. So far, everything has gone really well. However, one bud and the plants in the front showed slight signs of potassium overfertilization, which likely caused a calcium uptake issue and led to minor necrosis.
No worries, though – today I completely flushed the entire system and replaced it with a fresh solution. With this reset, everything should be back on track 💪💧.
On top of that, I decided to bring out an old Cree& Osram LED lamp as a booster. This will provide the two smaller front plants with more light intensity so they can metabolize the higher nutrient levels more effectively 💡🌿.
Everything is looking great so far! Stay tuned, follow along, and let’s see how this journey continues 🌺📸.
Woche 4-Update! 🌱 Woche 3 ist geschafft, und die Ladies sind jetzt drei Wochen in der Blütephase. Bis jetzt lief alles super. Eine Bud und die Pflanzen vorne zeigten jedoch leichte Anzeichen von Kalium-Überdüngung, was wahrscheinlich zu einer Kalzium-Aufnahmehemmung geführt und leichte Nekrosen verursacht hat.
Kein Grund zur Sorge – heute habe ich das komplette System gründlich durchgespült und die Lösung durch eine frische ersetzt. Mit diesem Reset sollte jetzt wieder alles reibungslos laufen 💪💧.
Außerdem habe ich beschlossen, eine alte Cree& Osram LED-Lampe als Booster herauszuholen. Damit bekommen die beiden kleineren Pflanzen vorne eine stärkere Lichtintensität, damit sie die höheren Nährstoffwerte besser verstoffwechseln können 💡🌿.
Es sieht alles richtig gut aus! Bleibt dran, folgt mir, und lasst uns schauen, wie sich die Reise weiterentwickelt 🌺📸.

Likes
6
Share
@Silverback_Guerilla
Follow
4/18:
The slow one has turned the corner and starting to grow well now. 👍
I foliar fed them with big bloom and fulvic acid, and gave them a little drink of water with humic acid, endoboost, and molasses.
4/19:
I foliar fed them again.👈
4/20:
I gave them their first full-strength dose of nutes today and foliar fed again...hang on to your hats!🤠👍
4/22:
I FIM'd both of them today and gave them about 20oz of water with cal-mag, humic acid, and boomerang and foliar fed with big bloom and fulvic acid.
Later, I rinsed off the plants with a stiff stream of filtered water in preparation for tomorrow.
4/23:
Today was BoomBoom Spray day! I just love how visible the growth is the day after a BoomBoom Spray day!😲
Tomorrow I'll spray them down with Axiom Harpin a|b proteins..they'll start flowering soon and I want them hitting their stretch with major vigor.👈
4/24:
I did a foliar application of Harpin proteins and fed them with about 1/4-gallon each. They are both showing sex parts now 😊
I removed all the cool white and blue light, and turned on the 3rd set of QB's and bud boosters so they will get their stretch on-
I also reduced their photoperiod to 20 hours so they can start getting some beauty sleep.
4/25:
Didn't have much time today, but I looked in on them..sexy little bitches..👈
It's getting crowded in here, so I'll remove all the photos (clones and seedlings) tomorrow.
That's it for week 3-
Likes
2
Share
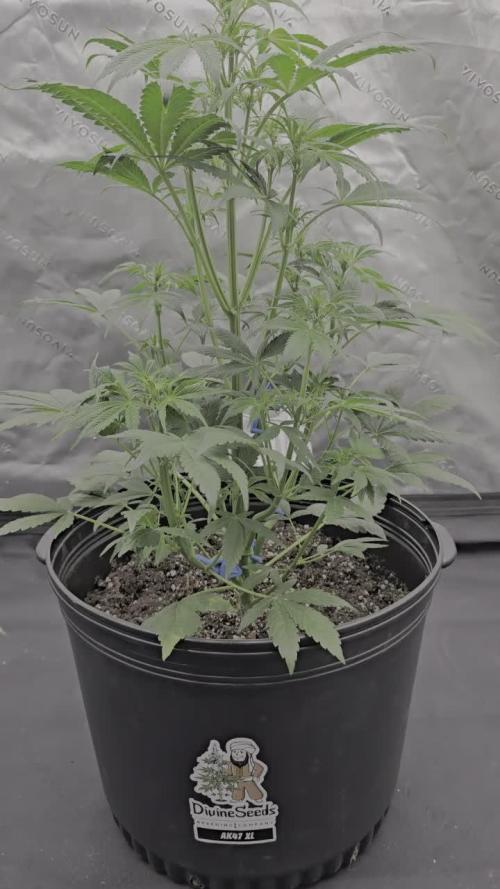
@IslandTerps
Follow
Strain: Divine Seeds – AK47 XL
Grow Type: Indoor
Pot Size: 7 Gallon
Medium: Peat Moss & Perlite
Nutrient Line: Athena (Bloom)
Week 5 Update
She’s doing great this week getting a little taller and showing steady progress as she settles into flower. She’s taking her nutrients well with little to no deficiencies, just a slight yellowing on the tips, but nothing too concerning at the moment.
It’s week two of flower, and everything looks fine so far. Hoping to see more pistil coverage and early bud development as the week goes on.
Feeding
1.7 L Athena Bloom nutrient mix (will raise gradually if needed).
Indoor Climate Conditions
Temperature: 18–23°C
Humidity: 60–65%
VPD: ~0.5–0.8 kPa
See y’all next week!

Likes
11
Share
@GREENPHOENIX6262
Follow
*Week 5 Flower 09/24*
Thus far both both plants are flowering and budding nicely, Trichomes are setting in accordingly, Increase in Phosphate and Potassium nute feeds.
Both plants have appeared to stop growing in height settling in at 48Inches.
Top COLAS are pretty dense and the aroma coming off both of them is bright and vibrant
White Hairs are starting to turn bright orange.
*Week 5 Flower Mid week update - 09/28*
Both plants have reached max height (48 Inches)
Bud sites are filling up and have become more dense with trichomes cover through the flowered bud.
60% orange hair coverage - Nearing harvest
*Week 5 Flower End week recap 09/30*
Both Apple Fritter and Critical+2.0 nearing harvest
Cutting back on nute feeds starting tomorrow and will increase clean water feeds
Flushing will begin in a week - both will be harvested in 2 weeks.

Likes
29
Share
@JeyGanesha
Follow
Anche lei è l'ultima settimana di lavaggio radici.......oggi 29/09/2024 taglio questa Ayahuasca purple...ha un profumo fortissimo....
Oggi probabilmente inizierò a pulire tt le cime e poi.via un taglio netto 😂🤣😜👍💪

Likes
16
Share
@Alchemy
Follow
Day 78 - I swear the Orchid is getting skunkier by the day. First thing I smell when opening the tent. Added some pics with a selfie seeds sticker to show the size
None of the strains here are Selfie Seeds, sticker was used for showing the bud size.
Day 81 - I'm so ready to smoke these plants. The Apple Banana Zoap smells just like the flower I ordered from LIT and it's sticky as hell so I know they're going to be fire even though they hermed. I removed a couple more nanners found lower on the branches that I couldn't see for ABZ#2, NO MORE found on ABZ#1 as of now...
Checked PPFD again today:
ABZ #1 - 810 PPFD | ABZ #2 - 875 PPFD | Biscotti - 750 PPFD | Black Orchid - 1040 PPFD
Day 82 - Used the jewelers loupe and camera to compare for trichome quality against the microscope
Day 83 - Noticing reduction in feeding consumption all around.
ABZ 1: 0.9L | ABZ 2: 1.5L | Biscotti: 1L | Black Orchid: 2.0L
Biscotti is giving a vanilla and lemon terp profile with the pine spice in the background now. It's nice tbh
Day 84 - This is the last day of week 7 since flip, week 8 starts Tomorrow. I'll be dialing back my light a bit and the ppm. Pulled the ppm back a bit tonight as I've still seen issues with the nitrogen. Feed tonight was 926PPM. Might have a new nutrient mix to use on them Wednesday....
I can't get better pics with the microscope sorry, I'm too unsteady for that. (Maybe cause I turned the LED down on the microscope)


Likes
19
Share
@Tmasm
Follow
Saudações.
Menina está bem, botões formados e lindos 🤩. Agora esperar e torcer 🤞, para que engordam muito e bem.
Ela está ficar com uns tons de roxo 🤩, bem tenho borrifando ela com água de torneira, que tem um ph alto, o alto ph e sua genética deve ficar roxa no final, esperamos para ver.
Bem tenho borrifando ela por ter ácaros aranha na sala, tenho mantido praga controlada. Mas ácaros aranha se reproduzem muito rápido, nunca se sabe bem dia de amanhã.
Bem por agora tudo controlado, menina não foi afetada. Espero manter limpa até ao fim, 🤞 torcer para que tudo corra bem.
Visite Dutch Passion conheça suas novidades e promoções.

Likes
14
Share
@Groweedo
Follow
Les têtes ne grossissent plus (déçu) je vais acheter une lumière plus puissante pour les prochaines sessions 😎


Likes
12
Share
@Bluemels
Follow
Tag 95: Die Fat Banana macht ihren Namen alle Ehre. Sie bekommt ziemlich fette Köpfe und richt sehr süß 😘
Processing
Likes
21
Share
@Onlypotent420
Follow
Hi all,
Grow area updates:
Nothing major far as area is concerned added Some yoyo’s to the net so it can be raised and lowered easily now. I also noticed I had been following ghp feeding schedule for a recirculating system when mine is drain to waste. Didn’t have in adverse effects on the plants at all actually think they loved it tbh. But I’ll notice the ppm difference on these future updates. I was using way more nutrients then what was needed. Now I get to save money lol.
Blue dream auto:
Def has the faint smell of flowering cannabis now. The branching power from the mixing blue dream and already branchy plant with the ruderalis is def perfect for a scrog set up when you trying to maximize the your yield off one plant. I had to visit the tent 3 times this week to re tuck her down. Did the last tuck Thursday so what you are seeing from the pics today is three days of growth. Crazy!!!! She sitting at about 900 ppm And that’s with cutting the the grow solution some.
Master kush photo:
She popped through the net mid this week and hit her first tuck under today. With how well she reacted to the femm job. I went ahead and topped on the new growth on each branch. Her branch structure is way more sturdy then autos for sure. Leaves are bigger as well. One is the size of my palm lol I have big hands so that’s awesome. She sitting at about 800 ppm and getting less bloom solution.
I’d also like to add I appreciate everyone’s advice far as set up and temp control. It was above 100°F the last couple days. And tent never got over 85 and as soon as the hotter part of the day was over we where back in the 70’s. Ima smoke one for y’all! 🤘🏾 Until next time #StayKited