
Likes
Comments
Share


@LoganatorDude
Follow
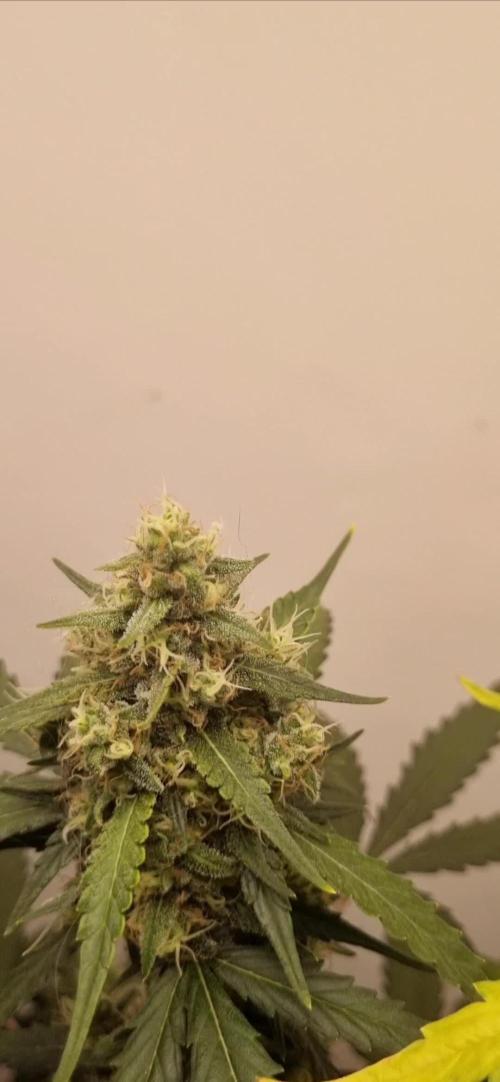
Blue Black x Maple Leaf Indica x White Rhino x Ruderalis
70I-20S-10R
Yeah, I’m not used to varieties that put out really tiny buds. Also I learned about bracts and that I falsely refer to bracts as calyxes. But yeah, she is slow with tiny bracts. A subtle smooth flavor/aroma. Can’t really put my finger on it, but I like it.
Day 70.
That smooth sweet smell is coming through more. A sweet fruity smell with undertones of almost a vanilla type of cream. Maybe the name was inspired by the smell?

Likes
18
Share


@JeyGanesha
Follow
Ok!!! adesso è partita bene...questa strawberry 🍓gorilla 🐵, è nata con un cotiledone che se guardate bene sembra morsicata da non so cosa😂🙈..le prime 2 foglioline sono uscite normali, la 3 foglia è uscita con una malformazione. ...adesso dal 3 nodo in su dovrebbe crescere più che bene💪💪🍓🐵


Likes
16
Share


@Boomdrawfyah
Follow
Empezamos la 7a semana con 49 dias de vida , el proyecto A ha cogido una fuerza espectacular en general, se estan haciendo unos monstruos, lo puedes comparar con las ultimas fotos y las nuevas, lucen sanisimas. Seguimos con el riego de elicitación y nutrición de terranabis , estan muy bien alimentadas. Las geneticas se ven bastante fuertes y sanas en general también , vamos a ver donde conseguimos llegar este año ya que dependemos mucho del tiempo de vegetación.
Likes
6
Share


@IamCy
Follow
She's starting to fatten up nicely! Terps still off the meter,and the roots are ridiculous. Definitely one of the best plants I've ever grown.
Likes
39
Share


@SamDo
Follow
La culture c’est dans son ensemble bien passée. La critical+2.0 est une herbe plutôt facile à faire pousser. Je suis un peu déçu du rendement, mais je pense que cela ne provient pas de la génétique, mais plutôt de mon expérience qui demande à être améliorer encore. Et peu être aussi augmenter la puissance de la lampe pour obtenir des buds encore plus grosses.
Je ferais un update pour le smoke review.

Likes
111
Share


@Salokin
Follow
Hi Growmies,
She did not take well to the ec of 2.0 that I intended to feed her, so I changed the reservoir again midweek and went down to 1.6, after feeding her canna flush with RO water for 24 hours. She seems very forgiving, as she didn’t even get stunted by the lockout. 4 of the 8 shoots went through scrog and were super cropped underneath the screen. The others should catch up any day now and will be trained in a similar fashion. Rootball looks also amazing. I will experiment with continuously feeding her orca every 3 days, as it feels like the mycorrhizal inoculants seem to go down after 3 days and root growth slows down. Let’s see if it’ll work.
Here is the code that’ll give you 20% in Zamnesia‘s online store, just input ZAMMIGD2023 at checkout.
Thanks for stepping by and until next week!

Likes
21
Share


@Staffedition
Follow
Привет друзья. Моей растихе сегодня 22 дня.
LST технику начал делать на 19 дне.
У меня не было канального вентилятора. влажность была 82% не много по листьям видно.
На сегодняшний день влажность 67%
В целом растения с хорошей гинеткой и очень меня радует
#Smail_Seeds

Likes
11
Share


@TgOgFaRms
Follow
🌿🔥 Rating: The Queen Strain 🔥🌿
The Queen strain and its outstanding qualities!
Appearance: ⭐️⭐️⭐️⭐️⭐️
"The Queen" strain boasts captivating buds with vibrant colors and a generous coating of glistening trichomes. Its regal aesthetic is truly remarkable.
Aroma: 👑🌺⭐️
The fragrance of "The Queen" strain combines floral notes with hints of sweetness, creating an enchanting scent of glue in a way
Growing Experience: 🌱⭐️⭐️⭐️⭐️⭐️
Cultivating "The Queen" is a pleasure from start to finish, thanks to its resilience and ease of growth. It's an ideal strain for growers of all levels, providing a rewarding experience.
Overall Satisfaction: 9/10 👑🌿🌟
With its captivating appearance, delightful aroma,and enjoyable growing experience, "The Queen" earns a well-deserved rating of 9 out of 10, offering a cannabis journey fit for royalty.
The Price
Price Consideration: 💰❗️
It is worth mentioning that "The Queen" strain comes with a hefty price tag of 7.500$ The expensive cost may make it challenging to justify growing it, as the strain may not offer enough value to match its price.💸⚠️


Likes
15
Share


@RDWCGrowing
Follow
2/1/2024- Pre-Germination Activities Day 1
I have 21 weeks until final photo is do.. I took 3 seeds out of cold storage and will let them get to room temp for the next 48 hours before I go with Glass of water for germination. I have 3 beans because I will start from the very beginning helping ensure I present the best Pheno. This is going to be a fun one.. I am a few days away from being able to clear my tent out for this run.. I have a breeding run in right now and the Seeds are a few days away from being mature enough for me to take down the girls.
Once I get them down I will need to get my tent cleaned up and turned over right away. This is going to be close, I will have to time them to the water and into the tray at the right time.. because I will need to get lighting on them right away.. I have my 2X2 and my light ready incase I need to hold them in the cloning machine if the others are not done in the next few days.. Glad I have options that can stretch me out for a week or 2 to give me a little more time.
2/2/2024- Pre-Germination Activities Day 2
I checked on my breeding run to see how close the seeds are and if the tent is ready for me to clear and clean but alas I am still going to need a few days. I setup the emergency 2X2 and that should give me 2-3 weeks. The plan is to still wait one more day to allow the beans to warm up to room temp and then drop them in Water sometime tomorrow.
Form my Emergency 2X2 I have the following:
4" inline fan and carbon filter
Fan
VS-2000 light
2/3/2024- Germination Activities Day 0 - Dropped the Beans in.. Today is 0 day.. Go.. Go .. Go..
2/4/2024- Germination Activities Day 0-1 - Checked in on them this morning and no tap roots yet.. covered them back up and back in to the closet they went. I setup the Root Riots and the Seed tray for them. I Ensured my water that I was soaking the root riots in was PHed to 5.8 and I used RO water.
Afternoon Update: Checked on my Breeders and they are done. I started to harvest them, I took down the one I had reversed with STS and I took down the Black African Magic- All but one bud, I wanted to get some pics of that one today.
I was only able to get 2lbs into the Cannatrol because I had to be very careful to keep the bud from the plant that was treated with the STS separated from the other seeded bud that was pollenated from the plant I reversed.
Cannatrol could have held an additional 2oz of wet but not today. Ideally I need 1 more Cannatrol so I can take an entire Tent, but will figure that out. I put an additional 1.5lbs into the freezer to wait it's turn into the Cannatrol, I would have left it on the plant and taken it in 4 days when the dry cycle gets done but wasn't sure how much 2.2 lbs was equivalent to chopped and wet trimmed.
2/5/2024- Germination Activities Day 0-2 - Checked in on them this morning and 2 of them have very small tap roots out.. one still doesn't going to give them some more time. I will check in on them this evening and see if they are more open if so I will transfer the ones that are ready to their medium and seed tray.
2/6/2024- Planting Day TRUE Germination Day 0- Checked in on them this morning and all 3 of them have tap roots out. I broke the bottom of the tap root for #1 which was the biggest.. pretty sad.. I hope she survives.. I tried to be careful it just snapped off when I was trying to get it in the root riot right. Other than that all three are now in their in-between home in the 2X2 while if finish clearing and cleaning out their forever homes.
2/7/2024- Germination Day 1- Checked in on them and no surprise no sprouts yet. Sprayed the dome to moist it and light spray to the tops of the Root Riots.
2/8/2024- Germination Day 2- #3 is popped and it looks like #2 will be popped by this evening.. I got my second Cannatrol today so now I can take down the rest of the tent and get it into the dry/cure.
2/9/2024- Germination Day 3- #2 is popped as well.. so I have #2 and #3 up and still waiting to see on #1 but that might be a loss since I accidently broke off some of the Tap root when transplanting.
2/10/2024- Germination Day 4- #1 has Popped... We have ignition on all 3.. YAY!! I finished clean up and install of RDWC system, this time was unique the back left buckets 3 inch pipe wasn't seated correctly so I had to clean up about 12 gallons of water all of the floor. I also had two leaks coming from one of the Waterfall return junctions, this is why I do a full pressure test before I put anything in. I will continue to monitor it through tomorrow to ensure that I am good to go and then I will finish setting up the baskets and prepping the water to be ready for the ladies planting day!!!
2/11/2024- Germination Day 5- #1 Of course is going to be my trouble plant.. No matter what If she lives through planting in the system and making it, I think I might not cull her at all regardless, she has been such a problem, makes me wonder if she will be super worth it towards the end.. We will see as we go through this grow, but #1 has a piece of the shell on the leaves,
Other than that I set up a new thing I have been doing since last grow converting my Baskets into Sure plants so I can see exactly where the water is when I plant them and ensure I have the water up high enough that they are able to access it and grow but not too high were they are drowning.
2/12/2024- Germination Day 6- Everything seems to be going good.. will just keep them moist and let the roots grow for a few more days before I transplant to forever home.
2/13/2024 - Germination Day 7- Just keeping them Moist.
2/14/2024 - Germination Day 8 - Planting day.. they are now in the system.. :-)I had to fill the water to the bottom of the basket where I could see water on the bottom rocks and just coming up where I had created my whole/ sure plant.
2/15/2024 - Germination Day 9- Top fed just a little to keep them moist and encourage root growth towards the water. I ensured the PH is right at 5.98-6.02 range.
2/16/2024 - Germination Day 10- Top fed just a little to keep them moist and encourage root growth towards the water.
Likes
2
Share

@Pechu420
Follow
They're gaining quite a bit of weight and shouldn't last much longer. The smell is strong and delicious, and the resin is getting stronger. Ak1 is more depleted, more yellowish, and also has a lot of fat buds.
12/12 from seed
Watering with filtered tap water every 2/3 days, when the pot is lighter, 500-1000ml
Soil:
peat, coconut powder, perlite, carbonized rice husk, sheep manure and worm humus. essential mineral mix, vegetable flours, vegetable cakes, biochar, bokashi EM1 and other organic inputs, Algae ascophyllum nodosum
small pots 3,7liters // 1gallon
light: lm301h-evo
120watts with other plants
Likes
53
Share


@Grow_for_Happiness
Follow
Gave her a good clean up on day 47.
Weather finally good enough to start bringing outside, trying to get hardened off so can plant this upcoming week. Was hoping to do at the end of past week but had to many rainy days and still getting too close to frost at night.
Outside 2 days this week temp ranging 18-28 degrees sun/shade as day progressed

Likes
5
Share


@Jays_Not_Here_Man
Follow
Seedlings are doing well! The 1 that is about 4 days older is showing good growth. I’ve been able to keep the humidity high enough and haven’t overwatered them yet! They are getting about a cup of water, starting with the outside rim and working my way in. This is about every third day or so. Not much else, it’s been an easy week. Happy Gardening 👊🇨🇦❤️

Processing
Likes
11
Share


@AGrowerNotAShower
Follow
Week 15 - August 09, 2020 -Day 99
08/09: We’re almost at the end. I gave Aaliyah her first watering with plain water. I’m planning on chopping the top colas off of her in a week. Hopefully I can get something out of the lower growth that isn’t getting any light right now. Alexis is coming down in two and Annie in three. Annie has some damage due to the light, but she is hanging in there. Alexis looks the healthiest overall. She stayed pretty compact, so light is still able to reach her lower parts. I think I could’ve had a better grow overall if I would have stuck with using only 3-gallon pots.
[General notes: The nutrients on the diary are based off what I’m giving Aaliyah. Alexis is on the previous weeks schedule and Annie in the schedule from two weeks ago.]

Likes
11
Share


@CanadianFillmore
Follow
Fed and defoliated to start week 7. The plant looks good, the buds are on point, frosty, sticky and look as expected at this stage of the grow.

Likes
4
Share


@Creme_De_La_Creme
Follow
Autopot system was turned on day 15 !!
Now everything is on automatic 🦍🍓🦍🍓
Im not touching this girl until day 50 or some like that, no LST, no topping, just a stress free VEG, lets go !
NO DEFOLIATION AT ALL
Likes
8
Share


@TeaTime
Follow
Fastberry Auto is truly a gem among autoflowering cannabis strains! Its rapid growth, delightful berry-like aroma, and beautiful purple buds make it a joy to cultivate. The sweet and fruity flavor is a treat for the senses, and the balanced high leaves me feeling creatively inspired and deeply relaxed. A must-try for any cannabis enthusiast, whether you're a seasoned grower or just starting out! -
Likes
15
Share


@MrGrowMan
Follow
week 14-15
1 nutrient water
1 non nutrient water
LsT and Scrog
Diesel and Mimosa Harvest
day 62 start 12/12 light period (genetically damaged plants)
2 break up cake day 67 start flowering


Likes
18
Share


@ChitownCannaChica
Follow
So this lady probably could co one more week as I’m getting that second round push of fox tails and more white pistols, but she is also about 10% amber 10% clear and the rest cloudy. I chopped her as these buds are FREAKIN MASSIVE and it’s getting pretty humid in the basement (even with the dehu running 24/7). So I’m chopping a little early to be on the safe side!
The speed and quality is amazing! Im super impressed with these fast flowering ladies! I will have to pop more really soon!
Smoke and dry weight in a week!
✌️🏻💚
Likes
19
Share


@DrLaggis
Follow
Day 64 - Beginning of the Final Flowering Week 🌱
Hello, my grow friends! We’re entering the last flowering week, and it looks like I’ll be harvesting the plant around Friday, which will be roughly Day 68.
💭 Harvest Decision:
It’s a tough decision because while the buds are still growing, the trichomes in the middle and lower parts of the plant are already about 80% milky and 10% amber. I’ll keep an eye on things and plan to check the trichomes again on Day 65, two days before harvest, to make a final decision.
🌿 Trichome Considerations:
I have a feeling that even after cutting the plant and hanging it upside down to dry, some nutrients might still move into the buds, potentially causing them to swell a bit more. This is something I’m curious to see.
💧 Humidity, Water, and Temperature:
As I mentioned in my last update, I flushed the plant yesterday, just before the start of the final week, with 4 liters of water. This should help flush out any remaining nutrients, and I likely won’t need to water again before harvest since the pots are thoroughly soaked.
The humidity and temperature are holding steady between 52-58% and 20-24°C, which I find ideal. I’ve got my exhaust system and fan running continuously to ensure no mold develops.
📸 Final Updates:
I’ll check in again with an update just before harvest to let you know how things are looking. Remember, I’m posting new pictures and videos of my plant every day.
🌱 Day 70 - Last Day Before Harvest 🌱
Hey Grow-Friends! 😄
Today marks the final day before harvest, and I couldn’t be more excited! As planned, I’ve kept the plant in darkness for the last 48 hours and haven’t watered it for 6 days. My goal is to let it sit in the dark until this evening, when the time finally comes to chop it down. 🌿✂️
Drying Decisions 🌬️
After much research and considering several factors—especially the high humidity in my tent—I’ve decided to go with wet trimming instead of dry trimming. I know dry trimming is often recommended for better bud quality and taste, but my main concern is avoiding mold at all costs. So, to play it safe, I’ll wet trim the buds, get them into the right size, and then place them in a drying net for about 7 days.
Timing Concerns ⏳
I’m still figuring out the best timing for transferring the buds into curing jars. Since I’m wet trimming, I won’t be able to rely on the classic “stem snap test” to check dryness. But we’ll figure that out as we go along!
Final Reflections 🌟
It’s been an amazing journey, and although I could push the grow a little further, I believe this is the perfect time to harvest. Given my upcoming personal plans, it feels right to finish up now.
I can’t wait to report back with the harvest update soon! 🌿 Stay tuned, and as always, thanks for following along!
Likes
23
Share


@SonomaSungrown
Follow
Buds are really setting up nicely.
French Macaron smells right on brand... and the Chem Brulee... my god!
It smells like a Tropical Rocket Fuel. Amazong.
The Pineapple Meatball has a really unique odor, but it is still fairly faint.
Hoping that the neem/nute burn didn't somehow affect its resin/terp/bud production.
It certainly hasn't seemed to affect the French Macaron and the Chem Brulee!
This week, I sprayed 3 times with Dr Zymes, and it completely knocked out the small number of fungus gnats I was dealing with. Also released 4,500 ladybugs, and it's been fun watching them spread and work.
Will probably stick with the once-per-week Zymes treatment for the next few weeks.

