The Grow Awards 2026 🏆 


Likes
Comments
Share
@Bombmom420den
Follow
This week was so mixed with the ladies and the heat issue we had this week. Cherry Bomb seemed to be the only one who didn't care that it got hot the rest have burned leaves from the heat. But they all are bouncing back and should be looking better over the next week.


Likes
39
Share
@Randyb4
Follow
Day 127 53 Days of flower, First day of Week 18
Day 128 54 Days of flower
Plants look good, they still have some white hairs though.
Day 129 55 Days of flower
Trimmed 1 bud from Plant B but it doesn't seem dry enough yet. Plants A and C look like they keep popping new hairs.
Day 130 56 Days of flower
Chopped Plants A and C and started hang drying them, they look great in my opinion.
Day 131 7 Days of drying for B and D
So the buds seemed dry and the stems snap so I jarred and trimmed. Looks like 3.5 ounces or or so but I didn't Weigh

Likes
7
Share
@BushDoctor740
Follow
Moving along nicely and growing entirely different than each other as the shorter mystery strain is much more bushy.
Likes
9
Share
@Thatgoodgas93
Follow
This week I’m glad I’ve spent time looking at my plants every time I cypher blunts w em because I wouldn’t have spotted seeds growing since their sacs are soo green it hides em pretty well. As you probably may have guessed I banished it from my tent & have cleaned my tent thoroughly to ensure there are no chances my females can get so much as get a whiff of it. Now as I said in my diary last week I was kinda bummed out that I couldn’t at least benefit from one plant giving me seeds but now I have been given a chance to reap something I had no idea I’d been sowing this whole time least of all the strain that wreaks of a very sticky & bubbalicious odor even with the most minimal contact. I must say it was a blessing in disguise cuz tbh them seeds ain’t cheap & as much as the wait may be worth it any & every grower novice (myself) to pro needs a stash on hand at all x to be able to grow or experiment with. It get cold up here in the winter so I be bored in the house on em snow days. As always there’s always something new each week & this week I’ll have to say the terpinator has not disappointed. I have been using far more little in terms of nutrient doses through out this grow as I realized the automatic spray bottle I have is nearly 3 liters & I've only been administering the minimal doses/liter as instructed in the grow diary nutrients chart into the near 3 gal bottle this whole time!! Not going to go crazy & double up but before I up the dosage I’ll perform a very thorough flush from rain in the forecast to reset its Ph. Can’t wait to see how both male & female turbo diesel strains differ in development in the 8 remaining weeks.

Likes
8
Share
@Enki_Weed
Follow
Licht aus, Drama an – Die Diva stellt auf Blüte um!
Die Vegetationsphase ist offiziell beendet, der Vorhang fällt, und das Licht hat auf den 12/12-Rhythmus umgeschaltet. Unsere "Diven" sind nun im Streckwachstum und bereit, ihr volles Potenzial zu zeigen.
Wichtige Aktion:
Das gesamte DWC System wurde wie aus dem Lehrbuch komplett gereinigt und mit einer frischen Blüte-Nährlösung befühlt.
(DWC) läuft mit der Präzision eines Schweizer Uhrwerks. Die Nährlösung ist perfekt balanciert für den neuen Zyklus:
• Wassertemperatur: 19 grad Absolut optimal. Die Wurzeln baden im Sauerstoff und sind glücklich (keine Spur von Wurzelfäule-Drama!).
• pH-Wert: 5.9 – Ein Volltreffer. Bessere Nährstoffverfügbarkeit geht kaum.
• EC-Wert: 1.62 { mS/cm} – Der ideale Startpunkt für die Blüte-Diät.
Klima-Kontrolle (Die Wellness-Oase):
Auch das Klima im Zelt ist bemerkenswert stabil und blütenfreundlich:
• Lufttemperatur (Tag): 25.0^C Perfekte Wohlfühltemperatur für das anstehende Streck-Wachstum.
• Luftfeuchtigkeit (RLF): 47% – Ideal für die frühe Blüte. Wir halten das Schimmel-Risiko niedrig, ohne die Pflanzen zu stressen.
Zusammenfassung:
Alle Weichen sind auf Höchstleistung gestellt. Die technische Basis ist 10/10. Jetzt liegt es an den Pflanzen, in den kommenden Wochen abzuliefern! Wir beobachten das Streckwachstum genau.

Likes
35
Share
@eldruida_lamota
Follow
Vamos familia con la décima y última semana de floración de estás Cereal Milk de RoyalQueenSeeds.
La temperatura está en 22 y la humedad actualmente está en 45%.
La cantidad de agua cada 48h entre riegos no cambia, y por supuesto controlando el Ph entre riegos alrededor de 6.5 - 6.2.
Ya se ven bien sanas estas 5 cereal milk, tienen un color y una salud espectacular, y ya están desprendiendo buenos aromas, vemos como han madurado las flores, ya estallaron.
Ya llevamos 2 semanas solo con agua, les daré machete ya en que acabe secar la maceta.
Mars hydro:
Code discount: EL420
https://www.mars-hydro.com/
Agrobeta:
https://www.agrobeta.com/agrobetatiendaonline/36-abonos-canamo
Hasta aquí todo, Buenos humos 💨💨

Likes
40
Share
@Chronicbastard
Follow
I'm trying to make these girls some beasts so I'm vegging the shit out these sexy little mamas.lol.i want them 2 feet before I veg but I just did some good training on them and brought my height actually down so when I can get all the bottom and inner branches to get tall enough to make an even canopy then at that point I will switch to flowering.
I have been staying on the Greek regiment from nectar of the gods and my girls are responding nicely.nice lush green and plenty of new growth everywhere. I added the kraken from nectar now that I have the structure I want.this stuff really strengthens your plant.it also help with pests by making your plant harder to eat.it will also help those branches with heavy buds.check it out for real.if you like my diary throw me some likes.peace out fellow growers

Likes
6
Share
@JackSkellington
Follow
😫PRIMO OVERFERT SENZA AVER DATO NULLA ASSURDO...solo acqua e sono cariche scure ora sono palesemente in over...
procederò ancora per altri 10 giorni di acqua
il topping a funzionato bene da come si vede nel video ora faro riposare per 15 giorni e poi lancio in flow
14/05/2021
la jungla sembra crescere ora dovrò fare un pò di pulizia defogliare dalle foglie piu grandi e lollipoppare per bene....
sono solo un pauroso di togliere le foglie grandi (foglie primarie)
al momento zero fertilizzanti ancora troppo scure
18/05/2021
la sera del 18 a un giorno da un mese di vegetazione in growbox ho lollipoppato e potato i rami i inutili....
ho dovuto anche fare una rotazione di piante in quanto non sono uniformi nel crescere....
ho riempito il bidone da 30 litri e mi sono accorto che le baby ora bevono molto
pur troppo sono ancora in forte stress e overfert non capisco da cosa provenga in quanto non ho usato nei fertillizzzante....
vedremo oggi 21 come staranno ora posto le foto del 19 maggio giorno in cui fanno un mese e sono ancora 40cm aime qualcosa sta rallentando la crescita
e arrivato il filtro a carboni e pesessantissimo speriamo che la mia box lo regge
Likes
11
Share
@MRTHC
Follow
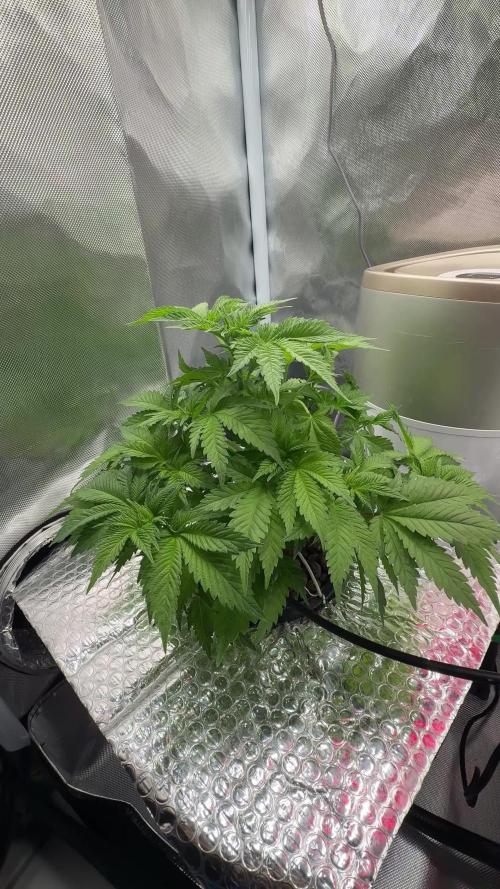
The ladies are doing well. Cant complain really but the hard work is yet to come. The different strains are getting bushy and the Blue Gelato #2 has the biggest canopy thus far. They all have been transplanted into 3gall pots. No strong smell even from stem rubbing but the orange Sherbet has a distinctive smell that's so citrusy. feeding has gone well this week. I may run into a pending issue when i bring out the 4x4 tent as I have been using a 2x2 for most of the veg period.Lets see what challenges week 8 brings to this run. The Vanilla Kush is taking training so well. So short and stumpy.
Likes
9
Share
@M3_Growing
Follow
Found mold on my plant. Since she is now pretty close to harvest time, this was her last watering and I will now try to dry her out slowly over her Last week.
Probably gonna harvest next week if nothing goes wrong from here on out.


Processing
Likes
88
Share
@No_Clout
Follow
25/07/18 - watered with 300ml each 24 hours ago giving them their first taste of veg nutes and their responding well so far, I will be upping the dosage later this week.
29/07/18 - everything’s looking alright so far, plant #3 did fall over because of the weight of the leaves but I’ve sorted it all out and it’s back to standing on it’s
own two feet.
30/07/18 - I dident feed them from 72hrs and the girl in the middle started to droop so I fed them all 600ml each.
31/07/18- the girl in the middle has perked up abit but all three seem to be not praying 🙏🏻 to the sungod.
Likes
6
Share
@Trichom420CZ
Follow
I saw a lights burning little bit on the highest colas. I downgrade lights on 75% now. I continue with fertilizing, i think that last 3 or 4 weeks to go.
Likes
35
Share
@The_Bearded_Grower
Follow
welcome to Day 29 15/1/21 she would be very tall if I was not doing SoG she is doing very well and is recovering from what looked like cal/mag diff coco is bas for causing that to happen. I really should get the stuff for coco lol.
well that's all for this week drop a like and comment if you like.
As always happy growing and keep your stick on the ice

Likes
30
Share
@ButterfliesLittleFarm
Follow
Hello Diary!
This time on the "Farm" there are two new strains from Royal Queen Seeds, Watermelon Auto and Purple Punch Auto. In this diary we will dedicate ourselves to Watermelon. 😀
I would like to thank James of the Royal Queen Seeds for sending me these strains. 🙏
LET'S START FIRST WITH THE FARM SET-UP:
Box - Secret Jardin DS120W 120x60x178
Lights - MIGRO 200+
Ventilation - Blauberg Turbo - E 100
Filter - Primaklima filter PK 100/125
Fan - Oscillating Koala Fan
Humidifier - Beurer LB 45
Soil - BIOBIZZ Light - Mix
Pot - 11L AirPot
Seed - Royal Queen Seed
Nutrition - BioBizz and RQS Organic nutrition
A few words about Watermelon Automatic.
The breeders from RQS set out with the intention of crafting a strain that lights the taste buds on fire. To achieve such a tantalizing terpene profile, they selected two of the most flavorful parent strains available: Tropicanna Cookies and Lemon OG. Both of these varieties are packed full of limonene, myrcene, and other fruity and earthy molecules.
Watermelon Automatic emerged with a genetic makeup of 75% indica, 20% sativa, and 5% ruderalis. The speedy autoflowering strain managed to inherit all of the tasty terpenes from her ancestors.
These are the characteristics, we will now see what it will look like on my small farm.
LET THE DIARY START OFFICIALLY:
14/01/2021.
Planting. After cleaning the Farm (GrowBox), I prepared everything I needed. Soil is a Light-Mix from BioBizz, Air-Pot's, Organic Additives that I mix with soil.
From the beginning of this hobby, I use only organic fertilizers.
I used 11L pots, to which I added 50g Easy Boost Organic Nutrition, 10g Easy Roots Rhizobacter and 5g Easy Roots Mycorrhizza Mix to the soil and mixed everything well.
After that I soaked the soil well with water, made a small hole, laid the seed inside and lightly covered it with soil.
After planting is completed, they enter their new home. As I wrote earlier, in addition to Watermelon, there are two more Purple Punch Auto on the Farm to keep him company. The temperature in the Box at that time was 23 degrees and the humidity was slightly below 45%, so I will have to put humidifier to raise humidity.
I set the lights 35cm from the pots as Migro recommends.
14 - 17/01/2021
I sprayed the surface of the soil with water a couple of times to keep the soil moisture at the surface.
17/01/2021
Watermelon Automatic sprouted. There was a seed coat left on the stalk so I had to remove it by hand, but a nice photo motif.
22/01/2021
I watered the plants with a small amount of water to which I only regulated p.H at 6.4.
Farm: 24.7 degrees - 55% humidity
I'm quite late with the publication of the diary, the reason is the large number of photos I take and then I need to find time to put everything in a pile, along with the notes and type everything nicely. No matter how much time I spend on the diary, it relaxes me and makes me happy.
See you soon.
Likes
10
Share
@WaffleTerps
Follow
Flowering Week 6 – wrap-up and transition into Week 7
We’re closing flowering week 6 with a very solid overall state: stable plants, buds stacking consistently, and a clear increase in resin production. The main goal this week was to finish the active bulking phase, keep metabolism high without forcing, and set everything up properly for the transition into maturation.
🌱 Environment & lighting
Throughout the week, conditions were kept very stable and within optimal ranges:
• Day temperature: 24–25 °C
• Night temperature: 18–19 °C
• Relative humidity: 50–55 %
• Day VPD: ~1.30–1.35 kPa
• Night VPD: ~0.95–1.05 kPa
• Average PPFD: 900–930 µmol/m²/s
• Ambient CO₂: ~550–600 ppm
These parameters allowed efficient transpiration, proper nutrient uptake, and the beginning of color expression without slowing down bud development.
⸻
💧 Irrigation schedule (exact recipes)
Base feeding (no PK) – 22 L
• Sensi Cal-Mag Xtra: 30 ml
• Bio·Grow: 6–6.3 ml
• Bio·Bloom: 115–133 ml
• Top·Max: 23 ml
• Bio·Heaven: 21 ml
• Bud Candy: 38 ml
• Atazyme: 25 ml
• EC: ~1.55–1.60 mS
• pH: 6.3
PK feeding (single, targeted application) – 22 L
• Sensi Cal-Mag Xtra: 30 ml
• Bio·Grow: 6 ml
• Bio·Bloom: 115 ml
• Top·Max: 23 ml
• Bio·Heaven: 21 ml
• Bud Candy: 38 ml
• Atazyme: 25 ml
• PK 35/60: 6 ml (pre-dissolved)
• EC: ~1.64 mS
• pH: 6.3
End-of-week adjusted feeding – 22 L
• Sensi Cal-Mag Xtra: 25 ml
• Bio·Grow: 5 ml
• Bio·Bloom: 105 ml
• Top·Max: 22 ml
• Bio·Heaven: 20 ml
• Bud Candy: 36 ml
• Atazyme: 22 ml
• EC: ~1.37 mS
• pH: 6.2
PK was applied once, at the correct moment, as a metabolic trigger. It will not be repeated.
⸻
🔍 Current plant status
• Calyxes are still swelling, not fully closed yet.
• Trichomes are mostly milky, with clear room for further maturation.
• Slight yellowing on some leaf tips, normal at this stage due to high demand and controlled senescence.
• No active deficiencies or nutrient lockouts observed.
⸻
▶️ Next steps
We’re now entering flowering week 7, maintaining stability and precision.
Over the next few days, we’ll start working with controlled drainage during irrigations to balance the substrate and progressively guide the crop toward the final stage, without aggressive flushing or rushed decisions.
📲 Daily content on Instagram, with real-time updates, photos, and videos of the grow.
Likes
10
Share
@MadeInGermany
Follow
Day 5
since time change
to 12/12.
Hey everyone ☺️.
Finally the time has come :-)
The lady moved into the flower tent on January 6th, 2021 😁.
The day before, of course, a cutting was taken 👍.
In the flowering tent, the distance between the plant and the lamp is 40 cm so that she can get used to the strength of the lamp. After 3-5 days I go down to 30 cm.
This week it was watered twice with 1 l per plant. GHSC enhancers were added to one wash :-).
Flower fertilizer will only be added in 12-16 days as soon as the first blossoms are there :-).
Otherwise the tent was completely cleaned and the humidifier refilled. For the next few days I have filled fresh osmosis water in canisters again :-).
Next week I will remove the bottom shoots so that the energy doesn't end up going into small popcorn buds 😉.
There is nothing more to report this week and I wish you all a lot of fun with the update 😀.
Stay healthy and let it grow 🙏🏻🍀
You can buy this Strain at :
https://www.zamnesia.com/de/5165-zamnesia-seeds-kalini-asia-feminisiert.html
Type:
Kalini Asia
☝️🏼
Genetics:
Black Domina x Purple Kush
👍
Vega lamp:
2 x Todogrow Led
Quantum Board 100 W
💡
Bloom Lamp :
2 x Todogrow Led
Cxb 3590 COB 3500 K 205W
💡💡☝️🏼
Soil :
Canna Coco Professional +
☝️🏼
Fertilizer:
Green House Powder Feeding
☝️🏼🌱
Water:
Osmosis water mixed with normal water (24 hours stale that the chlorine evaporates) to 0.2 EC. Add Cal / Mag to 0.4 Ec Ph with Organic Ph - to 5.5 - 5.8 .
Likes
27
Share
@420
Follow
Leider war von Tag 13 bis 16 vermutlich das Licht 24/7 an. Hoffentlich werden die Pflanzen nicht zwittern.
Likes
18
Share
@Chubbs
Follow
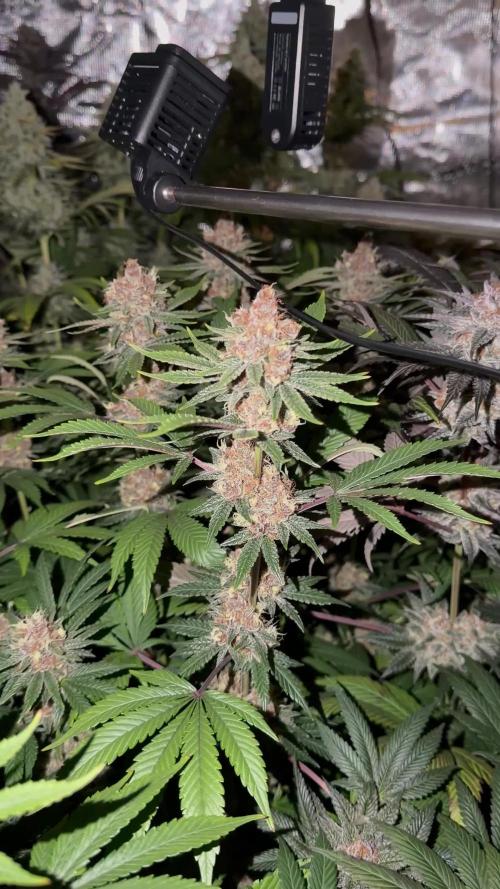
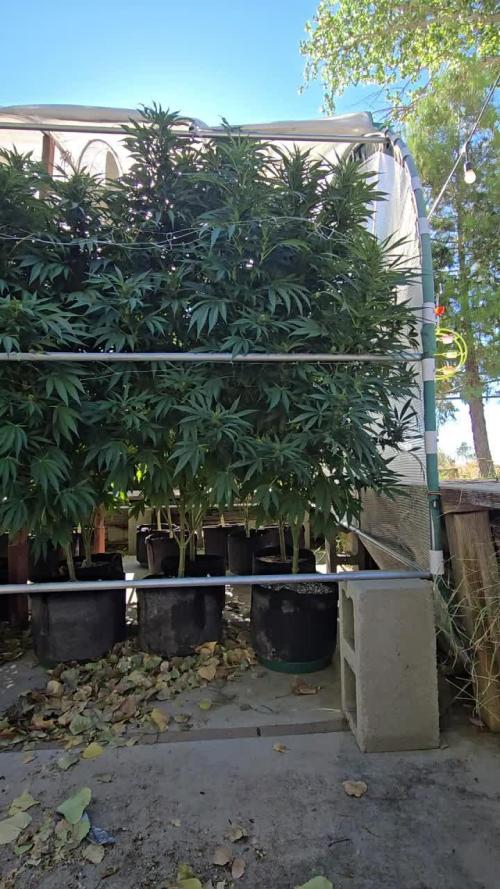
This week has been wild. I had to cut the sides of the greenhouse as the plants had it bursting at the seams. These girls are all flowering beautifully and starting to frost up. Still loving the pink pistols. Happy Growing
Likes
2
Share
@Strangelet
Follow
Day 43. Plant isn't growing much, cut all nutrients for the week, just water, seems better right now but hope she gets taller.
Likes
2
Share

