
Likes
Comments
Share


@DutchOutdoor
Follow
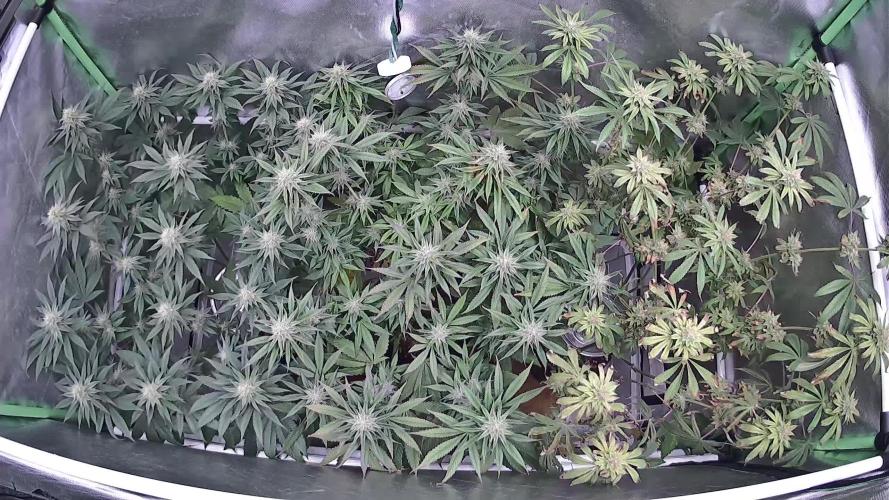
After mainlining ,lollypopping and topping my plant. She looks like on the video.
Since this moment i focussing on the flowering periode. And starting 12/12 light shedule since Day 34

Likes
25
Share


@MotherNaturesSon
Follow
Came back on New Years Day to be greeted by plentiful crystal laden flowers and incredibly nice terpene smell. Very glad they did well through the 12 day dry spell, now they can be watered good and well till harvest. One last minor defoliation, then I’ll stick to tying leaves out of the way. Also will begin incorporating the uvb bulbs for about 3 hrs on per light cycle, at about 12” distance from each plant. Cheers all
SideNote: I’ve just obtained a load of new seeds from about a dozen strains I chose for high levels of thc, yield, flavor, and overall quality genetics so expect some good things to come from my page within the next few months. Thanks for looking


Likes
15
Share


@DabMansGenetics
Follow
Getting closer to the finish line. Smelling amazing and fruity. More than half the hairs are red. Waiting for a good bit of amber before harvesting. Could still have a week or two judging from other similar diaries. Leveled out on height a week or two ago.

Likes
1
Share

@Lynx_361
Follow
28.07.2025
Something is wrong with the stretchy pheno. She is already finishing up. The Flowers are still small. And she looks hardly overfed.. I'll give her one ore two more days and hut her down. the other two look and smell great!

Likes
75
Share


@Bloombuster
Follow
Это всегда было приключением. Этот сорт выращивался и в ауте и помещениях, но никогда он не был таким маленьким, как в этом случае) Очень интересное путешествие, но и очень быстрое. Я не прилагал усилий, растение само росло, справлялось с высокой температурой и стабильно росло. Хорошие показатели в скорости цветения! Даже в партизанском выращивании, ей понадобится не больше месяца для наращивания своих цветов и ещё один месяц для их доращивания и созревания. Этот сорт быстр и неприхотлив. Могу рекомендовать его новичкам, желающим получить свой первый опыт выращивания на открытом воздухе.
Likes
Comments
Share


@AutomataClub
Follow
Parece que tenemos una verduleria en el indoor. Se siente un olor intenso a cascara de banana que dan ganas de comerse los cogollos. La alimentacion fue muy sutil.
Processing
Likes
37
Share


@MG2009
Follow
GTH SEED #1 in training, just super cropped on one side to even conopy.
The first site im recording will be a clone,it is on back side of plant and will not produce. #2,#3,#4 pics,#2 is stripped of leaves at about 12 inches.
06/16/18
#4 is showing
pre-flowers,#2,#3, no sign yet. #1 check in the morning.
06/19/2018
Still no pre -flowers on #1,#2,#3, #4 however is female so I Fimmed her to encourage side shoots to grow biggest of wider canopy. #1 reacting well to supercropping 20 tops as of today. Praying she is female🙏🙏. She is a stretchy girl in flower 2 to 3 x her vegged height so trying to be low profile as possible.👍


Likes
10
Share


@UGrowGuy
Follow
Been soo busy, these girls are just doing their thing. Some are a lil pissed from the fans but they need the airflow. Better than mold. 10 are thirsty AF, 2 are not. I have gone through 48 gallons of water since last friday! Crazy!
Likes
13
Share


@B4niTa
Follow
Shows preflowers this week, she grow tall on day 33 have 80cm💪
Tomorrow i will increase floranova to 1,5ml/l
Likes
14
Share


@Terpyboyz
Follow
Hi everyone 👊🏻 thanks for checking in 😏, so we have started flowering this week on the bigger tent using the 2 Lumii 720w LEDs, we might or might not run into some hight issues well see…
And we have the other 1.2 tent set up for the clones there under 1 Lumii 720w led delivered until I can another one sorted few weeks 🤙🏻 get them under that for a few weeks then get them flowering as well. Keep eyes open for progress 👌🏻


Likes
64
Share


@Roberts
Follow
Baked Bomb autoflower is starting to preflower. I think she is a bit behind due to the issues I had early on in the grow. She has been growing great for many weeks now. She has been looking really good lately. Thank you Bomb Seeds. 🤜🏻🤛🏻🌱🌱🌱💣
Thank you grow diaries community for the 👇likes👇, follows, comments, and subscriptions on my YouTube channel👇. ❄️🌱🍻
Happy Growing 🌱🌱🌱
https://youtube.com/channel/UCAhN7yRzWLpcaRHhMIQ7X4g

Likes
7
Share


@Sunstonedgrows
Follow
We are on Day 36 of Flower and going strong! As we are coming to the final weeks of flower, these buds are still immature but are definitely going to be maturing well. Word to the wise, at this stage in the fame you gotta check your plants DAILY (or you might have some unexpected droop 😅😅😅).
Surprisingly we are only watering every other day. I think the Mycorrhizae and the biochar in this soil mix are helping me out a lot here.
Overall feeling really good about this plant. The feedings look fine and she is looking very healthy. Here's hoping for a great rest of flower.
Cheers til next time
-DJ sunstone

Likes
6
Share


@TheMayor4434
Follow
As we enter week five we notice some of the plants pre flowering. But not all so I decide to stick with veg nutrients until all are showing pre flowers. Half way through the week and the rest of the plants are showing pre flowers. Just in time as the plants that had pre flowered earlier on in the week are showing slight Newt burn on the tips suggesting It is time to change to bloom newts which holds less nitrogen. The magnified picture are of the pre flowers forming ( two little fuzzy hairs).
Interesting fact: it takes thousands of those little fuzzy hairs to form just one bud.

Processing
Likes
4
Share


@el_cultivito
Follow
Fendi 2 has a mutated fan leaf that kinda looks like a lobster claw.
Some older leaves that started yellowing at the tips last week (I think it was a nutrient burn from transplanting from rockwool cube into soil), have gotten more brown and curled upwards.
Likes
8
Share

@Roberts
Follow
Fast version B is doing good. Not as tall as A. She us just as healthy thou. I lst her branches today and defoliated her some. She is ready to go. Thank you Dutch Passion, SSSC, Medic Grow, and Athena nutrition. 🤜🏻🤛🏻🌱🌱🌱
Thank you grow diaries community for the 👇likes👇, follows, comments, and subscriptions on my YouTube channel👇.
❄️🌱🍻 Happy Growing 🌱🌱🌱
https://youtube.com/channel/UCAhN7yRzWLpcaRHhMIQ7X4g.
Likes
36
Share


@Fayah_Burn
Follow
Today on Day 141 and at the same time @ the end of the 9th week of flowering it is Harvest day (final harvest) for the remaining two Tropicanna Banana's (Plants #1 and #3).
Plant #4 was harvested on Day 134 (8th week of flowering) - see harvest pictures week 8
Plant #3 was harvested on Day 138 (9th week of flowering) - see harvest pictures week 9
Did not take any wet weights as i am drying the buds on the stalks and i dont wanna know how many stalkes i grew 😂
Will be back soon with the dry weights of each one of the four ladies. Some pacience is asked now 😬

Likes
24
Share


@nonick123
Follow
Día 129 (07/10) Riego con 750 / 1.000 ml H2O de osmosis
Empiezan a moderarse las temperaturas con 28 ºC de máxima
Día 130 (08/10) Riego con 500 / 1.000 ml H2O de ósmosis
Las temperaturas están sobre 25 °C
Día 131 (09/10) Riego con 500 / 750 ml H2O de ósmosis
Día 132 (10/10) Riego con 750 / 1,250 ml H2O de ósmosis
Día 133 (11/10) Riego con 750 / 1,250 ml H2O de ósmosis
Día 134 (12/10) Riego con 500 / 1.000 ml H2O de ósmosis
Reviso los tricomas y estos indican que estamos más o menos a una semana de la cosecha! 50% trasparentes / 50% nublados
Día 135 (13/10) Riego con 1 litro H2O pH 6,5 + Kelp Hidrolizado 0,3 g/L
💦Nutrients by Lurpe Solutions - www.lurpenaturalsolutions.com
🌱Substrate PRO-MIX HP BACILLUS + MYCORRHIZAE - www.pthorticulture.com/en/products/pro-mix-hp-biostimulant-plus-mycorrhizae

Likes
28
Share


@Solarcradle
Follow
Lots of growth through days 17 to 21. I consider day one at time of sprout.
Tops height was 5.20" on day 19.. prior to applying LST. Height is no longer relevant when using LST. I'm hoping for height after I LST the plant around the bowl of the 5 gallon pot, just before bloom. Considering this is an Amnesia XXL auto strain that runs around 10-12 weeks, I am hoping for a longer vegetative period to allow for more vertical growth. Lights moved to a distance of 22" from tops on Day 19, after LST.
Day 18-19 HST/LST Height 3"
Day 20 a topping and pruned approximately 7 leaves
Day 21 lights moved back to 18"
Day 21 Height 4.25"
Water PH 5.85-6.2 through Week 3

Likes
21
Share


@BlackDragon22
Follow
Omg. Ha delle tonalità pazzesche. Anche questa bimba ha prodotto delle gemme di prima qualità. Gelide, puzzolenti, compatte e Cremose. La sto appena fumando e anche se deve stagionale, il suo sapore ed odore è pazzesco. Non vedo l'ora che diventi qualcosa di ancora più buono 🙏🏽💣 aspettando con impazienza la stagionatura.. Grazie per essere passati amici, fratelli.