


Likes
9
Share


@Colo420
Follow
25/12 se realizo fertirriego.
27/12 riego con agua.
Se observa un crecimiento vigoroso tanto de parte aerea como radicular.
Hoy se realizaran transplantes a masetas de 10L
El dia 30 se regará con agua


Likes
5
Share

@Chubbs
Follow
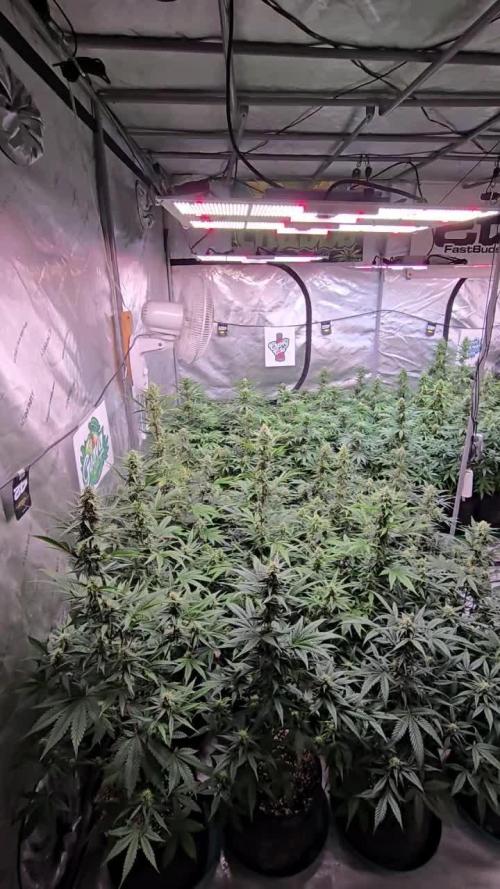
Hard to believe it's been another week. These beautiful girls are growing great. They're definitely swelling amazing especially at the top colas. Starting to see some faded leaves so I think I'll back down my nutes from 1050 to around 800. All in all Happy Growing.

Likes
4
Share


@Olduffybastard88
Follow
Quick tour taking a little longer to flower than expected but I don't mind that askong as there healthy it'd more important not had any problems with these plants so if they take an.extra week to flower I forgive them super hardy plants with massive yeilds will be doing more zamnesia f1 for

Likes
15
Share


@Noob_quest
Follow
Updated end of week 3. Off for 4 days. Wish me luck.
Have a great week 😊
Likes
12
Share


@Jays_Not_Here_Man
Follow
Week 5 - Another week has flown by! The girls are doing great, cruise control this week as I have just been monitoring RH and temps. Trying to keep them as low as possible, I’ve been getting as low as 82 during the day and 72 at night. It’s been creeping up and down for the past couple of weeks. I’m thinking of ordering a T8 Cloudline from AC to really suck that air out…
I finally took a look a look at the trichomes with my jewellers loop and wow, just wow. Already popping with some long stems and big heads! These girls just keep getting better and better. They are also really starting to show their pheno differences, and similarities. 3 of them have very similar terps, and slight variations, and one is distinct in both smell and look.

Likes
19
Share


@buddhi_coop
Follow
Day 7 of flowering & so far we’re off to a good start. They’ve grown 5” since last week so that’s almost an 1” a day. So far I’m still watering every other day with 1/2 gallon of water each-6.3 ph & that seems to be fine. I might have to start watering everyday here pretty soon though or I’ll have to increase the amount of water I give them each time I water. I’m having fun, I hope they are too.
Likes
2
Share


@BONGAPPETREATS
Follow
What’s up y’all!!??
Week 7 update is kinda bland.
The bud sites are growing fuller which is exciting to see. A weak smell is apparent. Same feeding schedule as last week. I give a normal PH’d watering every few days in between the feedings just to get some of the nutrient build up out of the cocoa / perlite mix.
I did a heavy defoliation in the beginning of the week. There are some lower bud sites which I’m hoping are getting more sunlight since I defoliated. Of course by the end of the week the leaves are back and big once again. I’ve been tucking them instead of putting the plant thru any further stress at this point.
See y’all in week 8

Likes
4
Share


@Stork
Follow
Day 16 Tue
PH 5.9
EC 0.6
DLI 18h
PPFD
Water 24
Day 17 Wed
PH 6.0
EC 0.6
DLI 18h
PPFD
Water 23
Day 20 Sat
PH 5.7
EC 0.6
DLI 18h
PPFD
Water 25
Likes
35
Share


@eldruida_lamota
Follow
Vamos familia que ya actualizamos la cosecha de estas Frosted Guava de Zamnesia.
Vaya flores que se han marcado repletas de tricomas, parecen escarcha y las flores se marcan aromas muy tropicales, la verdad que únicos.
Es una variedad bastante fácil de cultivar pero al tener un periodo de floración algo más largo, hay que estar pendiente de alimentarlas bien, gracias Agrobeta en mi sala es posible.
Temperaturas máximas en 24 y mínimas en 20 y una humedad estable en torno al 36%.
Las mantuve 10 semanas pero facilmente si se quedan 11 tampoco estaría mal, yo las vi bien maduras y ya tenía tricomas ambar así que les di matarile.
Os comento que tengo un descuento y para que compréis en la web de Zamnesia de un 20%, el código es ZAMMIGD2023
The discount 20% and the code is ZAMMIGD2023
https://www.zamnesia.com/
Agrobeta:
https://www.agrobeta.com/agrobetatiendaonline/36-abonos-canamo
Mars hydro:
Code discount: EL420
https://www.mars-hydro.com/
Espero que disfruteis este diario, buenos humos 💨💨💨
Likes
36
Share


@Salokin
Follow
Hi All,
The week was pretty uneventful, the plant is developing nicely. I removed a leave here and there to make sure maximum light exposure in the middle of the canopy is guaranteed. The buds stopped stretching so I’ll will stop with the boost and add the pk 13/14 to help with the fattening. Dried and smoked a few of the lowest popcorn buds and they are by all means not there, but smell and taste pretty awesome.
I have also added a few pictures of the new box that I have built for the cuttings. The box was build pretty low budget, however I will still need to add a better light source as I am currently running on only 60W veg lights. Was planning to buy the Greenception GCx5solo 150W full spectrum LED, as it would fit exactly Inside the box.

Likes
5
Share


@Cultiv8or
Follow
Very hard to control temperature and humidity in tent.
It’s a small 70x70x160cm on the balcony so it’s prone to fluctuations to outdoor conditions
Light increases temp in tent by 4-5 degrees C
I started a half dose of AN Micro (15 drops in a litre)

Likes
10
Share


@Pheno_Minds
Follow
Pheno_Minds 🌿 Link zum Strain: Hindu Kush
🔥-10% Code: PHENOMINDS
🔗 https://www.seedsman.com/eu-de/hindu-kush-feminised-seeds-sensi-hindukush-fem?a_aid=PHENOMINDS
🌿 Blüte Tag 43
📅 Datum: 17.03.2026
🌬️ Avg. VPD: 1.4
💦 Bewässerung: 2L pro Gießvorgang
⏱️ Bewässerungsintervall: alle 2 - 3Tage
📊 pH (Gießwasser): 6,0 - 6,3
⚗️ EC (Gießwasser): 1,7 - 1,9 mS/cm
🌊 Wassertemperatur: 19°C
👁️ Pflanzenzustand: Die Pflanze zeigt zum Ende hin eine minimal leichte Überdüngung. Durch die Zugabe von "Overdrive" wurde das P-K ordentlich gepusht. Untenrum wurden vereinzelnd Micro-Buds entfernt.
📝 Besonderheit: Es geht in Blüte Woche 7 für 4 Tage in den Urlaub. Ich lasse mich überraschen, wie fett die Buds in den Tagen geworden sind.
Likes
6
Share


@rvabudman
Follow
Cant take my eyes off my plant. This is my second round of growing and I am the type of person who learns through failure (not gonna upload the pics of the first round plants lol). The buds are thickening up very nicely. Hoping to get between 3-4oz , the strain is high yielding but I have a smaller tent. My auto yielded 2oz with the same space (2 plants in one tent splitting the space), but the buds definitely didn't develop as well as these buds.

Likes
32
Share


@midEastern
Follow
stems are wounded in the middle
as mentioned when they started flowering,my white table has fallen on parts of the plants and damaged
the main stem and a few branches.
i tied and bandaged the main stem and supported with sticks.
They flowered almost as if nothing happened except for a few small branches that stopped getting nutes and died
in the pics you can see how the main stems got severely broken in the middle.
in the last 2 weeks there has been a few weather changes such as storm,heat,and colder climate during night time,
i was ready for storm with a plastic roof on top-they were perfectly protected from water and winds and stayed healthy during 2 days of winter.got a perfect color due to colder nights and today decided they are ripe.trichs are cloudy mostly

Likes
28
Share


@Weedman46
Follow
Buds are starting to swell I had to back way off the Kool bloom pretty sure I stunted them a little also instead of feeding every other watering I cut the bloom nutes in half and feed every watering plants are responding well

Processing
Likes
22
Share


@CenturionGrower
Follow
02/08/20 (Sunday)
9AM - Continuing off of the great progress of last week I decided to take the initiative and attempt 'repairs' to the photosynthesis of my plants with compromised leaves using surgical tape. Unfortunately after one too many readjustments on one of the first true leaves of the SVG I caused some minor lacerations on the leaf; it should be fine though.
11AM - All four plants were fed.
5PM - I decided that it would be more beneficial to just defoliate the first true leaves and start lst on the SVG so it'll have a little more energy to grow the tops. Left the top leaf on the abandoned original stem to help with photosynthesis and not over stress the plant all at once.
03/08/20
The SVG seems to have responded positively to the training and is growing rapidly.
04/08/20
Had an exhausting day yesterday and fell asleep before I could turn off the grow light leading to the plants getting 24+ hours of continuous light. None seemed to be stressed and were immediately put to sleep for 6 hours before continuing their light cycle with a shorter day so they'd fall back on schedule.
05/08/20
The plants enjoyed a new record of 10 hours in the sunlight and are starting to look ready to stay outside for the entire day. Noticed one fan leaf on the Jam had evidence of leaf miners and decided to remove it to free up wasted energy for the plant.
06/08/20
More leaves are showing signs of miner activity so I feel it may be time to start considering an early topping.
07/08/20
I decided to do an early top on all single cola plants at their third from the bottom 3+ leaf node to help control the miner problem. Considering keeping the plants as indoor instead because pests seem to be targeting them in my gallery garden, but none of my other species of plants. Took some advice and squeezed all the leaves on the Jam to kill the leaf miners.
08/08/20
All leaf miner progress seems to have been halted.
Likes
59
Share


@OutForReal
Follow
Song of the week : method man & redman - how high part 2
------
03.10 - My 2 1st try was a fail so I'm re-(re)starting with my last 4 seeds of Blue dream'matic as my 1st attempt provide me a nice smoke full of terpenes. Today 4 seeds was put into a glass of water 🤞 hope this time will be the last & the good one 🌱
------
05.10 - Ready to be transplant 👍
------
06.10 - 4 seedlings have been poted in 0.25L pots.
------
Day 6 - 12.10 - They remain small but they are far from the light , I have to make more space in the box for them so next week my Green poison xl will get out for flowerimg to clear the space. I also watered them today.
Processing
Likes
66
Share


@DrGreenThumb95
Follow
First week of flush on the way with no where near as much swelling as I hoped, after last weeks question I decided to raise my light another 4 inches to reduce the burning seems to have helped but I'm not quite sure (it was already pretty bad), the EC of my run off varies between 1.4 and 1.8 by the end of the week, next week I am planning to use straight PH'd water however some one has got me questioning my self. But everything is a learning curve and I have learned alot from these ladies and from everyone who has helped and had an input your experiences have helped
Next week... HARVEST!!
Happy Growing! 👊👍

Likes
22
Share


@bypado_farm
Follow
Day 57:
Watered each plant with 1L with nuts
1588 ppm, 3380 us/cm, 3.3 EC (purple punch, strawberry banana, wedding Cheesecake)
1690 ppm, 3595 us/cm, 3.5 EC
(gorilla cookies)
2 different feedings for the 10 plants
Day 60:
Watered each plant with 1L with nuts
1563 ppm, 3325 us/cm, 3.3 EC
Day 62:
Watered each plant with 1L with nuts
1726 ppm, 3712 us/cm, 3.7 EC (purple punch, strawberry banana, wedding Cheesecake)(I gave them more than usual, by mistake)
1528 ppm, 3525 us/cm, 3.5 EC (gorilla cookies)
2 different feedings for the 10 plants
Day 63:
Watered each plant with 1L with nuts
1563 ppm, 3325us/cm, 3.3 EC (purple punch, strawberry banana, wedding Cheesecake)
1523 ppm, 3301 us/cm, 3.3 EC (gorilla cookies)
2 different feedings for the 10 plants
Day 65:
Watered each plant with 1L with nuts
1518 ppm, 3210 us/cm, 3.2 EC (purple punch, strawberry banana, wedding Cheesecake)
1359 ppm, 2891 us/cm, 2.9 EC (gorilla cookies)
2 different feedings for the 10 plants
Next feeding I will start to flush some plants, 1st week with flawless finish, 2nd week clean water, 10x the pot, 150L each
Day 67:
Watered each plant with 1L with nuts
1379 ppm, 2908 us/cm, 2.9 EC (1 purple punch, wedding Cheesecake)
1250 ppm, 2687 us/cm, 2.7 EC (gorilla cookies)
285 ppm, 606 us/cm 0.6 EC (3 strawberry banana and 2 purple punch) (2L each)
3 different feedings for the 10 plants
Started to flush all the strawberry banana and 2 purple punch with flawless finisher. (1st week flawless finisher, 2L each, 2nd week clear water, 150L)