The Grow Awards 2026 🏆
Likes
Comments
Share
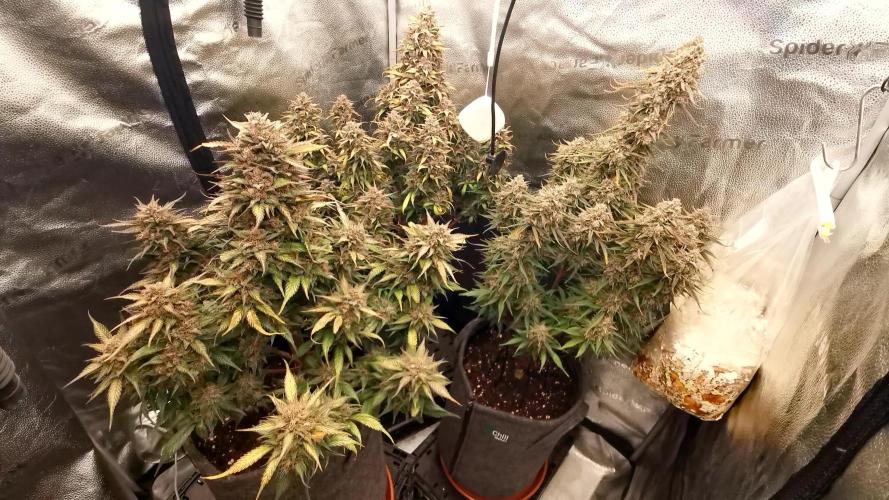
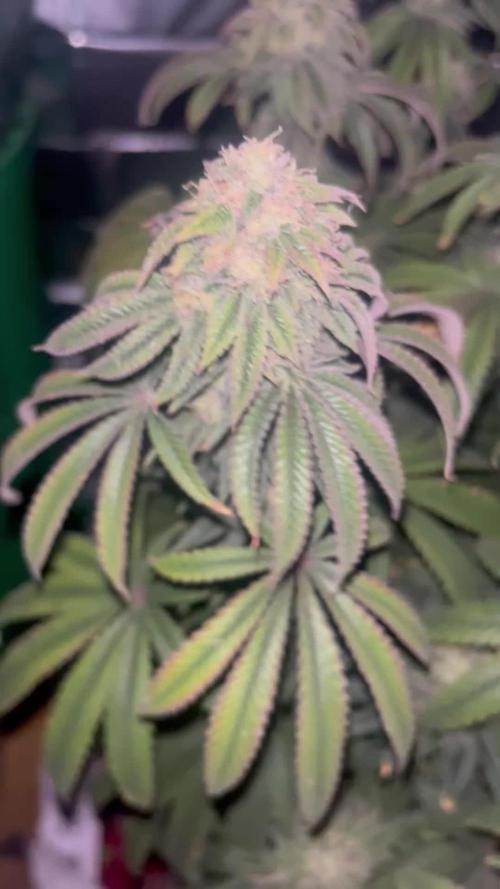
Week 4 for the sugar bombs 😁 another 4 or 5 weeks to go (depending on the phenotype) but we will notice when she's ready in the later flowering, for the rest everything is going quite good in my opinion, for now i must say that its a quite stable strain, no signs of nanners or any other trouble after applied HST which is good news!
Likes
13
Share
Defoliation and lst of the four super sour s1 and the 2 peanut butter soufflés as well they are growing great. Flipping to flowering in the next 3-4 weeks
Likes
50
Share
It was a good week for Night Nurse👍 Now that they're in the ground they're doing much better and putting out more growth. The one on the end could have better color, since her new growth is a bit yellow. I gave her an extra feeding last night after I transplanted some Calendula into the bed since it's a good pest repelling companion. We're getting some much needed rain today🙏 Otherwise there's not much else to report! Update 6/26- I totally forgot to add that on Monday the garden got a spraying of horn manure. Horn manure is a biodynamic preparation of cow manure that's been fermented in a buried horn. This results in a material that's teeming with beneficial flora and fauna for the soil. Ideally it would be sprayed prior to planting in the spring as it encourages healthy root growth. I purchased the pre-potenized so that I only had to spend 20 mins stirring rather than an entire hour. That would have been brutal😵 I sprayed it at night when the earth is breathing in and used a spruce bough to sprinkle it over the plants in the garden. The extra icing on the cake was that there was a rain the day before, and another the day after I sprayed so it was well watered in.
Likes
11
Share
LST is going well. Minor defoliation to remove growth on underside of plant. This will be last full week of veg. Planet of the grapes auto sprout hanging out in back. Video/photos taken 42 days after breaking soil.
Likes
36
Share
Info: Unfortunately, I had to find out that my account is used for fake pages in social media. I am only active here on growdiaries. I am not on facebook instagram twitter etc All accounts except this one are fake. Flowering day 57 since time change to 12/12). Hi all 😀. The inflorescences have stopped growing and are now starting to swell properly :-). The next 8-12 days will be harvested :-). Until then, she will only get the appropriate water and about 3-4 days before the harvest she will be poured a little more for the last flush. The week was poured three times with 1.2 l each. Otherwise, as always, everything was assessed and checked. I wish you all the best until the next update. Stay healthy 🙏🏻 You can buy this Strain at https://www.barneysfarm.com/blue-cheese-34 Type: Blue Cheese ☝️🏼 Genetics: Blueberry X Original Cheese 👍 Vega lamp: 2 x Todogrow Led Quantum Board 100 W 💡 Bloom Lamp : 2 x Todogrow Led Cxb 3590 COB 3500 K 205W 💡💡☝️🏼 Soil : Bio Bizz Coco ☝️🏼 Fertilizer: Green House Powder Feeding ☝️🏼🌱 Water: Osmosis water mixed with normal water (24 hours stale that the chlorine evaporates) to 0.2 EC. Add Cal / Mag to 0.4 Ec Ph with Organic Ph - to 5.5 - 5.8
Likes
4
Share
@Ensign420
Follow
|»» LOG DISCLAIMER: Not intended as a grow guide. Grow log entries are usually posted 3 weeks later and are for my learning reference. ««| Introduction - Week 26 Summary - Ensign's log, stardate 17608.3, Wow what a week! Drying is always pretty simple and been checking daily. Buds are drying nicely and terps are smelling pretty dank!! Most of the week has been in the veg tent with tissue culture! Mixed another batch of establishment media and took proper explant cuttings. Also super-cropped the mothers to even out the canopy. Ahh yea! Getting hyped for trim day next week! Next week will also be the last week for this grow log, but am already planning out the next cycle. Anyways! Onwards to next week! [START OF WEEK 26] ========================================================== ---------- [ 4x4 MAIN TENT ] ---------- Heady OG BX1 #1 [Round4 ~Wk19] - WEEK 26 - Dry Wk1 ----------- [ 3x3 VEG TENT ] ------------ TKO - WEEK 09 - Full Veg Gorilla Goat #1 - WEEK 05 - Full Veg Heady OG BX1 - WEEK 09 - Full Veg Garlic Budder OG#1 - WEEK 05 - Full Veg 10/13/25 → 10/19/25 This Week's Estimated Goals ---------------------------------------------------------------------------------------------- DLI: ~0 mol/m²/d PPFD: ~0 μmol/m²/s VPD: ~1.5 kPa This Week's Meter Readings & Averages ---------------------------------------------------------------------------------------------- Light On/Off: 00:00 - 00:00 | Wattage: ~000.0W [LV00] Distance From Canopy: ~00” DLI: ~0.00 mol/m²/d PPFD: ~0 μmol/m²/s VPD: ~1.17 kPa Soil %: [47.4, 34.1, 35.0, 55.7, 43.7, 43.6, 44.0, 43.3] ========================================================== Day 01 - Monday - 10/13/25 - Total Days: 183 ----------------------------------- Daily Averages ~[+01:00] - Temps: 78.8°F [26.0°C] - Humidity: 64.4% - VPD: 1.19 kPa - Soil %: [49, 34, 35, 57, 44, 44, 44, 42] ----------------------------------- - [22:05]: Night check on the 4x4 tent. --- Ca-Caw!! Looking great! --- Heady OG BX1 #1 is drying along and no signs of mold. Also airflow and RH is stable and within the 60-70% range. --- Getting stoked! Trim day is 9 days away! - [22:09]: Checked the Ecowitt soil moisture sensor data: ------------------ [ 4x4 MAIN TENT ] --------------- ------ 48% - [CH01 FT » G30 - Heady OG BX1 #1] ------ 35% - [CH02 FB » G30 - Heady OG BX1 #1] ------ 35% - [CH03 BT » G20 - TKO] ------ 56% - [CH04 BB » G20 - TKO] ------------------ [ 3x3 VEG TENT ] ---------------- ------ 46% - [CH05 BL » GR7 - TKO] ------ 40% - [CH06 BR » GR7 - Gorilla Goat #1] ------ 40% - [CH07 FL » GR7 - Heady OG BX1 #1] ------ 40% - [CH08 FR » GR7 - Garlic Budder OG#1] --------- Veg: 38% - 45% | Flower: 45% - 55% --------- General: 30% [Dry] «| 45 - 60% [Moist] |» 70% [Wet] - [22:18]: Checked the 3x3 veg tent. --- Looking healthy in the veg garden! --- All of the vegging mothers are looking great and the canopy is starting to even out. --- Also clones look healthy and no need to water yet. --- The stems, err, I mean, explants, don’t show any signs of contamination. --- Staying positive, glad the growth media is sterile and the overall procedure was successful. --- Anyways! Plan to create more establishment media and cut proper explants soon! - [22:21]: Checked the humidifiers. --- Tanks are still full and no leaks found. Day 02 - Tuesday - 10/14/25 - Total Days: 184 ----------------------------------- Daily Averages ~[+01:00] - Temps: 76.9°F [24.9°C] - Humidity: 64.8% - VPD: 1.11 kPa - Soil %: [46, 34, 35, 56, 43, 43, 44, 43] ----------------------------------- - [21:44]: Night check on the 4x4 tent. --- Looking good in the dry tent! --- Heady OG is drying along and humidity levels look great! --- Nothing to do but maintain and wait to trim in 8 days! - [21:55]: Checked the Ecowitt soil moisture sensor data: ------------------ [ 4x4 MAIN TENT ] --------------- ------ 45% - [CH01 FT » G30 - Heady OG BX1 #1] ------ 34% - [CH02 FB » G30 - Heady OG BX1 #1] ------ 35% - [CH03 BT » G20 - TKO] ------ 56% - [CH04 BB » G20 - TKO] ------------------ [ 3x3 VEG TENT ] ---------------- ------ 41% - [CH05 BL » GR7 - TKO] ------ 40% - [CH06 BR » GR7 - Gorilla Goat #1] ------ 47% - [CH07 FL » GR7 - Heady OG BX1 #1] ------ 46% - [CH08 FR » GR7 - Garlic Budder OG#1] --------- Veg: 38% - 45% | Flower: 45% - 55% --------- General: 30% [Dry] «| 45 - 60% [Moist] |» 70% [Wet] - [21:59]: Checked the 3x3 veg tent. --- Looking healthy and growth is raging! --- All mothers are looking beautiful! --- Clones are getting taller and looking healthy! --- Gorilla Goat #2 needs watering. Let’s go Ensign! - [22:03]: Here is the starting initial watering range: ------ Gorilla Goat #2 » 255.4g → 300.3g and was last watered 4 days ago. --------- General Solo Range: [Dry] «| [Initial Cup Weight] + ~55-100g |» [Wet] --- Took the starting weight before watering, ------ Gorilla Goat #2 » 230.8g --- While on a scale, --- Gently misted her straw mulch with RO water. --- Tried to keep the top growth dry. --- Misted 5-10 sprays. Waited a few seconds, then misted again. --- Made sure to reference the watering weights. --- Repeated this process until the cup weighted at least 300g. --- There was no runoff. - [22:23]: Took the saturated weight after watering, ------ Gorilla Goat #2 » 345.7g --- Marked the watering date on the side of the cup. Also marked the saturated weight on the back. --- Placed her back into the tent. --- Decided to train and super-crop both clones. --- Bent the taller branches to lower the canopy. - [22:38]: Checked the humidifiers. --- Tanks are still full and no leaks found. --- Onwards Ensign! Day 03 - Wednesday - 10/15/25 - Total Days: 185 ----------------------------------- Daily Averages ~[+01:00] - Temps: 75.6°F [24.2°C] - Humidity: 63.8% - VPD: 1.09 kPa - Soil %: [48, 34, 35, 56, 44, 43, 44, 42] ----------------------------------- - [+01:33]: Quick night check on the 4x4 tent. --- Looking great in the dry tent! --- Also starting to smell dank! --- 7 more days until the big trim! - [+01:37]: Checked the 3x3 veg tent. --- Veg garden is healthy and growth is green! --- Both the Heady OG BX1 #1 and TKO mothers will need another topping soon. --- Clones in the propagation tray also look great and no need to water. --- The explant media is still looking sterile with no signs of contamination. --- Easy night in the garden. Nice! - [+01:40]: Checked the humidifiers. --- Tanks are still full and no leaks found. --- Okay! Tomorrow plan to dive back into tissue culture and prep more growth media. --- Onwards Ensign! Day 04 - Thursday - 10/16/25 - Total Days: 186 ----------------------------------- Daily Averages ~[+01:00] - Temps: 74.6°F [23.7°C] - Humidity: 62.2% - VPD: 1.11 kPa - Soil %: [46, 34, 35, 56, 43, 44, 44, 45] ----------------------------------- - [11:41]: Alright! Back to tissue culture and time to start another batch of establishment media! --- Took the plant growth regulators out of cold-storage (my fridge). ------ [ » SMOKES A BOWL « ] --- While the products warmed up, gathered the necessary supplies and setup my workstations. --- Currently, focusing on: ------ PHASE 01 » ESTABLISHMENT --------- » DAY 01 » MEDIA - PART 01 - Mixing the growth media --------- » DAY 01 » MEDIA - PART 02 - Sterilization of media and tools [via autoclaving] --- Going to use the same establishment formula, but doubling the yield. --- Also using RO water instead of distilled water. --- Here's the establishment media formula: --- [» VER.0001 |» INITIAL TROPICAL PLANTS FORMULA |» 0.5L (500mL) RO WATER «] ------ MS [Muashige & Skoog] --------- » 2.22g ------ Sucrose [Cane Sugar] --------- » 15g ------ BAP [6-Benzlaminopurine | Cytokinin] --------- » 0.5mg » 0.5mL » 500μL ------ IBA [Indole-3-Butyric Acid | Auxin] --------- » 0.05mg » 0.05mL » 50μL ------ AGAR [Jelling Agent] --------- » 3.5g ------ PH [Potential Hydrogen] --------- » 5.7 --- [» 1mg/mL CONCENTRATION ratio | 1mg = 1mL | 1mL = 1000μL «] - [12:59]: Time to prep the growth media! --- Made sure to turn OFF the lung-room's oscillating fan. --- Filled a measuring cup with 400mL of RO water. --- Dropped a clean magnetic mixing bar into the measuring cup. - [13:05]: Placed the measuring cup on the magnetic stirrer. --- Turned the unit ON and have the unit on LOW. - [13:11]: Using a precision scale (sensitive to 0.01g) along with a micro-pipette (1000μL capacity along with tips) and disposable (100mL) weigh boats, ------ Added 2.22g of MS [Muashige & Skoog] ------ Added 15g of Sucrose [Cane Sugar] ------ Added 500μL of BAP [6-Benzlaminopurine | Cytokinin] ------ Added 50μL of IBA [Indole-3-Butyric Acid | Auxin] ------ Added 3.5g of AGAR [Jelling Agent] ------ Then filled the measuring cup to the 500mL line before covering the top with plastic wrap. --- Alright! - [13:46]: Let the media mix on the magnetic stirrer for a bit. --- Have the unit set to LOW with a steady vortex. ------ [ » ~20 MINUTES LATER « ] - [14:09]: Okay! Time to pH the establishment media! --- Gently removed the bottom cap of the AC Infinity PH Meter PRO [AC-PHM7]. Placed the cap in the storage case for later. Covered the top with plastic wrap (KCL solution still inside the cap). --- Swirled the probe in a cup of RO water to rinse off the storage solution. --- Shook the excess water out and wiped the unit with a clean paper towel making sure all mineral buildup was removed (kept away from the very tip of the probe). --- Temporarily placed the meter back into the cup of RO water. --- Removed the plastic wrap of the establishment media. - [14:13]: Using the AC Infinity PH Meter PRO [AC-PHM7], --- Took the establishment media's initial pH reading. --- The pH was at 5.14 --- Using the micro pipette, ------ Added pH Up solution. --- Made sure to let the media solution mix for a bit before checking for pH readings. - [14:21]: Adjusted the media's pH until it stabilized to 5.58 --- For this batch, tried to go for a range of 5.4 to 5.8 pH. --- Also glad that I did not need to add PH down. - [14:43]: Poured the pH'd establishment media into separate polypropylene containers. --- Made sure to re-mix the media solution between container fillings. --- Ended up splitting the media solution into 12 containers. ------ 8x » 125mL Polypropylene Bottles [with screw cap lids] ------ 4x » 236mL (0.5pt) Glass Mason Jars [with polypropylene jamming lids] --- Have the lids of all vessels loosely on and set each aside for later autoclaving. --- Also filled 12 empty polypropylene bottles with RO water and placed the lids on loosely (4 bottles are re-used). - [14:58]: Prepped the tools for sterilization. --- Took a new 5.25in x 10in sterilization pouch and added the following tools: ------ 3x stainless steel forceps ------ 3x stainless steel scissors --- Before placing into the pouch, wiped each tool with a paper towel sprayed with 70% isopropyl alcohol. --- Sealed the bag and marked the date. --- Time to autoclave everything in the pressure cooker! --- Filled a Presto 23qt-Pressure Cooker with 12 cups of RO water. - [15:06]: Added a few aluminum foil balls to the bottom of the pressure cooker. --- Placed the first rack on top of the foil. --- Made sure the rack was level and stable resting above the water. --- Gently placed the containers of media into the pressure cooker and onto the first rack. Lids are still loose. --- Made sure to give space for each container and kept them away from the sides of the pressure cooker. --- Placed a second pressure cooker rack on top of the containers of media. --- Placed the containers of RO water onto the second rack. Lids are still loose. --- Placed the third rack on top of the containers of water. - [15:16]: Lastly, placed the sterilization bag of tools on top of the third rack. --- Took the pressure cooker lid and made sure the release vent was clear of debris before placing it on. --- Sealed and secured the lid. --- Pressure vessel has been sealed! --- Alright! Time to sterilize! --- While keeping the vessel level and straight up, moved the sealed pressure cooker to the kitchen for heating. - [15:23]: Placed the pressure cooker onto a butane-gas stove. --- Turned the stove ON and set it to HIGH. ------ [ » ~20 MINUTES LATER « ] --- Once steam was venting out of the release vent, --- Placed the metal rocker onto the vent. --- Shortly afterwards, the pressure top-lock sprung up to indicate the vessel was under pressure. --- Then the pressure gauge started to rise. ------ [ » ~10 MINUTES LATER « ] --- At 15psi, the metal rocker started to rock! - [15:56]: Turned down the stove down to LOW. --- Set a timer for 15 minutes and began monitoring the pressure gauge. --- Maintained the 15psi by making minor adjustments to the stove. ------ [ » ~15 MINUTES LATER « ] - [16:12]: Turned the stove completely OFF and waited until the pressure cooker's top-lock dropped down which indicated that pressure levels were safe to open. ------ [ » ~40 MINUTES LATER « ] --- Once the pressure cooker was at safe levels (0psi) and the top-lock was down, - [16:48]: Moved the pressure cooker into the lung room. --- The pressure cooker was still quite hot so was careful to keep the vessel straight up and level during transport. --- Used towels for insulation. --- Rested the hot pressure cooker onto a stack of 5-gallon buckets covered with layers of towels and folded paper bags. --- Gently opened the pressure cooker and set the lid aside. - [16:57]: While wearing nylon gloves, sprayed my hands with 70% isopropyl alcohol. --- Gently removed the bag of sterile tools placed it onto a Pyrex dish. --- Removed the top rack and set it aside. --- Then one container at a time, --- Gently tightened and secured the lids of each bottle of sterile water before placing onto the Pyrex dish. --- Removed the middle rack and set it aside. --- Then one container at a time, --- Gently tightened and secured the lids of each bottle and jar of sterile media before placing onto the Pyrex dish. --- Throughout the entire process, kept the gloves on and sprayed my hands regularly with 70% isopropyl alcohol. --- Decided to store all the bottles in the Pyrex dish. - [17:16]: Have the dish resting on a shelf in the lung room. The jars of media are set right next to the Pyrex dish on a towel. --- To prevent dust, covered everything with towels. --- Done for now and will check on the growth media tomorrow. --- If all goes well, should be taking new explant cuttings in a couple days! - [17:39]: Night check on the 3x3 veg tent. --- Looking beautiful and healthy in the veg garden! --- All moms are getting bushy and getting pretty close to the grow light. --- Since I plan to take explant cuttings soon, not going to top or train quite yet. --- Clones also looking healthy and seem unaffected by the super-cropping. Nice! - [17:57]: Checked the Ecowitt soil moisture sensor data: ------------------ [ 4x4 MAIN TENT ] --------------- ------ 45% - [CH01 FT » G30 - Heady OG BX1 #1] ------ 34% - [CH02 FB » G30 - Heady OG BX1 #1] ------ 35% - [CH03 BT » G20 - TKO] ------ 55% - [CH04 BB » G20 - TKO] ------------------ [ 3x3 VEG TENT ] ---------------- ------ 43% - [CH05 BL » GR7 - TKO] ------ 45% - [CH06 BR » GR7 - Gorilla Goat #1] ------ 42% - [CH07 FL » GR7 - Heady OG BX1 #1] ------ 44% - [CH08 FR » GR7 - Garlic Budder OG#1] --------- Veg: 38% - 45% | Flower: 45% - 55% --------- General: 30% [Dry] «| 45 - 60% [Moist] |» 70% [Wet] - [17:59]: Checked the 4x4 main tent. --- Ca-Caw!! I got Headies! --- Wow! Heady OG BX1 #1 is drying along beautifully and she is smelling dank! --- Also no signs of mold and RH levels look stable! --- 6 more days until the big trim! - [18:11]: Checked the humidifiers. --- Tanks are still full and no leaks found. --- Wow what a day! --- Still gots more to do! --- Let’s go! Let’s grow! --- Onwards Ensign! Day 05 - Friday - 10/17/25 - Total Days: 187 ----------------------------------- Daily Averages ~[+01:00] - Temps: 76.0°F [24.4°C] - Humidity: 62.0% - VPD: 1.16 kPa - Soil %: [48, 34, 35, 55, 44, 44, 44, 42] ----------------------------------- - [22:57]: Night check on the 4x4 tent. --- Ca-Caw! Headies is smelling dank! --- RH levels are getting a bit dry, but are okay. --- Wow buds are frosty with trichomes! --- With 5 days until trim day, getting stoked! - [23:04]: Checked the Ecowitt soil moisture sensor data: ------------------ [ 4x4 MAIN TENT ] --------------- ------ 47% - [CH01 FT » G30 - Heady OG BX1 #1] ------ 34% - [CH02 FB » G30 - Heady OG BX1 #1] ------ 35% - [CH03 BT » G20 - TKO] ------ 55% - [CH04 BB » G20 - TKO] ------------------ [ 3x3 VEG TENT ] ---------------- ------ 46% - [CH05 BL » GR7 - TKO] ------ 40% - [CH06 BR » GR7 - Gorilla Goat #1] ------ 45% - [CH07 FL » GR7 - Heady OG BX1 #1] ------ 50% - [CH08 FR » GR7 - Garlic Budder OG#1] --------- Veg: 38% - 45% | Flower: 45% - 55% --------- General: 30% [Dry] «| 45 - 60% [Moist] |» 70% [Wet] - [23:11]: Checked the 3x3 veg tent. --- Looking healthy in the veg garden! --- Mothers are getting bushy and tall! --- Super-cropped and trained the taller branches down to lower the canopy. --- Plan to take tissue culture cuttings tomorrow so glad there are plenty of tops to choose. Still deciding on which mother to preserve next. --- Clones in the propagation tray look healthy! --- The original Garlic Budder #2 clone needs watering. - [23:26]: Here is the starting initial watering range: ------ Garlic Budder OG#2 » 256.4g → 300.2g --------- General Solo Range: [Dry] «| [Initial Cup Weight] + ~55-100g |» [Wet] --- Took the starting weight before watering, ------ Garlic Budder OG#2 » 258.9g --- While on a scale, --- Gently misted her straw mulch with RO water. --- Tried to keep the top growth dry. --- Misted 5-10 sprays. Waited a few seconds, then misted again. --- Made sure to reference the watering weights. --- Repeated this process until the cup weighted at least 300g. --- There was no runoff. - [23:40]: Took the saturated weight after watering, ------ Garlic Budder OG#2 » [000.0]g --- Marked the watering date on the side of the cup. Also marked the saturated weight on the back. --- Placed her back into the tent. - [23:45]: Checked the humidifiers. --- Tanks are still full and no leaks found. Day 06 - Saturday - 10/18/25 - Total Days: 188 ----------------------------------- Daily Averages ~[+01:00] - Temps: 76.8°F [24.9°C] - Humidity: 60.3% - VPD: 1.25 kPa - Soil %: [47, 34, 35, 55, 44, 44, 44, 47] ----------------------------------- - [15:19]: Decided to decrease the VPD level a bit. --- Within the AC Infinity App, --- Changed the schedule name from 'Flower [12/12]' to 'Drying [0/24].' Oops. --- For the Main Tent [4x4] controller, --- Adjusted the 'Drying [0/24]' Schedule for the exhaust fan. ------ Decreased the VPD LOW trigger value from 1.5kPa to 1.4kPa --- Adjusted the 'Drying [0/24]' Schedule for the humidifier. ------ Decreased the VPD target value from 1.5kPa to 1.4kPa --- This should increase the relative humidity a bit and will maintain a 60-65% range - [16:59]: Evening check on the 3x3 veg tent. --- Wow the veg garden is raging with healthy growth! --- Even with the lower veg temps, growth has been perky and bushy! --- The TKO mother has been looking a bit on the purple-side, but I plan to increase the temps back after trim day. - [17:23]: Okay! Time to continue the tissue culture journey! --- Checked on the sterilized media, water, and tools. --- Ooo yea! The growth media in the glass jars have solidified nicely! --- The media in the bottles also look great! Found only one that did not gel properly. --- Hmm. The sterile water bottles are not looking sterile. Unlike the first batch (using distilled water), each RO bottle had tiny white particles floating in the water. --- I think this was due to the water source. The RO water used was from the plant reservoir. For the next sterilization, will try using water straight from the tap. Will discard the entire batch and try again later. - [17:34]: Anyways! Time to cut and sterilize another batch of explant cuttings. --- Using the similar protocols as last time, but with a few changes. --- Instead of distilled, using reverse-osmosis (RO) water. --- Also simplifying the workflow and will not be using the sterile water. --- Only taking cuttings from one cultivar. --- Today, attempting to preserve Heady OG BX1 #1 --- Unlike the last attempt, going to be cutting apical nodes and will leave all leaf growth on. --- Last attempt was more for monsteras and not cannabis. - [17:35]: Made sure the lung room's oscillating fan was OFF during the entire process. --- Put on a fresh pair of nitrile gloves. --- Okay! Let's grow Ensign! - [17:47]: Filled a glass beaker with 180mL of RO water. --- Using a micro-pipette, ------ Added 20mL of Clorox bleach --- Mixed the solution. - [17:52]: Poured the bleach solution into a glass mason jar. ------ Added 1 drop of Dawn dish soap. --- Dropped a magnetic mixing rod into the jar before setting it onto the magnetic stirrer. --- Turned the unit ON and set it to a low setting. --- Placed a polypropylene lid loosely on. - [18:02]: Rinsed and filled the glass beaker with 70% isopropyl alcohol. --- Filled another glass beaker with RO water before adding a drop of Dawn dish soap. Mixed the solution. --- Okay! Time to take the cuttings! --- Using a clean pair of trimmers, - [18:09]: Gently cut two clone cuttings from the Heady OG BX1 #1 mother. --- Stripped each cutting down to 2-inch apical nodes making sure to leave about 0.5 inch of stem growth for planting. ------ Prepared a total of 2 nodal cuttings. --- Dropped the nodal cuttings into the cup of soapy water. --- Swirled the cuttings in the soapy water for a bit. --- Opened the jar containing the 10% bleach solution. --- Using clean tweezers, --- Took each cutting out of the RO water and carefully submerged it into the beaker of 70% isopropyl alcohol for about 30 seconds. --- Then transferred the cutting from the isopropyl alcohol straight into the jar of bleach solution. --- Once both cuttings were in the jar, sealed the top with the polypropylene lid. - [18:23]: Flipped and set the entire bleach jar upside down onto the magnetic stirrer. --- Started using the magnetic stirrer. --- But the cuttings were getting hit by the bar so ended up turning the unit OFF. --- Instead, made sure to swirled the bottle every few minutes to agitate the cuttings. --- For a proper sterilization, the cuttings should be agitated in the hypochlorite (bleach) solution for at least 20 minutes. --- While waiting for the explants to sterilize, prepped the still air box. - [18:39]: Unfolded and placed a Safloga still-air box onto my desk. --- Thoroughly misted the inside of the air box with 70% isopropyl alcohol making sure to coat the entire chamber. --- Then isopropyl misted and placed the following items inside of the still air box, ------ x1 » Jar of Establishment Media ------ x1 » Bottle of Establishment Media ------ x1 » Glass-Bead Sterilizer ------ x1 » Roll of Plastic Wrap [pre-cut] ------ x1 » Sterilization Bag Containing: --------- x3 » Stainless Steel Forceps --------- x3 » Stainless Steel Scissors --- Made sure to fully coat the outside of the tool bag and each of the containers with 70% alcohol. --- The bag had a torn corner (Oops), so made sure to spray the inside with a few mists of isopropyl alcohol. --- For the glass-bead sterilizer, ------ Wiped the entire unit with isopropyl alcohol. ------ Before filling the unit with the included beads, misted the heating chamber with a spray of isopropyl alcohol. ------ Misted the glass beads again with a spray of isopropyl alcohol. --- Set the cleaned glass-bead sterilizer into the still air box. - [19:02]: Still air box fully prepped for explants! --- Okay! Explant nodal sterilization complete! --- While still wearing gloves, --- Misted the outside of the explant jar with 70% isopropyl alcohol before placing it into the still-air box. --- Turned the glass-bead sterilizer ON. --- Made sure to re-seal the chamber. - [19:05]: Okay! Finally time to start the tissue culture transplant! --- Let's go Ensign! --- Sprayed my gloved hands with 70% isopropyl alcohol (also put on a pair of cloth arm sleeves), --- Placed my hands through the arm holes and into the still air box to begin the process. --- Started by laying out my initial workspace: ------ » Far Left Quadrant » Jar of Sterile Establishment Media ------ » Far Center » Bottle of Sterile Establishment Media ------ » Far Right Quadrant » Glass-Bead Sterilizer ------ » Mid Center » Bleach Jar with Explant Cuttings [Main Workspace] ------ » Near Left Quadrant » Empty [Trash Area] ------ » Near Right Quadrant » Bag of Sterile Tools & Roll of Plastic Wrap --- Opened the bag of tools and placed the forceps and scissors into the pre-heated glass-bead sterilizer. --- Set the bag in the trash area (near left quadrant). --- Loosened the lids of both containers of sterile media but did not remove the lids. The lids were resting on top and could easily be lifted. --- Also took lid off of the bleach jar and gently set it on the table. --- Took the jar of sterile media and set it in the center of my workspace (to the right of the bleach jar). --- Using my left hand, took a set of scissors from the glass-bead sterilizer and gently cut the bottom of the first cutting. --- Once the bottom cut was made, placed the scissors back into the glass-bead sterilizer. --- Using my left hand, lifted the lid off of the jar of sterile media and inserted the trimmed end of the cutting straight into the growth media (using my right hand). --- Covered the jar with the lid and placed the forceps back into the glass-bead sterilizer. --- Tighten the lid of the jar and set it aside. ------ [ » REPEATED THE ABOVE PROCESS FOR THE BOTTLE OF GROWTH MEDIA « ] --- Once the last cutting was transferred from the bleach jar into the sterile media, --- Turned the glass-bead sterilizer OFF. --- Cleaned up my workplace and placed the scrap stem tips and bleach jar out of the way (near left quadrant). - [19:28]: Wrapped the lid of each explant container with plastic wrap before setting it in the center of the workspace. --- Explant transplant completed! - [19:59]: Using a label printer (Brother DT410), made a set of labels for each container: ------ Heady OG BX1 #1 | 04.24.25 | Photo | Reg ------ Formula: v0001 | ExBatch: 0002 | Lot: 01 | Pod: 01 ------ Establishment Media | Sealed On: 10/18/25 --- Opened the still air box. --- Then one container at a time, took an explant out and wrapped the lid with a label. --- Set the labeled containers onto the propagation tray (in the 3x3 veg tent). - [20:07]: Done! ------ The explants are around 37 μmol/m²/s which gives a DLI of 2.40 mol/m²/d under an 18/6 light cycle. --- Will check daily for contamination. --- Ca-Caw!! Ahh yea! --- Heady OG BX1 is now officially my first true attempt at cannabis tissue culture! --- Using this new workflow, I may try reusing the TKO media. Do plan to take new cuttings soon. May even try using the liquid media. --- Shout out to microclone and Bill Graham! His 'Tissueponics' video contains tips and tricks of the trade that have straight up changed the way I think of DIY cannabis tissue culture. --- Plan to further refine my process and will continue to refine the workflow with each attempt. - [20:15]: Checked the Ecowitt soil moisture sensor data: ------------------ [ 4x4 MAIN TENT ] --------------- ------ 54% - [CH01 FT » G30 - Heady OG BX1 #1] ------ 34% - [CH02 FB » G30 - Heady OG BX1 #1] ------ 35% - [CH03 BT » G20 - TKO] ------ 55% - [CH04 BB » G20 - TKO] ------------------ [ 3x3 VEG TENT ] ---------------- ------ 43% - [CH05 BL » GR7 - TKO] ------ 48% - [CH06 BR » GR7 - Gorilla Goat #1] ------ 42% - [CH07 FL » GR7 - Heady OG BX1 #1] ------ 45% - [CH08 FR » GR7 - Garlic Budder OG#1] --------- Veg: 38% - 45% | Flower: 45% - 55% --------- General: 30% [Dry] «| 45 - 60% [Moist] |» 70% [Wet] - [20:56]: Checked the 4x4 tent. --- Ca-Caw! Looking great my ladies! --- Humidity levels are still a bit on the dry side, but still okay. - [21:08]: Checked the humidifiers. --- Tanks are still full and no leaks found. --- Wow what a day! --- Oh yea, 4-more days until trim day!! Ca-Caw! Let’s go! Day 07 - Sunday - 10/19/25 - Total Days: 189 ----------------------------------- Daily Averages ~[+01:00] - Temps: 76.7°F [24.8°C] - Humidity: 59.4% - VPD: 1.27 kPa - Soil %: [48, 35, 35, 55, 44, 43, 44, 42] ----------------------------------- - [07:08]: Quick morning checked on the 3x3 veg tent. --- The veg garden is healthy and perky! --- All moms and clones are healthy and raging with growth! --- Both Heady OG BX1 #1 explants also look alive and green! - [19:26]: Night check on the 4x4 tent. --- Ca-Caw! We got MENDO DOPE in the trunk! --- Wow terps are getting loud and buds are drying along nicely! --- Looking frosty and coated in trichomes! --- Three more days until trim day!! - [19:33]: Checked the Ecowitt soil moisture sensor data: ------------------ [ 4x4 MAIN TENT ] --------------- ------ 46% - [CH01 FT » G30 - Heady OG BX1 #1] ------ 35% - [CH02 FB » G30 - Heady OG BX1 #1] ------ 35% - [CH03 BT » G20 - TKO] ------ 54% - [CH04 BB » G20 - TKO] ------------------ [ 3x3 VEG TENT ] ---------------- ------ 40% - [CH05 BL » GR7 - TKO] ------ 43% - [CH06 BR » GR7 - Gorilla Goat #1] ------ 47% - [CH07 FL » GR7 - Heady OG BX1 #1] ------ 41% - [CH08 FR » GR7 - Garlic Budder OG#1] --------- Veg: 38% - 45% | Flower: 45% - 55% --------- General: 30% [Dry] «| 45 - 60% [Moist] |» 70% [Wet] - [19:35]: Checked the 3x3 veg tent. --- Vegging along beautifully in the garden! --- Mothers are getting taller and probably could train, but will wait until tomorrow. --- Clones and explants also look healthy and green! --- Gorilla Goat #2 needs watering! - [19:44]: Here is the starting initial watering range: ------ Gorilla Goat #2 » 255.4g → 300.3g and was last watered 5 days ago. --------- General Solo Range: [Dry] «| [Initial Cup Weight] + ~55-100g |» [Wet] --- Took the starting weight before watering, ------ Gorilla Goat #2 » 244.9g --- While on a scale, --- Gently misted her straw mulch with RO water. --- Tried to keep the top growth dry. --- Misted 5-10 sprays. Waited a few seconds, then misted again. --- Made sure to reference the watering weights. --- Repeated this process until the cup weighted at least 300g. --- There was no runoff. - [20:04]: Took the saturated weight after watering, ------ Gorilla Goat #2 » 345.6g --- Marked the watering date on the side of the cup. Also marked the saturated weight on the back. --- Placed her back into the tent. - [21:41]: With a few days before the big trim, decided to sample a few buds! --- Cut and trimmed branch for sampling and wow she’s got terps! --- Buds are dense and have a gassy diesel funk! Ca-Caw!! Wow! --- Without even curing, pretty sure she’s the one! --- Plan to grow out another cycle (in clone of the same pheno), but I think I found my female for my first breeding project! - [22:01]: Checked the humidifiers. --- Tanks are still full and no leaks found. --- Ahh yea! Three more days until the big trim! --- Also next week will be the last for this log. --- But already stoked for the next! --- Planning on popping more seeds and continuing the pheno hunt for another female! --- Since I lost TKO this harvest cycle, plan to grow a clone cutting of the same pheno (#2). --- As for seeds, popping more regulars and going to attempt to grow some of Mr. Grow-It’s Chillout OG! --- Got a pack of F3s and am stoked to give them a try! --- Also going to sprout some beans of Dead Ops OG from Zaza Genetics! --- Chillout OG, Dead Ops OG, and another round of TKO! Let’s go! Let’s grow! --- Hunters of the dank! Ca-Caw! --- Anyways! --- Onwards to next week! [END OF WEEK 26]
Likes
4
Share
1/12/23 all plants stretching nicely. P4 is vary one sided and P1-3 have similar structures. Starting 12/12 cycle tomorrow, still no pre-flower but should have signs by the end of next week. Hoping for at least 2 oz of or each plant.
Likes
5
Share
@RoyColt
Follow
Always R.O Water Watering the plant 3 times for per week 1st Watering with nutriens. 2st Watering with nutriens. 3st Watering with only R.O water & CalMag Extra Boosters: Terra Aquatica Pro Bloom With Sprey 3 times per a week
Likes
12
Share
@Chamed33
Follow
Plant is looking great so far I had to flush it 2 days ago to readjust my run off water ph
Likes
30
Share
2018-03-20 Week 12 Day 1 New week and not much to say. No water or nutes today, just the regular weekly check to see that they look nice and healthy. Raised the lamp about 10 cm to make sure that the girls don't get burned again. Sour Ripper nr1 is 59 cm Sour Ripper nr2 is 57 cm ----------------------------------------------------------------------------------------------------------------------------------------- Strain information After much effort Ripper seeds can introduce one of the most appreciated varieties by genetic collectors. They have worked to get one of the few lines of Sour Diesel feminized version preserving the main qualities of a good Sour D: flavor and potency. Sour Ripper has a sativa structure with a wide distance between branches, little foliage and a more compact and desirable bud than the Original Sour Diesel we work. It's flowering period is 65-70 days. The most "undergrown" taste of the United States available for your collection. Vegetative: 1 to 2 weeks Genotype: 60% Sativa / 40% Índica Indoor flowering: 65/70 days. Outdoor flowering: Mid October Yield: Medium / High Effect: Powerful. ---------------------------------------------------------------------------------------------------------------------------------------
Likes
6
Share
First flowering post - they arnt fully flowering yet tho I musta emit. I dunno why they all seem to be slow to sex but now there are a few pistols showing in the main growth mode so I’m v happy. The cheese plants are doing great. When I was LST’ing I must admit in order to make the canopy much more even I decided to try ‘supercropping??’ I pinched the stem enough for it to go soft and bend so I could get the highest growth node to the same height as all the others. It looked aweful after I did it but now after 24h it looks a lot better - really healthy even! I must admit I gave them a heavy dose of microbes and molasses just after bending and tying. Im sure that had a lot to do with the fast recovery. Full steam ahead to see some bloody pistols!!!!! Im working on which strains I want to grow next at the mo as well. Trying to get sweet seeds to send me some Tropicanna poison but not sure if they send test seeds to the UK. Probably not - we’ll see. Iv been wanting to grow that plant for aaaages. I’m also looking for a really decent gas strain. I been recommended NYCD. Havnt narrowed down a breeder yet tho. UPDATE - Saturday Thought I’d do a quick update just to say I added a few photos and a video from my security camera in there. It’s quite useful just to see how much they are stretching in a week. Not that I need to know it’s just cool. Also when I go away (as I do most weekends for about 2-3 days - sometimes more) I can just tune into the cam to make sure my physical security hasn’t been breached by any gangs lol. Well not any gangs just one - and they happen to be backed by the government. Lol I worry that when I’m away they will raid and leave me an arrest warrant after having stolen all my plants and meds. It’s a fairly dramatic fear but it’s not without its reasonings. I have been raided by the police number it’s times so it’s not a totally irrational fear - the difference is that I’m sober now (other than cannabis medicine of course) and so I’m not drawing attention to myself and bringing unwanted eyes on me and secondly (and maybe more important) I don’t actually sell drugs or weed or anything anymore so yeh. It’s a rational irrational fear lol I do believe the police have bigger fish to fry HOWEVER here in the UK it is still VERY illegal to grow so i have absolutely no doubt that given any chance they would happily relieve me of everything iv built up in the past 4 years (whilst being on probation I will add lol). The proof is in the pudding though. Every since I quit using heroin and benzodiazepines in favour of cannabis things have just been getting better and better and iv been able to function better and better also. I must admit I was worried for a while that cannabis took away my creativity when I used lots of it but I am learning that it was actually just the fact that my life was in a place I didn’t like and I was dealing with serious childhood trauma. When I was using heroin and benzos it allowed me to cover it in order to live my daily life (obviously, otherwise I wouldn’t have been willing to put up with the MANY negatives - there had to be something it was doing for me), however, when I took away the numbing opiates and benzos I had to start dealing with it and it was that trauma and having to deal with it which is why I wasn’t able to be creative. I’m an artist and so creativity is very important to me but for months, well years actually I just wasn’t able to paint or even play music really for that matter. I just couldn’t bring myself to do it, I think now because I was just preoccupied in my mind dealing with stuff. I won’t deny tho - that cannabis in excess DOES take away my motivation to get up off my ass and turn the TV or Netflix off though. I do have to watch out for that because If I’m not careful I can end up sitting there all day smoking when I should be out doing stuff and then I miss windows for my other crops where I can’t just turn the light source on and off whenever I feel like it - it’s quite hard to do that with the sun!! Anyway - I kind of use this space as a proper diary every now and again when I need to get something out. It’s not like anyone but me really reads these bits anyway so it doesn’t really matter!! Hell - even I don’t really read them tbh! UPDATE - I’m all jazzed up about growing again for sure. I somehow only just figured out really that you I can program different ‘scenes’ within my temp and humidity controllers. So anyway obviously the past month it’s been set to the veg/auto settings and I recently obviously had to switch it to the flower settings but I kind of forgot to lower the RH and adjust temp accordingly. So anyway that’s a long way of saying I did that lol. I’m definitely going to include another CBG seed in my new grow as I’m really interested in growing some hemp for medicinal use. Maybe as a tincture and or edibles, probably from rosin. It just seems to make sense rather than doing a nasty crude extraction using alcohol. The only trouble is I believe I sacrifice yield but then the flip side Is it would be less because there is less nasty shit. So I havnt narrowed down a specific breeder yet but iv been looking at a few. I was also looking at 1:1 CBD/CBG strains but they said they need more breeding before it brings the cbg ratios up in the majority of plants as it’s meant for people planting hundreds of seeds (from what I can gather). I received Fastbuds LSD-25, purple lemonade, chemdawg and I dunno something else but I’m kind of uninterested in growing them atm so they’ll stay in the vault. (which is growing pretty big now lol) To satisfy my purple craving I will be growing the sweet seeds Tropicanna poison as it looks banging and iv wanted to grow it since I sort of half grew the Dutch passion critical orange punch. So a long time. I will also be narrowing down two strains from the EU humboldt site. I intend to order tomorrow evening when I get paid as I’m always paranoid of them selling out. This is the only time iv really slowed down to choose what I want to grow. Also this is the first time iv chosen based on flavour first. I intend to cover sweet, sour, Chem and citrus with probably 4 THC dom strains and then the cbg variety also. I’m interested in starting to look at KNF but mainly from a vegetable plot perspective atm. I’m happy and comfortable using salt based nutrients now I’m not paying a lot for them and I’m not buying into the whole shipping a load of water philophosy - I do realise it can only get me so far tho. I do believe my allotment is a good place to start as I’m not reliant upon it. So if my practices don’t work it’s not as big of a deal to me. I rely on my cannabis crop - I can’t say the same about my veg yet.
Likes
39
Share
Fucking trees!!! Plants just broke my indoor plant height record by 2" now. I don't think this is going to brake my gram records tho. Compared to my other tent the buds are a lot smaller and then 2 of the plants have had issues since the start and don't have very many bud locations on them. But who knows they might suprising me at the end of the grow. Plant sizes Brain cake #1 - 51" Brain cake #2 - 53" Brain cake #3 - 48" Brain cake #4 - 32" Well that's all for this tent. Happy growing everyone's!!!
Likes
11
Share
@Crwfz1
Follow
Lots of training on all the girls this week all original sensible two gorilla glue one is the biggest under scrog already ghost is right behind then going to lay the last babby gorrilla across light range stay tuned
Likes
9
Share
In der fünften Blütewoche zeigt sich der Erfolg des Scroggens deutlich. Die Pflanze hat das Netz vollständig durchwachsen, und die Blüten verteilen sich gleichmäßig über die gesamte Fläche. Um die Stabilität der immer schwerer werdenden Blüten sicherzustellen, habe ich zusätzliche Netze aufgehängt. Außerdem habe ich die Beleuchtung von 400 Watt auf 720 Watt erhöht, um den Blüten noch mehr Energie zuzuführen und das Wachstum weiter zu fördern. Die Ergebnisse sind bereits sichtbar, mit dichten und kraftvollen Blütenständen, die sich vielversprechend entwickeln.
Likes
82
Share
Didn't go as well as i wanted it to go, but i had the issue with the lights from alibaba coming in wich caused losses of a minimum of 5000€ in estimated value, but its ok, its ok, its just consumption getting lost, wouldn't profit from it anyway, but i know this is gonna cost me big time when the weed is over before next harvest, but its ok, its ok, they sent 20€ for the mistake 😂 its oke. Get yours at: https://myfastbuds.com/?a_aid=DoDrugs420
Likes
19
Share
Very easy strain to grow. I grew the White Critical Express previous to this grow, I really liked it and wanted to try growing an Autoflower so I went for the Critical 2.0 and it was worth the grow.
Likes
37
Share
Stretch 6 centimètres Jour52 arrosage avec de l'eau ph6.3 Jour54 defolliation
Processing
Likes
21
Share
Switched from 24/0 to 12/12 at the end of day 14, also switched the 730nm Led's on. Its been 7 days the plants have started growing a lot faster but there's still no pistils showing. I started feeding biobizz grow @ 2ml/l At the moment there getting watered every 3-4 days. The light is showing 25000lux on a lux meter app.