
Likes
Comments
Share


@MrGrow
Follow
05.09.2022
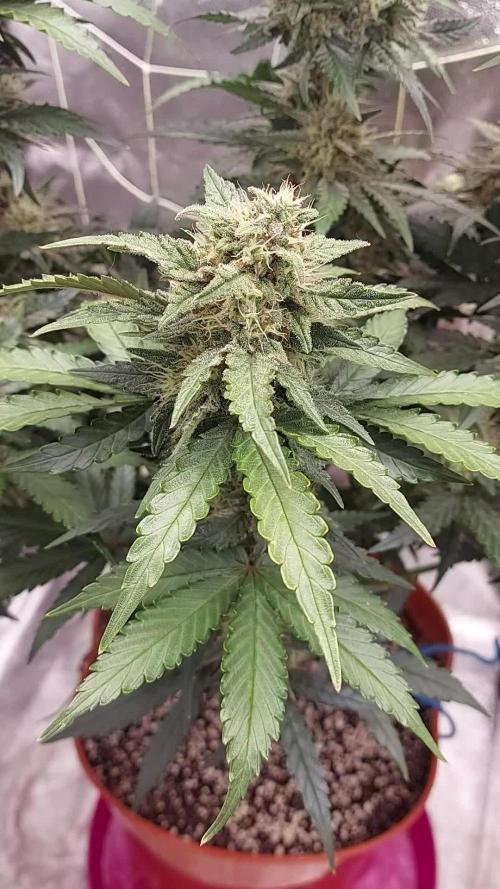
🌱 75 giorni dal seme
🌻 5 giorni fioritura
💧 1.5 l/48 h
ph 5.8
ec 1.35


Likes
50
Share


@AsNoriu
Follow
Day 0. New start. Sponsored grow.
ALL NUTRITIONS ARE GRAMS TO LITRES !!!! Neutralise is in real measurement only.
Soil was mixed two weeks ago !!! That line needs cooling time, have in mind !!!
Main sponsor of this grow is Mars Hydro. They sent me new light again, this time i will try out TSL 2000 model. First impression : easy to assemble, but i would create longer screws and put spacers , that way would ventilate better than now its bolted straight to board.
MSNL send me 5 strains to try out. Planted two purple strains, so had to cover my mistakes with this one, THC Bomb is my back up plan for good stash ;) Think name speaks A LOT !!! ;)))
Day 4. Girl sprouted on forth day, lets GO !!!
Day 5. Made a video, all runs smooth, a bit lanky, needed to put lights on on 3rd, not 4th day ;))) saving electricity not always pays off ;)
Happy Growing !!!


Likes
3
Share

@captaincondor
Follow
Doing nicely quite pungent, the buds are bulking up and some of the pistols are turning amber she's starting to mature !!!!

Likes
14
Share


@Grandillustrator
Follow
Pictures are taken 20 mins after watering left the soil to dry out. The plant on left that is further ahead doing good noticed cal mag issues on plant on right not to worried as reaching harvest time soon anyway but still added some with watering just to be safe . Other than that pretty happy
Likes
36
Share


@NAS_Garden
Follow
Week 6 Report
The plants are thriving with strong growth and great color.
Day 39: The last feed of the vegetative phase—1L of water per plant. At this stage, they’ve absorbed everything really well, and this marks the final watering before transitioning to the flowering phase.
Day 40: Defoliation day! I decided to give the 3 FullGas plants a proper trim, removing excess foliage to improve airflow and light penetration. These are the only plants that haven’t been topped so far, and they're responding well to this treatment.
Day 41: Final day of the vegetative phase. All the plants have grown beautifully and are ready for the next chapter. They look healthy, strong, and vigorous.
The plants are growing at a good pace, with no major issues. The Athena nutrients continue to work wonders, really boosting their health and growth. Some of the leaves are showing signs of thrips, but it’s nothing to worry about. Overall, everything looks great.

Likes
2
Share


@MicroHidroGrow
Follow
18 litros.
Feeding hybrids..........................26g.
Roots (Miner)..............................90ml
Bud Candy (Advanced)...............40ml.
Esta semana no pude sacar fotos. Pero hice un video mostrando el estado de las flores.

Likes
8
Share


@Piro420
Follow
Finally the stretched stopped.
Cut about 10 tops bent about 20 with 90s. Still right in the lights. They are looking very happy even though they are so close to the light ( thanks to high c02 levels most likely.)
Another week or 2 before I cut the temps and co2 levels down.
Been trimming all leaves below light line.
Stinky and brutally sticky I feel like Clark griswold with pine sap when ever I am bending the tops and such..
I think even with them being in the lights I will still get a few pounds of premium flower to smoke :)


Likes
24
Share


@JohnnyBlaz3
Follow
BEAUTIFUL!!! I Think the issue was CAL def like i was thinking but I'll give it a few more days before i can confirm the problem is fixed. the scrog is looking really really nice!!! learned alot from my previous mistakes. keeping the temps down and not doing the co2 early the plants are nice and low and more compact. The Co2 has been started as well!
Processing
Likes
11
Share


@LaughingDragon
Follow
This bugger neatly drank 3L of the solution I had prepared for three weeks!! there some serious growth happening. Defoliation was a good idea at this point to reduce the amount of wasted nutrients and increase the flowering priority.
Had to share the last "video" to show my appreciation in learning about LST here on growdiaries, those are pepper plants.

Likes
12
Share


@Tgrow411
Follow
Alle sind schön in der Blüte außer die Kaputte Genetik die braucht noch paar Tage.
Weiter LST.

Likes
1
Share


Likes
2
Share


Likes
26
Share


@Wicked_Stix
Follow
Was a pretty smooth week for most the girls. Showing some steady growth. I topped all of the plants around day 12 other than the slurricane 7. Ph got a little high since the nutrient level was too low to buffer it at the beginning of the week. Slurricane 7 and sugar cane are the ones that took some damage. I think they will be ok though. I upped the nutrients to 1/4 tsp per gallon and the ph has held stable since then. Should be able to start some training the middle of next week and looks like we might be going 2 more weeks on veg before flipping them to flower depending on how this upcoming week goes. Guess you will have to show up next week to find out...
Likes
69
Share


@ClubRiot
Follow
Kalini Asia by Zamnesia Seeds
Week 15
11L Pot
LED: SP250 (245W) for Flow. Stage
Canna COCO
Mineral Nutrients:
👇
Flawless Finish: 2 ml/L

Likes
46
Share


@PureMedicin
Follow
Buds starting to get really fat and frosty. One of the blueberries have a distinct smell of sweet berries. Too bad its an auto or i would have monster cropped it (clone). Looks like i will get a descent and potent yield.
