


Likes
28
Share


@TrueNorth
Follow
-Strain: Purple Lemonade - Fast Buds
-Tent: 5x5 Gorilla Grow Tent
-Lights: Budget LED Grow Lights 2 x 250 Watt
LED Full Spec/Red Spec mixed boards
-Light Cycle: 18/6
-Soil: Fox Farm
-Air Circulation: AC Infinity Cloudline T6 Inline Duct Fan
WECLOME BACK GROWMIES! Week 12 here with our PURPLE LEMONADE by Fast Buds!
February, 09, 2020 (DAY 78) - YOO GROWMIES! Welcome to week 12 of our PURPLE LEMONADE! week 6 of flower to be exact! she is just thickening right out, i cant believe my eyes daily. she is just exploding even when i think it wont anymore. and to think there are still 2 weeks or so left..... she is still a thirsty and hungry one. she has about 5L with food every other day lol.
The smell is such a sweet citrus, i love when i touch it by accident and i get SLAPPED with that wonderful smell. The nugs have hues of purple nothing to crazy though!
February 12, 2020 (DAY 81) - WHAT UPPPPP!!!! here we are folks another update. think she is getting flushed starting this weekend. this will be the last feed then its onto that FLAWLESS FINISH by ADVANCED NUTRIENTS. hopefully im making the right choice......maybe another week wouldnt hurt....

Likes
14
Share


@LokalGrenz
Follow
Did defoliation on all three never done it before not sure did k over do it but they needed the trim I had a lot of fan leaves blocking bud sights
Jan23 started to use the self watering pots from acinfinity gallon in each pot with fish shit


Likes
11
Share


@SubliminalSociety
Follow
F*CK MENSTRUAL CRAMPS!
Purplematic is a high CBD, low THC strain by RQS. It helps with pain management without getting you high as a kite, ie it's great to battle those monthly belly cramps. It has become my wife's favourite F*CK MENSTRUAL CRAMPS strain.
We use it to make edibles and tinctures. So, a little goes a long way. Rather than pushing for yield, we focus on getting one big fat juicy sticky cola.
ITS FAST - 8-9 weeks from seed to harvest
ITS BEAUTIFUL - the buds get a nice purple color with light brown pistils
IT WORKS - follow our journey to make the best anti cramps medicine!

Likes
15
Share


@Siriuz
Follow
Alright guys, this girl was stunned and stressed at the beginning because it didnt have the right nutrients in the soil mix due to lack of money and couldn't get any for the time being, thank god we did some hustle and ya know!... So for the next time we will grow another amnesia way better than what we could do with this one.
Anyways... at first we didnt think she was going to make it but since amnesia is super fast and strong she did so.
We could have waited a little longer for harvest and probably get better yield but we really didnt think it was going to make much difference at that time....
Of course, every single seed is a new experience for me every time, which is good because i keep learning
In the other hand, sucks because you waited this long and didnt get what you expected, just keep trying until u get better right!? xD!
haha... well here we go again, we love it tho so forever we will keep trying and with all the support and help from all the community at the grow diaries it makes me feel even better!
So yeah we gonna keep growing and someday hopefully
We will be showing you a great great amnesia akdlsakdlaksd xD!
Yo im high its 2 am whats up?
Anywaysss have fun guys enjoy happy growing
Likes
3
Share


@theicyeffect
Follow
Always cool to see what old school strains are all about. If there’s something experience has taught me is that classics are classics for a reason, and that’s the theme of this cycle.
The germination was exceptionally fast, followed by the development of a thick stalk and huge broad leafs, this Gorilla surely started strong.
Humidity and temperature kept fairly high throughout the week (70%/ 24°C), with regular misting, which they love!
So far so good, feels like a happy and healthy seedling. Let’s see what she’s got 💪🌱

Processing
Likes
29
Share


@CanadianFillmore
Follow
Week 4 begins for LSD, the good trip continues! Lots of nice bud sites developing and she has a somewhat sweet aroma. Removed some larger leaves and some yellowing one's. Overall plant looks great. I also increased feeding to 5 liters.
Thanks for looking 👽🔥🌳

Processing
Likes
17
Share


@Fabhz
Follow
easy strain, havent tried it yet, watch out for humidity, Great experience, my first grow. 100% recommended for beginners. Thanks for everything growdiaries.

Likes
13
Share


@Farmerskr
Follow
Así terminaron la cuarta semana! 🙏
Estas 🦍🍌 quieren la flora pero ya!
Se ven maravillosas, hambrientas a mas no poder… Se van a flora con 30 días!
Gorilla Banana - BSF Seeds
Saludos 🖤🙏💚
Processing
Likes
10
Share


@Calarok
Follow
hey guys! I decided to baptized my two ladys and add some visual markers to see wich is witch easily!
Batman = CBDurban / black bucket
Robin = Afghan / white bucket
After watching a tones of videos i finally decided to apply some prunning techniques. Batman received a topping to have for cola's, and Robin was FIM and i remove 2 big leaves that was doing lots of shadow!
You can see the hole process by picture and videos!
Thanks for following! And please subscribe!
Likes
20
Share


@DrGanj
Follow
budding up nicely now. One pheno looks to be growing different bud formations and is much more frosty. O stupidly didn't take a cut of this in veg so I've taken a flower cut to reveg and try monstercropping.


Likes
29
Share


@cherokee
Follow
Всем привет 🤙✌️.
6 неделя цветения закончилась.
Растения уже начинают желтеть из за минимального содержания хлорофилла, с 3 недели цветения после 21 дня я прекратил поливать азотом, хочу провести для себя эксперимент и проверить как влияет хлорофил на вкус.
У меня остался последний полив удобрениями, дальше я начну промывать горшки чистой водой и готовить растения к харвест.
Подписывайтесь на мои обновления 🔥🔥🔥
________________________________________________________________________________________________________________________________________
Ребята предлагаю всем желающим подписаться на мои социальные сети где я делаю еще больше контента о каннабисе.
Подписывайтесь пожалуйста, буду рад всем 😜 !!!
👽 Instagram - https://www.instagram.com/jedi_genetics/?hl=ru
👻 YouTube - https://www.youtube.com/channel/UCRFN2LzgQ4gxDj-6CIIr82g
________________________________________________________________________________________________________________________________________

Likes
1
Share


@Sur_cannabico
Follow
Estamos en plena floración ya engordando esos buds resinosos de las Withe Widow de RQS. Subimos la dosis de nutrientes y como se puede apreciar ningún síntoma de estrés o exeso de fertilizantes
Todo muy bien recibido 🙌🏻
Vamos por mas ❗️
Likes
86
Share


@CANNASIM
Follow
------GENERAL COMMENT------
This week was very flat and steady, girls are growing very well and leafs got sharper.
They have got a new defoliation session, and a bit of supper cropping to make steams stronger. Nothing fancy, just training to an even or more even canopy.
------GG.AK47 COMMENT------
Girl is growing with intensity, shooting various bud spots, i'm having a very good feeling about the outcome from her! Tips are a bit lighter, nothing to get overwhelm.


Likes
35
Share


@Roberts
Follow
Well the plant died on me during the flush period. So it started drying up. So I am harvesting her. She never was super healthy during the grow. I also had her in a cold room as she grew. So it was far from a perfect environment. Its frosty and looks potent. I will try another Jack Herer at some point. Thank you Spider Farmer, Athena, and ILGM. 🤜🏻🤛🏻💪🏻❄️🌱
Thank you grow diaries community for the 👇likes👇, follows, comments, and subscriptions on my YouTube channel👇. ❄️🌱🍻
Happy Growing 🌱🌱🌱
https://youtube.com/channel/UCAhN7yRzWLpcaRHhMIQ7X4g

Likes
11
Share


@MrPistil420
Follow
1 - 2 week left before Harvest!! Smells like Grape and Blueberry if anyone's had blueberry hash they would understand what I'm smelling .Not A Huge yield but quality should be !

Likes
2
Share


@Pardy
Follow
Thanks for tuning in. The harvest was great and the bud smoked very nice. It served me well for more than a month.
Shark widow being one of the closest strains to being a pure indica was satisfying and couch locking at the same time. I'll definitely miss smoking this strain and even more growing it. I grew a shark widow prior to this one, it was Infact my first grow. It hold up well and grow easy.

Likes
15
Share


@Bluemels
Follow
Tag 21 war es zeit die Triple G umzutopfen und sie in ihr eigenes Grow Zelt umgezogen 😁
Schon an Tag 22 konnte ich die Pflanze bei Nodien toppen 😃
Likes
32
Share

@DogDoctorOfficial
Follow
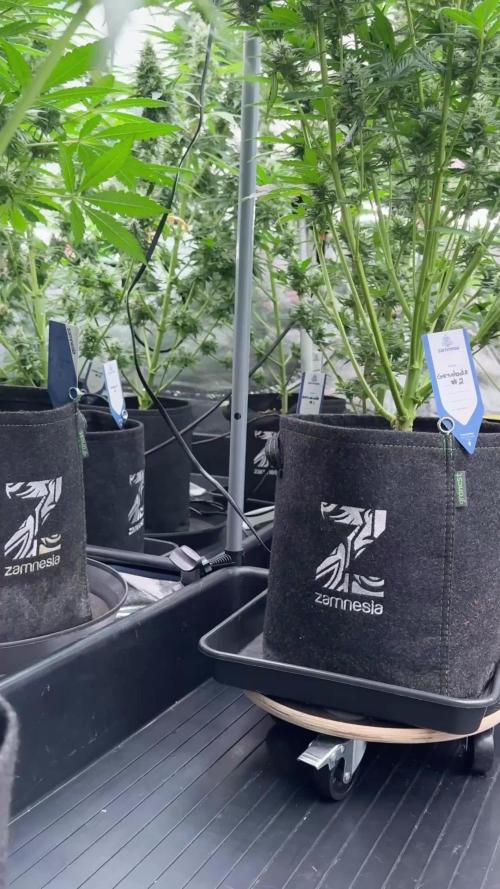
🌸 GrowDiaries Update — Week 11 (Week 7 Flower)
Permanent Marker Pheno #1 & #2 — Flower Week 7
Here we are again, my dear growers — week 11 from seed, and what a journey it’s been! Our two beautiful phenos continue to show their individual personalities: Pheno #1, the tall dreamer, still reaching for the moon; and Pheno #2, the compact queen, steady and strong in her deep greens. Both are truly thriving, expressing themselves with grace and power.
🌱 Quick Recap – From Seed to Now
From the very first sprout to now, this grow has been a journey of observation, learning, and connection.
We’ve seen perfect germination, vigorous vegetative growth, stunning branching, and a seamless transition into flower. We’ve tested light, temperature, airflow, and nutrition — keeping everything balanced with the organic Aptus program (Regulator, Top Booster, and CalMag), letting the soil and biology do their magic.
✨ This Week’s Focus — Trichomes, Terpenes & Color Explosion
At week 7 of flower, nature begins to paint.
Trichomes are swelling and clouding — a forest of frost starting to shimmer under the lights. Terpenes are coming alive, with rich, layered aromas filling the room: sweet, pungent, spicy, earthy. You can almost taste what’s to come.
Flavonoids and anthocyanins are starting to express beautifully, especially on Pheno #1, which is showing the first touches of purple hues. Meanwhile, Pheno #2 remains loyal to her deep emerald tones — dense, resinous, and classic.
☀️ A Note on Light & Albino Tops
Our big mama (Pheno #1) is stretching so close to the LED panel that her top is showing a touch of albinism — a bright, pale glow caused by intense light exposure. It’s not a problem; in fact, it adds a touch of uniqueness to her look. These light-stressed tops can sometimes develop special trichome patterns, and it’s fascinating to observe. A gentle reminder that even perfection has its quirks.
🌡️ Garden Conditions
Temperature: High but stable with the AC in control.
Humidity: Balanced despite the season’s challenges.
Airflow: Excellent — a full dance of air and photons.
Health: Exceptional. No bud rot, no major stress, just pure thriving energy.
🌍 Community & Gratitude
The Dognabis Cup is in full bloom! Packages have arrived, diaries are opening, and the community is alive with creativity and inspiration.
Let’s keep sharing, learning, and lifting each other up — because to grow is to share, and to bloom is to connect.
Massive gratitude to our sponsors and supporters:
Zamnesia Seeds, Ocogenectica Seeds, Aptus Holland, ThinkGrow, Future of Grow, Skunk Magazine, FOG, Grovebags, DaggaDNA, Popeyes Passion, Imperial Seeds,the cannakan and TrolMaster — and of course, to GrowDiaries, to the growers, the dreamers, the lovers, and yes, even the haters. You’re all part of the story, and that’s what makes it real. 💚
🌼 What’s Next?
Week 8 ahead — trichomes will turn cloudy, aromas will peak, and the girls will start signaling when they’re ready for their grand finale. We’ll talk harvest timing, resin maturity, and flushing techniques as we approach the end of this beautiful cycle.
Until then — let the garden sing. 🌿
**THE DOGNABIS CUP OFFICIALLY STARTED** ⏰ @everyone**The Dognabis Cup** is an independent, community-driven virtual competition designed to bring people together, celebrate and share the passion for cultivation. This competition is organized by DogDoctorOfficial and is not affiliated with any of other third-party platforms.
More than 30 contenders will have to grow with the same genetics and using one of our Aptus Pograms (Premium, Clean, Super Soil).
We can follow weekly updates
***(list will be updated all the time as more growers join)***:
🌱 **Dognabis#09P** (**P**hotoperiod)
https://growdiaries.com/diaries/285981-grow-journal-by-sadhus
🌱 **Dognabis#09A** (**A**utoflower)
https://growdiaries.com/diaries/286091-grow-journal-by-sadhus
🌱 **Dognabis #16P**
https://growdiaries.com/diaries/285519-grow-journal-by-fabisfinest
🌱 **Dognabis #017P**
https://growdiaries.com/diaries/285851-grow-journal-by-highgrower0711
🌱 **Dognabis #18P **(**P**hotoperiod)
https://growdiaries.com/diaries/265751-grow-journal-by-develgrow
🌱 **Dognabis #18A **(**A**utoflower)
https://growdiaries.com/diaries/285549-grow-journal-by-develgrow
🌱 **Dognabis #21P**
https://growdiaries.com/diaries/285531-grow-journal-by-mrs-larimar
🌱 **Dognabis#22A https://growdiaries.com/diaries/287996-grow-journal-by-daves-garden710
🌱 **Dognabis #22P https://growdiaries.com/diaries/287990-grow-journal-by-daves-garden710
🌱 **Dognabis #811A Jealousy Diesel Auto https://growdiaries.com/diaries/287216-grow-journal-by-philhsy
🌱 **Dognabis 19A https://growdiaries.com/diaries/289566-grow-journal-by-marijuanaut?lnk=2066296
***Here are some other useful links:***
*Dognabis Cup on Instagram:*
https://www.instagram.com/dognabiscup/
*Explore Aptus Premium Programs:*
https://aptus-holland.com/premium-programs/
*Explore Aptus Clean Programs:*
https://aptus-holland.com/clean-programs/
*Explore Aptus Super Soil Programs:*
https://aptus-holland.com/super-soil-programs/
Happy growing everyone 💚
⸻
📲 Don’t forget to Subscribe and follow me on Instagram and YouTube @DogDoctorOfficial for exclusive content, real-time updates, and behind-the-scenes magic. We’ve got so much more coming, including transplanting and all the amazing techniques that go along with it. You won’t want to miss it.
• GrowDiaries Journal: https://growdiaries.com/grower/dogdoctorofficial
• Instagram: https://www.instagram.com/dogdoctorofficial/
• YouTube: https://www.youtube.com/@dogdoctorofficial
⸻
Explore the Gear that Powers My Grow
If you’re curious about the tech I’m using, check out these links:
• Genetics, gear, nutrients, and more – Zamnesia: https://www.zamnesia.com/
• Environmental control & automation – TrolMaster: https://www.trolmaster.eu/
• Advanced LED lighting – Future of Grow: https://www.futureofgrow.com/
• Root and growth nutrition – Aptus Holland: https://aptus-holland.com/
• Soil & substrate excellence – PRO-MIX BX: https://www.pthorticulture.com/en-us/products/pro-mix-bx-mycorrhizae
• Curing and storage – Grove Bags: https://grovebags.com/
⸻
We’ve got much more coming as we move through the grow cycles. Trust me, you won’t want to miss the next steps, let’s push the boundaries of indoor horticulture together!
As always, this is shared for educational purposes, aiming to spread understanding and appreciation for this plant. Let’s celebrate it responsibly and continue to learn and grow together.
With true love comes happiness. Always believe in yourself, and always do things expecting nothing and with an open heart. Be a giver, and the universe will give back in ways you could never imagine.
💚 Growers love to all 💚
