
Likes
Comments
Share


Likes
11
Share


@Paul_on
Follow
Well I had to harvest some buds from one plant of Blue Zushi as I got some bud rot I found some a wk ago and cut it away and an inch around it ,but it came back in one more cola I saved 50% of 3 colas I had to remove , I harvested the other Zushi too ,I ll show photos soon ,they are really frost after 30 hrs of darkness, I didn't want to risk any longer incase there was any mould from the bud rot still present in the plant/s ,well they smell really dank blueberry and cheese I smell so far ,with a fruity undertone. I will keep you updated on harvest and smoke

Likes
1
Share


@TTerpz
Follow
Start of week 12 : 9/6/25
(Day 35 of flower)
Fed with water : 9/8/25
Fed with nutrients : 9/11/25
Likes
9
Share


@Roberts
Follow
Fast version B is doing good. She had a solution change today. She us just vegging along. No issues at the moment. Thank you Medic Grow, Dutch Passion, SSSC, and Athena nutrition. 🤜🏻🤛🏻🌱🌱🌱
Thank you grow diaries community for the 👇likes👇, follows, comments, and subscriptions on my YouTube channel👇.
❄️🌱🍻 Happy Growing 🌱🌱🌱
https://youtube.com/channel/UCAhN7yRzWLpcaRHhMIQ7X4g.
Likes
10
Share


@HideAndFly420
Follow
Hi all growers
Day 64 this is lady is gone so fast and Fat, every bus is full from up to bottom, and i already said it: FAT :D
I stopped Big Bud and this is the last week of fertilising, i think i've got 3 weeks left for this baby before harvest.
This week i give also aptus regulator to regulate some eventual issue before flushing, Next cycle i'll use it for all the cycle.
Day 66
Nothing to say, I ‘ve got last or two last fertilising before flushing. This baby did all alone without any help needed. She is really beautiful , bud are fat and full. I think that small size won’t be reflect on the harvest weight.
Day 68
Two days ago last feeding at ph 7 and 1100 ppm.
From tomorrow I’ll start flushing for 15/20 days before harvest.
I had to add a little fan because this blue dream is too bushy, I don’t defoliate anymore and soil needed more aeration
Can’t wait to see this baby good .
Day 69
Started flushing with 1 lt with water, i ll'keep flisghiung woth ph controled water at 6.2 ph. Last 10/15 days max, then Harvest is coming!!
Let's see!!
ANY SUGGESTION IS REALLY WELCOME :)

Likes
12
Share


@HighKing
Follow
They still get bigger. I will flush them 1 more time and then they are ready for the 2 days of full darkness. Cant wait to try those crazy frosty buds. Look at those colours 🔥

Likes
7
Share


Processing
Likes
5
Share


@O_GrowTom
Follow
WEEK☆7 J•1 Premier jour de la semaine, les branches latérales rattrapent bientôt la tête centrale. J'attends encore que ça se développe avant de penser à la floraison.@++
WEEK☆7 J•4 La progression continue, j'ai commencé un peu à défolier le bas du plant. J'attends encore pour la floraison.

Likes
6
Share


Likes
9
Share


@rhodes68
Follow
8/24 I am going to be cautiously optimistic here, the buds on Poly are looking so frosty and a consistent ratio of clear to milky at 1 to 3 with very occasional amber caused no doubt by wind damage. Four weeks to go and the excitement is building.
Zona my Zona ... she is just continuing to improve and build buds like a good girl should. Expressing very sativa obviously I dont expect them to be as dense as the indica Poly. I have great designs on the bud she is producing.
Fed just bio-bloom in a light dose (1 tsp/gal) 0.5 gal each more to give weight to the pots in heavy winds than anything else.
Just some pics of Zona, like children, sometimes the troublesome ones find a special place. Six weeks remain for her god willing and the creek dont rise, so those scraggly little buds are gone be heavy. Beginning the process of bringing her branches higher and supported firmly for both wind and weight protection.
I may never cut a plant down again for looking puny. As it turned out she is helping to save this grow :)
8/25 Zona into a seven gal pot for weight in windy conditions as anything else. Just put her smart pot and all into the larger container on top of about 1.5 inch of soil in the bottom and fill in the sides, worked well. If I lose the pot no big deal, those are cheap.
I know its week 19 just making a note till I can update
8/28 Feed - grow 1 tsp/gal bloom 3 tsp/gal pots light due to humidity and sun

Likes
48
Share


@CapybaraProbioticTeam
Follow
Bueno, esta fue la octava semana de floración. Desafortunadamente no pude sacar ninguna buena foto bien de cerca, pero la mayoría de todos los tricomas están bien blancos (o "lechosos"), pero casi ninguno color ámbar todavía. Para algunos, este seria un punto optimo de corte, pero a mi personalmente me gusta que tengan un 20%-30% de tricomas ámbar. Espero que para finales de la semana que viene pueda cosechar. Pero como ya sabemos, la ansiedad es nuestra peor enemiga cuando de cosechar se trata!
Nada que cambiar respecto de la semana anterior, riego y medio ambiente similar.
Esto es todo por ahora. Espero que les gusten las fotos y el vídeo de la planta completa!😃
(Todas las fotos son del día 119).


Likes
7
Share


@Krissci
Follow
Day 1 - LST mostly.
Will start using bloom nutrients this week.
And reduce humidity to 60-55%
Learnt from my last batch that 24hr light is best,
Likes
31
Share


@MadeInGermany
Follow
Info:
Unfortunately, I had to find out that my account is used for fake pages in social media.
I am only active here on growdiaries.
I am not on facebook instagram twitter etc All accounts except this one are fake.
Flowering day 33
since time change
to 12/12.
Hi everyone 😃.
The lady continues to develop very nicely :-).
The buds get thicker and look tastier 😅.
This week it was poured 2 times with 1.2 l each time.
The tent was cleaned and everything checked for functionality.
Have fun and stay healthy 🙏🏻
You can buy this Strain at :
https://www.royalqueenseeds.de/feminisierte-hanfsamen/220-pineapple-kush.html
Type:
Pineapple Kush
☝️🏼
Genetics:
Pineapple x O.G. Kush
👍
Vega lamp:
2 x Todogrow Led
Quantum Board 100 W
💡
Bloom Lamp :
2 x Todogrow Led
Cxb 3590 COB 3500 K 205W
💡💡☝️🏼
Soil :
Canna Coco Professional +
☝️🏼
Fertilizer:
GHSC Powder Feeding Bio
☝️🏼🌱
Water:
Osmosis water mixed with normal water (24 hours stale that the chlorine evaporates) to 0.2 EC. Add Cal / Mag to 0.4 Ec Ph with Organic Ph - to 5.5 - 5.8 .
Likes
9
Share

@Enki_Weed
Follow
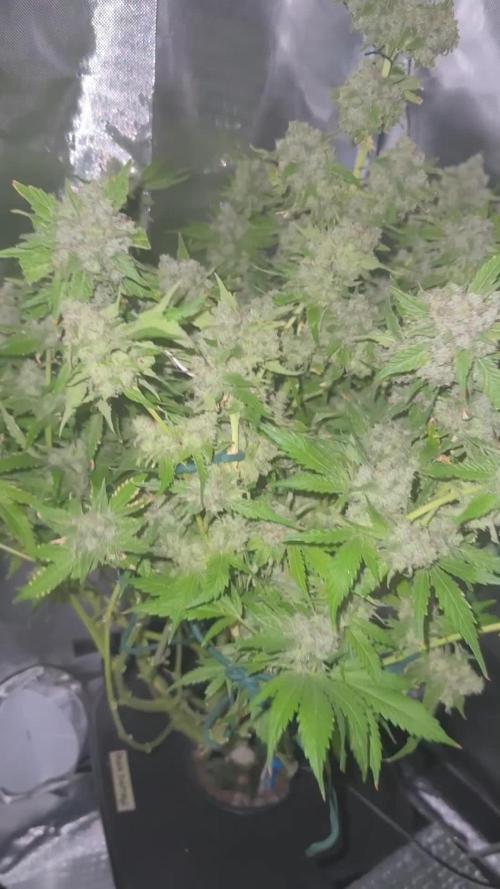
In den letzten ein bis zwei Wochen hat sich unsere Pflanze weiterhin prächtig entwickelt und zeigt nun deutliche Anzeichen einer fortgeschrittenen Blütephase. Es gab keine dramatischen Veränderungen, sondern eine stetige Reifung, die uns dem Erntezeitpunkt näherbringt.
Die Pflanze präsentiert sich sehr buschig und vital, mit zahlreichen dichten Blütenständen, die sich gut ausgebildet haben (siehe Gesamtansicht der Pflanze). Die Buds sind kompakt und haben in den letzten Wochen an Volumen und Gewicht zugelegt. Man kann deutlich sehen, wie die Blütenkelche anschwellen und sich zu reifen Blütenständen formen.
Trichom- und Stigmen-Reife:
Ein genauerer Blick auf die Buds (wie im ersten Nahaufnahme-Bild der Trichome und im weiteren Nahaufnahme-Bild der Buds mit orangenen Stigmen ersichtlich) zeigt den Fortschritt der Reifung. Die weißen, harzigen Trichome bedecken die Blütenstände in Hülle und Fülle, was auf eine intensive Produktion von Cannabinoiden hinweist. Bei den Trichomen ist nun eine gute Mischung aus milchig-trüben Köpfen zu erkennen, die auf die volle Potenz hindeuten. Erste bernsteinfarbene Trichome beginnen ebenfalls aufzutreten, was ein Zeichen dafür ist, dass der Erntezeitpunkt bevorsteht.
Parallel dazu haben sich die Stigmen (die feinen Härchen auf den Buds) von Weiß zu einem satten Orange-Braun verfärbt. Dies ist ein weiteres starkes Indiz für die Reife der Blüten und die nahende Ernte.
Blattwerk und Nährstoffbedarf:
Das Blattwerk der Pflanze ist größtenteils weiterhin gesund und grün, was auf eine gute Nährstoffversorgung schließen lässt. Einige der größeren Fächerblätter können in dieser späten Blütephase leichte Anzeichen von Vergilbung zeigen, da die Pflanze ihre Energie nun primär in die Blütenentwicklung steckt und Nährstoffe aus den Blättern zieht. Dies ist ein natürlicher Prozess, der oft als "Herbstfärbung" bezeichnet wird.
Wir werden die Reifung der Trichome weiterhin genauestens beobachten, um den optimalen Erntezeitpunkt zu bestimmen, der je nach gewünschtem Effekt variieren kann. Auch die allgemeine Gesundheit der Pflanze wird weiterhin im Auge behalten, um sicherzustellen, dass sie bis zur Ernte optimal versorgt ist.

Likes
6
Share


@eldruida_lamota
Follow
Que pasa familia, vamos con la septima semana de floración de estas Wedding Cheesecake Fast Flowering, de FastBuds.
Agradezco a Agrobeta todos los kits obtenidos de ellos 🙏.
El ph se controla en 6.2 , la temperatura la tenemos entre 21/24 grados y la humedad ronda el 50%.Tienen un color espectacular, estan a 12-12, iremos viendo cómo avanzan.
Agrobeta:
https://www.agrobeta.com/agrobetatiendaonline/36-abonos-canamo
Hasta aquí todo, Buenos humos 💨💨💨


Likes
27
Share


@Ksouth1
Follow
Last week went well. She is coming along nicely. Starting to show hairs and is stretching now. I have been doing a lot of lst training and supercropping to make it as even as possible. Removed some fan leaves blocking bud sites. Doing that has made for a beautiful wide plant with a very even canopy. It should allow for even light/ energy uptake by the plant which should create a bunch of better, fuller buds. It altogether should increase the yield a decent amount. Pruning the bottom growth in the next week or so to concentrate energy towards the tops. Until next time happy growing to everyone!


Likes
14
Share


@Snickelfritters
Follow
10/28 - First week in the books. I figured now would be as good a time as any to use a sprouted seed tea because the plants seem to be starting to fully stretch. Pistils are coming slowly but surely. Canopy isn't full but it's still the best I've ever done and I'll take that knowledge into future grows. Exciting weeks ahead. Crazy to think in two weeks it will look more like the finished product than the plants you see before you.
I'll take them out for a photo shoot this weekend. The amount times I will be taking them out of the tent will be limited from here-on-out. These plants are getting cumbersome.


Likes
20
Share

@Naujas
Follow
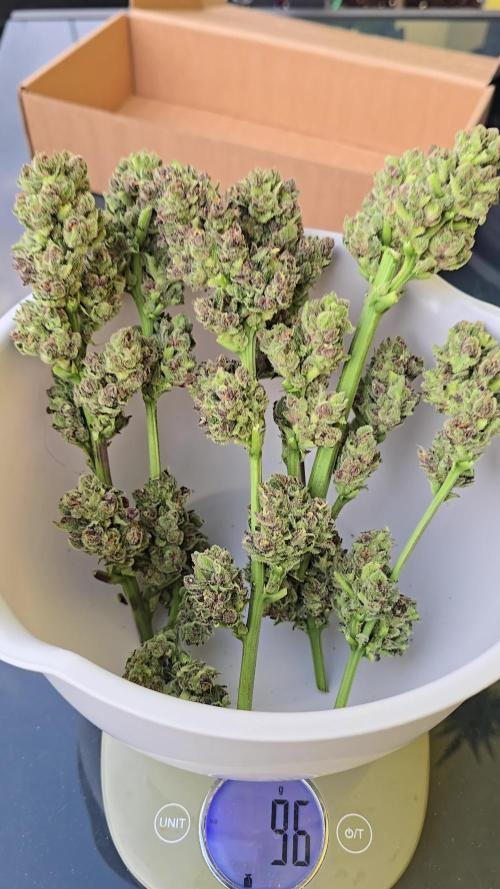
73 dienos!!!! Tiek laiko dingo mano projektas šiauriniame namo balkone, pastarąsias dvi savaites buvo labai karšta, apie 35°, o dabar artėja audros, tad nusprendžiau nerizikuoti ir nuimti derlių :) Visas augimas vyko gana sklandžiai, jokių sunkumų nekilo:) Žiedai atrodo labai pilni trichomų :) (Jau noriu paragauti) :D žinant, kad mano mergaitės saulės šviesos gavo tik labai ribotą laiką, apie 4-5 val. ryto, ji sunokino tikrai gražius žiedus:) @Plagron maistinės medžiagos, jas buvo labai lengva dozuoti (tai nuostabu) kitais metais, manau, tęsiu savo balkono projektą:) sėkmės visiems.