


Likes
16
Share


@Ladyblazed
Follow
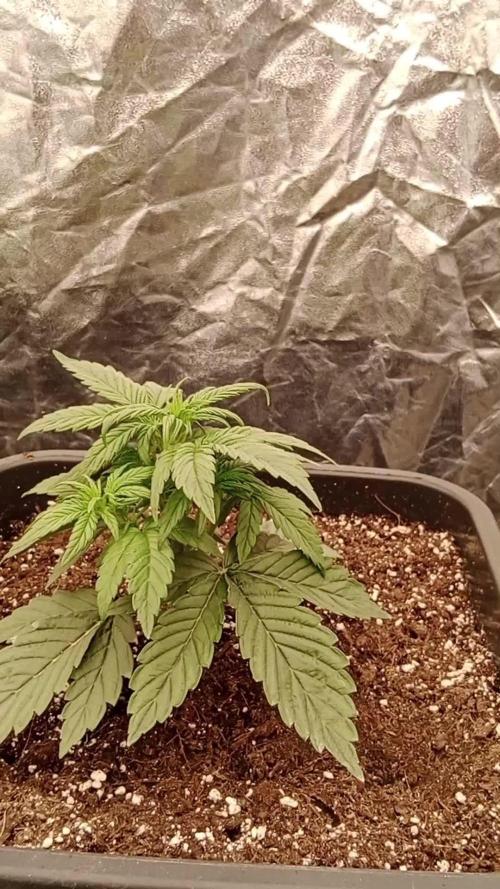
Bud forming so fast!!!!!! Comparing to previous plants I growth in witch I used biobizz light soil I changed kind of soil in this one I’m using canna professional and the different is quite noticeable I’m really satisfied. I was worried that the small box I’m growing in would eventually make the plant suffer but it’s totally not, the plant is responding well!!
Started with the maximum dose of bud ignitor by advanced nutrient. I’m really exited for this lady can’t wait to se the beautiful complete resinous buds.. keeping growing with LOVE 💚


Likes
24
Share


@Grnhead
Follow
Went ahead and supercropped as they were getting a little tall. It seemed to have gone mostly well as they have recovered quickly and there are many more bud sites than before. It’s still early in flower but the Pineapple Express 1 is already full of crystals. The rest are behind but looking good.
They all seem to love their nutrients. This week I will try topping off with a nutrient mix just to keep the TDS from dropping like it did last week. The LUX is around 70K on the top of the canopy!
The growth seems to have slowed. There are many bud-sites but I wonder how much this will yield if there isn’t much more vertical growth. Overall feels to be going in the right direction. Learning how to maximize in this space can be challenging!

Likes
54
Share


@Fatnastyz
Follow
Week 2 of flower
12-5
She is growing nicely. She got a good dose of microbes yesterday.
2k ml she got cal/mag 5ml per gal, Drops 1ml, dusting of yucca, Kelp 1/16th tsp, EM 1 1 ounce per gallon and 1/2 tsp recharge.
Top dress is soon. She will only get water x2 waterings.
Cheesecake pictures tomorrow.
I think I even may have, underwatered Cheese HAHAHAHA No way! Me ..... Underwater.... Thats a first! Now I have it marked. LOL 😬
J/s EM1 is kinda lol Icky. And the bottle almost exploded on me 😂 Good stuff.
12-7
Good ol plain water ph 6.2
Watered around 2.5 liters took it well.
Roots are coming out the bottoms of both bags. 💪 Almost looks like worms 🤣
I must be doin ok, I haven't had them jump out before. 💪 And on both. Not the other 2 🤣 yet?
The buds on 3x are tiny. They need top dressed, but i dont think thats it. May be a slow budder?? Idk, we shall see. But I do see signs of hunger. Top dress next water 💪
Removed all leafs pointing in. Or most at least.
Very happy with progress. Still no signs of over water/feeding yet. 😁🤘
12-10
Top dress both 2 tbs buildaflower, 1 tbs craftblend, 1/4 cup poo.
12-11
Just growin tall.

Likes
7
Share

@Psychopat_od_vedle
Follow
Zdravím začínám 4 týden.Holkam je přesně 23 dnů jsou 15 cm velké a 2 dokonce 20 cm 😂zatím jen jedna vypadá jak mrzák ale uvidíme 🤔 jsem zvědav jak toho dopadne jinak pH 6.0 Ec1.4 konec hlášení zase za týden mějte se ať to roste 🍀
Likes
5
Share


@Deltatigrou0169
Follow
Bonjour à tous,
Très jolie départ sur (21g) (21 de sortie 👍👍👍).
Mise en pots définitive aujourd'hui 😊 c'est parti, maintenant je vais encore plus les bichonner 😊😊😊 j'ai hâte qu'elles grandissent.
Je vous ferai une photo tout les jour pour voir leurs évolution.
Bonne journée à tous 😉


Likes
5
Share


@FlyHighhh
Follow
Gaat goed alles toont gezond . Gewoon afwachten met een lekkere dikke blow . Over een paar weken word het pas wat spannender 😁😁😁

Likes
Comments
Share

@JolliGrowz27
Follow
Last week of flush. Week 10 going to run last few days or week. Depending on trichomes. I think it's done now, but my older grow bro told me, when u think it's done, give it one more week. It does work to push it 1 more week. Smoother smoke and terps peak out.
Likes
17
Share


@mcjordan
Follow
Week 9 started, nothing much has changed from week 8, just looking at buds and trying to notice the changes in size and just checking in. Plants look well, mostly buds, some lower leaves arent that healthy but probably due to light. Still adding flower nutriens, because I think harvest could be one or two weeks away, could flush later. Not sure if I should add even more water? Cant really tell from plants. Hoping this week buds will get bigger in size, currently they seem pretty small still.
Week 9 ended, plant 1 has nice big bugs, some brown-ish flowers, sad that it outgrew space, some top buds were burnt by light, plant no 2 which was under secondary light also have nice big buds (this light has more red color i think), also this plant outgrew its space and had burnt top buds from light, but it looks almost ready, lots of brown flowers, also it has leaves with marks and issues, so already started to flush it, plant no 3 has nice frosty buds, but they are smaller in size, either lightning setup didnt reach it or maybe it was because of all the stress it recieved in vegetation weeks. Defoliated plants, which I think now is kind of mistake, should remove only the big fan leaves, no the small ones, perhaps thats why plant no 3 has smaller buds, because it recieved lots of defolation lately. Changed up lightning setup and moved plants around for better light conditions.
Plant no 1 or no 2 could actually be ready for harvest or in few days, im not really sure, Im waiting on all plants for harvest, because will use grow space for drying and curing. Also I've shoulde started flushing somewhere this week, now Im going to start flushing only at end of week which could be too late.
Likes
6
Share


@TrexyTame
Follow
They’re fattening up a lot now, they all drink really slow but they’re still packing on and look happy. It feels like I’m gonna kill them because I’m only watering about once a week. Humidity is getting to be a problem. Getting a dehumidifier soon, if you have any recs lmk I’m still kinda lost. Too many options and I’m not sure any of them even work. I’m getting the first few whiffs here and there, smell’s starting and everything looks frosty. The oils smell like fresh fruit and cream, some have a cookie-ish rub to em. Every day I get more excited to see what they do in the end!
Likes
10
Share


@ForbiddenSecret
Follow
Have some problem with bud leafs. It's looks like potassium def or maybe nut overdosing. My PPM meter was not accurate and I switched to another one. The old one showed 100 PPM less. Thats why I gave 800 PPM instead of 700 PPM

Likes
18
Share


@BrownRecluse
Follow
This week i noticed some swelling and orangish hairs on about 15 percent of the buds. The smell is less greeny and more pungent. Noticing more nutrition burn. But this week and next week is all flushing so. Dont know why everything says to flush.. But if thats the game so be it. Noticing the no low stress trained plant is fatter (cola) with fatter buds than the low stress trained plant however smaller buds but more of them so they might actually equal out lst plant is just shorter. Ive looked at alot of autoflowers and og specifically and noticed mine seem to be bigger and produced much more than white widow auto and cookie glue auto.

Likes
12
Share


@GREENPHOENIX6262
Follow
*Early Flower 09/10*
(2) Fastbuds - Mimosa Cake Auto
Aggressive LST was applied for even light coverage.
Smaller-Lagging budsites and bigger fan leaves under net have been removed.
Slight increase in nutrient feeds, thus far 0 signals of deficiencies.
*Mid week update - 09/13*
Both plants have grown approximately 6 inches in height
Early flowering continuing to progress accordingly
Half a gallon increase in water feed (Nutes included)
*End of week recap 09/16*
Mimosa Cake (Auto) - Both in week flowering accordingly
Small increase on nute feeds - Moderate increase in filtered plain water feed (1.5 gallons )
*SEE END OF WEEK RECAP VIDEO*
Likes
23
Share


@Dmon88
Follow
I have now started mid bloomon the nute chart. She has started showing more Orange hairs and seems to be a very happy plant has been easily drinking a gal a day

Likes
5
Share


@Tipper23
Follow
Most pistils on the upper buds have turned orange started flush on the 9th April 2023 due to be ready on the 15th April but will check the trichomes before chopping
Likes
8
Share


@Kimngan6221
Follow
This week I'm going to talk a little bit about the 2 gal pots I leave outdoors. Since they're going to be indoors now, I've assembled a fertilizer rack and the bottom compartment is perfect for a cage with all the plants I have. With a length of 1.5m, width 65cm and height of 1m, I will use 4 led bulbs 50w and 2 full spectrum LEDs 36w long 1.2m. 272w / ~ 1m2.
2/3:Plant the plants indoors and lst them. 4 led bulb 50w
5/3:Run off all the trees, as it was soaked with rain water when left outside. is still the old nutritional dose.
6/3: Today I received the led light I ordered. I perfect my design and let the tree in the cage out and lst.
9/3:I feel everything is perfect today, I reduce their lighting time to 12/12. I will cut off all the fan leaves from the stem of the 2gal pots and prune all the small branches of the 1gal pot. in this pruning I will trim them as much as possible. It's been 37 days since the seed and I think they're ready for flowering. I need to flower them urgently because in the next 2 months the weather can be as hot as 40 degrees, and I really have no way to reduce their temperature. I would probably have them flower for 7 to 8 weeks to retain maximum resin. a few days before high, I fliming an NL plant, I experimented with this technique and I feel that they have been very successful since the fliming plants have a much larger stump than other plants. I really like this technique, as it will save me the small space I currently have without having toppings. With just a few simple steps I have got a really big stump and still keep the biggest main bud of the tree. I hope each plant can give me 20-25 grams of dried marijuana.


Likes
18
Share


@Yasyjlakh
Follow
It's growing, but slowly this last week maybe it's going to enter in flowering stage?
This is the #26 day from germination, and I didn't defoliation but only LST
Likes
43
Share


@FreezingIslandBoi
Follow
I have been slowly defoliation as they were getting too bushy. They have been gaining size almost everyday.
I increased feed to 1200ppm for Tangerine Dream and Bad Azz kush. 1000ppm max for Abusive OG as I started seeing some nutrient burn.
Tangerine dream and Bad Azz kush is nitrogen deficient at the bottom once I exposed them to light. I will increase nitrogen feed and stop until they turn green. They don’t seem to nutrient burn yet and I am having more deficiencies mainly nitrogen and phosphorus. I have no clue what the buds are going to be like since this is my 2nd grow. My first grow was sadden with nitrogen toxicity and I was away for service calls for too many times. The landlord was selling the apartment and I had to hide it multiple time which messed with the atmosphere constantly. I will look in my old phone and try uploading it here. Now I am investing to see how it goes. Lots of growers here just delivers godlike buds and I wish I could hit y’all buds 😙💨💨 ✌️🏽
Week ending:
Being at 1200ppm and 1000ppm respectively, I noticed some tip burn. I went down to 1000ppm and 900ppm for TD, BAK and Abusive OG. Abusive OG is still stretching and I had to bend her down. She is 1 week late in flowering. I defoliated Tangerine Dream end of week 2, BAK throughout week 3 and Abusive OG end of week 3.