
Likes
Comments
Share


@GrowWithTheFlow710
Follow
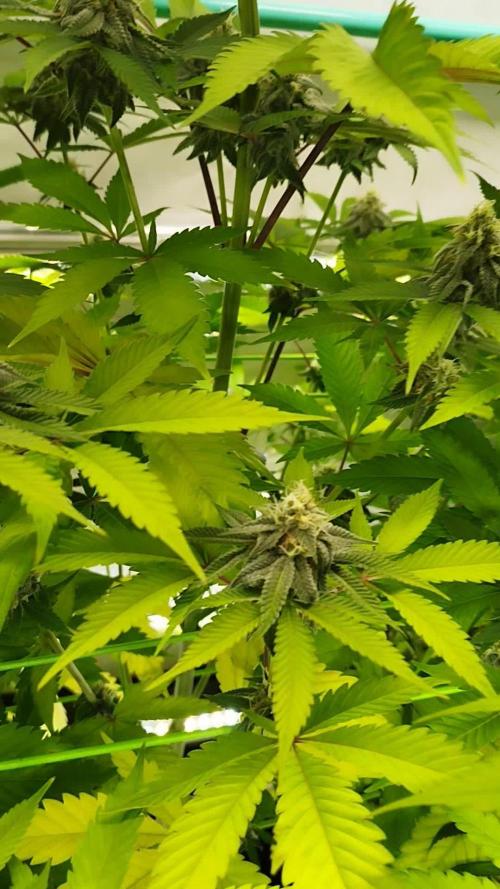
Did a top watering this week with some nutes added. Then back to plain RO water in the SIP. Seeing some light burn so lowered the PAR from avg 650 to 550. Tried a Co2 canister but without a proper lung room for this 10 x 5, it was pretty useless. Really getting into this hobby, love the abundance of free knowledge and different techniques available. Starting to resent those who I see bragging about "trade secrets". I've been spending more time in hash making discords, hash making twitch streams, and grower instagrams. It never ceases to amaze me what we can learn for free with some motivation and the internet.
*I am growing 4 plants here, but only tracking one.

Likes
1
Share


@omgfailsauce
Follow
Lots of new growth this week. Donny 2 is looking great, but I feel like Donny 1 is missing something. Gonna give the girls a compost tea this week.
Likes
10
Share


@Dirty_rich
Follow
Pistilos mayormente marrones y más importante aún; tricomas 100% blanco lechosos. Esperare una oleada más de resina o al menos cosecha con tricomas 50% blancos 50% ámbar.

Likes
4
Share

@Jabbamo
Follow
_______________________________________________________
Di. 17.3. ( Beginn "Herbsteln" )
- 3,15 Liter pro Pflanze gegossen (ca. 100ml Drain)
1,2 ml / Liter "Calmag"
1,0 ml / Liter "Bio Grow"
3,5 ml / Liter "Bio Bloom"
1,5 ml / Liter "Top Max"
Ph 6,2 / 620 ppm
- Luftentfeuchter auf 40% runter
_______________________________________________________
Sa. 21.3.
- 3,05 Liter pro Pflanze gegossen (ca. 50ml Drain)
1,2 ml / Liter "Calmag"
1,5 ml / Liter "Bio Grow"
4,0 ml / Liter "Bio Bloom"
2,0 ml / Liter "Top Max"
Ph 6,2 / 770 ppm

Likes
12
Share

@Hanibert
Follow
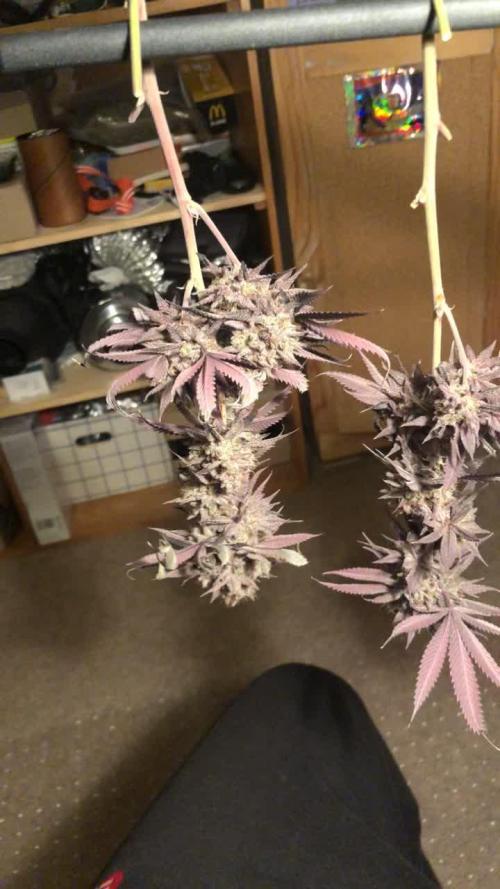
Sadly had a two moldy headbuds, but i think it was my bad. I didnt take my time watering slowly and the right way. I will still wash the rest, didnt see anymore mold, i checked very cautios. From the Too much GAK #3 i also saved three headbuds to try her as flower aswell
Pressed the 45-90u first at 75°C and a 2nd time at 80°C. First press was 5,65g and 2nd press was 0,5 which i dabbed right away and had some very nice candy fumez terps. Makes it a ~1,2% return on the lower quality, i am hoping for ~4g on the 90-160u which will be my premium quality.
Likes
6
Share


@masterofsmeagol
Follow
5/4 I stupidly watered everything this morning. They were pretty much perfect weight for transplant......then I watered them. Oh well. If that's the worst mistake I make I'll be ecstatic. Went back over and found my 1 gal and 2 of those wierd slanty airports that tapers and holds like a gallon and a half and washed them. I mixed up 12 gallons of soil in a garbage bag and mixed it thoroughly with my gloved hands. It's mixed good. Looking at my plants in sadness thinking, "today could've been the day" and noticed a Special Kush of average size I didn't water that weighed in the 220's. I was happy. I filled the pit arpund a cup before removing it leaving the perfect hole. Mykos and water were poured in. Plant came out of the cup REALLY easy. Suprisingly easy. This wasn't totally dry. I was amazed it came out so easy so I kinda rolled it around looking at the roots. I started lowering it in the hole and I felt something break away but it webt DIRECTLY into the hole made for it. I tucked some soil around it but it was pretty tight from packing it around the empty cup. Didn't take a picture but the plant is fine. That was an average size plant too. So I may have to give some of the strains I popped later a little longer before I transplant. After everything's been transplanted I'll need to change lighting again. I think I'll open the window and use the hps and the l.e.d on the days and nights cThat's these girls won't be hardening off. I so wanna go plant those others but my intuition tells me to wait until morning and it's been serving me well. A couple can stay in cups longer. Not much longer but still.
5/5 Transplanted everything but two this morning into 1 gals with 1/2 happy frog half ocean forest. Mykos and water used during transplant. Found put the l.e.d was on for 24hrs for a while. I made sure the timer switch was ON but it was a different cord plugged in. Oh well. All transplants went perfect. I'm picking up an adapter for the outlet so I can plug the power strip into the timer and only use one timer. I had to hang the 150watt hps back up with the 1,000 watt equivelant 105 true watts. I hope this lighting setup works. Chemdog #4 and One MK Ultra will be transplanted later today or later in the morning. I also opened the shade to the south facing window. Shits getting real.
EDÌT: I FINISHED TRANSPLANTING THE LAST TWO PLANTS AND PICKED UP THE ADAPTER SO I COULD HANG THE HPS NEXT TO THE L.E.D. THEY WERE FIBE WHILE I WAS GONE. EASIEST TRANSPLANTS EVER. THEY ALL LOOKED PERKY AND HAPPY SIX OR SEVEN HOURS POST TRANSPLANT. I OPENED THE CURTAIN TO (SOUTH FACING WINDOW) BUT I MADE SURE THE PLANTS WEREN'T IN THE DIRECT LIGHT. EVEN THOUGH IT WOULD PROBABLY BE FINE. LAST TIME I HAD SEEDLING IN DIRECT LIGHT. I'LL PLAY IT BY EAR BUT IM HAPPY.
EDIT 2. Went back over to meditate by the stream and do my qigong. It's 75 and BEAUTIFUL today. The girls will be going out for a few hours on days like this. Anyway when I went in I was surprised to see everything looking nice and happy with praying leaves. Nothing is in direct sunlight but damn that window let's in a lot of light.
5/6 Girls LOVED the transplant! They seem to be all happy. No stress. Easiest transplant I've done. Leaves are praying upwards so I think the lights are approx tje right distance. They'll be going outside soon to harden off. It's been in the 70s but it's rainy now. I'll play it by ear according to weather. I'll continue to monitor lighting and I may lower the hps.
5/7 The soil was super dry when I went over this morning. Everything looked awesome though. I used about a half gallon watering. I don't want to water to run off. I want to keep the nutes IN the soil. It's also easier to fix an undet watered plant than an over watered one. It came out to about a half gaterade bottle on the biggest and half that on the smallest. I'll gradually increase water after I monitor the response. The water sat on the soil for quit a while so they definitely needed it. Looking good so far.
5/8 Soil lookeddry this morning. I think I'm going to up the water. Last time I dod seeds I gave like a pink. Some plants still had a little dampness where I watered that I could see. Others looked dry but happy. I gave the REAL dry bigger ones a small circle around the rootball. Just in case. I'm thinking of lowering the hps slightly so it's at least level with tje L.E.D. That window being open gives tons of light. If u moved them slightly left they'd get DIRECT sun most of the time. I'll be bringing them outside soon to start hardening them off.
EDIT: WENT TO CHECK THE GIRLS AT 5 TO MAKE SURE THEY WERENT DRIED OUT. THESE GIRLS ARENT JUST GETTING BIGGER BY THE DAY THEYRE LOOKING BIGGER FROM MORNING TO NIGHT! ITS BEEN RAINING LIKE CRAZY BUT WE WILL HAVE GREAT WEATHER NEXT WEEK AND I'LL BE BRINGING THEM OUTSIDE. I'M SUPER HAPPY WITH GROWTH SO FAR. ILL PROBABLY HST (TOP/FIM) AT THE NEXT NODE. I WANT THEM TO SETTLE IN NICELY BEFORE STRESSING THEM.
5/9 I may have stupidly uploaded doubles of pictures from today. Soil LOOKED real dry. I gave the plants their first real watering. I still went light. Almost a gallon with all plants. I know many say I should be watering to runoff but I want to keep the nutes in the soul as long as I can I don't want to overwater. I always start out careful. Once they show they xan tolerate it I'll increase water next time. This weekend it will be raining but after that we are getting some real good weather and I'll he taking the girls out to begin hardening off. I also need to take a look and top/FIM the plants now that they are settled. Also need to wash grow bags and sanitize outside.
5/10 It's pouring out. Horrible night and morning but this is about cannabis. After the watering ALL the plants shot up in size! Substantially. Leaves are over the sides of containers. I think I'm somewhere close with the watering schedule. I may bring the hps light down a little. I also NEED to start HST. I need to FIM and/or top these girls. Unfortunately I've been dealing with medical problems of my wife so I haven't got to it. If I get some sleep I may do something this morning or in the afternoon.


Likes
25
Share

@Dr_Green_Thumb87
Follow
5/29 - 6/5 Flowering Week 3
🌡️28c
💧Tap water
🌀 55%
Defoliation during this week


Likes
11
Share


@rold8388
Follow
-Stretching big time.
-Finished at 2.6ec and 5.9ph.
-Potassium silicate from Humboldt is crushing the stem wall development.
- roots filling out bottom of bucket.

Likes
5
Share


@Mr_nugs_lover_David
Follow
She looks absolutely gorgeous on her 2nd week,she's a super big girl that unfortunately I did not train however I'll train her for sure if I have the possibility to do so.she's being grown 100% organically without any type of chemicals full of salts,just bacteria,bat shit,humic acids,seaweed powder and love
Likes
30
Share


@SooSan
Follow
Mars Hydro m'a sponsorisé, je vais donc tourner à 100% en Mars Hydro !
J'ai donc une nouvelle tente, la 2in1 90x60x140 Mars Hydro !
Et le FC-E 4800 est arrivé ! 😍
J'ai divisée la 90x60x140 en 3 parties (et donc 3 Diaries) :
1️⃣
🏠 60x60x140
☀️ FC-E 4800
🍁
1x Black Bomb / Philosopher Seed
2x Amnesia Lemon / PEV Seeds
1x Blueberry / PEV Seeds
1x Blueberry / 00 Seeds
1x Wappa / Paradise Seed
1x Dark Phoenix / Green House Seed
1x Quick Sherbet / Exotic Seeds
1x Mango Cream / Exotic Seeds
1x Banana Frosting / Sensi Seed
1x Hindu Kush / Sensi Seed
1x Fast Mix / Sweet Seed
📎 https://growdiaries.com/diaries/122084-grow-journal-by-soosan
2️⃣
🏠 30x60x90
☀️ TS1000
🍁 4x Fast Mix - Sweet Seed
📎https://growdiaries.com/diaries/124052-grow-journal-by-soosan
3️⃣
🏠 30x60x50
☀️TS1000
🍁 4x Quick Sherbet
📎 https://growdiaries.com/diaries/122080-grow-journal-by-soosan

Likes
14
Share


@OutForReal
Follow
Song of the week : Jingle bells 🌲
14.12
Boom bang 🔥 ! I think I've found my outdoor 12/12 Autoflowering phenotype , with this height , that shape in a 7tL pot , the flowering under 18/6 , and the vigour : she have all that I was searching for.
Now I have to wait and see for the flowering and yield to really know if I've found my winner
I also hope that the sex reversion will be effective soon but to stop doubting I prefer to spray it again with sts
Now concerning her health and feeding : she has been feed with 1 tea spoon of Mr.B's Green trees Bloom because it's time to push some more pistils but on the other hand the lower leaves are starting to yellowing a bit so suspect her to be or a huge eater or that the pot is so small that she need to be feed at each watering. Whatever it could be she will 're rice s little amount of beg nuts this week then I'll get back to the regular feeding ✌️🏼🦎
-------
15.12 - I have made 2 videos today. One to show you how it rain in my country and the second to show you the wind during the rain. A regular rain not the hard one
Likes
26
Share


@XperencdGmanXG
Follow
looks like ive only got 2 weeks left on these, they are bigger and denser than when i grew it outdoors this spring. stickyer as well. Time to start looking at these under the microscope. More to come...


Likes
6
Share


@802FIZ0
Follow
Had to do the first res change, brought the ppm to 620+/- . This week was recorded on morning number 11. Roots are starting to come out of the net pots in all 3 plants. Looking forward to next week with a new res change to 800ppm.
Update. 4/10
Res change to 850 and ph of 6. Day 18.
Will do res change around the 28th to a heavy feed for late veg stage of around 950 to 1000. That will bring me into flower for the 2 blue dreams.

Likes
1
Share


@Islandhigh
Follow
LST training for my little girls she begins to recover from training another 10 days or more depending on their vigor before flowering✅


Likes
14
Share


@eurorack
Follow
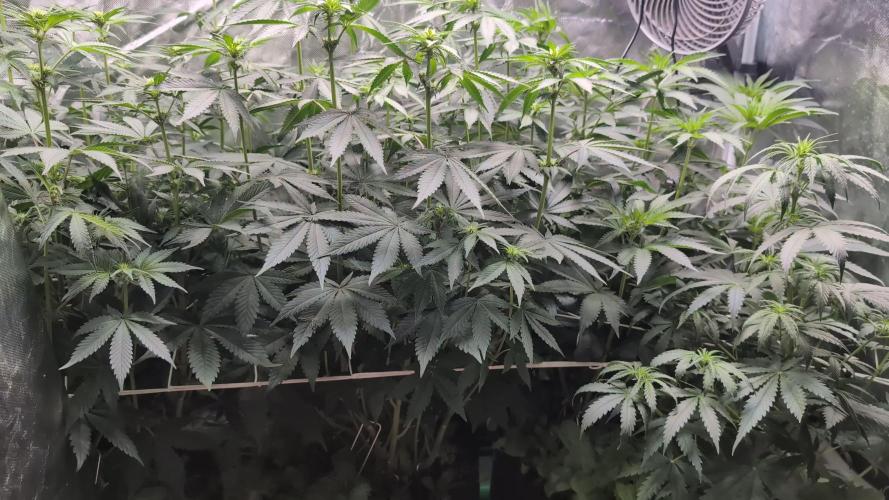
Pretty much the same state as last week, plants growing well, still have the runty Pink Kush plant but its pushing flowers out well and getting some good colour to it. Red Pure plants are growing great though one of them has some leaf spotting but its not seeming to hinder growth.
Nutes same as last week, only watering when I get a full finger-depth of dry Coir and checking with soil probe for pH and Moisture too, getting a regular pH7 in the soil, I've got some pH Down to add a drop into my tap water just to ensure I'm watering with the right pH.

