The Grow Awards 2026 🏆 


Likes
10
Share
@TopTerp
Follow
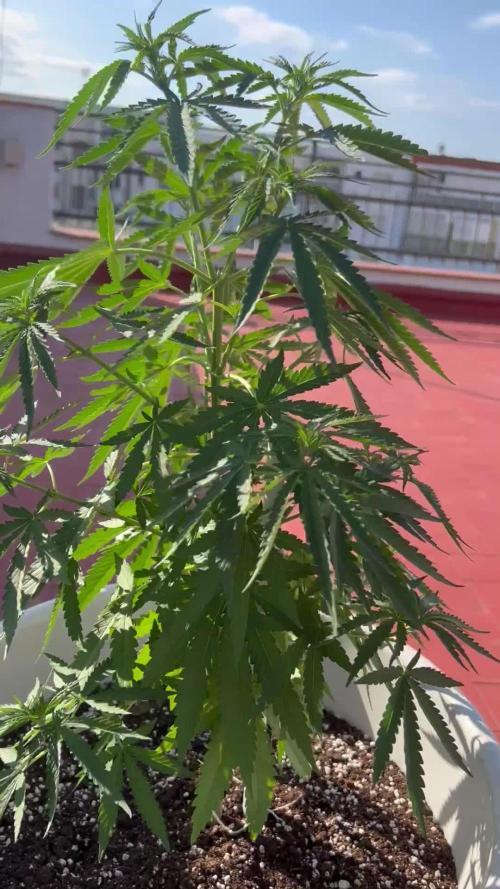
The phenotype named "Amnesia" was harvested at day 66. She was the smaller of the two, though she was frosty like no other.
The phenotype named "Gold" is much larger in both plant and bud structure. She will go on for at least another week in hope of her frosting up some more.
The buds are equally dense, but nonetheless there is quite the variation within this 5-pack of seeds. They seem more like cousins than sisters. But I am just a newbie, and this is my first grow, so take it with a grain of salt.
Also: This week I started adding a few hours of UVB every day (just a 25w bulb for reptiles)

Likes
5
Share
@PlantMike
Follow
Purple Alaskan has turned into a beast. She eats like a hog and puts size on all day every day I'm running the solution at 1.95 EC and still cannot properly feed her. I just mixed the res with a solution of a shade over 2 ec and pH to 5.5 to account for the pH drift I've been encountering, first pistil hairs are evident now and I have been deleafing to try to keep intra-canopy humidity in check. I added a new Viparspectra P1000 in the tent to give 220w of power to give her the photons she needs without keeping the one light right on top of the leaves. Here comes flower!

Likes
17
Share
@GangbudsGenesgdl
Follow
28/12/20. inicio de semana, 64 cm de altura hoy se aplico un nutriente foliar marca mexicana Rootz kelper son un extracto algas y azucarez y se aplico por riego giga grow. este contiene guano de murcielago
todo organico.
30/12/20. hoy se rego con forzasilicia un fertilizante organico de una marca mexicana muy buena en mi pais
01/01/21. hoy se aplico un nutriente foliar marca mexicana Rootz💪 kelper son un extracto algas y azucarez y se aplico por riego giga grow. este contiene guano de murcielago
03/01/21 cierre de semana 68 cm

Likes
29
Share
@Spliffing_Around
Follow
Now they are a bit bigger , this is the start of week 2 , now day 19 in real time from germination.
I would appreciate any help to maximise the yield.
I feed around 500-600 ppm. How much should the drain be ? I have to plants struggling, one had 500 run off , should I give nutes or flush them more ?

Likes
19
Share
@3footgiraffe
Follow
She has come down! .... 13 weeks start to finish, I let her go a little longer than necessary but she looks really good, should take a week or so to dry and then I will update the harvest.
114 grams/4 oz dry weight after one week in the box, happy with the result. 😉00
Likes
20
Share
@French__flair
Follow
First Week of flowering
Week without too much hassle. A small excess of fertilizer but nothing serious. Uniform color. High water consumption (10L every 2 days), you can feel that they are in good shape.
Semaine sans trop d'encombre. Un petit excès de fertilisant mais rien de grave. Couleur uniforme. Grosse consommation en eau (10L tous les 2 jours), on sent qu'elles sont en forme.
Una semana sin demasiados problemas. Un poco de exceso de fertilizante pero nada serio. Color uniforme. El alto consumo de agua (10L cada 2 días), se puede sentir que están en buena forma.

Likes
41
Share
@MadeInGermany
Follow
Flowering day 37
since time change
to 12/12 h.
Hey guys :-)
The buds have developed incredibly nicely this week.
The smell is getting more and more extreme :-) .
The whole plant itself looks perfect 👍.
The growth has slowly stopped as the full energy goes into the production of the buds.
This week it was watered 3 times with 1.2 l each (nutrients see table above)
They were individually inspected and checked for their health.
Osmosis water for the coming week was refilled in a 100 l tank 👍.
Have fun reading the diary and stay healthy 💚🙏🏻
👇🏼👇🏼👇🏼👇🏼👇🏼👇🏼👇🏼👇🏼👇🏼👇🏼👇🏼👇🏼
You can buy this Nutrients at :
https://greenbuzzliquids.com/en/shop/
With the discount code: Made_in_Germany you get a discount of 15% on all products from an order value of 100 euros.
👇🏼👇🏼👇🏼👇🏼👇🏼👇🏼👇🏼👇🏼👇🏼👇🏼👇🏼👇🏼
You can buy this strain at :
https://www.exoticseed.eu/
Water 💧 💧💧
Osmosis water mixed with normal water (24 hours stale that the chlorine evaporates) to 0.2 EC. Add Cal / Mag to 0.4 Ec Ph with Organic Ph - to 5.8 - 6.5
MadeInGermany

Processing
Likes
25
Share
@Greengirl420
Follow
Ok so this week has been awesome! These girls are so much fun to watch! They seem to be doing very well!
We have stronger lights now, We are using a 1000 watt, Plus a 2000 watt Spider light LED. Our room is 2x5. We raised them up today to 24inches away hoping to gain some height.
Plant #1 we topped at 11 days and did some LST and girl #2 we just let it be. We have removed leaves from both plants.
I am super excited to see how it goes 💨 💨 🤞🏼🤞🏼🤩🤩
Likes
2
Share
@morganfreeman420
Follow
La planta crece sana y fuerte, y la planta definitivamente acepto la poda y crece super bien en su nuevo hogar de 50 litros
Likes
12
Share
@HowtoBubatz
Follow
Unfortunately I lost some of my timelapse footage and the harvest shots of the plants hanging, so I only have the week 10 pictures left.📸
Still, this run with Ztrawberriez Auto was smooth and very enjoyable.🌿💚
All three plants finished in about 11 weeks from seed to harvest.
The aroma and taste came out pretty much the same across the whole run, sweet, fruity with that little pink pepper twist, a really unique profile.🍓
#1 was the biggest and most compact of the three, with very dense, stacked flowers.💪🔥
#2 and #3 produced slightly fluffier buds, but still frosty, aromatic and with great bag appeal.🌸
I gave them all 48 hours of darkness before chop, then trimmed and hung them up. After 9 full days of drying they were ready for trimming and went into jars for curing.
The final result: beautiful, resinous flowers, consistent in flavor, with some variation in bud structure but overall great quality 😍.
Even without the missing footage, this run left me more than happy 🌟🌿
Likes
26
Share
@pifflestikkz
Follow
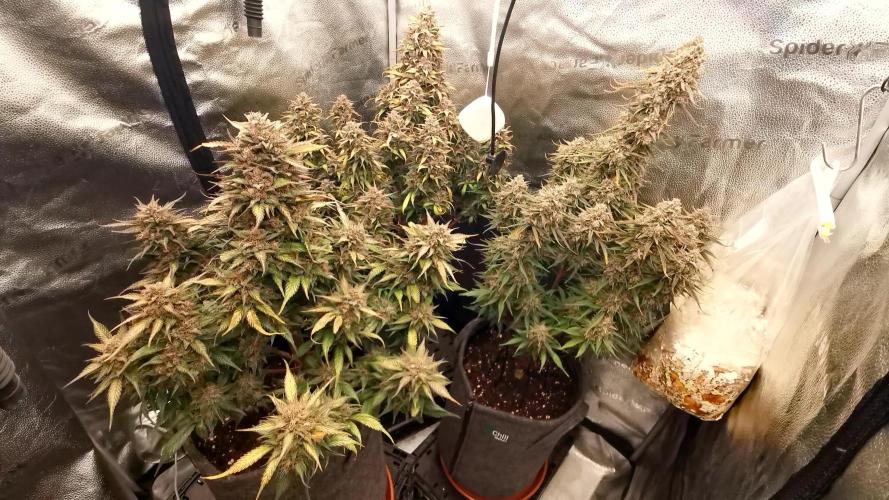
Day 43
12/08/24 Monday
Feed today, it was warm again so they drank the whole 300ml each so I have topped up another 150ml to see run off to prevent salt build up.
All thriving 😍✌️💚
ACOP and Melonade Runtz structure is stunning 💪
Divines Overdose is getting chunky and showing nice stack potential 👌
Leaving these to just run there natural course, will allow me to best pick my next SOG run with micro autos indoor 😎
Video update
Day 45
14/08/24 Wednesday
De-chlorinated tap water pH 6 only today.
Day 48
17/08/24 Saturday
Another watering today using de-chlorinated tap water pH 6 only.
Orange bud is tall!! Top her next time.
Critical orange is lovely and compact.
Overdose is nice and compact,
Melonade Runtz nice compact structure also.
Picture and video update ✌️ 💚


Likes
8
Share
@Bud_vista
Follow
We are entering week 6 now!
Since the last heavy defoliation 3 days ago she’s handling any stress like a champ. No highs of slowing down growth. First pistils are showing and looking strong
I feed her with 2liter of ph regulated water from bottom and about 1,5liter from top every 4 days.
The stretch is visible but not that crazy, which is good in regards of the limited space in the vgrow. At the end of week 6 she’s getting a little defoliation to ensure good light conditions in the lower part of the plant.
Processing
Likes
13
Share
@DrewbieDoobieNoobie
Follow
I think I started flushing to early, back to feeding for 2 more weeks then I will flush, I goofed on the flowering time I did not take into consideration the veg time for 4 weeks so my harvest is more like a month out I see some yellowing in the lower leaves these nugs need to put on some weight so back to feeding. I scrapped the SCROG and the Blue Dream. Some new pics and some new time-lapse. A small tribute to one of the greatest Drummers in the world. RIP Neil Peart. they are starting to smell a little stronger. I hope I did not mess these up gave them a diluted feeding today 1/11/20 and soaked the whole pot till run off, PH was 6.1 PPM was 1780 lets see what happens this week. Trichomes are looking milky and a few amber, I want to see next week if it puts on any more weight, Got a good comment on my question regarding early feeding and stunting the growth Thanks GD Community. I will try not to RUSH these ladies and give them a little more time. 🙏


Processing
Likes
6
Share
@Marquise_ao_Sul
Follow
This month and the next will be at day, 40 Celsius, i have the lights on at night , 18 Celsius, and I got a water atomizer that being more humidity to the grow. She handle the hot, till now very good.. Let's work on it.
This seed it was the last that James from RSA send me and, due to several problems i never can't make a RSQ diary..
She grow, a 2year seed!
Congratulations Royal Seed Queen!
I will do my best this time.

Likes
12
Share
@SnarkyGoat
Follow
I wanted to title this weeks grow "How Big Are Your Balls? (root balls that is, lol)". I've been wanting to post pictures and video of the root balls for a while now, so today's the day! The temperature has been dropping here, so the plants are getting much less heat stress. In a couple of weeks the temperature should be down into the 60's and 70's during the day and all will be good.


Processing
Likes
14
Share
@wolvex
Follow
I am a little bit worried about its flowers size so I've duplicated the green sensation dose from 1mL/L to 2mL/L due I haven't using any other fertilizer apart from the banana (+potato+honey) juice . These photos are intended to take a look at the state of their trichomes, since, according to the variety information, there is only one week left to be harvested (although I do not believe it). Lets see what happens.
Likes
Comments
Share
@Alexkghdjnd
Follow
In the end I was pretty happy and surprised about the dense and hard buds! Especially when I think about the way we had to move this plant in a setup that was completely crap except the LEDs.
Likes
11
Share
@JohnnyBarrel
Follow
Week 16
Nothing really moved this week. It’s something like between low tide and high tide: not my favorite moment … waiting for blossoms and flowers 🙄🙏.
Good point is that every plants are healthy ( except a parasite problem on Psicodelicia) and well
prepared for flowering.
For now it’s bad weather outside: 20 degrees max, with lot of wind and rain (cf video). The green house is the best option despite of less exposure.
Morning soon I moved the plants outside to sprayed them with potassium soap (natural insecticide). I cleaned the grow space inside the greenhouse (didn’t touch spiderwebs…good insecticide too).
I removed the automatic watering and get a few liters of rain water during this days.
Watering 1L every 3 days
-Calmag + Cannazym + Alga mic + Root booster
-Flora Series: preflowering quantities.
Daylight 14h30: 6h50/21h20
Blackberry Moonrocks is still healthy; no problem of deficiency or pests, diseases. This strain is resistant and vigorous: no more stretch, waiting for flowering.lot of blooming sites along the branches.
