
Likes
Comments
Share


@guerilla
Follow
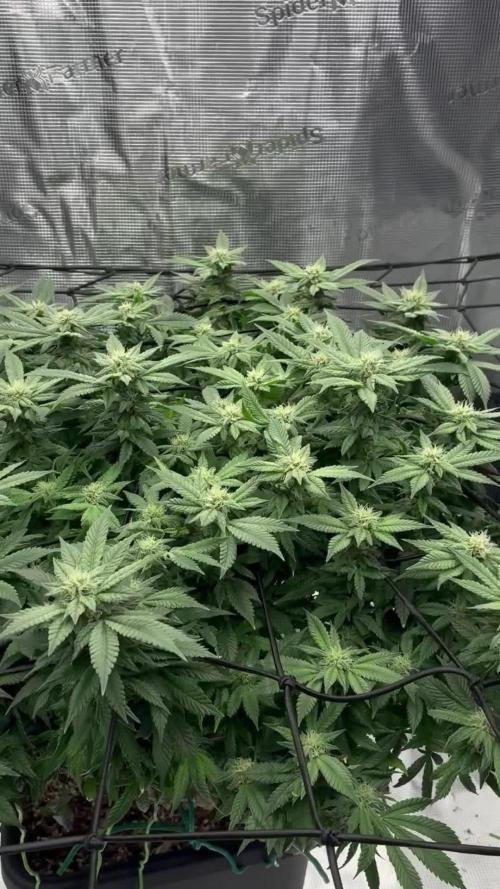
Start of 6th week and very close to chop!
Reduced ppm..
VERY fast flowering!

Likes
17
Share


@420DeepGrow
Follow
Gracias al equipo de AnesiaSeeds, Marshydro, XpertNutrients y Trolmaster sin ellos esto no sería posible.
💐🍁 Violet Face:
Esta variedad feminizada es como un dream team de la realeza del cannabis, que mezcla la majestuosa Blue Face con las frías vibraciones de la Frozen Black Cherry. Es como el perfecto día de verano: vibraciones soleadas con una brisa fresca.
Blue Face aporta esa refinada magia Z, con notas cremosas de naranja y pastel de plátano que te harán sentir como si estuvieras en un paraíso tropical. A continuación, Frozen Black Cherry entra en escena con su aspecto escarchado y su aroma a cereza dulce y ácida que es sencillamente adictivo.
Sube el volumen porque Violet Face golpea fuerte con niveles de THC que se disparan hasta el 35%. Cada calada es un billete al paraíso, que combina los lujosos aromas de la cereza con una embriagadora mezcla de dulzura y sabor afrutado.
Violet Face no es sólo un estilo de vida relajado; también es una campeona de peso pesado, con rendimientos de 600 g/m² en interior y unos exuberantes 900 - 1200 g por planta en exterior. Esta belleza florece en 8-9 semanas, y está lista para la cosecha a finales de septiembre. Tanto si la mantienes acogedora en interior como si la extiendes bajo el cielo, Violet Face se extiende con alturas de 80-120 cm en interior y 160-200 cm en exterior.
🌻🚀 Consigue aqui tus semillas:
💡TS-3000 + TS-1000: se usaran dos de las lámparas de la serie TS de Marshydro, para cubrir todas las necesidades de las plantas durante el ciclo de cultivo, uso las dos lámparas en floracion para llegar a toda la carpa de 1.50 x 1.50 x 1.80.
https://marshydro.eu/products/mars-hydro-ts-3000-led-grow-light/
🏠 : Marshydro 1.50 x 1.50 x 1.80, carpa 100% estanca con ventanas laterales para llegar a todos los lugares durante el grow
https://marshydro.eu/products/diy-150x150x200cm-grow-tent-kit
🌬️💨 Marshydro 6inch + filtro carbon para evitar olores indeseables.
https://marshydro.eu/products/ifresh-smart-6inch-filter-kits/
💻 Trolmaster Tent-X TCS-1 como controlador de luz, optimiza tu cultivo con la última tecnología del mercado, desde donde puedes controlar todos los parametros.
https://www.trolmaster.com/Products/Details/TCS-1
🍣🍦🌴 Xpert Nutrients es una empresa especializada en la producción y comercialización de fertilizantes líquidos y tierras, que garantizan excelentes cosechas y un crecimiento activo para sus plantas durante todas las fases de cultivo.
Consigue aqui tus Nutrientes:
https://xpertnutrients.com/es/shop/
📆 Semana 4:
Aparecieron un monton de erizos esta semana, el temporal ha hecho algo de mella en la carpa al bajar las temperaturas aunque todo sigue correcto.
Continuamos con las dosis de nutrientes recomendadas por el fabricante.

Likes
2
Share


@johnjoe9525
Follow
new week did a small bit of LST. Not sure if things are imrproving with the calmag but i am seeing more growth but still little brown patched on the leaves but ill stick at it and see how it all goes.
I am wondering if i should remove any of the leaves with the brown patches etc but tempted to just let it grow and see where it ends up

Likes
8
Share


@eldruida_lamota
Follow
Vamos familia que finalizamos la séptima semana de floración de las Blue Spider de ZambezaSeeds.
Ya esta es la última semana que van a recibir la alimentación de Agrobeta. A partir de esta semana solo estarán a Agua.
Progresan muy bien las flores están hermosas una tiene varias carencias que aguantaremos hasta el final. Aun así contento.
Y os digo que pronto empezaré a germinar lo del nuevo proyecto. Seguro que os gusta son variedades bastante top.
Agrobeta:
https://www.agrobeta.com/agrobetatiendaonline/36-abonos-canamo
Mars hydro:
Code discount: EL420
https://www.mars-hydro.com/
Las maximas de temperatura no superan los 26 grados y las mínimas no bajan 20, así que no me puedo quejar.
Los niveles de humedad también son los correctos van entre 45%/55% de humedad relativa.
Por supuesto el Ph lo estamos dejando alrededor de 6.
Hasta aquí es todo, buenos humos 💨💨💨.


Likes
6
Share


@GuyPablo
Follow
Day 21 since germination, added a little bit of fish mix to watering schedule, a little bit of yellowing on foliage, ph testing RO filtered water and bringing it down very slightly to 6.5, I think possibly the soil as all mix quite nutrient rich to start with so going really easy on the nutes at mo and not too concerned, if it continues or notice more will water till run off check ec of the soil just to be on safe side. Pleased with the amount of growth after 21 days :)

Likes
67
Share


@MisterZ
Follow
Bonjour les amis. Cette semaine les fleurs ont pris du volume et surtout l'odeur est est nettement plus forte. Dès que j'ouvre mon placard une odeur terrible se répand. Ma femme est terrifiée. C'est la dernière semaine théorique mais il faut encore quelques jours, je pense récolter la semaine prochaine. Les 2 grandes plantes ont une forme et un volume normal, je vais les libérer de leurs liens très rapidement. La petite semble encore plus chargée en résine. Je n’arrose que à l'eau pH ~6.8. Led 80%. Bon grow à tous. M.

Likes
2
Share

@FourTwenty_Plants
Follow
Sooo, about three and a half weeks have passed since the last update - she should be around week 3.5 of flowering by now, and goddamn, I’m stunned, bro. I had some medical PM a few months ago, and the smell already reminds me so much of it. It’s also the stickiest stuff I’ve grown so far, and she’s not even halfway through flowering yet.

Likes
165
Share


@SlowpokeFuegobud
Follow
Thank you all for growing the fish with me!! 💙 💙 💙
I loved how much fun everybody had!!!
I'm already looking out for the next sweet tiny pot, and recommend you to do so as well, if you have enough time. 😎 It's rewarding, you can learn a lot, and shoot nice pics with nice stories. 🐟 💨
It was maybe lucky coincidence that there were so many holes, so that the roots culd air-prune themselves all the time. 🙏
I watered three times a day, and the sweet smell was my companion. ❤️ It was a bit tough to chop my fish in the end. Sniff. But well, thanks for the great time!! 😘

Likes
65
Share


@Dendegrow
Follow
The harvest is in! 🌿✨ The buds have turned out absolutely stunning – dense, frosty, and bursting with trichomes. The aroma and flavor are something truly special: a delicate blend of cherries with a refreshing hint of mint 🍒🍃.
The high is incredibly potent, deeply relaxing, and body-focused – the perfect companion for unwinding in the evening 🌌💤. These cuttings have truly delivered, and despite the challenges along the way, the results are impressive. I harvested them at the perfect moment, with fully milky trichomes, ensuring peak potency and a balanced effect 💎✨.
Thanks to everyone who followed this journey – stay tuned for more updates and new adventures. Until then, enjoy the vibes and happy growing! 🌺📸
---
Die Ernte ist da! 🌿✨ Die Buds sind einfach wunderschön geworden – dicht, frostig und voller Trichome. Das Aroma und der Geschmack sind etwas ganz Besonderes: ein leichter Hauch von Kirschen, kombiniert mit einer erfrischenden Minznote 🍒🍃.
Das High ist unglaublich stark, tief entspannend und vor allem körperbetont – perfekt, um den Abend ausklingen zu lassen 🌌💤. Diese Stecklinge haben wirklich abgeliefert, und trotz der Herausforderungen unterwegs bin ich mit dem Ergebnis sehr zufrieden. Ich habe sie genau zum richtigen Zeitpunkt geerntet, bei vollständig milchigen Trichomen, um maximale Potenz und eine ausgewogene Wirkung zu gewährleisten 💎✨.
Vielen Dank an alle, die diesen Grow begleitet haben – bleibt dran für weitere Updates und neue Abenteuer. Bis dahin, genießt die Vibes und happy growing! 🌺📸
Likes
32
Share


@MadeInGermany
Follow
Info:
Unfortunately, I had to find out that my account is used for fake pages in social media.
I am only active here on growdiaries.
I am not on facebook instagram twitter etc All accounts except this one are fake.
Flowering day 43
since time change
to 12/12 h.
Hey guys, a quick update on the mini experiment :-).
Slowly but surely, the buds of this mini lady are developing very well :-).
It was poured twice this week with 1.2 l each.
Otherwise everything was checked and cleaned.
Stay healthy 🙏🏻
You can buy this Strain at :
https://www.zamnesia.com/de/5165-zamnesia-seeds-kalini-asia-feminisiert.html
Type:
Kalini Asia
☝️🏼
Genetics:
Black Domina x Purple Kush
👍
Vega lamp:
2 x Todogrow Led
Quantum Board 100 W
💡
Bloom Lamp :
2 x Todogrow Led
Cxb 3590 COB 3500 K 205W
💡💡☝️🏼
Soil :
Canna Coco Professional +
☝️🏼
Fertilizer:
Green House Powder Feeding
☝️🏼🌱
Water:
Osmosis water mixed with normal water (24 hours stale that the chlorine evaporates) to 0.2 EC. Add Cal / Mag to 0.4 Ec Ph with Organic Ph - to 5.5 - 5.8 .

Likes
10
Share


Likes
3
Share


@Chubbs
Follow
Week 6 update:
What up Grow family. These testers are growing fast and strong. Where in week 6 now and the swelling and ripening of flowers are going amazing. Still feeding 500ml/16oz daily as I've found that's the sweet spot for 3gal fabric pots for these. I'd say these probably have about 2 weeks left until they'll be finished.
All in all Happy Growing.
Likes
49
Share


@AsNoriu
Follow
Day 99. Girls are good, even delayed/unmature buds are catching up and i feel like last feed was given already. Should be only water regime from now ...
Nothing to add or say..
Fatter, Bigger, Stronger - is theirs target now and slowly they are crawling there ;)))))
My cam is still shit, during thirps it made me happy, now when some girls are true beauties - it makes me nervous ;)))
Happy Growing !!!
Processing
Likes
12
Share


@Pauwela
Follow
7/14 girls are from 32" to 37" tall at 35 days old, looking good

Likes
18
Share


@Grower_Of_Persia
Follow
my dry and cure style is this:
4 days of hanging upside down to get water activity lower to around 0.6 in 50% humidity and 26 C temp (i know its a little high but we are in a hot summer right now and i cant get it lower even with air conditioner) and then after 4 days of drying i remove leaves and stalks, trim buds and move them to jar for the rest of their life :D . and in the first 4 days of curing i open the jar door and let hem get some fresh air in the jar for about 5 minutes and close the jar door again, after 4 days of curing like that buds are smokable but they will get better as they getting cured about 1 month.
buds are one of the hardest as fucking rocks type of buds! very dense , compact , sticky , smelly , amazing at every aspect
growing stage was 56 days and flowering stage was 75 days total (harvested tops at day 64th)
the total weight of dry buds was : (plant #1 & #3 top buds 56 G + lower buds 22 G ) 78 G + (plant #2 top buds 47 G + lower buds 18 G ) 55 G + (plant #4 top buds 120 G + lower buds 67 G ) 187 G = 367 G
Processing
Likes
27
Share


@Dunk_Junk
Follow
I'm so excited! This week she entered flowering!
Almost doubled her height! Grew 22cm this week!
I have transplanted her into a 10 Litre fabric pot.
I've never used these before, but they look promising. Different to airpots. I'd say more extreme tbh. Oxygen to the root zone is never a bad thing 😎

Likes
71
Share


@Roberts
Follow
Quebec Blast is starting to bulk. I did a solution change today. Hopefully I didn't go too strong. She is growing in a New Level Hydro bucket, under a Spider Farmer SE5000 light. It is her start of 5th week of flowering. Everything is going as normal. Solution changes about 3 to 4 days apart. Thank you New Level Hydro, Spider Farmer, and Quebec Seeds. 🤜🤛🌱🌱
Thank you grow diaries community for the 👇likes👇, follows, comments, and subscriptions on my YouTube channel👇. ❄️🌱🍻 Happy Growing 🌱🌱🌱
https://youtube.com/channel/UCAhN7yRzWLpcaRHhMIQ7X4g
SE5000
https://amzn.to/3qFpAML
Spider Farmer Official Website Links:
US&Worldwide: https://www.spider-farmer.com
UK: https://spiderfarmer.co.uk
CA: https://spiderfarmer.ca
EU: https://spiderfarmer.eu
AU: https://spiderfarmer.com.au
Coupon Code: saveurcash
Www.newlevelhydro.com
Www.hygrozyme.com

Likes
2
Share


@Krissci
Follow
Day 1- topped last week.....now LST training to make spread of the plant..
Most probably top again day 2 & water
Likes
12
Share


@CruzeBlade
Follow
DLI auf 45 gestellt. Wert bleibt bis zur Beginn der Blüte. Denke noch eine Woche dann Umstellung auf 12/12.

Likes
22
Share


@SirDillton
Follow
First grow. Ph 6.3 /temp 23 /RH%60 /water ppm 210 /Co2 500 ppm/18-6 light/ par value 600/ techna flora recipe for success nutrient cycle. Kryptonite organic worm casting soil. No training yet. 3.5 litres of water every 3 days . First mistake and note to growers and self when using spray bottle to wet surface make sure not rip off any leaves as your pulling the trigger... on the do Sweet dos plant. oh well she will live.