


Likes
15
Share


@Skinnytalls420
Follow
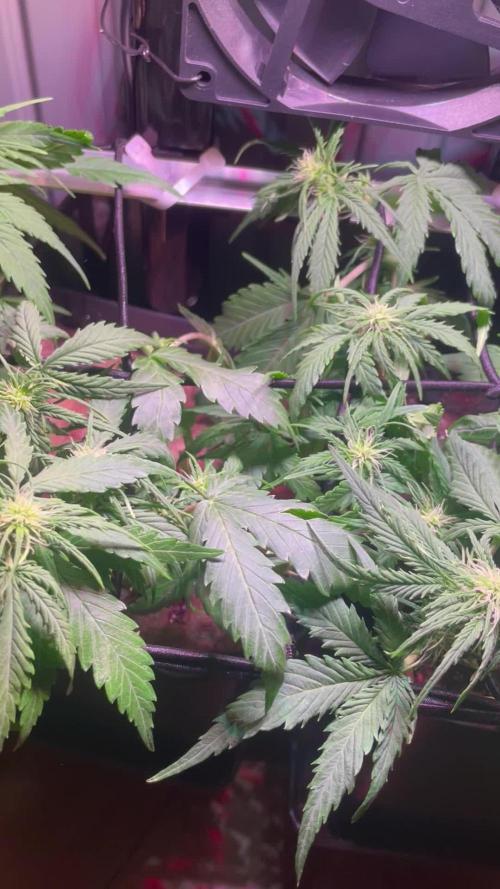
So I think we are on day 36!!-02/08/22😂 had a lot of things to do but we should be back on track with this diary and the new one!!! So they are a lot bigger than the first blue cheese I had grown! So today because they got so big I’ve had to take em out and put them under a tsw2000 in a bigger tent just while a organise everything! But they are looking amazing so far

Likes
55
Share


@MadeInGermany
Follow
Info:
Unfortunately, I had to find out that my account is used for fake pages in social media.
I am only active here on growdiaries.
I am not on facebook instagram twitter etc All accounts except this one are fake.
Hi everyone :-)
This week it has developed really well again :-).
I didn't train her this week, I'll do it again next week :-).
It was poured twice this week with 1.2 l each time (see nutrient table above for adding nutrients).
I sprayed them all with GreenBuzzLiquida Fast Plant spray.
I also cleaned the entire tent and checked everyone's health.
Fresh osmosis water was prepared and filled into canisters.
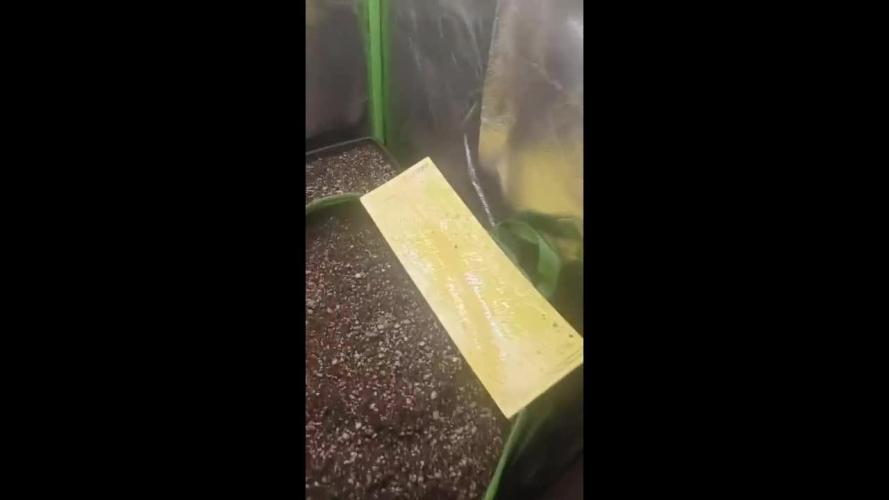
Yellow boards against flies have been put up and blue tags to prevent trips.
Unfortunately I still struggle with them but they have become significantly less pushed.
I think in a few weeks the last story should be :-).
Otherwise, like every day, they were looked at and petted for a while ;-).
I wish you lots of fun and stay healthy 🙏🏻
You can buy this Nutrients at :
https://greenbuzzliquids.com/en/shop/
With the discount code: Made_in_Germany you get a discount of 15% on all products from an order value of 100 euros.
You can buy This Strain at :
www.Zamnesia.com
☝️🏼☝️🏼☝️🏼☝️🏼☝️🏼☝️🏼
Strain
Gelato clone from mother (Zamnesia )
☝️
Genetics: Wedding Cake x Gelato x Gelato 33
Vega lamp:
2 x Todogrow Led
Quantum Board 100 W
💡
Bloom Lamp :
2 x Todogrow Led
Cxb 3590 COB 3500 K 205W
💡💡☝️🏼
Soil :
Canna Coco Professional +
☝️🏼
Nutrients :
Green Buzz Liquids :
Organic Grow Liquid
Organic Bloom Liquid
Organic more PK
More Roots
Fast Buds
Humic Acid Plus
Growzyme Big Fruits
Clean Fruits
Cal / Mag
Organic Ph - Pulver
☝️🏼🌱
Water: Osmosis water mixed with normal water (24 hours stale that the chlorine evaporates) to 0.2 EC. Add Cal / Mag to 0.4 Ec Ph with Organic Ph - to 5.8

Processing
Likes
73
Share


@Andres
Follow
she with her strong smell ... she has only a couple of weeks to wait ... and here the begining started to lower the temperature and shortened the days ... she will be productive ... with her buds fat ... the stems have begun to bend ... smell of mint between earth and firewood ... a good smell ... 100% recommendable ...

Likes
2
Share


@Topshelf_only
Follow
Been a rough week with temperature and humidity as well as starting the flush probably half a week early. Hopefully back to smooth sailing for the final couple of weeks. Just as long as it doesn't get much hotter outside .
Likes
16
Share


@Chucky324
Follow
Hello. This is the end of week 8 and the beginning of week 9 of flowering.
Although the seed description said 10 to 11 weeks, I going to cut these girls down at 10 weeks.
I need the room to grow and flower some Mac and Crack that's already growing..
Getting close to harvest I'll start flushing, But I'll give them 1 more feeding and then nothing but water till the end.
I get much better taste and the buds smoke better if I flush and get the chemicals out of the soil before harvest.
Well, that's the end of the Freak Bros. book # 10... I think there are 3 or 4 more books left in that series. I'll show them in future diaries.
My other diaries have the old underground comic book, Weirdo by Robert Crumb if you want to check them out to see.
The buds are really getting solid now and some are getting heavy and heading for the floor. Good times...
Getting some great smells now. Musk is the most common. But some, smell of Citrus with Musk under tones.
The smell is overpowering my carbon filter. I can smell these plants out by the street if the wind is blowing that way.
Pure Lemon Skunk smell by the street. Nice.
Getting near the end of their lives now and there are more yellow leaves as the plants pull what they need from the big fan leaves before turning the leaves brown. Some plants have sticky resin and some have slippery resin.
OK. Have Fun.
Chuck.
Likes
35
Share


@bypado_farm
Follow
Everything is going well. They are drinking good, they recovered as well, idk how but..
Let's go 💪
Likes
6
Share

@KarlOlga
Follow
Heute (01.04) noch mal entlaubt und alle Triebe auf gleiche Höhe gebracht bei der Mango. Die bloody skunk holt auf und ist aber direkt nach dem Topping in die Blüte gegangen.
Bin gespannt!
04.04- paar Blätter entfernt
06.04 - LST und paar Blätter weg!


Likes
10
Share


@StickyFingah420
Follow
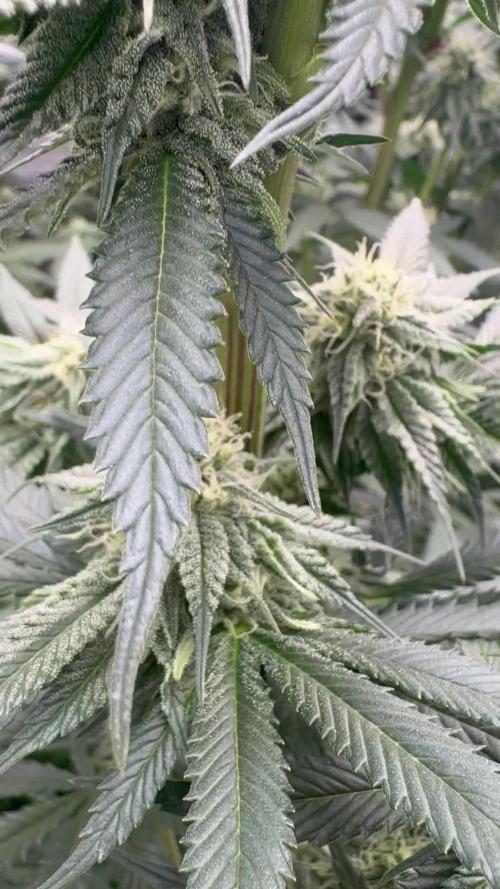
Extrema producción de tricomas de esta variedad! Gran parte de los frutos lo usaré para extraer rosin, su resina se ve ideal para este propósito.
Fragancia exquisita a ponche de fruta dulce, con notas ácidas y un fondo de especias.
Como mencioné anteriormente dejaré la parte de la reseña de efectos, sabores y sensaciones para cuando los cogollos estén secos y curados, por ahora solo puedo apreciar lo que mi vista y olfato me permiten captar.
Totalmente conforme por la calidad de estas flores y agradecido de los amigos de Sweet Seeds por la confianza.
Será hasta la cata entonces, buenos humos!
Likes
2
Share


Likes
2
Share


@Ultraviolet_
Follow
We become aware at such times of man's wonderful ability to bring seemingly unrelated elements into harmonic balance, and receive a glimpse into a world where everything exists in conscious sympathetic attunement to everything else. When we listen to a piece of music that seems to strike a beautiful chord somewhere inside us, or view a painting that simply glows with harmonic awareness well executed, we probably do not spare much time to contemplate the wonderfully intricate combination of vibrations that our sensors make it possible for us to perceive. We tend to appreciate the relationship between the parts of something by an awareness of the harmony or dissonance of the whole. This ability enables us to say "what a beautiful house!" instead of "analysis has proven that this collection of building materials exhibits certain elements of harmonic proportion." While this ability to instinctively appreciate the beauty of true harmony has an important role to play in evolution, a more analytical understanding of the laws involved can be most useful. This is especially so if we wish to create works of art where each part exists in true harmony, not only with the other part of that particular whole, but with the universe within which the creator and the created exist.
Everything vibrates. From the most dense matter to the most subtle cosmic rays, everything which our senses allow our thoughts to become aware of, can be specified in terms of wavelength or frequency of vibration. These two terms define the same thing, but from different points of view.
The following are the approximate wavelengths of various energy carriers:
Cosmic rays 0.000,000,001 mm
Gamma rays 0.000,000,1 mm
X rays 0.000,500 mm
Ultraviolet rays 0.003 mm
Visible light 0.006 mm
Infrared 0.01 mm
Sound waves 1 meter
Radio waves 300 meters
Violet light 400 nm to 450 nm
Blue light 450 nm to 500 nm
Green light 500 nm to 570 nm
Yellow light 570 nm to 590 nm
Orange light 590 nm to 610 nm
Red light 610 to 700 nm
1 nanometer (nm) = 0.000,000,1 cm = 1/10,000,000 cm
If a guitar string is plucked and we hear a sound, it is not too difficult for the human mind to associate this sound with the vibration of the guitar string. With color it is quite different. It is difficult for us to conceive that the color of a substance is not an inherent property of the substance itself, but an indication picked up by our senses of that substance's ability to absorb or reflect the light which happens to be shining on it at that moment. Neither the matter nor the light is colored. What happens is that the brain learns to differentiate between the frequencies reflected or transmitted by the substance the eyes are focused on. The same thing happens with sound. When we say "Oh! Listen, they're playing my favorite song," what we really mean is: "My brain has stored within it a particular pattern of frequencies. I have compared the new information being received with this stored pattern and have deduced the answer that the two patterns are similar within certain specified tolerances." The 'pleasure' involved could have something to do with our running the pre-recorded pattern at the same time, in 'sympathy' with the new pattern as it is received.
The word sympathy describes very well our ability to appreciate color and sound. It also describes the reason behind certain elements of harmony. For instance, if a substance vibrating at 100 cycles per second (tone 1) is in the proximity of another substance vibrating at 200 cycles per second (tone 2), we could perceive, if we had the right equipment, a certain sympathetic relationship between the two.
We will see from this that there is a uniform doubling of the first tone seen in the second. At various points along the waves, the two are the same in amplitude. At other points, they are at opposite poles to each other. This doubled frequency has more points of similarity to the original than any other frequency except the original itself. If the equipment we had available for measuring these two frequencies was a soundboard amplifier and a pair of ears, then we would hear what would sound to us like one tone. If we had the opportunity to hear one at a time, we would hear that although they sound the same, one is higher in pitch than the other. This characteristic of 'the same but different in pitch', musicians have called the octave. Any two tones produced where one has exactly doubled the frequency of the other is called an octave. Speaking in ratios, an octave would appear then as the ratio 2:1 or 1:2, depending on whether we are talking of an octave up or down.
A single note produced by almost any instrument will contain more than one wavelength or frequency. It will have a dominant frequency, the wavelength of which we would call the note's 'fundamental' or 1st harmonic. It will also have a varying number of upper harmonics, gradually fading in intensity into infinity or silence.
Natural harmonics always have the same pattern of intervals between them. The interval between the 1st and 2nd harmonic is a perfect octave; between the 2nd and 3rd a perfect fifth; between the 3rd and 4th a perfect 4th; and so on, the intervals becoming smaller and smaller until they lose any relationship with the western 12 tone scale as it exists at the moment. Just as an octave has certain elements of sympathy with its fundamental, so some intervals have been noted to be more perfectly in sympathy with the fundamental than others. The ratio of the 'perfect 5th' or interval of 7 semitones, as it occurs in the harmonic series, is 3:2 or 2:3, while that of the 'perfect fourth" is 4:3 or 3:4. All the tones in the western 12 tone scale can be expressed in terms of the ratio between the upper tone and its fundamental. This would seem to be an ideal way of generating a scale from any given fundamental and several attempts have been made to do this, the Pythagorean system being probably the most well known. Although when working with a single tone instrument playing on its own, the Pythagorean formula works wonderfully well, if we had several instruments tuned this way together and asked them to play almost any western music, we would find that at times they sounded quite out of tune to each other.
The lack of flexibility of the various scale systems based on the harmonic series has led to what is known as the 'tempered' scale. This uses as its primary unit of interval the ratio of the octave or 2:1. It then proceeds to divide the interval between any fundamental and its upper octave into 12 smaller intervals by applying the ratio: two to the one-twelfth power, to one (21/12:1). This equals 1.059463094, so by multiplying any frequency by this number, we will obtain the tempered semitone next up from our fundamental. We will also find that any tone twelve semitones up from any other tone, in a scale generated in this way, will have exactly double the frequency.
If we took the note middle C on a piano and halved the wavelength, we would have the note C one octave above. If we halved this, we would have the C above, and so on. However, within about 6 octaves, we would find that although a 'sound' was being produced, no human ear could perceive it. If we kept on going, halving and producing upper octaves of our fundamental C, we would proceed through the infrared band, into the visible light spectrum. If we happened to be outside during the day, we would, for one octave only, see the note C with our eyes. The next octave above would already be in the ultraviolet band, and outside the eye's sensitivity range. If we can think of color as being an indication of a substance's vibratory rate or wavelength, we may begin to see a relationship that could exist between the color and sound spectrums.
The logical extension of what has so far been said is that there exists a scale in the color spectrum that corresponds exactly to the scale in the sound spectrum, each color tone being an octave of the equivalent note in the sound range.
This is not the end of the story but only the beginning. If we can for the moment accept that any wavelength in one band has upper and lower octave stretching out to infinity, then the next question is 'fine, but what shall we use as our fundamental? A particular color? A particular sound frequency?' The musicians among us will probably say 'A 440'. This means that the note A should vibrate at 440 Hertz, or 440 times per second. They would tell us that this is standard pitch has been adopted by most orchestras around the world; pianos are tuned to it, instruments are constructed to formulas based on it, and so to them it would probably seem the most appropriate place to begin. Some of these musicians may know of the battle that is still raging with regards to this being the standard, but few would know why A = 440 Hz was chosen except that it worked when it was set to be a suitable compromise between the many different pitches in use at the time.
432 Hz is said to be mathematically consistent with the patterns of the universe. Studies reveal that 432 Hz tuning vibrates with the universe’s golden mean PHI and unifies the properties of light, time, space, matter, gravity, and magnetism with biology, the DNA code, and consciousness. When our atoms and DNA start to resonate in harmony with the spiraling pattern of nature, our sense of connection to nature is said to be magnified.
Another interesting factor to consider is that the A=432 Hz tuning correlates with the color spectrum, while the A=440 Hz is off. Audiophiles have also stated that A = 432 Hz music seems to be non-local and can fill an entire room, whereas A=440 Hz can be perceived as directional or linear in sound propagation.
Once you adopt the idea that sound (or vibration in general) can have an equalizing and harmonizing effect (as well as a disturbing effect), the science of harmony can be applied to bring greater harmony into one's life or tune to specific energies. There is a form of absolute and relative harmony. Absolute harmony can, for example, be determined by the tuning of an instrument. The ancients tuned their instruments at an A of 432 Hz instead of 440 Hz - and for a good reason. There are plenty of music examples on the internet that you can listen to in order to establish the difference for yourself.
Attuning the instrument to 432 Hz results in a more relaxing sound, while 440 Hz slightly tenses up the body. This is because 440 Hz is out of tune with both macro and micro cosmos. On the contrary, 432 Hz is in tune. To give an example of how this is manifested microcosmically: our breath (0,3 Hz) and our pulse (1,2 Hz) relate to the frequency of the lower octave of an A of 432 Hz (108 Hz) as 1:360 and 1:90.
It is interesting to note that 432 Hz was the standard pitch of many old instruments and that it was only recently (19th and 20th century) the standard pitch was increased. This was done in order to be able to play for bigger audiences. Bigger audiences (more bodies) absorb more of the lower frequencies, so the higher pitch was more likely to “cut through”. One of the oldest instruments of the world is the bell ensemble of Yi Zeng (dated 423 BC), tuned to a standard F4 of 345 Hz, which gives an A= 432 Hz. The frequency of 345 Hz is that of the platonic year! Similarly, many old organs are tuned in A=432 as well; for example, St. Peter’s Capella Gregoriana, St. Peter’s Capella Giulia, S. Maria Maggiore in Rome.
Maria Renold’s book “Intervals Scales Tones and the Concert Pitch C=128 Hz” claims conclusive evidence that 440 Hz and raising concert pitch above scientific “C” Prime=128 Hz (Concert A=432 Hz) disassociates the connection of consciousness to the body and creates anti-social conditions in humanity.
The difference between concert pitch A=440 Hz and Concert A=432 Hz is only 8 cycles per second, but it is a perceptible difference of awareness in the human consciousness experience of the dream we share called existence.
Likes
13
Share


@Chorizo555
Follow
Royal AK:
Buds are still somehow small, but I see their promise. Hopefully, they will get more forsty after I cut the quick one and move the light further.
Quick one:
Buds are maturing quickly. I started flushing already on day 50
Likes
7
Share


@100Trillion
Follow
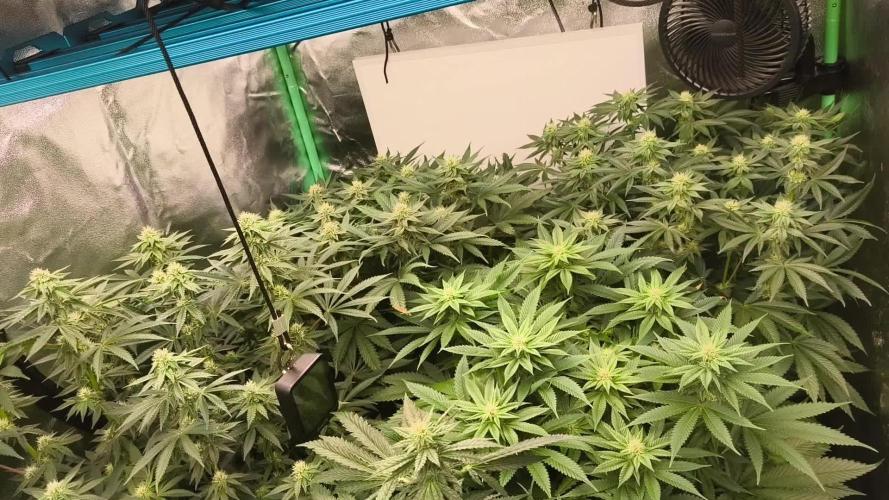
12/12 has been initiated. Girls are looking amazing and filled up the trellis really well over the week. The contrast Pheno in the back right still out growing the others. I got the canopy as even as I could possibly get it even with the height differences. Got the light at 12 inch per spider farmer recommendation and light at 50 percent. Aiming for about 28 DLI for first week and will continue to ramp up as weeks progress.

Likes
20
Share


@Dunk_Junk
Follow
She's looking lovely this week!!!!!
Starting to get frosty.
Still a while to go but her pistils have 'just' started changing colour.


Likes
22
Share


@PrairieFrostGrow
Follow
*
********* Week 3, April 25 to May 1, 2020 - Days 15 to 21 from germination **********
*
So we have been chugging along and doing well. Keeping the feeds in check and not given any waterings over 6.0pH before this week. By mid week when checking runoff numbers found they were flipping 7.2pH!!!!!! What is shooting up the numbers so high?? They were given some Epsom salt and not sure if they have been given too much magnesium. Wondering if it could be the pots? Watering patterns have not changed? Cut slits in the bottom of all the fabric pots to help with drainage and see if moisture is sitting in the bottom of the pot causing issues with pH???
They are doing well but not at the same time.....GSC girls seem a little show in veg growth at this stage.
Little more detail.......
April 25/20 - Day 15
- Mixed 1L of water with Vitathrive, Dual Fuel @ 1.5ml = 700ppm and 6.0pH.
- each girl given 0.5L feed.
- humidity a little low at 52% and bumping up to 65%
- light heights at 30” roughly right now.
- GSC outer edges of leaves getting a little light.
- GSC2 is forming a nice structure and new leaves are wider.
April 26/20 - Day 16
- no real growth and the girls don’t look happy.......not sure of the issue?
- mixed 2L water with Sensi CalMag @ 1.5ml. Sensyzime @ 2ml, Epsom Salt @ 1/4 tsp/L
- GSC fighting magnesium deficiency so adding Epsom Salt,
- increased light intensity a bit today.
April 27/20 - Day 17
- dry out day
- think the root zone is holding too much moisture and causing pH issue.
- cut long slits in the bottom of the pots to let moisture run out faster/easier.
- GSC has liked the increased lighting.
- all the girls got clockwise rotation today.
April 28/20 - Day 18
- Girl Scout girls given 3L watering with Vitrathrive @ 1.5ml = 100ppm and 5.1pH
- runoff numbers:
- GSC - 600ppm and 7.2pH
- GSC2 - 475ppm and 7.2pH
- pH is still too high!!!!
- leaf colours on all the girls look good😳
April 29/20 - Day 19
- more runoff numbers to look at
- Mixed 8L for each girl with Dual Fual @ 1.75ml - 325ppm and 5.0pH........each girl given this amount!!!!
- Run off numbers:
- GSC - in tray before feed was 7.2pH, brought down the pH to 7.0 and 525ppm
- GSC2 - in tray before feed was 7.2pH, brought down the pH to 7.0 and 500ppm
- now we see if the flush will help in the next couple of days.
April 30/20 - Day 20
- dry out day
- stems are looking thicker today. All nodes are separating and they are growing.......slowly though.
May 1/20 - Day 21
- dry out day again
- need to let the pots dry out in order to adjust the pH further.
- they are looking taller and happier today.
Sorry for running behind gang. Always so much to stay on top of😀........
Processing
Likes
18
Share


@eldruida_lamota
Follow
La primera semana de floración les sentó bien la echaron su sexo, hembras, ahora ya queda ir viendo cómo se forman las flores.
La temperatura no pasa a los 30 nunca.

Likes
2
Share

@Gabgrow
Follow
Seeds planted directly in substrate. Took about five days for them to germinate. Temperatures on these days were around 11~20ºC with a RH above 60%. Automatic seeds were planted on 19L fabric pot and feminized ones on 3,5 L plastic pots (planning to transpant them after to 19L fabric pots), and one directly in a 15l fabric pot.
Likes
13
Share

@Jessi576
Follow
👉 Week 4 Bloom👈
👉 Week 13 Overall 👈
👉 12.01.2026 - 18.01.2026👈
👉 Days overall : 81-87👈
👉 Days bloom: 22-28👈
👉 Update 12.01.2026:
The plants got a "day 21 bloom leave reduction + lollipopping".
Check the pictures :)
👉 Update 12.01.2026:
The plants doing pretty good.
Check the pictures :)
Likes
12
Share


@MUZ_Farms
Follow
Was a great plant to grow pretty resilient but once I got the hang I kept it going I know this might not be the best but it’s one of my first harvests ( all started around same time just harvested differently )
