The Grow Awards 2026 🏆 


Likes
Comments
Share
@Drtomb
Follow
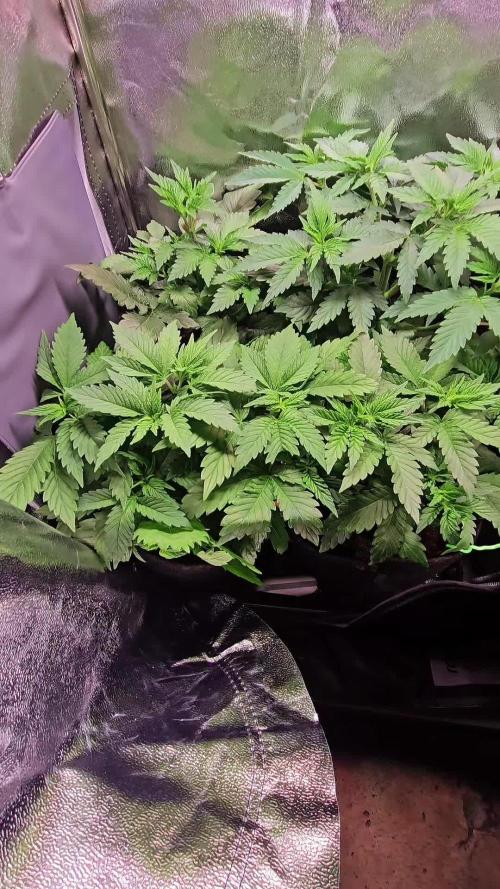
Week 2 in the books. I trimmed more lowers to help shape the tops the way I like. Swapped ratios from veg to flower to start the flowering process. One more week until autopilot.
Likes
Comments
Share
@Uneasy
Follow
Two plants are on the 29th day of flowering and the other two are on the 22nd. I started giving pk 13/14 to plants that entered their 5th week.

Likes
35
Share
@MadeInGermany
Follow
Info:
Unfortunately, I had to find out that my account is used for fake pages in social media.
I am only active here on growdiaries.
I am not on facebook instagram twitter etc All accounts except this one are fake.
Bloom day 70
since time change
to 12/12 h.
Hi everyone :-)
We have slowly reached the end 👍.
Tomorrow the lady will be rinsed a little so that she can be harvested in the next 5-10 days :-).
Before that, she comes to the darkroom for 48 hours.
Have fun and stay healthy 🙏🏻
You can buy this Strain at :
https://www.zamnesia.com/de/3271-zamnesia-seeds-blue-dream-feminisiert.html
Type:
Blue Dream
☝️🏼
Genetics:
Blueberry x Haze
20% Indica / 80% Sativa
👍
Vega lamp:
2 x Todogrow Led
Quantum Board 100 W
💡
Bloom Lamp :
2 x Todogrow Led
Cxb 3590 COB 3500 K 205W
💡💡☝️🏼
Soil :
Canna Coco Professional +
☝️🏼
Fertilizer:
Green House Powder Feeding
☝️🏼🌱
Water:
Osmosis water mixed with normal water (24 hours stale that the chlorine evaporates) to 0.2 EC. Add Cal / Mag to 0.4 Ec Ph with Organic Ph - to 5.5 - 5.8 .

Likes
2
Share
@RoccosForest
Follow
Was only able to plant 4 out 5 seeds one seed still hasn't germinated yet.

Likes
10
Share
@CoastalEisenberg
Follow
The growth has continued to explode using all organic ingredients.
Been using an aerated compost tea with worm castings every other watering.
Used coast of main soil with buildasoil dry amendments plus some coast of Maine bloom.


Likes
6
Share
@ZombieKushAddicted
Follow
June25:🤦♂️🏿🤦♂️🏿
June27: the lizards have attacked again... for this... today we are going to raise the girls and place a mesh
June28: I have no idea how they did it... but they got in again!

Likes
4
Share
@AustinRon
Follow
El Diablo Week 9 - Flower 7
[Twenty20Mendocino]
(X-Factor X Whiskey Zulu)
Objective
- Trained Plant - @3Nodes - Bend apical meristem to Node 1 Height, 7 STEMS . . .
Week 8 : [ Wed Mar 28, 2025, ED 1Q25 64:B:9:1]
[ Tue Apr
3, 2025, ED 1Q25 70:B:9:7]
24/0 @ Germination through 24 Hour Open Cotyledons (then 18/6)
Germination: 25 Jan 2025
#3A Earliest Harvest Date: Thu Apr 10 2025
#3B Latest Harvest Date:
Mon April 21, 2025
__
Fri Mar 28, 2025
ED 1Q25 64:F:9:1
Full Watering
3 Liters
- CytoPlus (µNutrients, Kelp, Potassium, Humic Substances): [ 1/2, tsp, gal].
- Photosynthesis Plus: [ 4.5, ml, l]
Then, for each Liter Delivered
- CalMag Fuel: [ 1, ml, l]
- Silica Skin: [ 1, ml, l]
- Quillaja 60 Powder: [scant]
__
Sat Mar 29, 2025
ED 1Q25 65:F:9:2
No Water Today
__
Sun Mar 30, 2025
ED 1Q25 66:F:9:3
No Water Today
__
Mon Mar 31, 2025
ED 1Q25 67:F:9:4
Full Watering
3 Liters
- [x] Photosynthesis Plus: [ 4.5, ml] # [ 6, ml, gal]
- [x] Resin Bloom: [ 1.75, ml] # [ 2, ml, gal]
Then, for each Liter Delivered
- CalMag Fuel: [ 1, ml, l]
- Silica Skin: [ 1, ml, l]
- Quillaja 60 Powder: [scant]
__
Tue Apr 1, 2025
ED 1Q25 68:F:9:5
We’ve been peaking @ 89F
- Dropping to 75% Light
- Airflow to room ON
No Water Today
__
Wed Apr 2, 2025
ED 1Q25 69:F:9:6
No Water Today
__
Thu Apr 3, 2025
ED 1Q25 70:F:9:7
LightDimmer: [ 75, %]
LightIntensity: [ , ]
Full Watering (Evening, After Lights On)
3 Liters
- [x] Photosynthesis Plus: [ 4.5, ml] # [ 6, ml, gal]
- [x] Resin Bloom: [ 3.5, ml] # [ 4, ml, gal]
- [x] PCAL 1660: [ 0.125, tsp]
Then, for each Liter Delivered
- CalMag Fuel: [ 1, ml, l]
- Quillaja 60 Powder: [scant]


Likes
12
Share
@rickhaZe
Follow
-riego de 2 ml x litro de heavy bud se rego con 6L
-se supone que eran de 55 dias pero tendremos que dar mas semanas a estos ejemplares.
- aplicaremos un riego de agua para ir bajando

Likes
23
Share
@SonomaSungrown
Follow
Skipped a week in my journal due to travels.
Had my neighbor water my plants.
Having some minor early deficiencies with my photoperiod plants (particularly the chem brulee)... so I decided to go ahead and give everything a solid feeding of Foop Bloom 1, 2 and Sweetener. This is their first ever bottled feeding. Have been running on supersoil and a prayer.
Also top dressed everything and mulched with rice straw to help with the soil drying out a bit too quickly.
Leaves have been yellowing on all three. Mostly relegated to the interior of the plants.
Chem Brulee is looking a bit too yellow overall, as well.
French Macaron is a 66in. Chem Brulee is 56in. Pineapple Meatball is 45in.
I have a sneaking suspicion that my neighbor didn't water them quite enough while I was gone.
Will probably continue with the Foop feedings... probably at least once per week. Don't want to overdo it.
Also top dressed with my flowering top dress mix and mulched all plants with a thin layer of rice straw.
8/4 Sprayed with Neem Oil and Castile Soap
8/5 Sprayed with Gravenstein Apple FFJ and OHN
8/6 Sprayed with Neem Oil and Castile Soap (this will likely be the last time I spray with Neem Oil, as I don't want residual oils as buds start swelling. Also fed 1/4 strength FOOP to ensure we head off any deficiencies.


Likes
1
Share
@Osavv_OTGUK
Follow
I set up a scrog net at this moment of time I wasn’t sure how to set it up until I watched a couple of videos. One of the bag seed girls started showing which was amazing. I was still waiting for the other bag seed to show. The female gorilla cookies started to show which was also amazing
Likes
13
Share
@Gardengobblin
Follow
Les plantes étaient vraiment givré lord de la coupe . A manipuler avec gant 🤣
Agréablement surpris des terpene . Il ses vraiment installer une odeur de crème glacer à la vabille ses dernière semaine .

Likes
43
Share
@420DeepGrow
Follow
Gracias al equipo de Kannabia Seed y XpertNutrients, sin ellos esta magia no seria posible.
🍁💐: Si Runtz se ha ganado su popularidad a pulso, esta versión autofloreciente es digna heredera de sus atributos. No es de extrañar que nuestros criadores hayan acertado con su programa de reproducción, al combinar dos de las cepas más fascinantes de la actualidad: Zkittlez y Gelato.
planta resistente y robusta, de cuerpo esbelto y fuerte ramificación lateral, que se puede cultivar prácticamente en cualquier entorno; pero prefiere los veranos largos y cálidos, tal y como quiere la madre naturaleza, donde bañada por el sol se eleva hasta los 120 cm. para producir unos rendimientos muy gratificantes de 100-150 gramos por planta.
En interior, y tras solo 70 días desde la semilla, también recompensará con cosechas abundantes de hasta 500 gr./m²
Inmediatamente después de encontrarte con ella, lo primero que notarás es su aroma descaradamente afrutado, con un toque tropical cortado con reminiscencias terrosas y amaderadas, que se entremezclan de forma agradable para ofrecer un combo que hace salivar las papilas gustativas.
Ofrece un sabor confitado, refrescante y similar a sumergirse en una piscina de frutas cítricas y flores de fragancia intensa. Al inhalar, obtienes la bondad de la dulzura; al exhalar, el humo se convierte en suave y cremoso, dejando suficiente profundidad en cada bocanada para satisfacer a aquellos que buscan los matices más complejos.
⛽ XpertNutrients: es una empresa especializada en la producción y comercialización de fertilizantes líquidos 🍶y sustratos🐛, que garantizan los mejores resultados y cosechas de la más alta calidad. A través de una cuidadosa selección de materias primas y un proceso de producción avanzado, sus productos son sinónimo de resultados confiables.
🛒 Consigue aqui tus fertilizantes:
https://xpertnutrients.com/es/sobre-nosotros/#:~:text=Xpert%20Nutrients%20es%20una%20empresa,de%20la%20m%C3%A1s%20alta%20calidad.
📆 Semana 2:
Esta remesa va algo mejor que la de la semana anterior ya que la temperaturas van siendo algo mas elevadas 🌞🌡️.
🌱 sigue con la luz del sol + 12 horas de luz artificial con el Marshydro TS-3000, el frio y la baja humedad dificulta su crecimiento, en los próximos dias ira a su lugar definitivo en medio de algun lugar donde mostrará todo su potencial 🚀😎.
La he estresado debido a la aplicación de infusión de ajo y jabon potasico casero (error) porque las que tengo en el exterior han sufrido la mordida de algun insecto y no quiero que me pase esto con esta XD.

Likes
102
Share
@love_2_grow
Follow
D56 - The first day in the fourth week of flower. She is definitely in late flower now with yellowing leaves. I checked her trichomes for the first time today, and I already see amber. Not a lot, but still.
D62 - She is showing quite a bit of amber now, so I will cut her down in a day or two. I never experienced an auto that finished in such a short time. Two months is just insane.

Likes
61
Share
@Dunk_Junk
Follow
Well she's chugging along this week. Just waiting for the trichomes to change from crystal clear.


Likes
9
Share
@joshehutch
Follow
Set up the tent cam to take a picture every 5 minutes during lights on so I can try and make a cool timelapse. I fed them kinda lightly and I think my EC might be a little low and thats why they're so light colored; they're hungry. I also had the light on 3 but now its on 2. Its sitting pretty high above them so I don't think it should be burning them. They show no signs of stretching however so they're definitely not getting too-little light at least.

Likes
3
Share
@AustinRon
Follow
Week 15 - Flower Week 11
Lemon Jeffrey by IRIE Genetics (14 Starts for 8 Finishers)
63-70 Days Flower (9 - 10 Weeks)
Weeks Observations:
- Our light leak on July 6th through July 31 ‘cost’ us ~ 21 Days. Extending Harvest to account for 21 day light leak. New Harvest Date 12 Sep 2023, Plant Day 121, Flower Day 86
Seeds Wet: Monday 14 May 2023
Harvest Date Range: [ 2023-08-11, 2024-08-21]
Start of week:
- Dates: [2023-08-27: LJ2Q 106:F:11:1,
2023-09-03: LJ2Q 112:F:11:7 ]
End of Week:
- Plant Height Range: [46, in]
- Water/Day/Plant: [935, ml]
EnvironmentalCurrent:
- Scotoperiod: [ 11, hrs] # 1900 - 0600 + 24
- LightIntensityPeak: [ 1000, µMol/m2/s ]
- DailyLightIntegral: [ 42.1, Mol/m2] # Target: < [ 40, Mol/m2/day]
- LightDistance: [ 6, in] # 3.5” LESS than Optimal for SP3000
- TempAvg: [79.1 , °F]
- RH: [ 68, %]
- VPD: [ 1.10, kPa]
- 230*4*11/8
- FeedwaterPerPlantPerDay: [ 1265, ml]
- Feedwater: [ 10.12, l]
- EC: [ 2.0, mS]
Environment NOTES:
- RULE
- CLOSE Room Airflow during LOW TEMP periods(2030 - 0700)
- OPEN during HIGH TEMP Period (0700 - 2030)
SOP:
- WEAR CLEAN GLOVES FOR ALL SEED OPERATIONS
- CLEAN All Instruments before use
- Light Strengthvegetation := 100 + (#nodes * 100)
- Light Strengthflower := [ 1000, 600, µMol/m2/s]
- Scotoperiodvegetation := [ 1300, 1900, 6, hr]
- Scotoperiodflower := [ 0600-1900, 13, hr]
Environment
- Late Flower (Week 10-14) (F5-F10)
- Temp: 78-80°F
- VPD: 1.2 ± 0.2
- Photoperiod: 11/13
- Light Strength: [930, 850, µMol/m2/s]
- EC: 2.3 # Week F5-F8
- EC: 1.8 # Week F9
- EC: 1.1 # Week F10
- Finish (Week 14) ( F10)
- Temp: 78°F
- VPD: 1.3 ± 0.2
PPFD: 750 peak
- Resin Bloom ONLY
- EC: 0.8
_______________________
Base Application for 10 Gal:
- [x] Primer A: [ 100, ml]
- [x] Primer B: [ 100, ml]
- [x] Silica Skin: [ 35, mll] # Reduce to reduce/eliminate Sediment
- [x] SLF-100 (Enzymatic Root Cleaner): [ 50, ml]
- [x] King Crab (Biology): [ 5, ml]
__________________________________________
- @ EC: 1.7 Supplement: [ Application Rate], [ Total Delivery for 2 Gal Solution]
- [ ] Primer A: [ 10, ml, gal], [ 12.5, ml]
- [ ] Primer B: [ 10, ml, gal], [ 12.5, ml]
- [ ] Silica Skin: [ 4, ml, gal], [ 5, ml]
- [ ] CalMag Fuel: [ 4, ml, gal], [ 5, ml]
- [ ] Peak Bloom: [ 4, ml, gal], [ 5, ml]
- [ ] Resin Bloom: [ 4, ml, gal], [ 5, ml]
- [ ] SLF-100: [ 5, ml, gal], [ 10, ml]
- [ ] King Crab: [ 0.5, ml, gal], [ 1, ml]
- [ ] EC: [ 1.7, mS]
85 ml/plant X 11, : 935 ml/plant/day, 2.4x of field capacity
Meaning ALL Fertigation through pot is Refreshed 2.4 times per day with this schedule.
____________________________________
Mon 28 Aug 2023 # End of Harvest ORIGINAL Window , before discovering light leak
LJ2Q 106:F:11:1
- [x] Will scope trichomes by hand, and set a chop date today.
- Some are ready today, Some look to need 10 - 14 days.
This has been an interesting grow - the extra stretch munged the SOG Strategy - with severe Chiropractics I still have >±12” of height per plant. We should be harvesting today . . .
- We could conceivably take the grow as far as Day 139, if we calculate a 4 week light leak forward. That would make LATEST DATE 24 SEPTEMBER -
- IF We go more than this week
- Week 15 Nutes (Mixed Daily)
- Mon - Wed: ONE SHOT, EC: 1.7
- Thus - Sun: ONE SHOT, EC: 1.4
- NEXT WEEK
- Mon: Resin Bloom: EC: 1.1
- Tuesday - Harvest: Resin Bloom: EC: 0.8
- ELSE if we take them down next Sunday:
- [ ] Been feeding The Rooted Leaf Hydro schedule, Base Nutes plus Silicon. Need to move to harvest nutes, potassium (+Resin Bloom/+Peak Bloom) at
- [ ] Monday:+Resin Bloom/+Peak Bloom: EC: 1.7
- [ ] Tuesday: EC: 1.4, (+Resin Bloom)
- [ ] Wednesday: EC: 1.1, (+Resin Bloom)
- [ ] Thursday EC: 0.8 (Resin Bloom Only)
- [ ] Friday EC: 0.8 (Resin Bloom Only)
- [ ] Saturday EC: 0.8 (Resin Bloom Only)
- [ ] Sunday - Harvest
Growtek Mod
- 170 ml/event per emitter -> 2 Gallons Input
-
___
EC: [ 2.0, mS]
Tue 29 Aug 2023
LJ2Q 107:F:11:2
EC 1.6+
- Defoliated (final) blocking and unviable fans. Looks better - clearer airflow
Wed 30 Aug 2023
LJ2Q 108:F:11:3
EC: 1.6
For 2 Gal (ml’s) RLA Minerals
14.0 Primer A
14.0 Primer B
7.0 Silica Skin
10.5 Peak Bloom
South Cascade Organics
- [x] SLF-100: [ 5, ml, gal], [ 10, ml]
___
Plant Success (Beneficial Bacteria, Crab ‘Frass’)
- [ ] Sunday - Harvest?
- [x] King Crab: [ 0.5, ml, gal], [ 1, ml]
Thu 31 Aug 2023
LJ2Q 109:F:11:4
EC 1.4
For 2 Gal (ml’s) RLA Minerals
12.3 Primer A
12.3 Primer B
9.2 Peak Bloom
Required 1 qt to bring down from 1.6 to 1.4
Friday 01 Sep Jul 2023
LJ2Q 110:F:11:5
EC 1.1
For 2 Gal (ml’s) RLA Minerals
7.6 Primer A
7.6 Primer B
5.7 Peak Bloom
Sat 02 Sep 2023
LJ2Q 111:F:11:6
EC: 1.4
Peak Bloom as Needed for Dilution
- [ ] Scope Trichomes Last Time
With a 21 day light leak, we’ll extend harvest to Day 118, Flower Day 90 - or 69 Unleaked Light Days . . .
Through End of Harvest, Daily
Daily Feed through Harvest Day -2
Per TWO Gallons: EC 1.4
- [x] Primer A: [ 12, ml, gal]
- [x] Primer B: [ 12, ml, gal]
- [x] CalMag Fuel: [ 4, ml, gal]
- [x] Silica Skin: [ 4, ml, gal]
- [x] Peak Bloom: [ 4, ml, gal]
- [x] Resin Bloom: [ 8, ml, gal]
- [x] King Crab: [ 0.5, ml, gal]
- [ ] SLF-100: [ 5, ml, gal]
- [ ] Reduce to EC 1.1 on Harvest Day -2
- [ ] Reduce to Resin Bloom Only, EC: 0.8 Pre Harvest Day
DECISION - We’ll take the girls down Flower Day 83, Nominal Day 62 assuming 21 Day push for light leak. It’s not in practice3 that long - we should be good, if not - latest day 90 (Nominal 69)
____
Sun 03 Sep 2023 # Flower Day 77
LJ2Q 112:F:11:7
EC 1.4
- [x] Dismantle And Clean Res, Pump, Chiller, Lines
- [x] Clean Res
- [x] Clean Pump
- [x] Load Res with a a gallon of HOT tap water, a cup of 30% Vinegar
- [x] Run Pump for :30
- [x] After 30: Reverse Lines
- [x] Run Pump for :30
- [x] Stop pump
- [x] remove tubing from pump and chiller
- [x] Remove pump, reclean
- [x] Clean Chiller Tubes
- [x] Rinse with 30% Vinegar
- [x] When Dry: Reassemble & Replace

Processing
Likes
6
Share


Likes
6
Share
@Growstopher
Follow
7.2.25
9th week of flower started on 6.30. Buds smelling nice and pungent! Almost done another week and it’s harvest! Trichomes are almost all milky with some still clear! Can’t wait to finish this one up!
Thanks for looking at my mini plants have a great week! 🏼