
Likes
Comments
Share


@Style_weed
Follow
Avendo già coltivato queste genetiche è stato un ricercare qualcosa che mi mancava… la critical della RQS e la banana della zamnesia sono le genetiche che almeno a sapore preferisco in assoluto

Likes
24
Share
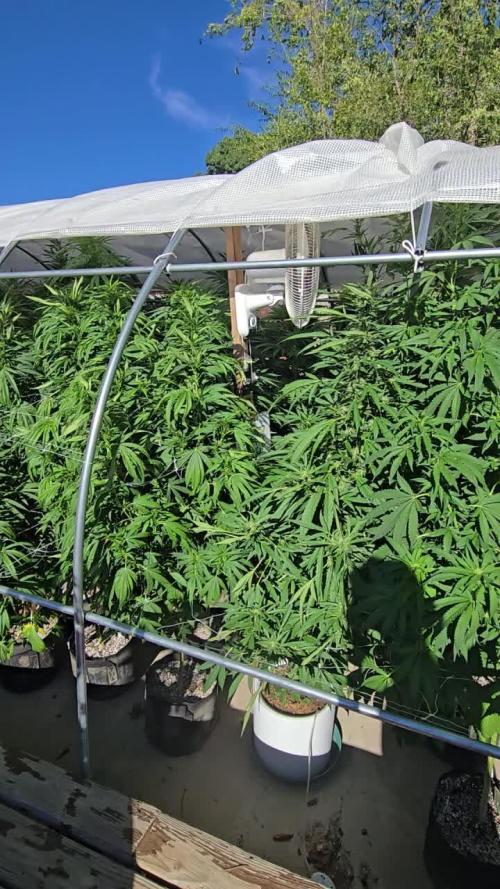

@Chubbs
Follow
This week has been wild. I had to cut the sides of the greenhouse as the plants had it bursting at the seams. These girls are all flowering beautifully and starting to frost up. Happy Growing.

Likes
15
Share


Likes
Comments
Share


@Canabisseurs
Follow
Nutrients: EHG Micro & Grow, Biodyne, CalMag pellets, Phytha tonic
Height: ±92cm
Training: Minimal so far – letting her stretch naturally
Tart Pops is now at Week 5 of veg and towering at just over 90cm! Strong central stalk with nice spacing between nodes. She’s clearly enjoying the environment and feeding routine, showing healthy leaf structure and consistent vertical growth.
Started alternating Biodyne and fish tank water feedings with light EHG Grow + Micro to maintain a steady nutrient uptake. CalMag pellets are doing their job—no deficiencies showing. I’ve also added a preventive Neudosan spray due to early spider mite issues spotted on other plants in the grow.
Holding off on heavy training for now—may top or tie down later this week depending on growth pattern. She's shaping up to be a beast going into the next few weeks!
📏: 92cm and rising
🌱 Vibes: Vigorous and lush
Pest Control: Neudosan preventive spray


Likes
4
Share

@Selkot
Follow
.
YEAR 5 - 2nd quarter
-----------------------
The 5th season continues with 3 Gorilla Punch from FB and 3 Original XXL from GB in the same tent.
A disappointment: with 6 plants, they yield 179 g, less than the previous 5. But in only 10 weeks.
Green Brand did better than Fastbuds for a first try.


Likes
2
Share


@cboyaki
Follow
I am happy how this grow went , didn’t come across no issues at all it was a pretty smooth run , it took all nutrients like a champ , never had any over watering problems or nothing
The water I use is 6.4 PH from Lidl and haven’t occurred no problems across my grows
I don’t even have a PH or TdS tester 🤭
Overall this was a joy to grow very strong sour citrusy apple smell , looking forward to trying it so hope the dry and cure goes well as the rain hasn’t helped the humidity
Temps around 19-22c Humidity 50-67
I’m trying to control it as much as possible also with a oscillation fan blowing air around the room
Likes
7
Share


@Stickygreens420
Follow
4/10/2023 - Day 43: just watered yesterday so nothing really new to report. They are really starting to smell now. Hits you right in the nose when I open the tent. Seeing more purple on the Grand Prix and some pistol browning on all the plants. Only minor problem I've had is the heat. It was almost 100° today, but my three fans and the exhaust have kept the temp under control for the most part. Had to turn on the AC for the assist, but kept temps at 80° in the tent.
4/13/2023 - Day 46 Flower: Not much has changed and I haven't had to do anything, so I haven't provided an update in a few days. Had to water again today. Added 4 gallons mixed with the same things I've been using. Jay Plantspeaker Quillaja as a wetting agent, Rootwise Bio-Phos and Bio-Catalyst, BuildASoil Big 6 Micro Nutrients and BuildABloom, Fermented Peach Extract, and Coconut Powder.
4/15/2023 - Day 48: I think the warmer weather has caused the girls to drink more. Watered another 4 gallons today, but just plane water with Jay Plantspeaker Quillaja. Seeing more purple on the two Grand Prix. Seeing a lot more orange pistols as well. The Grand Prix #2 has like a citrus gas smell, and the Frozen White Runtz is like a sweeter gas. The Ice Bath is earthy, and the Grand Prix #3 does not have a strong scent, but the bud structure is my favorite of all four.


Likes
9
Share


@Moonsmoker420
Follow
Ich denke die 2 Bruce Banner und die Critical kommen noch. Die sehen prächtig aus.


Likes
25
Share


@TheCannaProphet
Follow
____________________________
~Seedsman Fuel D.O.G.~
____________________________
'Fuel D.OG Feminized was bred by crossing two highly celebrated and popular strains from the USA - Chemdawg (Sour Diesel x OG Kush) and Fuel OG (Diesel x Headband). Fuel D.OG is a 70% sativa, 30% Indica plant with very good potential yields both indoors and outdoors. Resin and THC production is also at a very high level.
Fuel D.OG improves on Chemdawg, being a much more robust plant with a much more intense flavor while also developing a larger calyxes than Chemdawg. Its robust appearance is typified by a thicker central stem that is so strong that it does not need to be supported during the later flowering stage in spite of the high degree of sativa stretch it undergoes once flowering has been initiated. Large spear-shaped buds surround the main stem like a crown. Outdoor cultivation produces plants that can grow up to 350 cm. tall in optimum conditions.
When cultivated indoors Fuel D.OG produces yields of 450 - 600 gr/m2 in a 65 - 70 day flowering period with generous quantities of resin already noticeable in the nascent buds during the third week. Its height can be controlled indoors by switching to the flowering light-schedule once plants are established and also by the use of the SCRoG technique whereby plants are trained horizontally. Outdoors, each plant can yield 700 - 800 gr. of large, sticky buds with harvests in the northern hemisphere ready at the beginning of October. Its large trichomes, concentration of terpenes and the sheer quality of resin make this a very serious proposition for extract/concentrate makers.
Fuel D.OG has more intense OG Kush flavors than the Chemdawg parent, with increased diesel emphasis and with citric, lemon and grapefruit scents. THC content is very high with low proportions of CBD. The effect experienced by consumers is one of intense relaxation evolving into a long-lasting narcotic stone that makes Fuel D.OG more suitable for evenings unless there are no important tasks to be completed.'
*description credit to Seedsman Seeds
__________________________________________________________________________________________________________________________________________________________________________________________________________________________________________________________________________________________________________________________________________________________________________________________________________________________________________________
-Characteristics-
BREEDER/BRAND: Seedsman
GENETICS: Chemdawg (Sour Diesel x OG Kush) and Fuel OG (|Diesel x Headband)
VARIETY: Mostly Sativa
FLOWERING TYPE: Photoperiod
SEX: Feminised
THC CONTENT: 20% Plus
CBD CONTENT: <1%
YIELD: Indoors: 450 - 600 gr/m2; Outdoors: 700 - 800 gr/plant
PLANT HEIGHT: Up to 350 cm. outdoors
GROWS: Greenhouse, Indoors, Outdoors
FLOWERING TIME: 65 - 70 days
HARVEST MONTH: Beginning October
TASTE / FLAVOR: Citrus, Diesel, Grapefruit, Kush, Lemon
EFFECT: Powerful, Relaxing, Sedative, Stoned
__________________________________________________________________________________________________________________________________________________________________________________________________________________________________________________________________________________________________________________________________________________________________________________________________________________________________________________
THE SETUP:
~Planted into Jiffy Peat Pellets that were hydrated with de-chlorinated water with SuperThrive added then ph'd to 6.0 @ 80℉
~Grown 100% organic in 10g fabric pots with Mother Earth 70/30 Coco/Perlite medium amended with 2tbs/g of Down To Earth 4-4-4 / 2 cups/g of Earthworm Castings / 1tbs/g of Dr. Earth Flower Girl 3-9-4, 1tbs/g of Dr. Earth Bat Guano, 3/4 cup of Down To Earth Azomite and 1 tsp/g Down To Earth Fish Bone Meal.
~24hr light cycle during Germination / 19/5 light cycle for Vegetation and 12/12 for Flower
~Straight water ph'd @ 6.2-6.8 when needed and weekly Compost Tea's.
__________________________________________________________________________________________________________________________________________________________________________________________________________________________________________________________________________________________________________________________________________________________________________________________________________________________________________________
Weekly Updates:
9/20- 💥BOOM!💥 Week Six of flower is here and my girl's in high gear, stacking her flowers and pumping out trichomes!
Today I watered her with 1.5g de-chlorinated water with 5ml/g of Botanicare CalMag+ added, then ph'd to 6.2 @ 72℉. I turned her pot and plucked a couple of yellow shade leaves...the basic daily maintenance.
9/22- I didn't water her yesterday as she looked great and was 'praying' hard. Today she was given 1.5g of de-chlorinated water which was ph'd to 6.2 @ 72℉ which I gave her through her drip pan (bottom chuggin) and I also gave her pot a turn.
I'm keeping an eye on what appears to be a few seeds developing. I'm hoping they're just fat calyx's that haven't matured yet however there's a strong possibility that, due to a temperature fluctuation that was excessive (20℉) may have caused her to stress and turn hermaphroditic... Fingers crossed! 🤔🤞
9/24- We're getting close to wrapping up Week Six of flower in a couple of days and she'll be around four more weeks from finishing, with the most exciting weeks yet to come!
I didn't water yesterday and today I went ahead and Top Dressed her with 2 tbsp/g Dr. Earth Flower Girl 3-9-4, 1 tbsp/g Dr. Earth Gold Premium 4-4-4, 1/2 cup Down To Earth Bio-Fish, 1/3 cup Down To Earth High Phosphorus Bat Guano and 2 cups of Worm Castings.
I watered in the Top Dress with 1.5g of de-chlorinated water which was ph'd to 6.2 @ 72℉ and let her enjoy her meal! 😜
9/26- After her heavy watering on the 24th I didn't water yesterday and when I checked her today at 'lights on' and she still had some weight to her pot and her leaves were praying hard so I held off on watering today and will hit her tomorrow with her usual 1.5g watering.
~Thanks for stopping in! Things should be getting a lot more interesting in the coming weeks...Stay lifted and be Blessed! 😎🙏~

Likes
29
Share


@MarsHydroLED
Follow
Sundae Driver (Fruity Pebbles X Grape Pie) - This time did a mild prune, really loving the Kyle Kushman technique, definitely gonna save time on dry trimming.

Likes
41
Share


@Santica_Garden
Follow
So this is how the ladies are looking at the end of Week 4, day 28 from Seed. I have added a video with better explanation of how things have been going for the ladies up until now. Happy Growing guys, any questions just ask away! 👍🏾🌱💚


Likes
2
Share


@ChiTaN
Follow
Girls are healthy and juicy,getting ready for the light switching,changing pots and also some defo probably 💚🌱

