
Likes
Comments
Share


@elementhc
Follow
Almost week 6 in flower for Mandarin Cookies V2 and Mandarin Bubba.


Likes
11
Share


@Ananas_Comosus
Follow
Sunday, 14-08-2022
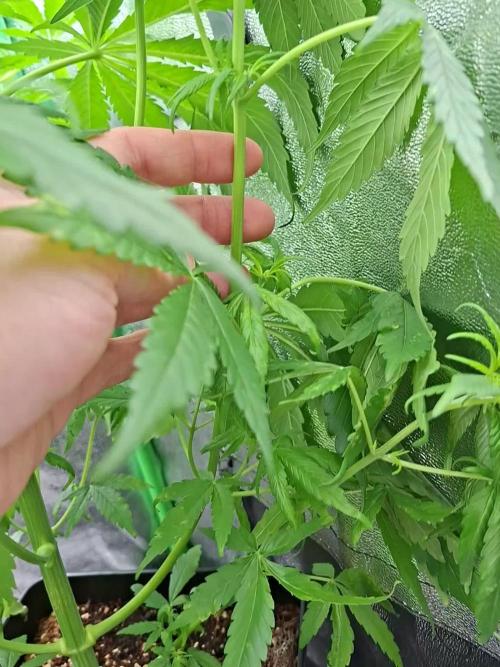
Plant continuing to look good and is in flower. Secondary stems from mainlines so tall I decided, in the moment and not planned at all, to tied them down yesterday. I realize this is not fully in keeping with quadlining but I went for it. Broke one of the lower mainlines where it attaches to the stem 😞. Supplemented feed today with my Beneficial Booster. Foliar sprayed the last two nights with The Amazing Doctor Zymes Eliminator for IPM. Except for testing before use, I followed instructions exactly and have noticed no phytotoxicity. Will report on effectiveness next week after completing initial 3 day treatment tonight.
Likes
84
Share


@Van_Terpen
Follow
LIVING SOIL & TCO
DEMETEARTH SYSTEM
⚡CODE PROMO : VAN-TERPEN420⚡
-15%+2 Seeds THE HIGH CHAMELEON 🦎
https://linktr.ee/vanterpen

Likes
27
Share


@eldruida_lamota
Follow
Vamos actualizar la tercera semana de crecimiento de estas Biscotti de RoyalQueenSeeds.
Están sanas pero tuve un error grande, la primera semana dejé desenchufada la extracción y se ahogaron un poco, me di cuentes pronto pero el daño está hecho, están más pequeñas de lo normal, lo bueno crecerán y se desarrollarán bien igualmente.
La humedad es perfecta, la temperatura me gustaría tenerla par de grados más abajo pero aún así es pasable.
Empiezo aplicar el flash root de Agrobeta y Blue line A de Agrobeta.
Esta semana añadí tucán y gold joker también de Agrobeta.
Mars hydro:
Code discount: EL420
https://www.mars-hydro.com/
Agrobeta:
https://www.agrobeta.com/agrobetatiendaonline/36-abonos-canamo
Hasta aquí todo, veremos como progresan pronto. Buenos humos 💨💨💨


Likes
17
Share

@SkunkyDog420
Follow
Hallo zusammen 🤙.
Habe sie heute geerntet.
Wir hören uns in 3 Wochen mit dem Erntebericht.
Bis dann

Likes
18
Share


@valiotoro
Follow
Hello everyone 😎
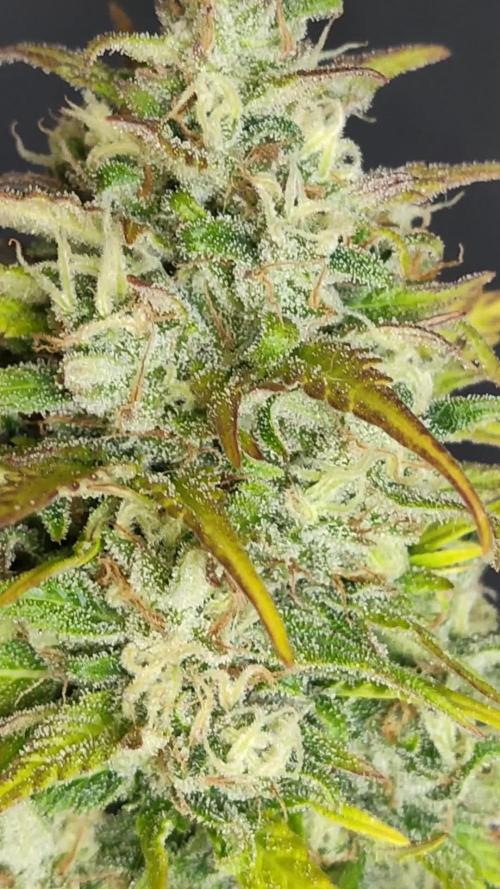
Week 6 of flower for the Amnesia Zkittlez🍭
Only 1 plant left then finito✔️
Very nice smell super sweet🤤
The buds are super sticky🔥


Processing
Likes
4
Share


Likes
22
Share


@GrowinHome
Follow
Most ladies are showing signs of flowering so today I will start counting the weeks.
Here u can also see my mutant/special ladies. They germinated a bit different from the others.
Day 3 of flower is showing some major progress‼️🙌🏽
I did NOT top any of these mutated plants. I only removed some very ugly growing leaves.
So everything u see on them is done by mother nature.

Likes
12
Share

@BlaKX
Follow
Ai Gude Growmies,
Gorilla Punch Auto:
8.6 - 25cm 15.6 - 30,5cm +5,5cm
Mimosa Cake Auto:
8.6 - 30cm 15.6 - 46,5cm +16,5cm
Alter Tobi Auto:
8.6 - 29cm 15.6 - 48cm +19cm
Leider mit 1 tag Verspätung bei mir haben wie bei den Pflanzen der Hitze Stress zugeschlagen. Habe zum ersten Mal Canna Ryzotronic als blattspray gegen hitzestress benutzt und wie ich finde haben sie die Temperaturen um die 30C° gut weggesteckt. Ich Wechsel sobald des die Temperaturen zulassen auf 80% Leistung oder 60% Leistung aber immer so das im Zelt nie mehr wie 28C° herrschen.
DLI bei 80%= 40-42
DLI bei 60%= 28-32
Seit 1 Woche ist das deep red 660nm adlite an.
Ebenfalls läuft eine extra Zuluft mit 230-280m³ extra Zuluft die ich aus dem Fenster hänge oder in einen anderen Raum.
Likes
9
Share


@GardenOfHerbs
Follow
pics are from right before harvest on day 60 of flower. 9.5 weeks of flower
Likes
13
Share


@UK420hydrogrow
Follow
Ok guys had a bad week this week plants have been really affected went away took my eye of ball for 5 days plants ph has fucked up and caused alot of damage to leaves etc checked ph run off @6.4 so going to flush with 5.8 to hopefully get these babies back to normal also maybe a ec problem think may have been feeding too much I am a newby learning has a go so any advice help etc feel free to comment

Likes
33
Share


@FreshCoastOrganics
Follow
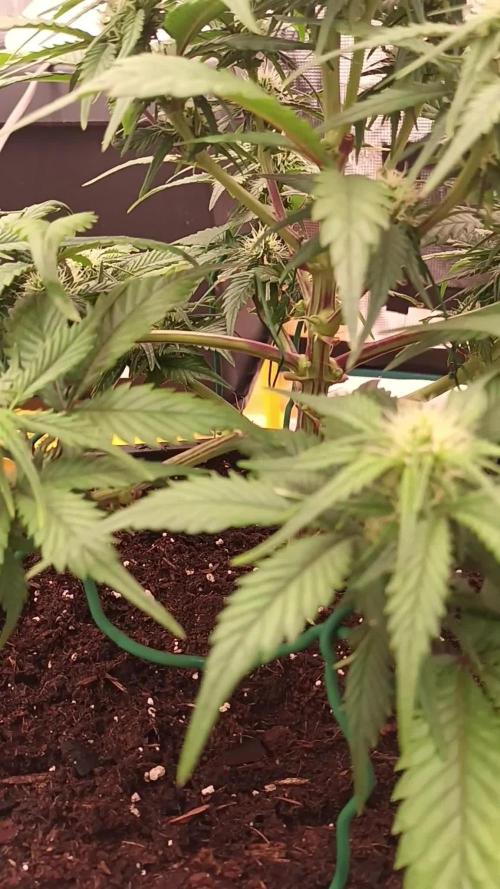
These girls are getting bigger and bigger every day. I’d say week five is the beginning of pre-flower. I started with a very low dosage of nutrients to see how they will respond.
I’ve had to tie them down quite a bit but it has helped branch out new nodes and Bud sites that are comparable in size to the main cola. With the small environment I’m growing in I’ve also had to do a large amount of leaf tucking.
The EC and PH of the runoff was pretty spot on, I was around 800ppm, 1.6ec, and the ph was around 6.0. Overall I’d say that these plants are a hell of a lot happier than my other plants in the different medium. This is the Miller soils organic ammended soil, which is pretty decent but I prefer to control most of my grows so next time around I will be using either bio bizz light mix or light mix with 40%-50% coco and added perlite or pumice. I want to really see the full potential of these advanced nutrients products and see how they compare to other brands/amending with basic dry organics. I have so many seeds to play with so I will have a lot of diaries coming soon after these are harvested 😉


Likes
13
Share


@SecretC8keSociety
Follow
I planted the seed on March 31 Easter and 8 days later they all sprouted . I literally throw em in the soil. Didn’t use paper towel nor let it soak in water. I had this strain yrs in freezer and grew previous strains before from Elev8 like Granny Apple Fritter, HeadCake , Magic Monkey etc last harvest was Birthday Runtz. I be wanting to clone but I am still trying out diff as well looking for a keeper. Now willing to show my work on their discord plus on here diaries to seewhat I can do with their genetics.
Likes
2
Share


@AestheticGenetix
Follow
6/28/25 Transplanted into 3 gallon pot amended with dr earth 463 at 10 ml per gallon of soil and a couple handfuls of homemade worm castings. added mykos to the transplant hole for the roots. The roots on the black opium look really really nice and

Likes
65
Share


@Roberts
Follow
She fox tailed on me to summed heat at end. She grew good overall. Didn't have many extra issues with her. She grew under a Spider Farmer SE5000 light in a New Level Hydro bucket. Thank you Spider Farmer, New Level Hydro, and Quebec Seeds 🤜🤛❄️🌱
Thank you grow diaries community for the 👇likes👇, follows, comments, and subscriptions on my YouTube channel👇. ❄️🌱🍻 Happy Growing 🌱🌱🌱
https://youtube.com/channel/UCAhN7yRzWLpcaRHhMIQ7X4g
SE5000
https://amzn.to/3qFpAML
Spider Farmer Official Website Links:
US&Worldwide: https://www.spider-farmer.com
UK: https://spiderfarmer.co.uk
CA: https://spiderfarmer.ca
EU: https://spiderfarmer.eu
AU: https://spiderfarmer.com.au
Coupon Code: saveurcash (is stackable in most cases)
Www.newlevelhydro.com
Www.hygrozyme.com

Likes
13
Share


@Alpha_Green
Follow
Some of you may have wondered:
Why do I use CO2 at average 950 ppfd μmol/m2/s (moral flow)?
The answer is quite simple. Because of lack of space in some regions of my cultivation area, I simply cannot keep the ideal distance to my Sanlight high-performance lamp, due to some height growth of various strains. And so some of the main colas have ppfd values of 1250 μmol/m2/s and even more...
So this is how I manage to achieve and compensate for such high radiation levels even with a CO 2 balance. And I have to say, my strategy to avoid various light stress symptoms works just fabulously. In combination with CO 2 implementation, my babies are simply unbeatably insensitive to light. Thats it!
Beginning of 3rd week flowering:
Again feeding my babies by 36 hours fermented potions of Bio Tabs Kompost Tea PK-Booster (15 g pro Liter) and added:
5ml Orgatrex/Liter
1 Spoon of Bactrex
1 Spoon of Mycotrex
1 Spoon of Mycco-Vital
1 Spoon of Dynomyco
A little tip for those who are interested in small modifications that have a big difference or influence - on the result - effect - beauty - health - taste! Before adding microorganisms or beneficial bacteria or Mycorrizae and Trichodermas, please use oxygen-saturated water. On the one hand, unwanted chlorine gases evaporate and the small world of the microbiome becomes even faster and more rewarding in compost tea to sprout.
Last but not least for this week, I would like to introduce my reasons, why I prefer growing biologically and sustainably.
First of all, it’s something which suits very well in these times/days we are living now. Sustainability is a big need and task for our planet. 🌎 Nature means life. Our home, the air we breathe and everything that surrounds us. Not just today. Hopefully tomorrow as well.
Maybe I'm starting to protect our environment on a small scale, but maybe I can also make a big difference at all.
If you change the way you look at things, the things you look at change...
I thought about what’s the difference, between Mineral Feeding and Super Soil Feeding.
It’s very easy. Biologically Growing is a similar process than the natural soil activities out there in the lap of nature’s. So plants has to work and interact with the microorganisms and microbiomic communities in the soil. So the plants will never get lazy like the lazy ones of mineral feeding growers.
If you grow biologically, you will feed the soil first and the microorganisms will support every parameter next to your plant conditions. And that will generate an unbelievable spectrum of Terpenes and Trichomes you will never forget.
It’s the same comparison, when you daily visit McDonalds and you eat only fast food. How does your body and mind react on this shit for money?!?!
May I invite you to think about it…
See you next week dear Growmies! Have a nice Weekend and take care…
Peace out!
Addendum for Day 53:
At the moment we unfortunately have another winter onset here in Germany. This means that I am forced to take additional heating measures due to structural facts in order to be able to keep the temperatures constant. After all, just tonight the thermometer climbs again to -1 degree Celsius.
In addition, my exhaust air system runs out of my bedroom terrace and I therefore grow winter and summer with the patio door open. Well, sometimes I experience real weather-related challenges. But all in all, no problem...
"Where there's a will, there's a way."
Addendum to pouring out the fermented PK tea: I always administer half a liter of lukewarm aerated water with 3.5 ml of cannazyme per liter to each plant. This means that the "root machine" is not supplied with supplies unprepared and the nutrient solution can thus also be better distributed in the soil. Since I also work with cloth shoes, I spray them evenly moistened everywhere with water that is also warm before pouring them out from the outside. This has the advantage that the moisture stays where it should: in the pot!
... I did the math today ;-) We are still in week 7 until this Friday. And week 8 starts on Friday! OMG... still so much time yeahh!
Today my Fast Buds Sour Jealousy and Sweet Seeds Big Devil and Dark Devil Automatics arrived. I'm looking forward to it.
This time Fast Buds next Time Sweet Seeds. Love them too. Very beautiful genetics.
Today a review video of the beginning of week 3.
At the time of the pictures, I had minor signs of nitrogen excess. (Light peaks first at the crown of the roof and then slightly continuing to the middle section.) I then painstakingly racked my brains as to why this could be. I found that very slight dry spots had formed and therefore the root found small accumulations of nitrogen that caused its problems. But then, when I carefully homogeneously checked the moisture content in the substrate, the problem evaporated again. However, they had not shown any loss of growth rate during this time. Nevertheless, they developed as expected.
They Strawnanas had no problem with that.
In the end, I always have a hard time killing them. But I guess that's the way things go.
We live and die.
We come and go.
But it's not there yet. ;-)
Tomorrow is day 56.
Tomorrow’s updating day!
Can't wait to see their progress.
Have a good time and see you tomorrow… 🏽🕊️
🏽 ☮️🕊️
Likes
11
Share


@HerrnBubatz88
Follow
We’re done! Thanks a lot again to Zamnesia and Greenhouse, next big shoutout to Spiderfarmer and Biobizz.
For further updates and more stuff hit me up with a follow on IG @herrnlubitz88
Stay tuned for next run!
