The Grow Awards 2026 🏆
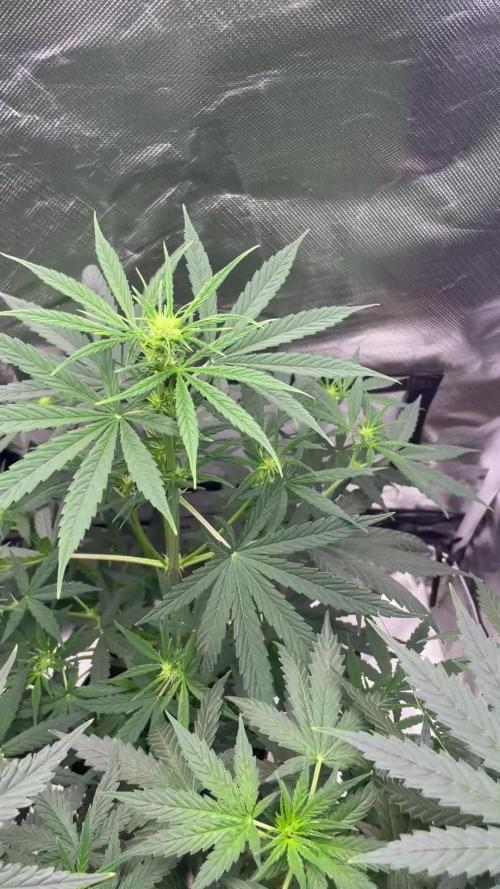
Likes
14
Share
@TeaTime
Follow
One of those pot I’m already doing the flush. Tomorrow I’m going to do the flush with cold water and leave for 2 day in the dark before to cut. After normal flush, 3 day before I did the flush with cold and ice. And I going to leave for 72 hours in the dark.remember that it’s one of 3 pot of speed + , another pots I’m leaving for one more week .
Likes
101
Share
Been a minute since I’ve posted. Quick update as I’m finishing rebuilding the grow room. Feeding in pure coco 1 time a day 600ml…they are in gallon pots. They’ve doubled in size in 2 weeks! Almost done, low rise flood tables will be here next week and let’s hope for set it and forget it results 🤞
Likes
97
Share
~_~_~_~_~_~_~_~_~_~_~_~_~_~_~_~_~_~_~_~_~_~_~_~_~_~_~_~_~_~_~_~_~_~_~_~_~_~_~_~_~_~_~_~_~_~_~_~_~_~_~_~_~_~_~_~_~_~_~_~_~_~_~_~_~_~_~_~_~_~_~_~_~_~_~_~_~_~_~_~_~_~_~_ ❤️💡🌱😽💨 Week 4! We're about 1/3rd the way through flower..these girls are getting really frosty for their age. There's still some yellowing from almost killing them 1.5weeks ago but they've almost full recovered from our neglect. Nodes have a great distance, its growing similar to our White Widow under the SP-3000..I suspect long 6 long colas on each plant a couple with some side growth we decided to keep. Not too much else to report, we're still babying these girls after our blunder but they seem to be on track now..Thanks for dropping by and happy harvests everyone!! ⚡Mars Hydro/SP-3000⚡ Specifications ⚙️: Diodes: Samsung LM301B / Osram 660nm (960 total!) Driver: Meanwell 300watt 🔌 (300W±5% @AC120V-277V) PPF: 824umol/S ☢️ PPE: 2.8 µmol/j 〰️〰️ Lifespan: 50k+ hrs ⌛ Weight: 10.1 lbs (4.6kg) Veg Coverage: 3 x 5 ft 🌱 Flowering Coverage: 2 x 4 ft 🌼 -The SP-3000 uses an aluminum heatsink (no fan) and the driver can be placed outside the tent 🌡️⬇️ -IP65 waterproof ratings, tolerant to high humidity grow environments 💦 .. -Up to 15 can be daisy-chained together and all controlled from a single light! 💡~💡~💡~💡~💡 ~_~_~_~_~_~_~_~_~_~_~_~_~_~_~_~_~_~_~_~_~_~_~_~_~_~_~_~_~_~_~_~_~_~_~_~_~_~_~_~_~_~_~_~_~_~_~_~_~_~_~_~_~_~_~_~_~_~_~_~_~_~_~_~_~_~_~_~_~_~_~_~_~_~_~_~_~_~_~_~_~_~_~_
Likes
8
Share
@4F1M6
Follow
Pollen was dropping like crazy as the male flowers got ripe and ready. The females got good and coated and fully pollinated. I harvested the males to collect and preserve the pollen. Some dried and I veiled it up. But the bulk majority is still drying up. I left just the bottom portion of the male kicking for some extra pollen well the females throw off. The diary will now begin to focus on the pollinated females. The journey to beans is well under way! Until next update. Happy growing and stay lit fam.
Likes
6
Share
@pzwags420
Follow
Week 8 has gone well and she is chugging along. She is still putting out new pistils with some turning orange. Calyx's are growing longer and buds are still soft. I'm thinking a min of 10 weeks flowering for her. I removed some leaves on inner canopy to bring some air and light deeper. She is so bushy its hard to even defoliate maybe next time i will remove some more lateral branches... afterremoving the leaves I must have come incontact with a pollen sack as where I defoliated all seemed to be polinated over night and are making seeds :( I will cut my losses and harvest while seeds are still small.
Likes
9
Share
Likes
1
Share
@Macblack
Follow
Working out the kinks. Starting the ripening phase this week. Cutting nutes and watching the progress. The frost on one of the Frostybeans.com Strawberry Goo x Gooey Bear is spectacular
Processing
Likes
2
Share
@Justrite
Follow
Working temps up slightly and increase light intensity. Quite please with this quantum board led so far whilst in veg . Nutes upped slightly but bearing in mind I have a little amount of light mix soil at top of pot when rock cubes got put in the bigger pots Still feeding over the top of pot to eatable roots before hooking up the auto pot system . All seems in check so far apart from a little water drip damage on the young leafs from doing a folair sprey in the begging of this run . Still undecided weather to go for topping at the 6th pair of sets and remove the bottom set for my usual 5pairs and top n top or to get them growing on a side ways lean for a lower stress impact throughout the veg . Any thoughts and comments on this would be good regarding what would yeild better
Likes
22
Share
Next Week i will start 12/12 (Flowering Stage).
Likes
4
Share
10/28 - (2x2-4x4) Both tents running at 18/6 (Clones) - flush feeds next 2 weeks - flipping into flower by next week - had a small PH issue since addressed.
Likes
36
Share
@nonick123
Follow
Día 37 (08/07) Ajustes de LST en todas las plantas! 🚀 Día 38 (09/07) Ajustes de LST en todas las plantas. Las ramas inferiores están creciendo como un cohete! 🚀😍 Riego con 250 ml H2O pH 6,5 Día 39 (10/07) Las plantas se muestran sedientas! Creo que el cepellón está lleno de raíces y piden el trasplante! El crecimiento no se ha visto afectado de momento Riego con 500 ml H20 pH 6,5 Día 40 (11/07) Paso a regar con 500 ml / día, ya que hace mucho calor (30 ºC) y efectivamente las plantas ya han copado la maceta de raíces Las ramas de nodo inferior se han quedado enanas tras el entrenamiento, de modo que las elimino y aplico canela en polvo en los cortes Riego con 500 ml H20 pH 6,5 Día 41 (12/07) Riego con 500 ml H20 pH 6,5 Clones! Mi experimento vuelve a demostrar que NO necesitas complejos productos de clonación ni sistemas para obtener clones! Hace 15 días puse 2 clones con el tallo sumergido en miel durante 5 minutos en una maceta de 400 ml con PRO-MIX HP BACILLUS + MYCORRHIZAE He mantenido la humedad alta con una cúpula de humedad casera hecha con una botella de agua PET de 5 litros cortada por la mitad y pulverizando a diario. Han estado los 15 días en mi terraza con luz indirecta, y temperaturas que rondan los 30 - 32ºC durante las horas centrales del día Hoy los he trasplantado a una maceta de 1 litro porque ya habían formado raíces y empezaban a formar nuevas hojas! 🐥🐥🚀🐥🐥 Día 42 (13/07) Riego con 500 ml H20 pH 6,5 Día 43 (14/07) Trasplante a maceta definitiva de 21 litros de ROOTPLUS Pot de GSKOREA GLOBAL! Estas macetas son una maravilla! Proceso de trasplante: Se prepara con 17,85 Litros (85%) de sustrato PRO-MIX HP BACILLUS+MYCORRHIZAE + 1,05 Litros de Humus de Lombriz (5%) + 2,01 Litros de Insect Frass (10%) + 210 gramos de Earth Vibes Super Soil (10 g/L substrato) Se llena la maceta de sustrato con las manos (limpias) y rompiendo los trozos más gruesos, para que el sustrato esté aireado y esponjoso, sin presionar Se coloca una maceta vacía de 6,5L para que quede la forma perfecta de la maceta donde están actualmente Se espolvorea la parte proporcional de la probeta de microorganismos sobre el agujero de trasplante Se saca la planta de su maceta actual (bonitas raíces 😍) y se coloca en la maceta final Se riega muy lentamente hasta percolación profunda con H2O EC 0,5 pH 6,5 Una vez asentada, complemento con un riego de 500 ml con 25 ml/L de Humus de Lombriz Liquido Se coloca mulch (acolchado) de paja para evitar traspiración excesiva y cuidar a los microorganismos del suelo A ver como reacciona al trasplante! Aplicación foliar Kelp hidrolizado de Lurpe Solutions a 0.25 ml/l Realizo ajustes de LST aprovechando el trasplante a la nueva maceta. De momento tienen una canopia muy bien formada! 💦Nutrients by Lurpe Solutions - www.lurpenaturalsolutions.com 🌱Substrate PRO-MIX HP BACILLUS + MYCORRHIZAE - www.pthorticulture.com/en/products/pro-mix-hp-biostimulant-plus-mycorrhizae
Likes
12
Share
Everything is going pretty smoothly so far. Had a lot of growth this past week, looking forward to how much more they will grow this current week. Top dressed the two Jedi cookies, and did some minor defoliation on the larger plant.
Likes
43
Share
Bonjour a tous les padawans et les maîtres jedis Pour cette semaine 4 je surveille comme à mon habitude hygrométrie et arrosage. Je peaufine mon LST en stressant ma plante le moins possible. Je combine mon LST avec un pincage d'Apex cela me permettra d'avoir une canopé plus homogène donc une meilleure pénétration lumineuse et par conséquent un meilleur rendement. Petit rappel sur le pincage d'Apex: Le pinçage des plantes de cannabis Proche de la taille d’apex sur le principe, cette technique possède cependant plusieurs avantages, le principal étant de conserver le gros bud central de la plante, d’une production et qualité maximale. Pinçage des plantes de cannabis Le pinçage d’apex (tête de la plante) consiste simplement à pincer délicatement la tige du dernier étage de la plante, entre le pouce et l’index, jusqu’à sentir la fibre s’écraser sous les doigts avec un petit bruit critch caractéristique. Si l’espace disponible sur la tige du dernier étage ne permet pas d’y placer confortablement ses doigts, il faudra plutôt pincer l’étage du dessous. Le pinçage ralentira fortement la croissance verticale de la plante, tout en stimulant le développement des branches secondaires, donnant ainsi à la plante une forme de buisson. La plante mettra quelques jours à réparer ce pinçage, formant un nœud à cet endroit, et poursuivra ensuite sa croissance de façon normale. Le pinçage peut alors être répété si nécessaire, sur l’étage suivant nouvellement formé, ainsi que sur les éventuelles branches secondaires qui pourraient dépasser l’apex. Le pinçage est donc une excellente technique pour avoir une belle canopée uniforme de type marée verte. En pinçant régulièrement l’apex des plus grandes plantes de votre espace, durant la croissance et en début de floraison (stretch), vous obtiendrez ainsi facilement des plantes de hauteur homogène en pleine floraison, ce qui facilitera la culture et augmentera la production finale, surtout si vous cultivez simultanément de multiples variétés de marijuana. Avec un peu d’habitude le pinçage pourra être réalisé aussi rapidement qu’efficacement. En cas de pinçage trop violent qui se traduirait par un apex arraché, cela produira simplement les mêmes résultats qu’une taille classique de l’apex, ce qui ne sera donc pas dramatique. Que la force soit avec vous💪
Likes
27
Share
Week 5 for Kalini Asia by Zamnesia, Shes still doing very well, looking happy. She was topped once again for now shes at 8 tops. Her new pot is cooking atm for a week or 2 before i transplant her into her final pot. Have been fighting high humidity but atleast i still in veg😅 Will be buying a dehumidifier for flower time.
Likes
11
Share
1 - 2 week left before Harvest!! Smells like Grape and Blueberry if anyone's had blueberry hash they would understand what I'm smelling .Not A Huge yield but quality should be !
Likes
1
Share
@Ninjabuds
Follow
Gorilla Runtz is probably my favorite plant in the tent so far. I love how close the nodes are being packed also I love that the nodes are starting to be every other and not on the same spot this helps the buds super stack It’s day 41 from seed and all of the plants are really thriving
Processing
Likes
52
Share
The week starts Monday Jan-27, being day 27 of flowering. Plants are looking very good and healthy, albeit some bigger buds at this stage is missing. Carried out more minor defoliation, only trimming fan leaves on one side of a bud site in alternate fashion. Strategy is to expose more bud sites to light. Leaves are getting sticky and glistening brightly. The canopy has a few branches stretching out typical of Sativa genetics. Hoping the bud sites grow bigger soon filling up the space. Feeding a high EC nutrient mix whilst monitoring run-off EC which remains below feed EC. Light is maintained at 30cm above the canopy, with daily fertigation at lights on - watering just under 3L per day. Maintaining an average RH in the space at 50%. ---- updates for prior 4 weeks -------------------------------------------------------------------------------------------------------------------------------------------------------------------------------------- ----------------------------------------------------------------------------------------------------------------------------------------------------------------------------------------------------------------------- The week starts Monday, Jan-20 still flowering away. Bud sites are beginning to take form and the ScrOG setup looks full, ready for the development of some large buds. Removed a few more leaves from above the canopy which were blocking bud sites below. Also cut small stems (with bud sites) below the canopy from both plants which were unlikely to grow strong. It's now looking clearer below the canopy. The canopy is still thick with beautiful luscious green leaves typical of an Indica. Run-off EC has been slowly rising over the weeks but still under the feed EC - will be keeping my eyes on this. Light is maintained at 30cm distance from canopy, with daily fertigation at lights on - watering almost 2.5L per day. Maintaining an average RH in the space at 50%. ----------------------------------------------------------------------------------------------------------------------------------------------------------------------------------------------------------------------- The week starts Monday, Jan-13 in flowering stage. The plant is growing thick and fast, with very short node intervals creating a thick canopy. Carried out substantial defoliation of almost all the big fan leaves and a few little stems that were not likely to make it above the canopy. Avoided defoliating the major cola branches. This encourages the plant not to waste resources on a node which is only going to produce “popcorn” buds. The plants reacted well to the defoliation and were looking good by the end of the light cycle for the day. The net is completely full and this will be the last week of applying any LST as part of the ScrOG setup. Light is maintained at 30cm distance from canopy, with daily fertigation at lights on - watering almost 2.5L per day. Lowered the average RH in the space to 50%. ----------------------------------------------------------------------------------------------------------------------------------------------------------------------------------------------------------------------- The week starts Monday, Jan-06 in flowering stage. The net is filling up nicely with the ScrOG process being enjoyable - just tucking branches nicely under squares once stretched enough. The Indica dominant strain is really shining with incredible dense growth and thick branches that don't bend as easily as it's Sativa neighbour. Light is maintained at 30cm distance from canopy. ----------------------------------------------------------------------------------------------------------------------------------------------------------------------------------------------------------------------- My grow setup includes; - Secret Jardin DS120W tent (120cm x 60cm x 180cm) placed inside the bedroom. Passive intake of air is from a closed off section of the room where the central heating boiler sits - the intake is warm air (20 degC.) and fairly dry (40% RH) during the winter months. - Mars Hydro SP250 LED light - extraction fan - AC Infinity Cloudline T6 - ventilation fans - aquarium heater - small oil heater - small dehumidifier - 20L Airpots and 3.5L general pots for seedling stage - Canna Coco substrate and nutrients - pH and EC/TDS meters - Thermo/Hygro meter
Likes
6
Share
@dank604
Follow
Looking good but I'm hoping the smaller colas beef up a bit more, makes me worry about the yield. Surprised to see ambers but I'll take it as a good sign. Good news is my tent and light arrive tomorrow! Just a 2x2x4 and a mars ts1000 but I'm really looking forward to growing in it. I plan to grow two 3-gallon pots at a time, autoflowers of course! Looking forward to having more room to work with instead of just the bucket and about 12" diameter that I've had my first 2 grows in. Happy growing y'all! 😎